You might have heard stories about data breaches and cyberattacks even on popular, well-known websites. Hackers use different methods to defeat vulnerable websites. XML external entities (XXE) injection is one such method.
In an XXE injection, a malicious user exploits a website’s capability for processing XML data. As a result, the attacker may gain access to files on the server. XXE is one of OWASP’s top 10 web application security risks .
It is possible to parse XML data in your Laravel application. For example, you can set up a route that accepts requests with a content type of text/xml . An attacker may exploit any part of your application that processes XML data to inject malicious code. Because of that, protecting your application against Laravel XML external entities is crucial.
In this post, we’ll learn about Laravel XML external entities by walking through some examples and methods of prevention.
Before we continue, let’s take a look at what XXE is.
What Is XML External Entities (XXE)?
XXE is a type of vulnerability that targets applications that parse XML data. It allows an attacker to inject XML that points to external entities. Hence, the attacker can gain access to the server file system and sensitive data.
Some of the ways an attacker may take advantage of XXE include retrieving sensitive files from a server and performing server-side request forgery (SSRF) attacks . SSRF is a type of exploit that grants unauthorized access to server functionalities.
Examples of Laravel XXE and Methods of Prevention
Now that we know what XXE is, let’s take a look at some examples of Laravel XXE attacks and ways of preventing each attack.
In Laravel, you can parse XML data using tools like SimpleXML . However, this may lead to XXE injection in your Laravel application if not done properly.
1. File Retrieval (External Entities)
In this example, we’ll take a look at a Laravel web route that processes requests with XML data. An attacker may gain access to a server’s internal file system by injecting the following XML to the route:
The following is the code for the actual controller method that parses the XML data:
libxml_disable_entity_loader (false);
$xmlInput = file_get_contents('php://input');
$dom = new DOMDocument();
$dom->loadXML($xmlInput, LIBXML_NOENT | LIBXML_DTDLOAD);
$info = simplexml_import_dom($dom);
$name = $info->name;
echo "Thank you for registering " . $name;
From the above code, we can see that it parses the XML data and prints the value for $name . As a result, if our server is vulnerable to XXE injection, the content of file:///etc/passd will also be in the output. Below is an example of what the output looks like:
Thank you for registering root:x:0:0:root:/root:/bin/bash
bin:x:1:1:bin:/bin:/sbin/nologin
daemon:x:2:2:daemon:/sbin:/sbin/nologin
As we can see above, the actual content of /etc/passd is visible in the request response. Usually, you’d need to log in to the server as an admin or root user to access /etc/passd . However, with XXE anyone can access that file by injecting malicious XML code.
Now, let’s look at some ways we can prevent this type of attack on a vulnerable server.
Prevention
We already know that XXE attacks take advantage of an application’s XML parser. The parser contains features that a hacker may exploit and pose danger to your application and its users. However, turning off such features can prevent XXE. Different XML parsers have different steps for disabling these features. You should look at the official documentation of the parser you’re using for more specific guidelines.
Examples of potentially dangerous XML features include document type definition (DTD) and external entities. If you’re using SimpleXML with Laravel, for example, you can disable external entities by calling the following method before parsing any XML:
libxml_disable_entity_loader(true);
Another way to prevent XXE is to validate user-generated XML data before running it through your XML parser.
2. Server-Side Request Forgery (SSRF)
Another serious XXE vulnerability is SSRF. An attacker can exploit SSRF to perform operations on the server and control the back end.
Below is an example XXE attack that performs SSRF. This attack attempts to steal IAM secret keys by exploiting the AWS metadata endpoint.
Tip: By default, the path of AWS metadata is /latest/meta-data/iam/security-credentials/.
Let’s assume the IP address for the targeted server is something like http://189.23.100.2 . An attacker can send the following XML data to start the exploit:
Parsing the above code without any validation on a vulnerable server will expose your IAM secret.
Prevention
You can prevent this type of attack by disabling vulnerable features that your application isn’t using. That includes turning off DTD, external entities, and external doctype declaration.
Also, setting up an allowlist policy to stop hostile XML data can reduce risk.
3. Blind XXE
Unlike the first two examples, blind XXE attacks don’t return values in response. That is to say, the value from an internal file like /etc/passd or other resources with sensitive data is not sent back to the attacker. However, it’s possible for an attacker to detect that your site is vulnerable to XXE by triggering an out-of-bounds interaction.
For this example, we’ll be looking at an application that displays details of an item based on an ID. The application reads the value for ID from an XML payload.
We can attempt to perform an XXE attack by injecting the following XML data:
Sending the above XML data will cause the application to return an “invalid item” message. Although the message doesn’t contain any sensitive data, it shows that the value for &xxe is out of bounds. As a result, the response confirms that the request to the external entity was successful.
Another type of blind XXE involves the retrieval of data via an error message. This can be done when the attacker injects an XML payload that may cause parser error and expose sensitive data in the error message.
Prevention
This type of attack takes advantage of an application’s response to user input. Hence, we can reduce the risk by not including sensitive data in error messages. Another good practice is to turn off the display of default error messages in your production environment.
You can turn off error display in Laravel production by updating the value for APP_DEBUG in .env to the following:
APP_DEBUG=false
The .env file is located on the root of your Laravel project.
You can also prevent this type of XXE attack by validating user-generated XML data before parsing or displaying the content.
Finally, ensure you always keep your application’s XML parser up to date, as the maintainers may release new security patches.
To Conclude
Though XXE is not as common as other types of web vulnerabilities, it’s important to test your Laravel application for XXE. It’s even more important if your application parses a lot of user-generated XML data.
In this post, we’ve covered what XXE is and walked through three examples of Laravel XXE and how to prevent them.
Everything you learned in this post is a good starting point for securing your Laravel application against XXE. The most effective way to defend your application against XXE is by disabling DTD for external entities completely. In addition, ensure you take other measures like following Laravel security best practices. You should also use security testing tools to scan your application for XXE vulnerabilities.
This post was written by Pius Aboyi.Piusis a mobile and web developer with over 4 years of experience building for the Android platform. He writes code in Java, Kotlin, and PHP. He loves writing about tech and creating how-to tutorials for developers.
TypeScript has come a long way to become a part of the modern web development tech stack, be it front end or back end. Developers who transition to TypeScript almost never look back! However, even with a robust programming language under your belt, you could run into the most basic security caveats.
TypeScript strongly compliments modern front-end frameworks like React and Angular. However, it doesn’t automatically safeguard your code against DOM vulnerabilities. In fact, many times, developers don’t use TypeScript to its full potential, making their codebase vulnerable to DOM XSS attacks. Other times, they just don’t know what XSS is and fall prey to vicious attackers injecting their DOM with malicious JavaScripts.
So in this post, I’ll talk about what XSS is and how an XSS attack takes place. I’ll then show you how you can prevent XSS attacks in your TypeScript projects.
What Is XSS?
XSS stands for “cross-site scripting.” It’s a technique of injecting external JavaScript into a website. Most of our website’s logic, including animations and interactivity of a user, is owned by the JavaScript of our website. Even if you use TypeScript at runtime for building your React or Angular project, at the end of the day, all that TypeScript would be compiled down to JavaScript.
When your application leaves a void that allows an attacker to run some JavaScript that you didn’t authorize, your website is under an XSS attack. That void itself is an XSS vulnerability of your application. But what does an XSS vulnerability look like? And how can an XSS attack really happen?
How Does an XSS Attack Happen?
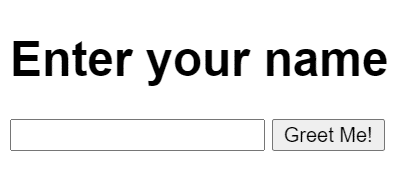
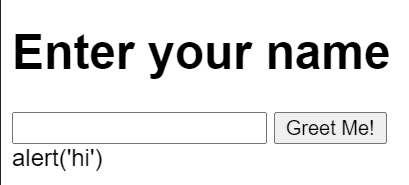
Let’s take a simple example of a website where you’re filling out a form. For brevity, I have a simple CodeSandbox example that renders an input field and a Submit button on the page. This is how the page appears:
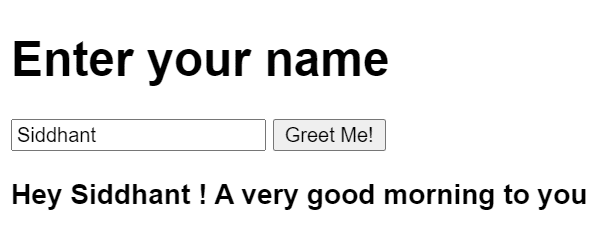
When a user writes in their name and presses the Submit button, we run a simple JavaScript function. This function captures the value in the input field. It then generates a greeting for the user right underneath it. So if you were to type out your name and hit Submit, this is what you’d get:
An example of the greeting you’ll see.
Now, this might seem safe and sound, right? Let’s take a look at the JavaScript code that does all this:
import "./styles.css";

const input = document.querySelector("input");
const submitButton = document.querySelector("button");
const greetingBox = document.querySelector("#greeting");

function onClick() {
  const name = input.value;
  greetingBox.append(`Hey ${name}! A very good morning to you`);
}

submitButton.addEventListener("click", onClick);
If you look closely at where we’re manipulating the DOM, we’re appending some new HTML using the append method on a DOM element. Does this sound safe to you?
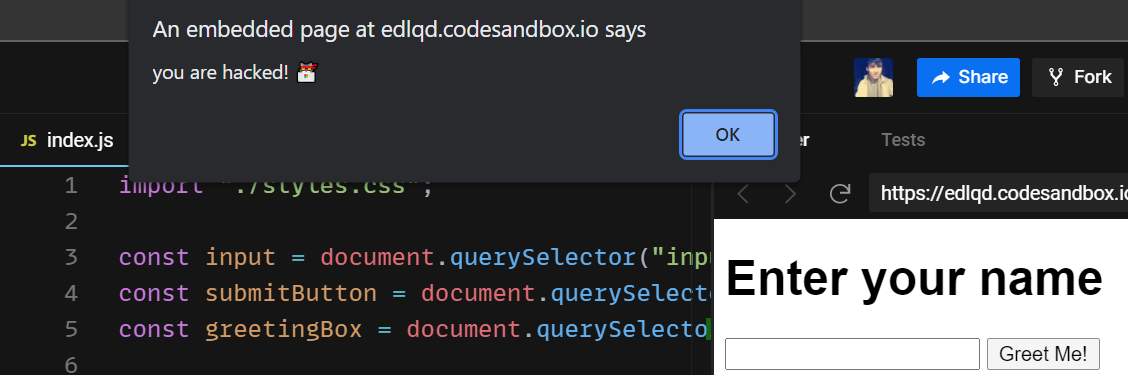
Well, it isn’t! It’s a breeding ground for XSS vulnerabilities. All this JavaScript code is available to anyone via the browser, so I could just go ahead and modify that line to be like this:
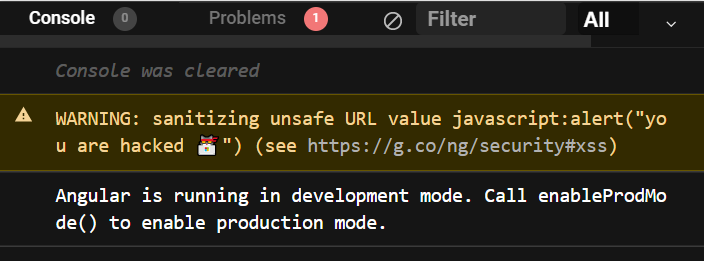
greetingBox.append(alert("you are hacked! 🐱💻"));
And now if anyone presses the Submit button, the alert function is executed:
The alert you’d see.
That’s what an XSS attack is in a nutshell. If you’re curious and wish to know more about it, check out this in-depthpost that dives deeper into it.
XSS Example in TypeScript
The previous example was written in JavaScript, but its TypeScript counterpart wouldn’t be much different either. To demonstrate, let’s take the example of a React with TypeScript project where we can replicate the above scenario.
Here’s the example for your reference. All we have is a simple React app with the following code in our App.ts file:
If you look at all our functions and DOM manipulations, we’re using full-on TypeScript instead of plain old JavaScript! However, the way we’re manipulating the DOM is still incorrect. It still exposes a DOM XSS vulnerability. That means just using TypeScript won’t help.
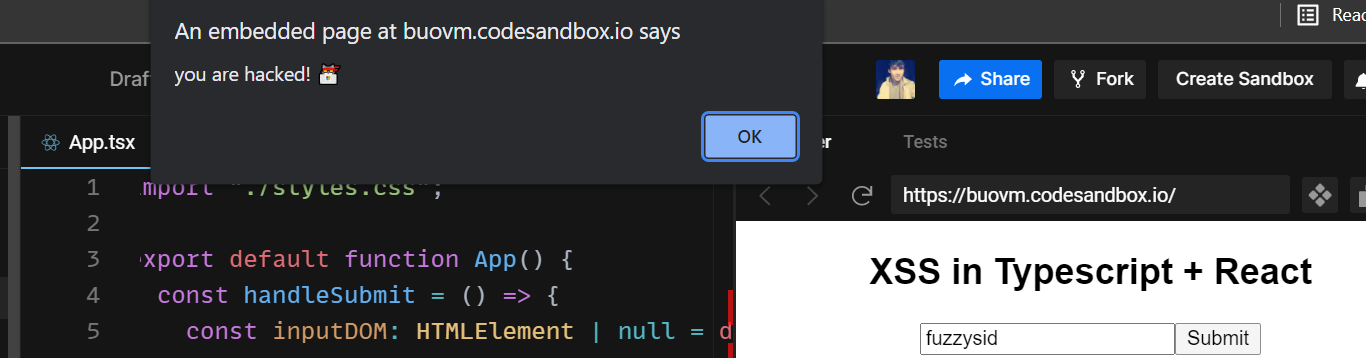
In the above codebase, let’s say that an attacker manages to inject a script and programmatically executes this:
...
greetingBox?.append(alert("you are hacked! 🐱💻"));
...
The XSS attack could very well be executed:
The alert you’d see.
But the solution to the above problem is simple: there’s some bad code that needs refactoring. Let’s look at it now.
Prevent XSS in Your TypeScript Project
In the vanilla JavaScript example, here’s the change you need to make. Instead of using the append method to append some text to the DOM, use textContent as shown:
greetingBox.textContent = `Hey ${name}! A very good morning to you`;
The above would yield the same result. And if an attacker tries to add some JavaScript to it:
greetingBox.textContent = `alert('you are hacked!')`;
The JavaScript will be rendered as a string on the HTML page instead of being executed:
The text the attacker will see.
Now let’s go back to our React and TypeScript project. There’s a ton of bad code. We’re directly manipulating DOM without using state and ref , which could really come in handy here.
Instead of using the append method, we simply set the value of the input field to be that of the state. We then use this state to output the value on the DOM.
If you want to learn more about how to prevent XSS attacks in React, head over to our guide on it.
Unsanitized HTML Can Cause XSS Attacks
We’ve seen a way to work around DOM-based XSS vulnerabilities. But what about cases where you absolutely need to set HTML inside a container? For instance, you could have a rich text editor that would save the formatted text in the database. But when this text comes back, it comes along with its relevant HTML tags.
Or in other cases, your server could return hrefs of some dynamic link your TypeScript application needs to render. In that case as well, you’ll need to programmatically manipulate DOM.
For brevity, let’s consider a scenario where your back end returns the href of a link that your Angular + TypeScript application renders. Here’s the HTML part of the component:
<div>
  <h3>
    Welcome to XSS with Typescript in Angular!
  </h3>
  <a class="link">Click</a>
</div>
In its component.ts file, we can set the href property of the <a> tag. Here’s how:
If you click on the above link, you should be redirected to google.com. But in this case, imagine the href coming from an API request. In that case, an attacker could easily manipulate the href of the URL to be this:
url: string = 'javascript:alert("you are hacked 🐱💻")';
And now we’re back to square one! Our Angular + TypeScript application has an XSS vulnerability. So what do we do now?
Sanitize HTML to Prevent XSS Attacks
Well, we should sanitize our HTML! Angular provides us with a library called DomSanitizer as a part of its platform-browser module. We can import it in our component.ts file like this:
import { DomSanitizer } from "@angular/platform-browser";
We can now use DomSanitizer to sanitize any HTML according to a specific rule. Since we want to sanitize an HTML URL, we can use the SecurityContext module from the Angular core module.
import { SecurityContext } from '@angular/core';
Finally, we can now sanitize our URL like this:
url: string =this.DomSanitizer.sanitize(SecurityContext.URL, 'javascript:alert("you are hacked 🐱💻")';
And now if you try to click the link, the alert should not appear. If you head over to the console, you’ll see something like this:
The warning you’ll see after sanitizing.
That’s how you can sanitize your unsanitized HTML in your Angular + TypeScript applications to safeguard such use cases against lethal XSS attacks. You can read more about how to prevent XSS attacks in Angular applications in our guide on that topic.
Conclusion
XSS vulnerabilities are most commonly introduced in DOM manipulations. If you are careful about how you’re manipulating your DOM, avoiding them would be a breeze. You must also be careful when directly outputting HTML on the page. Developers often forget to sanitize this HTML, leading to XSS vulnerabilities that attackers may use to launch lethal attacks on your application.
This post was written by Siddhant Varma.Siddhantis a full stack JavaScript developer with expertise in frontend engineering. He’s worked with scaling multiple startups in India and has experience building products in the Ed-Tech and healthcare industries. Siddhant has a passion for teaching and a knack for writing. He’s also taught programming to many graduates, helping them become better future developers.
In this article, we’ll explore access control and its role in the security and reliability of the modern web.
First, we’ll briefly explain what access control is and why it’s essential. Next, we’ll explore broken access control, what it looks like, and the vulnerabilities it targets. Last, we’ll offer some mitigating strategies for these vulnerabilities that you can apply to your systems.
The development stack used to illustrate the concepts in this article is Spring Boot and Java. If you have no experience with these technologies, you can find other articles tackling this topic in the context of different technologies on our blog.
However, if you want to learn more about Spring Boot, feel free to use this great resource.
Spring Boot Starter
Before jumping into the subject, let’s briefly build a simple Spring Boot web project for Java to use as the backdrop for this article. To build it, all you need is a JDK installed, Gradle, and your favorite IDE to code.
Let’s start by going to https://start.spring.io and downloading our boilerplate project. Make sure to select “Spring Web” and “Spring Security” as dependencies, Java as your language, and Gradle as your project type.
Once downloaded, proceed to the src/main/java/com/example/demo folder and create a class file called HelloController.java.
Then input the following code:
package com.example.springboot;

import org.springframework.stereotype.Controller;
import org.springframework.web.bind.annotation.RequestMapping;
import org.springframework.web.bind.annotation.ResponseBody;

@Controller
public class HelloController {

  @RequestMapping("/")
  @ResponseBody
  public String index() {
    return "Greetings from Spring Boot!";
  }
}
And that’s it.
You can run the code and go to localhost:8080 to see your page.
What Is Access Control?
In a nutshell, access control represents a set of policies and mechanisms that manage and control access to resources. Access control is also commonly known as authorization.
Once the server has determined your identity through a login or authentication mechanism, it grants or limits what functions and resources you have access to. Additionally, access control is usually employed as the platform for user tracking.
Despite the simplicity of its concepts, appropriately implementing a robust and secure access control system is difficult. Access control is closely bound to the system architecture. Moreover, users regularly fall into more than one role, which makes access management more complex. Therefore, developing access control from scratch is generally discouraged, and battle-tested, robust solutions like OAuth 2.0 and JWT are adopted.
What About Broken Access Control?
Broken access control comprises a set of known exploits that can represent a threat to your systems’ access control.
Despite many of the vulnerabilities in access control being easily exploited when neglected, they can be addressed relatively quickly. This point is important because the consequences of a breach in access control can be pretty destructive since attackers can take over your system.
To learn more about the complexities of access control, please follow this [LINK] to our in-depth article on broken access control.
Broken Access Control Vulnerabilities
There are plenty of vulnerabilities that attackers can exploit, depending on your technology stack and architecture. However, we will focus only on insecure IDs, path traversal, file permission, and client caching for brevity.
Insecure ID Vulnerability
Most modern websites use some form of ID or index to quickly and efficiently refer to data. For most circumstances, this is satisfactory. However, if these IDs are easy to figure out, either by hand or brute force, then you have a security problem.
To illustrate, imagine that you have a profile page section where the server displays the user profile. Then the following URL retrieves a user profile.
https://www.mywebsite.com/profile?id=123
Now, if I were to change the number in the query string manually and no active access control is in place to validate my request, I can access any profiles.
Path Traversal Vulnerability
Path traversal defines the capacity of a user to navigate a file system’s directory tree freely.
A system without proper access control might be a victim of path traversal exploits and allow attackers to access restricted resources in the server. This situation can happen when the path of a resource the system is allowing to retrieve is accessible to be modified and is not adequately validated.
To illustrate, take a look at the following URL:
https://www.mywebsite.com/photos?file=user.png
If we were to change “user.png” to something like “../../etc/passwd”, we could gain access to the application secrets.
File Permission Vulnerability
File permission vulnerabilities are in the server’s permission mechanism in its file system.
All web applications contain critical configuration files and resources that should not be accessible. However, if there is a lack of proper configuration policies, an attacker can target these files, taking over the entire platform.
To illustrate this, here is an example of an attack attempting to access a file that should be inaccessible:
Client caching vulnerabilities are tough to address because they involve attackers physically taking over the user’s computer. Instead of remote attacks, they take advantage of the session credentials, cached pages, or data in the browser already present in an authenticated client.
Once this happens, the attacker can quickly gain access to the user data.
Addressing Broken Access Control
The first step to take to mitigate broken access control attacks is to implement a robust authentication mechanism. In this article, we will be implementing a simple form-based login mechanism to illustrate. Please explore the resources available in the Java and Spring Boot community for a more in-depth implementation.
First, create a file called SecurityConfiguration.java in the project src/main/java/com/example/demo directory.
As you can see, this is essentially a contrived way to create the user in memory for the authentication manager. Of course, this action is not advisable in production, but it allows us to illustrate the concepts swiftly.
Congratulations, you have just implemented an authentication mechanism.
Refresh the page and check it out.
Tackling Broken Access Control Vulnerabilities
In order to tackle the specific vulnerabilities stated above, we need to make a few adjustments to the platform.
Insecure IDs : This solution is easily achievable by implementing GUIDs as IDs. You must develop your system with this vulnerability in mind early on. All IDs (or at least those belonging to sensitive resources) must be both obfuscated and unique.
Path Traversal : Path traversal mitigation requires validating all user inputs and restricting access to critical resources. Luckily, you don’t need to do much to implement proper path traversal policies thanks to the robustness of libraries like Spring Security.
File Permission : Unless you need to tinker with the server permissions and add features related to file manipulation, you don’t need to do much to stay secure. Nonetheless, consult with your server manager if you need further instructions.
Client Caching : In this case, the most effective solution is also the most simple. Don’t store sensitive user information on the client browser. However, if you must venture into sophisticated features due to requirements, implement proper HTML meta tags and async validations to confirm authority on page load.
Conclusion
According to SDTimes , broken access control is now the highest vulnerability in the OWASP Top 10 2021. This situation should be a cause of concern for developers.
However, as you have seen, delivering robust access control, despite its complexity, is relatively straightforward.
Exploits and attacks are now more prevalent and ubiquitous than ever, and ensuring your system’s security is an increasingly more complex task. Nevertheless, we must rise to the task and continue developing solutions to these issues.
This post was written by Juan Reyes.Juanis an engineer by profession and a dreamer by heart who crossed the seas to reach Japan following the promise of opportunity and challenge. While trying to find himself and build a meaningful life in the east, Juan borrows wisdom from his experiences as an entrepreneur, artist, hustler, father figure, husband, and friend to start writing about passion, meaning, self-development, leadership, relationships, and mental health. His many years of struggle and self-discovery have inspired him and drive to embark on a journey for wisdom.
In this article, we’ll explore the concept of path traversal and how it can become a critical vulnerability in your system. In addition, this article will present a brief and comprehensive guide on path traversal attacks. We’ll also explore some basic examples and investigate how to moderate their impact in the Kotlin and Spring Boot development stack.
By the time you finish reading this article, you should have a basic understanding of what path traversal attacks are and be capable of implementing proper mitigation strategies.
I wrote this article for the Kotlin and Spring development stack. Therefore, I assume that you have experience with the technology. Please check out this Spring Boot guide for some excellent introduction info and samples if you haven’t done so.
Kickstarting Our Demo Site
Before we jump into the theory of path traversal, let’s make sure we’re all on the same page. For that purpose, we’ll be crafting our demo site in Spring Boot at lightspeed using the start.spring.io site.
If you already know how to do this and just want to read the theory of the subject, don’t hesitate to jump to the “Demystifying Path Traversal” section below.
As we mentioned above, to expedite the process, we’ll start by going to https://start.spring.io and setting up our startup project. Before downloading the Zip file, remember to select Kotlin as your language, Gradle as your dependency manager, andSpring Web as your dependency.
Creating a Class File
So, once you’ve completed the download, proceed to the src/main/kotlin/com/example/demo folder. Then create a class file called HomeController.kt .
{{> header}}
<h1>{{title}}</h1>
<p>This is a test blog.</p>
{{> footer}}
And there you go! That’s all you need.
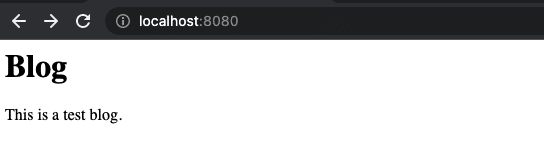
You can now run the code with gradle bootRun in the terminal and see your website on localhost:8080 .
Blog home page
Simple, right?
Do you want an extensive explanation of what’s going on behind the scenes? If so, please check out the Kotlin community and the Spring Boot tutorial I mentioned earlier.
Let’s move on.
Demystifying Path Traversal
Path traversal attacks take advantage of vulnerable access control settings on a server, particularly file access, to gain control of the OS file system.
In a typical path traversal attack, an attacker tries to access sensitive files by, for example, injecting invalid or malicious input into your platform. Think of it as an injection attack, but on directories instead of databases.
Understandably, if the attacker succeeds, that compromises the entirety of the server.Goodbye, security and service.
Further Down the Rabbit Hole
The concept of path traversal is in itself quite simple. However, it’s crucial to properly understand the underlying mechanisms that can reduce its impact on our platforms.
Examples of Path Traversal Attack
OK, you understand the theory now. But what does a path traversal attack look like in the wild?
The objective of this attack is to gain access to folders in your server that shouldn’t be accessible to users.
The evil of path traversal lies, in my opinion, in its simplicity and conciseness. With a basic understanding of paths and the command line, you can access pretty much anywhere in a server this way.
Let’s see some other examples.
Relative Path Attack
Relative path attacks work by abusing the user input validation, or lack thereof, with malicious string inputs. In our case, the id_rsa file contains sensitive information on our server.
Mitigation
One approach to mitigate this vulnerability is by implementing proper user input validation.
This strategy should be obvious to most developers, but I’m explicitly stating it anyway. Unfortunately, there are still cases where some platforms have disregarded these basic validations. Sanitizing user input and using methods like path.normalize() can go a long way in preventing disaster.
Poison Null Bytes Attack
Null bytes , represented as , are encoded characters that usually aren’t visible and are commonly used for encoding purposes.
When an attacker appends a character at the end of an URL in an HTTP request, that person can bypass some string validations used to sanitize user input. This approach can lead to granting the attacker access to files and directories on your server.
See the %00 at the end? Those characters could cause basic validation methods to decode to .txt . And that opens the door to give access to the passwd file.
More Mitigation
To mitigate this attack, we need to improve basic user input validations.
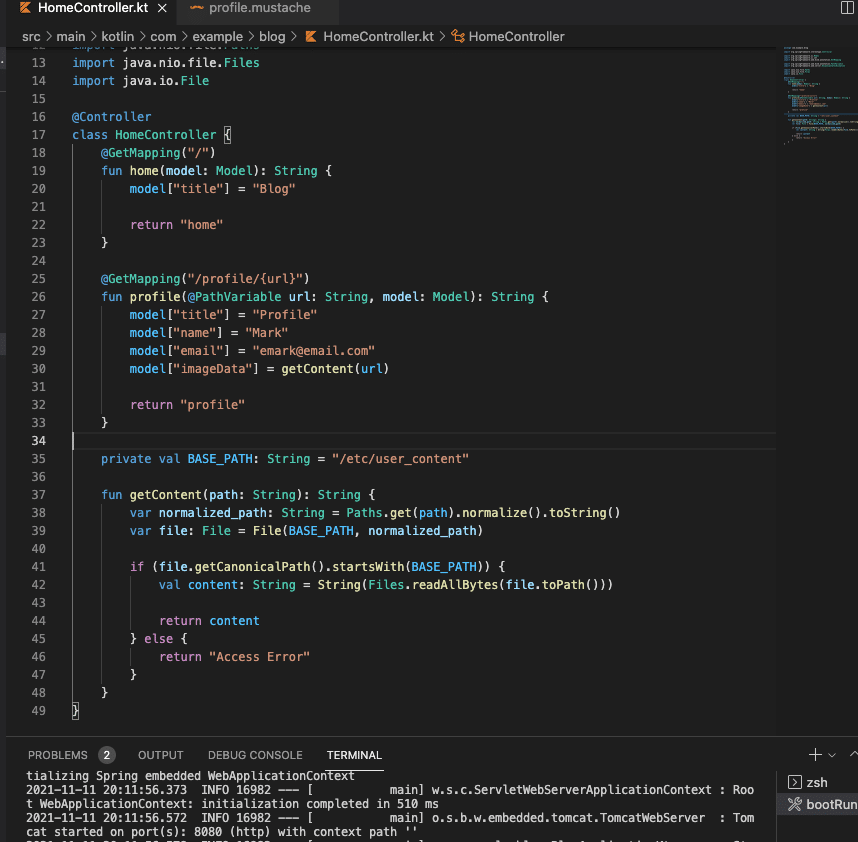
val BASE_PATH: String = "/etc/user_content"
fun getContent(path: String): String {
var normalized_path: String = Paths.get(path).normalize().toString()
var file: File = File(BASE_PATH, normalized_path)
if (file.getCanonicalPath().startsWith(BASE_PATH)) {
val content: String = String(Files.readAllBytes(file.toPath()))
return content
} else {
return "Access Error"
}
}
Path traversal attacks, by themselves, usually aren’t sophisticated. They rely on poor access control implementations or outdated, vulnerable libraries. Still, it’s crucial to understand their potential for damage and do your best to prevent them.
Obviously, you don’t want users accessing sensitive files on your server. Therefore, it’s vital to implement proper validations whenever possible.
Thankfully, doing so isn’t really complicated.
Mitigation Strategies for Path Traversal Attacks
First, let’s explore a scenario where our application needs to provide access to files in different folders—profile pictures and essays, for example.
In this situation, we could implement path validations with some hardcoded prefix values. However, this would only open our platform to prefix path traversal attacks.
Path Prefix Validation
By inputting dots and slashes in a particular way as the user input in the application, an attacker can bypass your validation and traverse the server filesystem.
That’s quite simple but powerful.
So, to mitigate this vulnerability, you must account for this specific pattern and ensure that your string contains only valid characters. Later, you can either strip them from your string or return an error.
Safelists
A safelist, also called whitelist, is a list of valid possible paths that can be accessed reliably. By validating the input provided against the list, you can then weed out potential attacks.
Also, if you designed your application to produce files in a particular scheme—say, lowercase alphanumeric characters—you can then validate that the user input conforms to this standard.
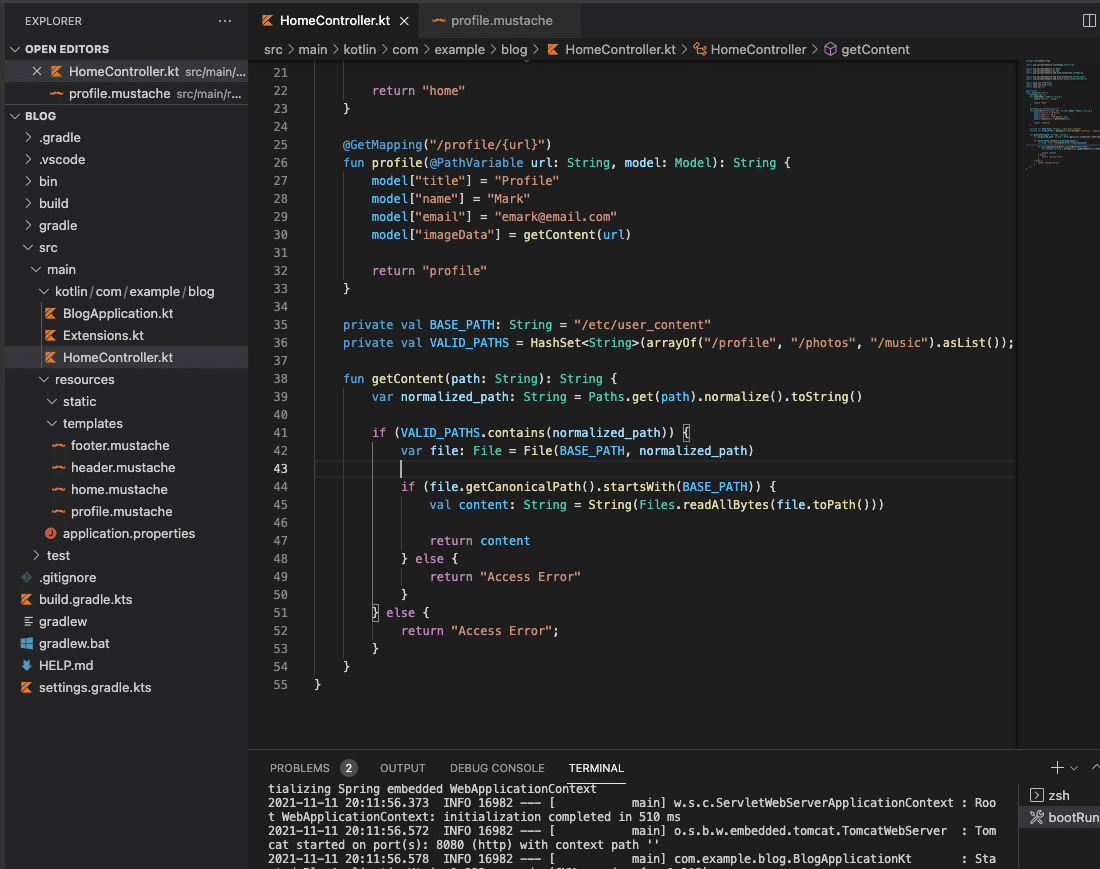
private val BASE_PATH: String = "/etc/user_content"
private val VALID_PATHS = HashSet<String>(arrayOf("/profile", "/photos", "/music").asList());
fun getContent(path: String): String {
var normalized_path: String = Paths.get(path).normalize().toString()
if (VALID_PATHS.contains(normalized_path)) {
var file: File = File(BASE_PATH, normalized_path)
if (file.getCanonicalPath().startsWith(BASE_PATH)) {
val content: String = String(Files.readAllBytes(file.toPath()))
return content
} else {
return "Access Error"
}
} else {
return "Access Error";
}
}
Adding a safelist validation to user inputs can serve as an extra layer of protection against malicious attacks.
Summing Up and Learning More
Finally, I want to emphasize that even though you can deliver a fair amount of security with simple validations, the best defense is always to restrict user input.Only allow specific access when absolutely needed.
Furthermore, development kits, packages, and libraries are pretty robust and have implemented many layers of protection against path traversal. However, there’s always the possibility that you introduce a vulnerability in your code unintentionally. Therefore, you can always count on the excellent Kotlin community to expand your options.
Additionally, consider the security analysis solution StackHawk . Providing secure solutions nowadays is incredibly complex and requires a lot of work. So for developers who just want to focus on delivering quality solutions and staying productive, StackHawk offers a security test suite so that you can go back to focus on your work. You can sign up here .
This post was written by Juan Reyes.Juanis an engineer by profession and a dreamer by heart who crossed the seas to reach Japan following the promise of opportunity and challenge. While trying to find himself and build a meaningful life in the east, Juan borrows wisdom from his experiences as an entrepreneur, artist, hustler, father figure, husband, and friend to start writing about passion, meaning, self-development, leadership, relationships, and mental health. His many years of struggle and self-discovery have inspired him and drive to embark on a journey for wisdom.
In the interest of providing robust solutions for the ever-evolving needs of our users, we developers must keep our skillsets sharp and updated. Building solutions that stand the tests of the modern web and its threats is simply not a one-person task anymore. Moreover, protecting our platforms from the vast catalog of threats is unquestionably a daunting responsibility that requires years of experience. But don’t be intimidated. Resources exist all over the web to help those who need guidance.
The objective of this article is to provide guidance on open redirect vulnerabilities. We will explore the many vulnerabilities that one can find in platforms lacking proper security measures and how to mitigate them effectively. And we’ll keep our examination of open redirect brief and limit the scope to the Kotlin and Spring boot development stack. If you want to explore open redirect further, you can read our in-depth article.
Before we tackle open redirect, we want to make sure your environment is ready. So let’s start by crafting a demo site in Spring boot using the start.spring.io tool.
Note: If you want to get straight to the point, feel free to skip to the next section.
If you already have your environment ready to work with Java and have an IDE set up and ready, we can proceed to https://start.spring.io and set up our project. Again, remember to select “Spring Web” as your dependency before downloading your boilerplate project.
After the download completes, proceed to the src/main/java/com/example/demo folder and create a class file called HomeController.kt and input the following code:
Then proceed to the src/main/resources/templates folder and corresponding header and footer templates. Notice that we have chosen the mustache template syntax. You can, however, make them in the syntax of your preference.
header.mustache
<html>
    <head>
        <title>{{title}}</title>
    </head>

    <body>
footer.mustache
    </body>
</html>
home.mustache
{{> header}}

<h1>{{title}}</h1>

<p>This is a test blog.</p>

{{> footer}}
That’s all you need.
Now run the code by typing “gradle bootRun” in the terminal and see your website on localhost:8080.
You can proceed to the Spring Boot tutorial page for more information on this particular example and the whole code.
What Is Open Redirect?
Understanding open redirect requires knowing what redirects are. Essentially, redirects are the way servers move the user from one page to another. Thus, redirects serve as a tool for developers to ensure that their users follow the proper flow of predefined use cases.
The primary purpose of redirects is to provide continuity in navigation for functionality purposes. Additionally, they are used as a contingency against the incursion into an incorrect or unauthorized address.
Clearly, redirects provide vital functionality for the web. That’s why they’re a prime target for an attacker hoping to mislead users to malicious sites.
Open redirect attacks happen when an unvalidated URL, usually provided by a bad actor, is not adequately validated. As a result, users clicking on links using these malicious URLs end up redirected to malicious websites. Attackers rely on these vulnerabilities in phishing scams and when attempting to steal a visitor’s credentials.
Examples of Open Redirect Attacks
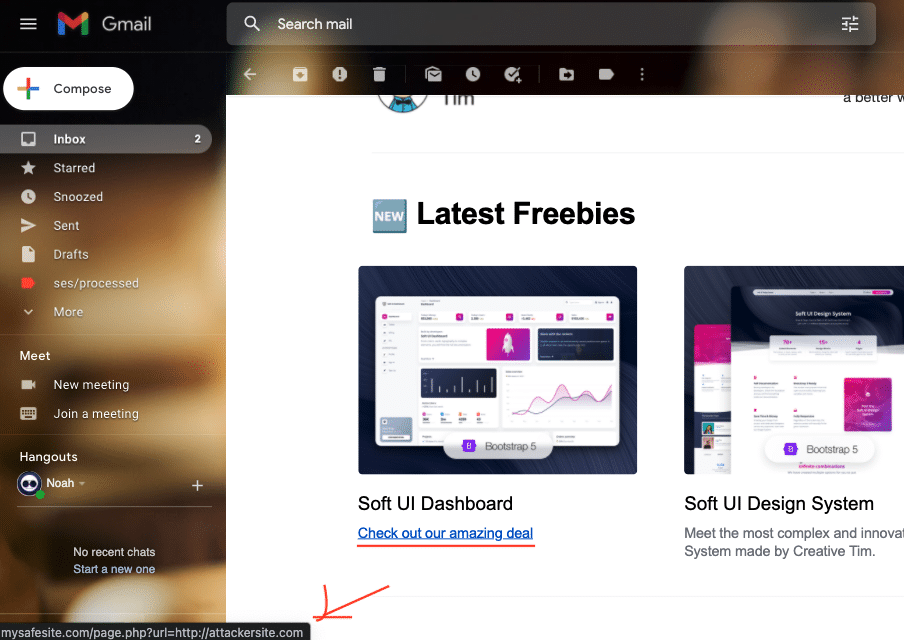
So what does a malicious URL look like? Well, something like this:
OK, so we can see at a glance that the vulnerable site mysafesite.com contains a “page” that includes a feature that receives user input, in this case a URL, in the query string and uses it to redirect the user.
If you were to click on this link, the browser would redirect you to the legitimate website.
Great, right?
Yeah, but if the target server does not correctly validate the provided URL, it will redirect you to the URL provided as a query string. In this case, the site happens to be a malicious site controlled by the attacker.
Additionally, since the original URL contains a safe-looking URL, the attacker could easily fool you about the intention of the attack.
Subsequently, once you land on the attacker’s site, the attacker can disguise the site to look just like the target site and ask for credentials. Ultimately, the attacker will redirect you to the legitimate site after obtaining your credentials.
This is not the full extent of open redirect vulnerabilities. Despite the low level of sophistication, open redirect attacks are usually bundled with phishing and cross-site scripting.
Now let’s look at the different types of open redirect attacks.
Header-Based Open Redirect
Header-based open redirect attacks exploit vulnerable code by attacking the user input. These attacks depend on social engineering tactics and the redirect mechanism in the platform. Moreover, no JavaScript is required for this attack.
JavaScript-Based Open Redirect
JavaScript-based open redirects happen when part of the redirect requires executing JavaScript. Accordingly, redirects of this kind do not work for server-side functions.
Mitigating Open Redirect Vulnerabilities
The best way to mitigate open redirect vulnerabilities is to do away with redirects. Unfortunately, this means we have to rethink our approach to solutions that rely on redirection.
This course of action might not be viable for you. Still, we want to stress that even if you think you need redirection, you might not. There are modern, reliable, and safe ways to provide the same functionality.
Nevertheless, we will offer some alternatives.
Limiting Destinations
Limiting the possible redirection destinations available to users can go a long way toward preventing attacks.
Additionally, using fixed options in your application makes it harder for these exploits to work.
Sanitizing Input
Parsing and sanitizing user inputs can weed out many of the attacks the application could be subject to. For example, if the user is not supposed to navigate out of your domain but tries to anyway, that is a red flag.
A simple implementation of this solution on Spring boot would look like the following:
private val BASE_PATH: String = "http://mysafesite.com/"
private val VALID_PATHS = HashSet<String>(arrayOf("/profile", "/photos", "/music").asList());

fun redirectTo(path: String): String {
    var normalized_path: String = Paths.get(path).normalize().toString()

    if (VALID_PATHS.contains(normalized_path)) {
        return "redirect:" + BASE_PATH + normalized_path;
    } else {
        return "Access Error";
    }
}
Notice that we are verifying that the user input is in the safelist with a simple match. However, you can implement a more robust and complex matching solution with a RegEx.
Additionally, we explicitly indicate the URL’s domain in the redirect. This way, if the attacker manages to exploit the safelist for some reason, the attack will not succeed in taking the user away from your domain.
Beyond these strategies, implementing system-wide solutions like firewalls and redirection notices is recommended.
In Conclusion
Finally, we want to stress the importance of regular penetration tests, security audits, and keeping libraries updated. Unfortunately, doing this extra work can be complex and time-consuming. That’s why we encourage you to consider StackHawk.
StackHawk tests your production-ready applications, services, and APIs for security vulnerabilities that your team might have introduced. Additionally, it searches for exploitable open source security bugs and suggests actionable solutions to mitigate them.
Please follow this link if you want to read more about our solution and start providing sound and reliable protection for your platforms.
This post was written by Juan Reyes.Juanis an engineer by profession and a dreamer by heart who crossed the seas to reach Japan following the promise of opportunity and challenge. While trying to find himself and build a meaningful life in the east, Juan borrows wisdom from his experiences as an entrepreneur, artist, hustler, father figure, husband, and friend to start writing about passion, meaning, self-development, leadership, relationships, and mental health. His many years of struggle and self-discovery have inspired him and drive to embark on a journey for wisdom.