It’s common knowledge that HTTPS URLs are safer than plain HTTP. The “S” confirms some transport layer security TLS, which protects your network from middleman attacks among other threats. Implementing Rust HTTP Strict Transport Security (HSTS) is a step you should keep at the back of your mind as you develop with Rust-Lang.
This post explores just what it means when, for instance, you conduct a health scan of your Rust web application and get a “HSTS headers missing” report. We’ll cover why you need to have the headers in place, how they work, and how best to implement HSTS across Rust and its frameworks.
Why You Need Rust HSTS
When you have Rust HTTP strict transport security in place, your web application redirects to HTTPS even when a user types HTTP:// in the navigation bar. Assuming your certificates and other security measures are watertight, this imbues the user experience with a significant level of security.
Now, there’s only so much that browsing with the HTTPS version of your site can benefit you and your users. However, without it, hackers can do as they please with your applications. Let’s explore some harms that HSTS protects your users and the application itself from.
What HSTS Protects You From
Among the space of vulnerabilities, you can avoid the following by having valid (properly implemented) HSTS headers.
Loading Unsafe Versions of Your Website
It’s not new that some cPanel options lead to developers accepting both HTTP and HTTPS loading of their web applications. While it may seem convenient because now everyone that knows your domain can access your application, it’s actually a security flaw.
Loading the HTTP version of your website means even the resources passed from other sources don’t need any certificates. This leaves your application open to a wide range of other threats.
Man-in-the-Middle Attacks
Notice how we stressed proper implementation of HSTS headers? When you rely on manually imposed redirects (HTTP 301) instead of the HSTS header method, hackers can send visitors to your application to their own versions of your website. Then, there won’t be restrictions on what they can do with the information they steal from your patrons.
Future Bugs
When you neglect to impose Rust HTTP strict transport security, your application’s integrity weakens with multiple bugs. This deteriorates user experience and hints to hackers just where your application is weak when they open the console. Even when your code is perfect, not having a good redirect policy can become the weak spot in your otherwise perfect application.
Rust HSTS Won’t Protect You From The Following Threats
Tempting as it is to relax once you have your Rust HTTP strict transport security in place, you’re far from being safe. The header is porous to the following vulnerabilities:
Phishing
When hackers make an app to appear as if they’re you, the browser won’t distinguish between the two. HSTS headers, however, assist within your version of the application with restrictions that make it easy for users to detect clones. This is why banks and other reputable organizations continuously educate their visitors about the dangers of phishing.
Breaches Due to Defective Code
No matter how much you restrict users within the HTTPS fence, if your code has vulnerabilities that hackers can leverage, chances are they will.
In reality, the HSTS headers are best taken as extra coverage of some loopholes—not the fix-all security solution for Rust applications (or any other programming language). Having the headers will reinforce your security strategy.
Rust HSTS in Action
Now that you know what Rust HTTP strict transport security means and what it can accomplish, let’s explore how best to implement it. Because a lot of web applications now rely on CDN platforms for better reach, as with CloudFlare, turning HSTS on and off can be a matter of toggling an option.
The same holds for hosting platforms like Heroku and any cPanel-managed Rust applications. While these options save you from the complexity of manually adding the headers to your application, always make sure HSTS headers are active. For this, you either check the source of your application in production (backend), or simply run a Mozilla Observatory check on your domain.
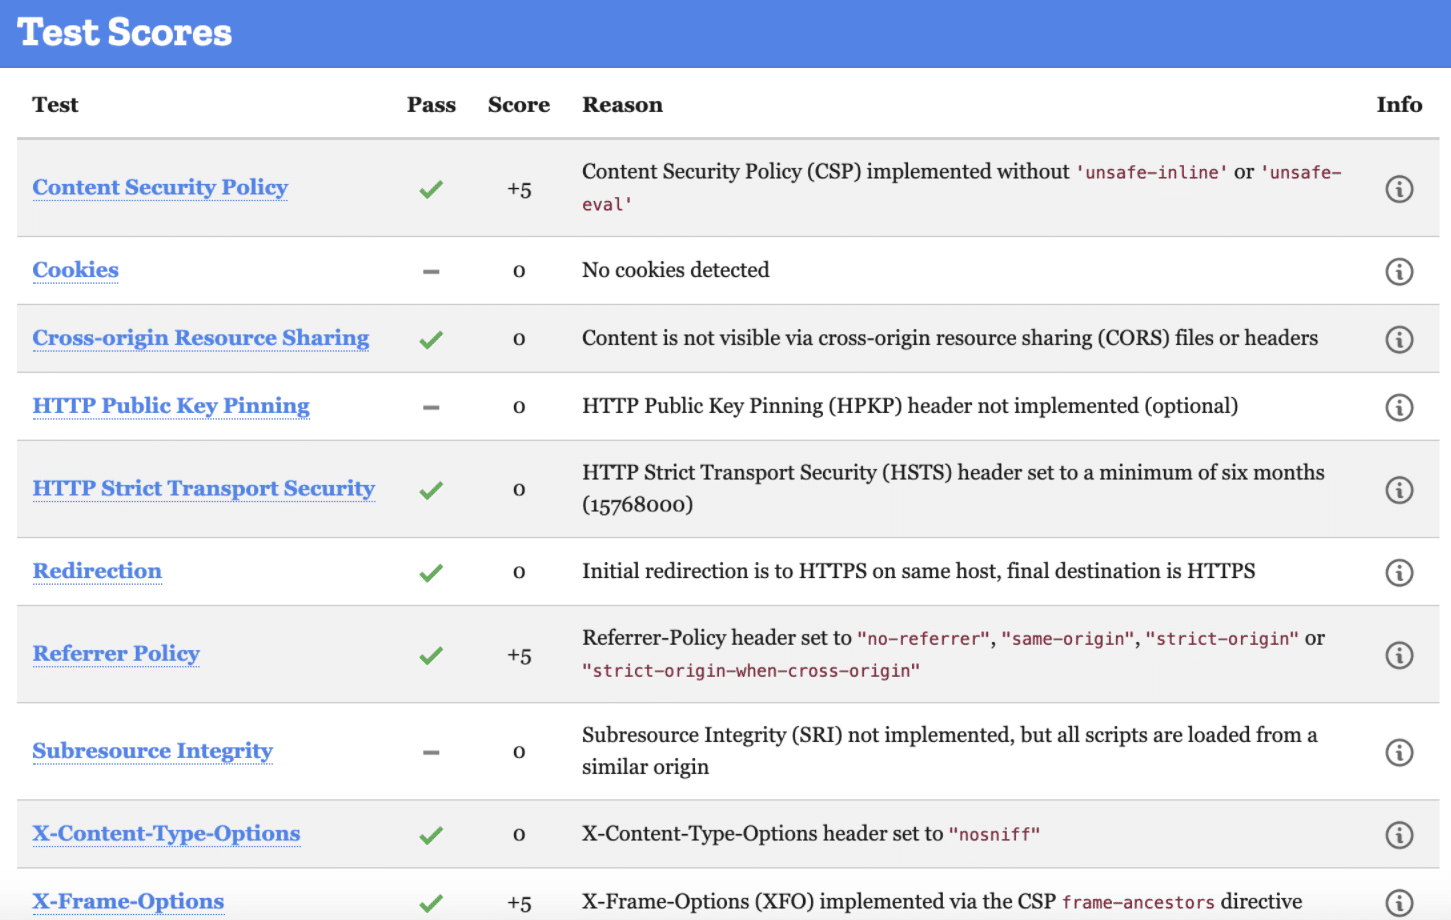
Typical results from an observatory scan.
This report shows that they ( rust-lang ) set the HSTS header to a maximum of six months. However, it’s possible, and recommended, to set a longer time—even two years. For the header to take effect, a browser will need to have accessed your application and recorded the HSTS header at least once. This way, every other visit for the coming two years will redirect to HTTPS. This works even when the user has an HTTP version in their bookmarks.
Consider the header below, which shows an implementation of an “always set” HSTS header with a maximum age of one year (in seconds).
Header always set Strict-Transport-Security "max-age=31536000;
includeSubDomains; preload"
The “include subdomains” directive covers the entire domain tree—that is, its branching environments at the end of subdomains. If you create a new domain after setting this header, it too will be safe.
The “preload” directive gives consent to the browser to cache and permanently deem your domain and application pair a strict HSTS instance. This makes it possible for unknown visitors to load the HTTPS version of your application immediately, with no prior rendering requirements.
Applying Rust HSTS Through Cargos
When it comes to applying Rust HTTP strict transport security in applications built on top of frameworks (such as Rocket.rs ), you have two options. The first is to create your own headers and call them where they’re needed. Alternatively, you could leverage implementations in cargos with tests and documentation at your disposal.
A common solution to the HSTS conundrum is the Armor crate .
let mut headers = http::HeaderMap::new();
armor::hsts(&mut headers);
assert_eq!(headers["Strict-Transport-Security"], "max-age=time");
Replacing “time” with your duration should extend the validity of your implementation. The code above restricts users to a strict HTTPS usage. However, it can’t guarantee that users can open an incognito browser to run a strictly HTTP session. For this reason, you should have a server-side implementation always on the guard.
To offset the HTTP loophole left open with some cargos, you’re best implementing the single-line header within your main file. Just as follows:
use rocket::fairing::{Fairing, Info, Kind};
use rocket::http::{ContentType, Header};
use rocket::{Request, Response};
static HEADERS: &[(&str, &str)] = &[
    ("x-xss-protection", "1; mode=block"),
    ("strict-transport-security", "max-age=63072000"),
    ("x-content-type-options", "nosniff"),
    (
        "referrer-policy",
        "no-referrer, strict-origin-when-cross-origin",
    ),
];
This way, your application can’t run on HTTP even when someone tries to bypass your implementation through sneaky means.
Conclusion: Rust HSTS Best Practices
It’s possible to build a Rust application with no frameworks guiding or imposing methods on your process. However, for this you’d need to pay closer attention to your headers and where they apply.
The good thing about the HSTS header is that it’s a low-maintenance variable. Once you declare the time duration and any subdomain support, along with the preload option, you can rest assured that it gets read each time your application loads.
A best practice is having tests run whenever you’re deploying your applications into production. StackHawk can help with that. This way, no live applications expose users to the threats that hackers are ready and eagerly waiting to inflict on your Rust applications.
This post was written by Taurai Mutimutema.Tauraiis a systems analyst with a knack for writing, which was probably sparked by the need to document technical processes during code and implementation sessions. He enjoys learning new technology and talks about tech even more than he writes.
Building secure, robust applications is a craft that requires a lot of consideration and effort. Making sure to cover the extensive list of potential vulnerabilities can be an enormous task that demands experience and guidance. One such vulnerability is the directory access security of our system, which is commonly exploited by path traversal attacks.
Understanding that, however, should not deter you from approaching the problem head-on. After all, extensive and very comprehensive resources that can guide you exist all over the net. This article is intended to be one such resource.
The purpose of this article is to serve as a guide to understanding path traversal attacks and what approaches we can take to mitigate them with Node.js. First, we will briefly explain what path traversal attacks are. Then we will explore some common examples. And finally, we will implement fixes for these exploits. By the end of this article, you should have a basic understanding of path traversal and be capable of implementing mitigation mechanisms in your platform.
Note that we intend for this article to be for Node.js developers specifically. Therefore, we expect that you have a basic understanding of the Node.js development stack. So, if you haven’t dipped your toes in it yet, please check out the Node.js guides for more information.
Talking Path Traversal
What is a path traversal attack? Well, it’s an attack that takes advantage of poor access control implementations on the server side, specifically for file access. In these attacks, a bad actor attempts to access restricted files in the server by injecting invalid or malicious user input into the application. Think of it as SQL injection but on directories instead of the database.
Now, it’s pretty apparent why unauthorized access to server files is terrible. With this kind of power, an ill-intended individual can wreak havoc in our systems and compromise our user’s information.
Let’s dive much deeper into the simple quirks that make this vulnerability possible and why it even matters what system your server is running in. Now, let’s explore a few examples of path traversal attacks.
Examples of Path Traversal Attacks
What does a typical path traversal attack look like, you might ask?
Well, it’s as simple as this:
../../etc/passwd
Surprising, right?
The core idea of path traversal is basically to find ways to get to folders that the developer and application did not intend for you to be able to get to. So, if you have a basic understanding of path logic and Linux or the command line, you can really go places on an unprotected application.
Here are some examples of what these can look like.
Relative Path Attack
A relative path attack is essentially what we illustrated above. By exploiting the user input validation, or lack thereof, attackers might attempt to access restricted files in the server. In this case, the passwd file contains our secrets on the server.
A simple way to mitigate this vulnerability is, of course, to apply proper user input validation. By doing something as simple as using path.normalize() and sanitizing the user input—something you should always do, by the way—you can save yourself from a lot of headaches and issues down the road.
Poison Null Bytes Attack
By adding a NULL byte, , at the end of a string in an HTTP request, the attacker can bypass the string validation used to sanitize user input and get access to unauthorized files and directories.
Notice the %00 at the end, which our poor validation would end up translating as something like .txt and potentially give access to the passwd file. Yikes!
To prevent this kind of attack from thwarting security, you only need to validate the user input with the following:
if (user_input.indexOf('') !== -1) {
  return respond('Access denied');
}
Relatively straightforward, right?
Path traversal attacks are not particularly sophisticated. As we mentioned before, they depend on poor access control implementations or edge-case vulnerabilities from poorly updated code. However, they can be very dangerous, and we should mitigate them as much as possible. The good news is that it’s not that hard to do so.
Other Mitigating Approaches to Path Traversal Attacks in Node.js
There are, of course, many more things we can do to cover more potential gaps in our security. JavaScript has matured enough to offer extensive documentation on different approaches to mitigation, but we will be listing a few here.
Path Prefix Validation
What about allowing some level of traversal in your application? There might be cases where you want the application to enable the user to find files in different folders—for example, profile pictures and essays, both in their folders. You can implement hardcoded path validations like variables used when requesting specific resources, but by doing so, you could open yourself up to prefix path traversal attacks.
An attacker can freely traverse the directories if the user can enter dots and slashes in the application without validating the resulting string. To mitigate this, we need to validate that the user input does not contain these characters and strip them, or flat-out display an error.
Allowlisting
Allowlisting is a straightforward and relatively effective method to reduce the potential for exploits. Of course, you won’t always be able to use it, but you should when you can.
A straightforward example of this consists of validating that the user input conforms to a certain predefined standard. For example, if you have coded your application only to create and work with files with lowercase alphanumeric characters, then you can validate that the user only inputs such characters.
if (!/^[a-z0-9]+$/.test(user_input)) {
  return respond('Access denied');
}
By adding this validation to user inputs, you can have an extra layer of protection against malicious attacks.
Path Concatenation
Finally, one way to address all these gaps and create a robust solution to all the potential vulnerabilities we might face is to implement a general validation scheme that comprises all these tests and makes a secure final path string.
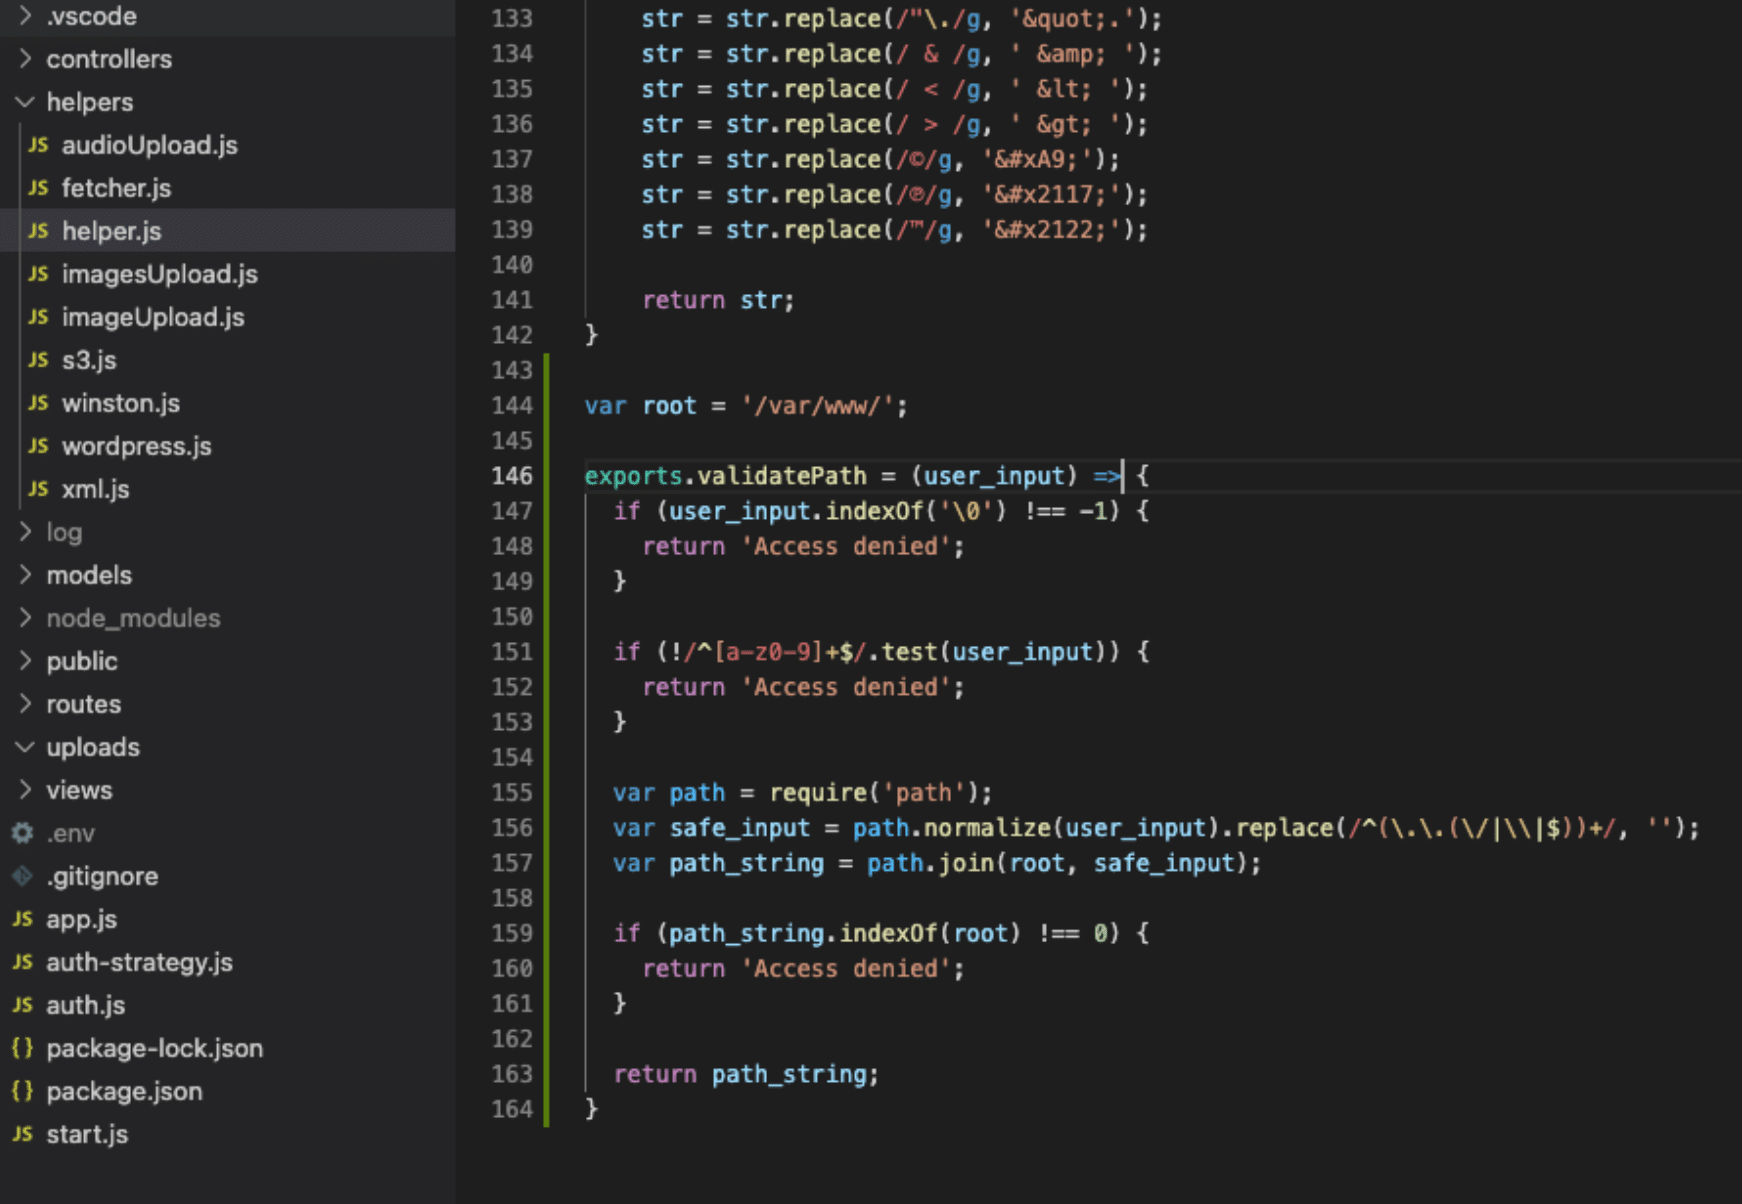
One example of a solution would look something like this:
var root = '/var/www/';
exports.validatePath = (user_input) => {
  if (user_input.indexOf('') !== -1) {
    return 'Access denied';
  }
if (!/^[a-z0-9]+$/.test(user_input)) {
    return 'Access denied';
  }
var path = require('path');
  var safe_input = path.normalize(user_input).replace(/^(..(/|\|$))+/, '');
  var path_string = path.join(root, safe_input);
if (path_string.indexOf(root) !== 0) {
    return 'Access denied';
  }
return path_string;
}
Lines of code in an integrated development environment.
As you can see, we have incorporated all the checks and validations already discussed to encompass any potential abuse of our system.
Final Thoughts
As JavaScript is such a mature and robust language, there are myriad ways to go around this. None of them is really the best. Just make sure that you find something that satisfies your needs and then adequately test your approach and implementation.
As simple as it might seem, it is essential to make sure that we enforce good path traversal security policies. We must also work on covering as many potential gaps in our application as possible. Technology will, of course, continue to evolve, and more robust and comprehensive solutions will become available to mitigate these issues. However, don’t forget that humans can always cover for the gaps in our systems, as long as we are thorough and creative with our approaches.
This post was written by Juan Reyes.Juanis an engineer by profession and a dreamer by heart who crossed the seas to reach Japan following the promise of opportunity and challenge. While trying to find himself and build a meaningful life in the east, Juan borrows wisdom from his experiences as an entrepreneur, artist, hustler, father figure, husband, and friend to start writing about passion, meaning, self-development, leadership, relationships, and mental health. His many years of struggle and self-discovery have inspired him and drive to embark on a journey for wisdom.
From payments and password resets to downloads, website redirections are everywhere. They’re a popular way to perform background actions and navigate users to the relevant pages after the action is complete.
However, with a subtle blend of social engineering , attackers could use your website’s redirection feature to steal your users’ data. Open redirect is a vulnerability that allows an attacker to control your website redirections.
But what exactly is open redirection, and how can you prevent it?
In this post, you’ll understand what open redirections are and how you can prevent them in your React application.
Redirections: What, Why, and Where
You might think, “If open redirection is harmful, why not just disable redirections from the website?” Well, website redirections aren’t a security vulnerability in themselves. You can consider them a feature or a way to enhance user experience for some actions on your site. Therefore, to understand open redirection, let’s have a quick refresher on redirections in general.
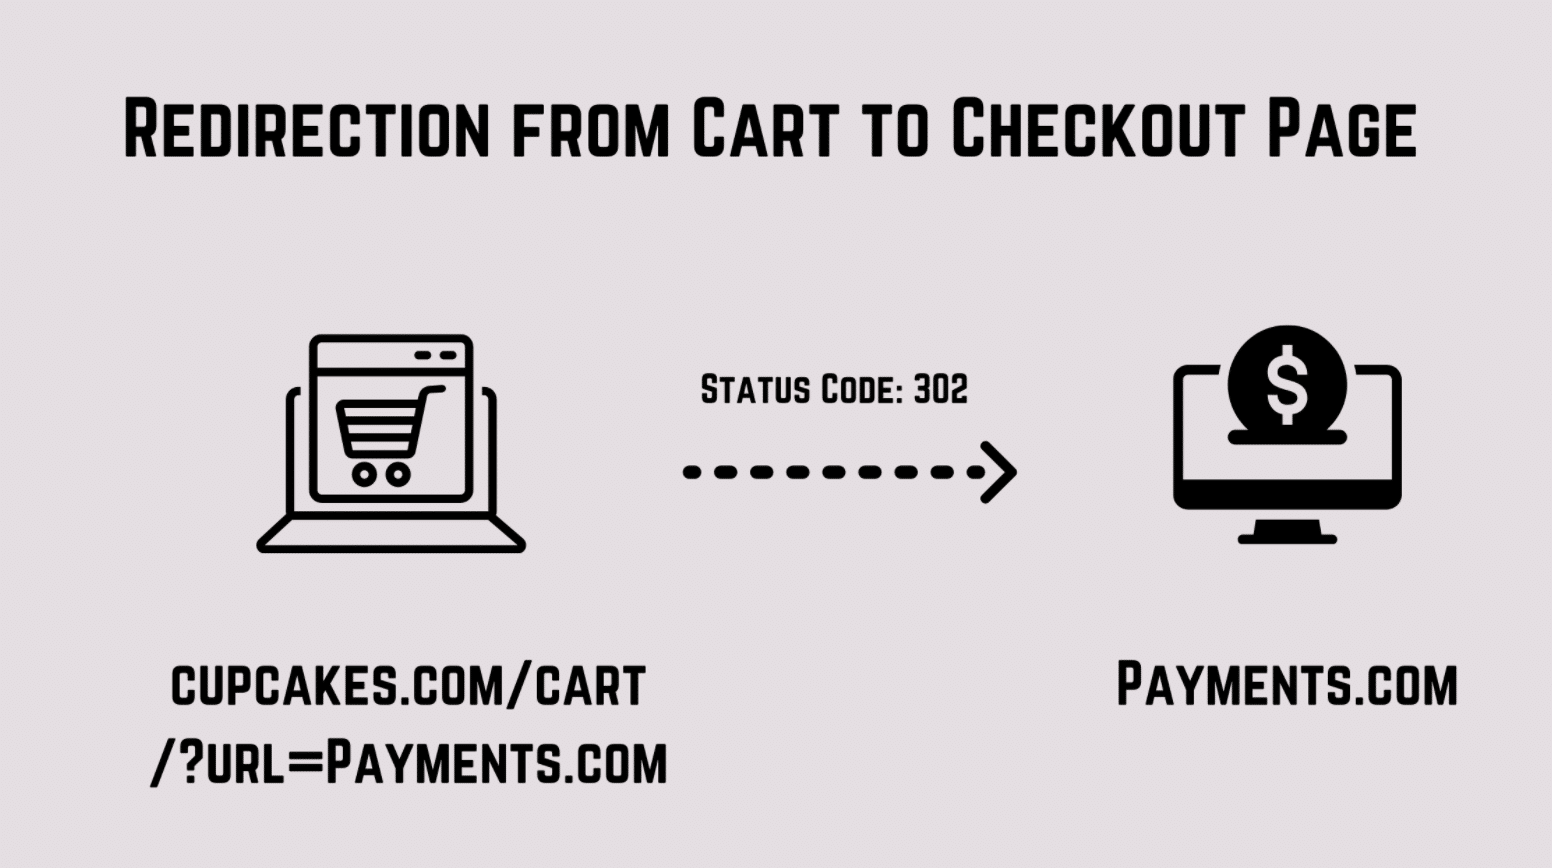
Let’s say you have an e-commerce website where your users can buy some items. So you have a simple cart page where the user sees what items they’re purchasing.
Now let’s say you decide to integrate a third-party payment provider into your application. So now when the user lands on the cart page, you add a redirect URL property in your cart page’s URL.
Redirecting from cart to checkout page in an e-commerce site.
This allows you to grab the redirect URL and immediately redirect the user to the payments page, where they make the actual payment. This is a classic example of redirections in e-commerce websites.
Other Examples
Websites that allow you to download files also use redirection. They land you on a Thank You page after your download is complete. Similarly, password reset links often contain a parameter in the URL for redirection. Once the user has reset her password, the redirect is to a Login or Home page. This provides a more engaging user experience and ensures that users don’t drop off from your website after a process.
Open Redirection Vulnerability
Now you know why redirection is important and sometimes even necessary. Let’s see what an open redirect vulnerability is and how an attacker can use it to cause some damage to your users.
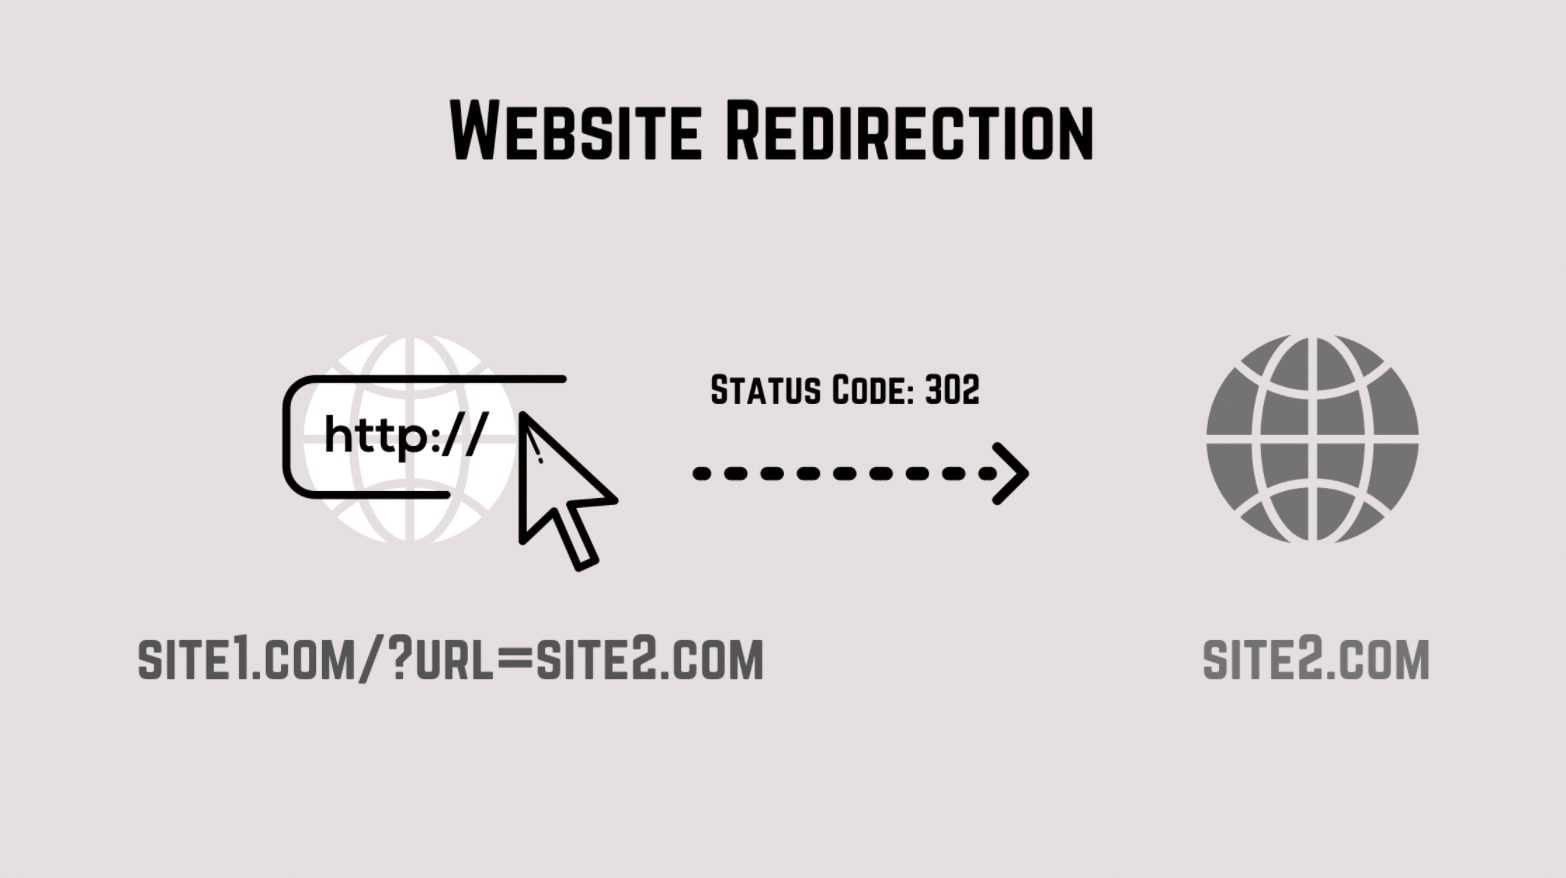
Let’s say for any of the above reasons, site1.com allows you to redirect to another website. Consider the part of the URL that actually performs this action. The query parameter url tells you which website you should redirect the user to.
Website Redirection.
Now imagine there’s an attacker who wants to trick you into landing on her website. The attacker could convince you to open her website through social engineering and perform some phishing attacks on you. However, these kinds of phishing attacks are difficult to execute because users are mostly aware of the websites they’re visiting.
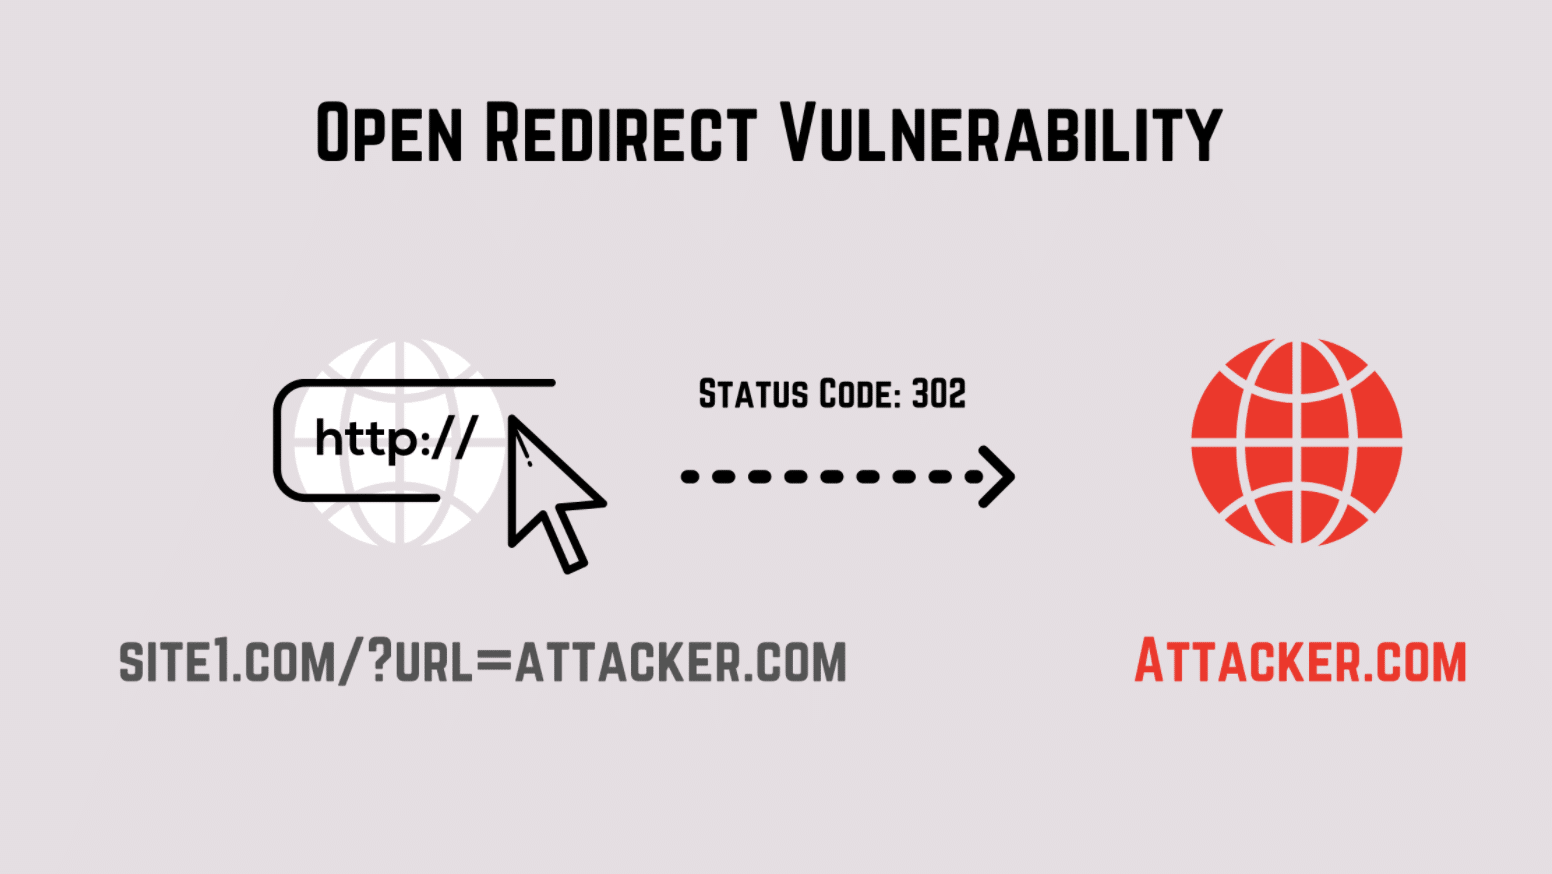
An open redirect vulnerability allows anyone to modify the redirect URL in the website externally. So instead of redirecting to the website you’re supposed to go to, the attacker could modify the URL to another harmful website.
Here’s how such an attack might look:
Open redirect vulnerability.
Since the redirect URL could be externally modified, the attacker easily tricks you into visiting a malicious website. Because you came from an authentic website, you might not even notice it! After executing some harmful scripts on her website, the attacker could then redirect you back to the original website. Since redirections happen almost instantly, users think it’s a normal flow for the website.
That’s what an open redirect is and how it can be damaging for your users.
React Open Redirect Example
Open redirect vulnerability can be exploited on both the client and server sides. For the sake of brevity, we’ll be talking about the client-side vulnerability only in this post. If you want to learn about open redirects in server-side implementations, here’s a great post that might help you out.
Remember we talked earlier about redirections used in reset password pages? In this example, we’ll create our own mock reset password page with a redirection. I’ll then use it to demonstrate an open redirect attack.
Setup React App
Let’s create a new React app by running:
npx create-react-app react-open-redirect
We’ll be using React-Router-DOM, so let’s install it by running:
npm i react-router-dom
We’re going to create a root route and a route that handles our Reset Password Page. Add the following code inside your App.js :
import './App.css';
import {
  BrowserRouter as Router,
  Switch,
  Route,

} from "react-router-dom";
import Homepage from './pages/Homepage';
import PasswordReset from './pages/PasswordReset';

function App() {

  return (
    <div className="App">
      <Router>

     <Switch>
          <Route path="/password_reset">
            <PasswordReset/>
          </Route>
          <Route path="/">
            <Homepage/>
          </Route>
        </Switch>
        </Router>
    </div>
  );
}

export default App;
The above code renders the Home page for all routes and renders the Password Reset page for the /password_reset route. Next, let’s add these two pages.
Create a folder called pages inside the root directory. Add the file Homepage.js inside it with the following code:
The above code renders a Password Reset form with two input fields for old password and new password. It has a Submit button that fires a function when clicked. We also use the useLocation hook from react-router-dom to get the query parameters from the URL. When the page loads, we fire two functions that extract the token and a redirect URL from the query parameters. We then store them inside our state along with the new and old password that the user types in.
Finally, I also created some basic styles to make our Reset Password page look a bit better. You can add these inside the App.css file:
Great, we’re all set now! To open your React app, run npm start inside your root directory. If you now visit the URL http://localhost:3000/password_reset?token=123&next=home, you should see the following page:
Reset Password page.
Awesome! Next, let’s see why this React app is vulnerable to an open redirect attack.
Vulnerability
In the previous section, we created a Reset function that fires when the user presses the Submit button. Let’s add the following code inside that function:
    const Reset=()=>{
        //Make an API call to reset password

        //Callback fired when Reset Password API gives a response
        setTimeout(()=>{
            window.location.assign(resetPassword.redirectTo);

        },0)
    }
In a real-life scenario, you’ll make an HTTP request inside the Reset function. This request will send the old and new password that the user typed. It verifies the entries, and if everything looks good, it sends back a status code 200. At this point, you know the user’s password has been successfully reset.
However, notice that we have a redirectUrl property inside our resetPassword state. This redirectUrl is the URL you’re supposed to redirect to after the user’s password is successfully reset.
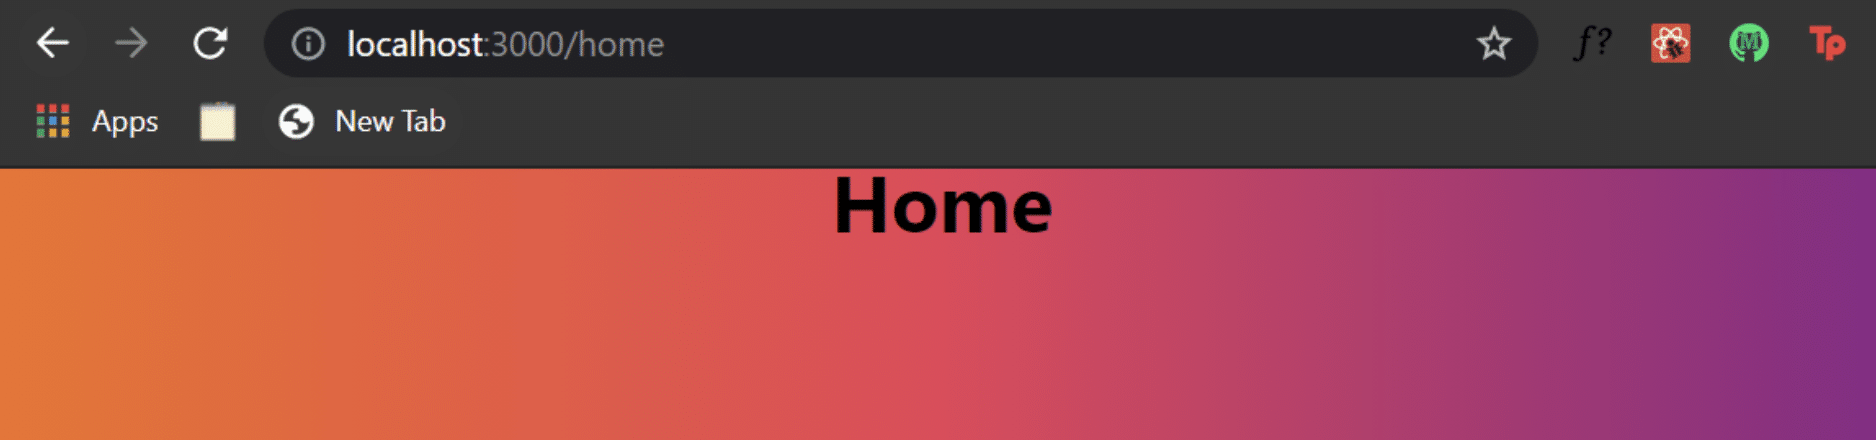
Inside the Reset function, I can change the URL route to whatever value we have inside our redirecrUrl property. Since our current URL is http://localhost:3000/password_reset?token=123&next=home, we navigate the user to the Home page. You can press the Submit button to verify this behavior:
Redirected to Home page on Submit button press.
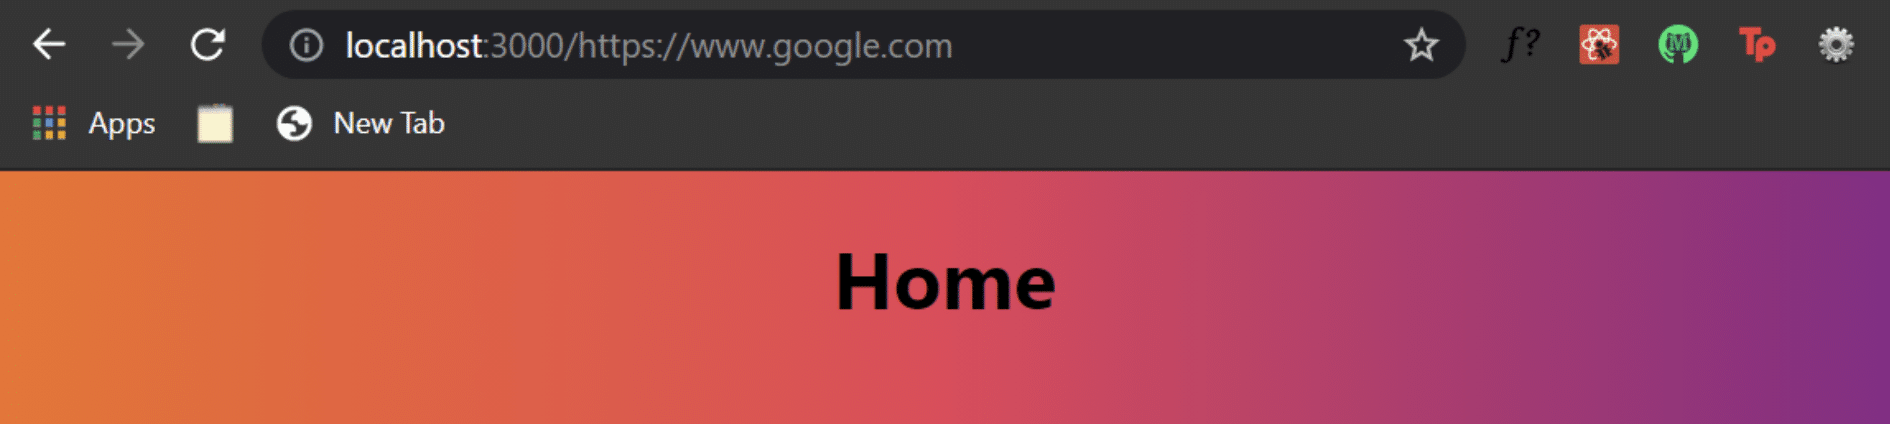
However, the problem with this approach is we have an open redirect vulnerability in our application. If you change the next property inside your URL to an external website like https://www.google.com and then press the Submit button, you’ll be redirected to google.com.
If this were a live application, an attacker could easily change the URL to point to a malicious website. What’s more lethal is when that redirection happens, there’s a chance of your reset password token being leaked to the attacker through headers of the HTTP request. If an attacker has this information, she can easily go and reset your password—and boom, there goes your account!
Prevent Open Redirect
Open redirects can be easily prevented by setting coding guidelines for your application. The most important one is to sanitize your redirect URLs. To put it differently, you should write code that doesn’t let a user redirect to an external website.
If you look at our current use case, we want the user to navigate to a different page of our own website only. This is a simple fix inside our Reset function. Instead of using window.location.assign , we can use the useHistory hook provided by react-router-dom instead. First, import it at the top inside PasswordReset.js .
To use the useHistory hook, we need to create an instance of it and store it in a variable:
consthistory=useHistory();
Almost there! Finally, our new Reset function now looks like this:
    const Reset=()=>{
        //Make an API call to reset password

        //Callback fired when Reset Password API gives a response
        setTimeout(()=>{
            //window.location.assign(resetPassword.redirectTo);
            //window.location.href=resetPassword.redirectTo;
            history.push(resetPassword.redirectTo)

        },0)
    }
If you now visit the URL http://localhost:3000/password_reset?token=123&next=https://www.google.com and hit the Submit button, you’ll be redirected to the Home page only.
If you look at your Home page’s URL, you’ll see that it has the redirectUrl appended to it as a route parameter.
Open redirect fix using React router.
You can further remove this by using a function that changes the current URL without reloading the page. You need to fire this function every time your Home page component mounts on the DOM.
Here’s how your Home page.js file would look after accommodating the above changes:
import { useEffect } from "react";

export default function Homepage(){
    function changeurl() {
        var new_url = '/';
        window.history.pushState('data', '', new_url);

    }
    useEffect(()=>{
        changeurl();
    },[])
    return(
        <div>
            <h1>Home </h1>
        </div>
    )
}
If you want to enable external redirect websites, the safest thing to do is to have a list of websites you’ll be redirected to. Then, before redirecting, you can check if the website is present in that list and redirect only if it’s there.
Other Vulnerabilities
Attackers often combine open redirect vulnerability in combination with other vulnerabilities, such as XSS, CSRF, and so on, to cause more damage to your users. Using the above steps, you can ensure that you don’t leave any redirects open to be exploited by attackers. I wrote a detailed guide on XSS attacks and how you can prevent them in your React application. If you’re curious to know more, you can check it out here . You can also check out the rest of the StackHawk site, which includes a free signup and a searchable blog .
This post was written by Siddhant Varma.Siddhantis a full stack JavaScript developer with expertise in frontend engineering. He’s worked with scaling multiple startups in India and has experience building products in the Ed-Tech and healthcare industries. Siddhant has a passion for teaching and a knack for writing. He’s also taught programming to many graduates, helping them become better future developers.
Learning that so-and-so big tech company has been hacked isn’t surprising news anymore. Hackers are now capable of setting companies back millions of dollars—a trend that makes it beneficial to adopt a security-first development approach. If you’re using Go at any level of your software delivery process, such an approach includes looking into Golang content security policy (CSP) headers. And you should look at how they can help your security goals in particular.
This guide explains the implementation of a Golang content security policy at length. Our approach starts with a specific definition of CSP. This is followed by some reasoning to justify why you should implement a content security policy. Finally, we’ll discuss best-practice methods to enforce CSP in Golang applications.
Let’s dive right in!
What Is a Content Security Policy?
A content security policy is a set of rules that guard web applications against innocently executing unscrupulous scripts otherwise pushing hackers’ agendas. The core functions of a content security policy distill into the following three-point list:
Identity-matching scripts within the app such that only those known by the server ever get to run
Cross-checking resource tags before they render/fire such that only those from trusted sources appear on the front end
Cleaning/sanitizing communication with external resources (for example, turning HTTP to HTTPS defaults) to avoid Golang CSRF
These three functionality aspects make CSP a useful XSS and code (tag manipulation) injection deterrent.
To learn more about content security policies, check out this post that describes the subject in more detail.
Golang Content Security Policy Format
Good as all this seems, it’s worth mentioning that CSP should not be the primary security feature for your Golang applications. Mostly because it best works as a blanket solution to a static set of access permutations. If your Golang project is just a single page of static content, implementing a content security policy can prove futile. This, due to it being a lesser target than projects handling user data. However, dynamic projects would benefit from CSP.
By no means will CSP be the most comprehensive security strategy for your Golang project. Make sure you explore the headers in your project along with their associated risks. This way, you can follow up with more elaborate security solutions to reinforce the effects of even the most well-thought-out content security policy. The more deliberate and focused a solution, the better your application security overall.
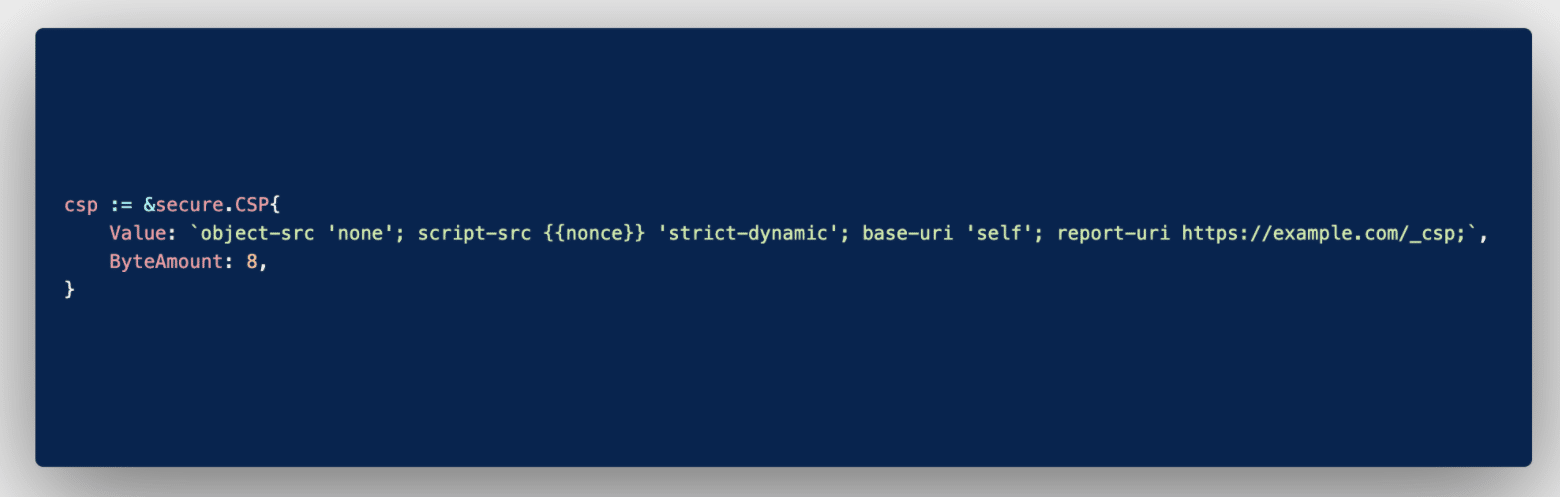
Let’s refer to the uncomplicated Golang content security policy implementation below to explain the structure of CSP.
Typical Golang CSP implementation.
This content security policy specifies just four values, but it’s not rare for double the amount (or even more) to feature therein. Now for a breakdown of what the code in the screenshot means.
object-src
The object-src value is a protection variable that specifies any scripts embedded in the Golang application that should be executed. The ‘none’ option specified in this case negates the possibility of running applets or flash elements wherever this policy is included/called . Often you’ll encounter the ‘self’ keyword as the object source directive. It simply instructs that scripts emerging from the host domain itself can be executed as they’re deemed safe by origin.
script-src
When the script-src value is specified in CSP, any scripts that mirror the {{nonce}} will execute. This works in much the same way as encryption in that the matching key is stored on the server side, away from hackers’ reconnaissance efforts. You’ll do well to notice that passing a second directive is possible with the script source variable. In this case, the ‘strict-dynamic’ option accepts execution of scripts if, and only if, they were added to a page by already-approved sources. This caters to any dynamic resource builds.
base-uri
The base-uri value works in a similar fashion to the object source variable in that it specifies if any base tag values can run. The ‘self’ option therein limits any chance of manipulation of the URLs in base tags. It’s worth specifying this tag even when your code consists of no base values, lest hackers inject them post-production.
reporting-uri
The reporting-uri value directs the interpreter to post any reports/errors to a specified webpage for analysis. This reporting feature notes down any hacker attempts to assist with any audit and safe-fencing efforts thereafter.
CSP Errors
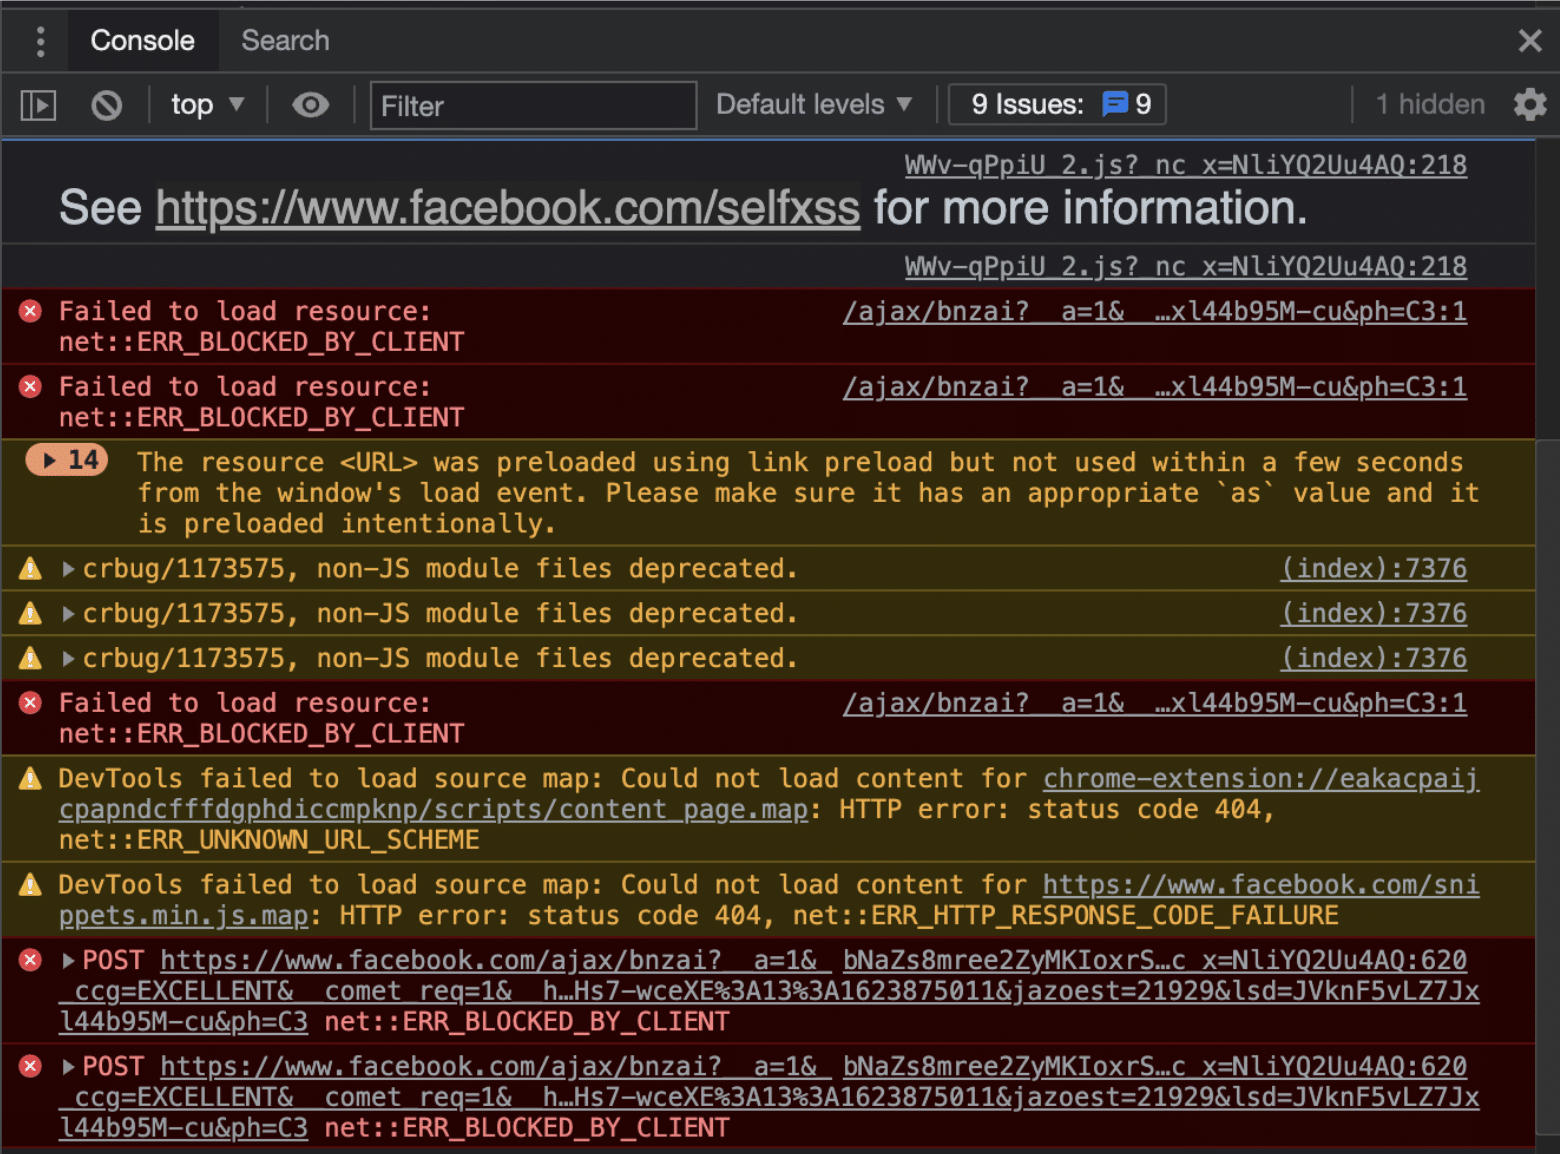
Typically, any values for which directives exist in the Golang content security policy should fire off errors when access attempts fail. All of which should reflect at the address set in the reporting-uri variable. As an example, let’s take a look at some errors/blocks that result in errors. Facebook is one company using Golang , among a handful of other big names.
CSP errors and their sources.
Key to note from this screenshot is how the platform has actively placed an information resource explaining some of the errors. In particular, it shows those from attempted Self-XSS attacks . This helps with a sneaky kind of attack that blends social engineering with cross-site scripting for persistent access to user accounts.
Some of the errors detected by the browser happen on the client side. If you encounter these during your Golang testing stages, consider doing away with any deprecated value-directive pairs in your CSP declaration. This browser compatibility chart maintained by the Mozilla Foundation should help troubleshoot most CSP errors.
Typically, resolving an error requires a specific element value-directive declaration that either excludes the self or sanitizes the particular access instance. However, you should be careful not to open the rest of your web application to attacks for the sake of a single tag. Otherwise, to mitigate risk, you may as well apply a single value-directive case for each error-flagging tag like this:
<tag nonce="3hDsif/="> ... </tag>
This would be a tedious procedure. Especially if your application looks to scale significantly in the long run. Clearly, there must be a better way to implement CSP.
How to Enable CSP
No two Golang projects will come out identical, even (especially) when you patch together various Git repositories to come up with one. As such, it’s tempting to create a Golang content security policy from scratch. Without taking anything away from your team and their competence, you may realize that’s probably the least effective route.
The Golang package library is awash with stable all-encompassing templates and even header generators that fit snugly with your project. More important than understanding the code is how you approach the implementation and maintenance thereof.
Best practice alert: Like you would with any module in your project, ensure you test your Golang content security policy across the possible access device matrix. Make sure your policy evolves with the project to cover any resource tag introductions.
In Conclusion
By the time you read this sentence, you’ll have acquired ample knowledge around the Golang content security policy subject to implement your very first headers. This should provide the first line of defense against injection-dependent attacks, at the same time patching basic cross-site scripting vulnerabilities.
That said, in the event of a rapidly scaling application, your headers will need equally attentive efforts. The cat-and-mouse game that can ensue as you update new headers and fitting values is likely to cause a lot of developer exhaustion. This is where automated security testing tools that seamlessly merge with CI/CD workflows come in handy. StackHawk is a perfect case in point.
Since missing headers don’t necessarily mean your code has bugs, associated vulnerabilities easily make it into production. StackHawk lets your developers focus on feature development by automating security vulnerability checks.
This post was written by Taurai Mutimutema.Tauraiis a systems analyst with a knack for writing, which was probably sparked by the need to document technical processes during code and implementation sessions. He enjoys learning new technology and talks about tech even more than he writes.
Command injection is considered to be one of the five most dangerous injection attacks. It’s equivalent to a malicious attacker using your system themselves. Imagine the damage an attacker will be able to do if they were to get access to your entire system.
As a developer, you’ve used the command line terminal to do literally everything—creating folders, reading files, or even deleting them. Command injection transfers all this power to the attacker. But how does that really happen? What all can an attacker do?
In this post, I’ll help you understand what command injection is and how it works using an example. I’ll also walk you through how you can prevent it in your React application.
What Is an Injection Attack?
Most injection attacks follow a similar pattern across all their variants. In its most primitive step, an injection attack finds a vulnerability in the application. This vulnerability provides a gateway to get unauthorized access to server files, system OS, etc. The attacker then injects some code through this gateway to steal data, modify system files, or execute shell commands.
Based on the type of injection attack, the code is injected in different ways. If it’s a client-side vulnerability, the easiest way for an attacker to inject code is through JavaScript. In this case, the attacker injects a script that runs on the user’s browser. If you’re curious as to how script injection works, have a look at my other blog where I talk about XSS attacks in React in detail.
On the other hand, if it’s the server, the attacker could inject some shell commands. We know how powerful shell commands are. They can interact directly with your system-level APIs.
What Exactly Is a Command Injection Attack?
A command injection attack is more lethal because it gives the attacker more privileges than a regular injection attack. Earlier, I talked about how attackers can inject a malicious script on the client side. However, the script can only execute some JavaScript. The extent to which it can hamper your application is largely influenced by what JavaScript can do.
In other words, injecting code or a script often becomes limited to the language. However, that’s not the case with command injection.
A typical command injection attack allows the attacker to execute shell commands on your server.
This gives the attacker complete control over your system. Consequently, the attacker can read your environment secrets and other configurational files. Not only this, but the attacker can also modify or delete other files on your system.
Example of a Command Injection Attack
Typical command injection attacks happen directly on the server, but they may also be triggered from the client side. Let’s assume you have a React app on the front end and a NodeJS server on the back end.
Create a Back-End Server
To set up the latter, run the following command:
cd command-injection-server && npm init -y && npm i express
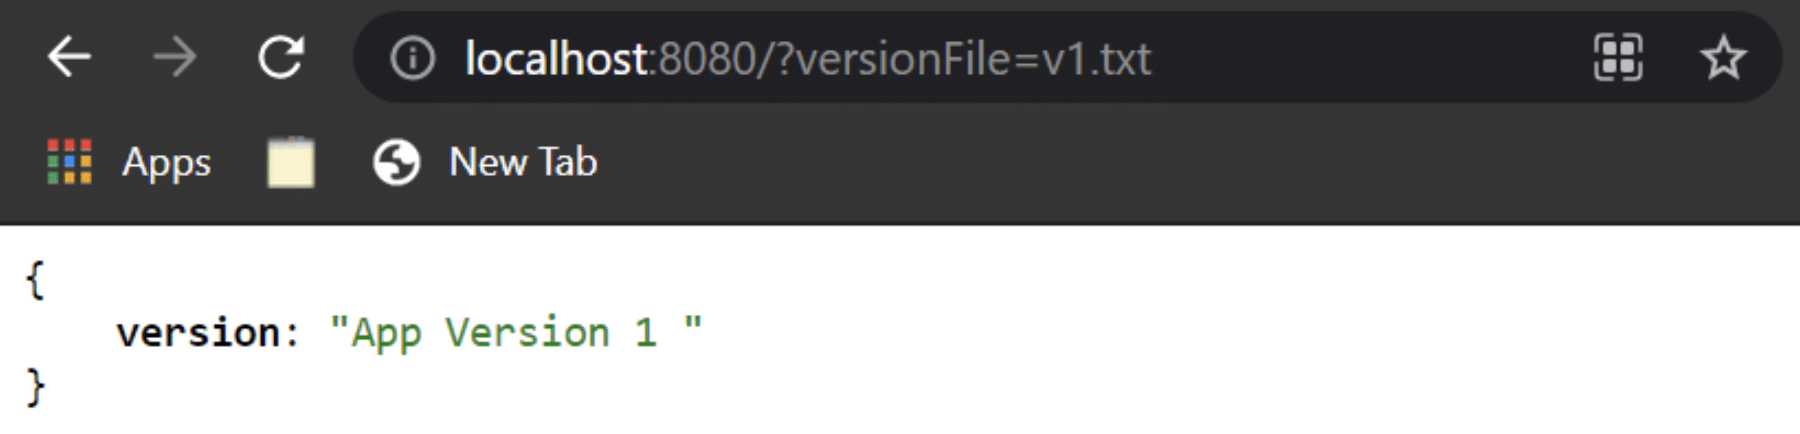
Let’s assume that your back end receives the name of a text file stored locally on your server. This text file stores the version of your server. You need to validate if your back end and front end are running on the same version. So, you make an HTTP request to an endpoint. You send the version file as a query parameter from the front end to an endpoint. This endpoint checks if that version file exists on the server. If it does, you send back the contents of the file. Otherwise, you throw an error.
Consider the following code that does all of the above:
To demonstrate, let’s make a v1.txt file in the root directory of your project. Add the following content inside that text file:
App Version 1
Your project structure should look like this:
Version API Back-End Project Structure.
If you now make a request to http://localhost:8080/?versionFile=v1.txt endpoint, you’ll get back the following response:
Version API Response.
Consume Version API on Front End
You saw the above response of the version check API from the server. However, you need to make a request to the above endpoint from your React app. First, let’s create an empty React app by running:
In the above code, I simply invoke a method that makes an HTTP GET request to the server at the http://localhost:8080/?versionFile=v1.txt endpoint. I call this function inside the useEffect so that it’s fired as soon as the page loads. If you check the console, you’ll get back the app version in response as shown:
Version API Front End.
Command Injection Vulnerability
Until now, it may seem as if everything is fine. There’s a server that serves an endpoint for version check and your React app makes a request to it. However, the endpoint exposes a command injection vulnerability. Let’s see how.
The front end hits the version endpoint with a query parameter that executes a shell command on the server. The query parameter is the file name that contains the version of the app. It’s extracted by your server and is directly taken to execute a command. An attacker could easily infiltrate this request and send some malicious commands that can be executed on the server.
Let’s say we also had a secrets folder that contains all the sensitive configurational credentials of our project. An attacker could make a request like this from the front end:
which would then execute the following command on the server:
type v1.txt && cd secrets
Now the attacker can access your secrets folder! This is just a simple example, but there are a ton of dangerous commands an attacker can execute. Here’s a detailed guide that tells you all the realistic attacks the attacker can commit using command injection once your system is compromised. For now, let’s move ahead and see how we can fix this problem.
Prevent Command Injection Attack
There are several methods, best practices, and coding guidelines you can follow to prevent a command injection attack on your application. Let’s have a look at some of the methods below, what they do and how they combat command injection.
Refactor Your API
If you head back to the back-end code, the following lines of code are the bottlenecks for the command injection vulnerability in your system:
We’re directly getting the file name as a query parameter in the API. We’re then using this file name directly in the command. Thus, any infiltration with the query parameter is directly going to affect the shell command executed on the server. Besides, it doesn’t make a lot of sense to send a hardcoded file name as a query parameter from the front end.
Let’s refactor the above lines of code to the following:
We have changed the query parameter to be only the version number that we need to check. This is because we don’t really need an entire file name as a query parameter in the API. We then use the version number to dynamically generate a version file name. Finally, we use that filename to execute a command. If you now make the same request as earlier, you’ll get an error with the following:
Similarly, if the attacker tries to inject a command in your server through your React app, they won’t be able to do so as the API would throw an exception.
Version API Refactored Response.
Hence, the attacker won’t be able to run any lethal shell commands.
Use More Airtight Functions for Executing Shell Commands
We use the exec function to execute the shell commands. According to NodeJS official docs , this function takes in a command that runs it as it is, “with space-separated arguments.” Instead, you can use a more airtight function that disallows your server to run arbitrary commands.
The execFile function takes in a file that contains some shell commands. Additionally, it also takes some arguments to run those commands. It’s more secure as now you don’t generate commands on the fly. Instead, you store them inside a bash file and can send some arguments specific to the command you want to execute. You can read more about this function here .
Validate Input
I can’t emphasize enough how important it is to validate inputs from the front end. In this scenario, you can validate the query parameters before sending them to the server. Have a look at the following code:
The above code validates the query parameters on the front end before sending them in the request. The validateQueryParam function checks if the query parameters are infiltrated. If this function returns true, the front end blocks the API request and throws an alert.
Command Injection Prevention From Front End
You can also validate the query parameters against a more robust regular expression.
Conclusion
I hope this post helped to simplify command injection for you. Make sure you validate all inputs on the front end. This safeguards your application from several malicious attacks, like command injection and SQL injection.
However, you can’t completely rely on input validation from the client-side to prevent such an attack. The most foolproof protection from such an attack must be implemented on the server-side. Remember to use secure functions when running shell commands. Finally, routinely refactor your code to detect potential bottlenecks.
This post was written by Siddhant Varma.Siddhantis a full stack JavaScript developer with expertise in frontend engineering. He’s worked with scaling multiple startups in India and has experience building products in the Ed-Tech and healthcare industries. Siddhant has a passion for teaching and a knack for writing. He’s also taught programming to many graduates, helping them become better future developers.