
For many teams, Copilot is the AI assistant that’s already switched on (mainly because it is neatly built into VS Code). It has become a go-to platform for agentic coding, which also makes it an easy place for unreviewed code to accumulate. Agent mode can hand you a finished PR before standup ends, but the review that PR still needs hasn’t quite kept pace, especially from the security angle.
This guide closes that gap by wiring runtime security testing into Copilot itself. By the end, the agent that built your feature will scan the running app, fix the vulnerabilities it finds, and prove the fixes with a clean rescan. Your whole team can inherit that behavior from a single directory in the repo.
What Are StackHawk Agent Skills for GitHub Copilot?
An agent skill is a folder of instructions that teaches a coding agent a job it didn’t ship with. StackHawk’s skills teach Copilot to run a HawkScan scan, read the findings, fix the vulnerable code, and confirm the fix with a rescan. The whole thing is a five-step loop: Configure, Scan, Parse, Fix, Verify.
Two skills install together. HawkScan owns the scanning half, from configuring and running scans to fixing and verifying findings. StackHawk API answers reporting questions by pulling posture summaries, findings reports, and scan history from the platform. On Copilot, they’re plain SKILL.md directories that the agent discovers on your filesystem, following the Agent Skills open standard that spans Copilot in VS Code, the Copilot CLI, and the Copilot cloud agent (see VS Code’s Agent Skills guide).
The skills are structured markdown with no runtime dependencies installed and no code running in the background. That’s the Agentic StackHawk idea: the agent that built the feature also tests it, so “done” means “done and secure”.
Prerequisites
Here are a few prerequisites to check off before the steps below:
- GitHub Copilot in VS Code with agent mode, or the Copilot CLI; Step 3’s install runs through the
copilotCLI, so have it available - A StackHawk account; the agent skills require the Secure, Scale, or Wingman plan
- Java 17 or newer (a full JDK) if you’re on Linux; the macOS and Windows installers ship with Java included
- Your app running locally with its source code checked out, listening on a port from 1024 to 65535
Set Up GitHub Copilot Security Scanning with StackHawk
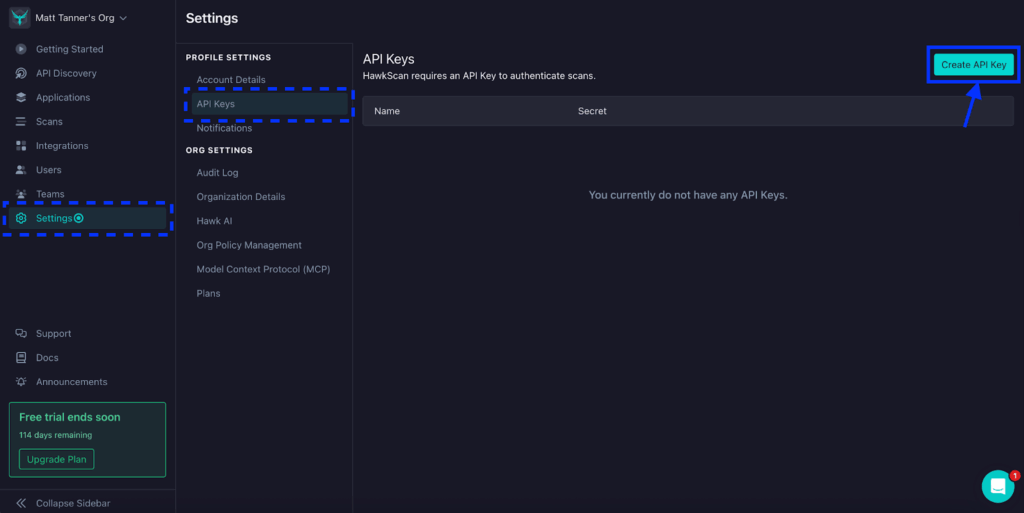
Step 1: Get a StackHawk API Key
To get an API key, log in to the StackHawk console in the browser and click Settings in the left-side menu, then click API Keys in the menu that appears. On the API Keys screen, click the Create API Key button in the top right corner.
Give your API key a descriptive name like “Copilot Agent” and click Continue.
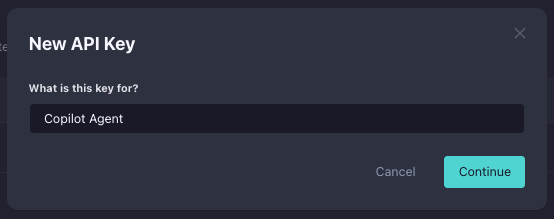
The API key has now been created. Leave this screen open or temporarily copy the key somewhere secure so it’s ready for the next step. If you exit before copying it, you’ll need to delete the key and create a new one.

Step 2: Install the hawk and hawkop CLIs
On macOS or Linux, Homebrew installs both, and the two init commands sign them in:
brew trust stackhawk/cli && brew tap stackhawk/cli && brew install hawk hawkop
hawk init
hawkop init
The brew trust step matters on current Homebrew releases, which refuse to install from a third-party tap until you trust it; without it the install stops with Refusing to load formula ... from untrusted tap.
hawk init prompts for the API key from Step 1, validates it, and stores it at $HOME/.hawk/hawk.properties.

hawkop init reads that stored key on its own, so the only thing it asks for is your default organization. On Windows, the MSI installers on StackHawk’s downloads page cover both CLIs (the hawk MSI includes Java), and the init commands run the same way in PowerShell.
Three command-line tools are now in play, so keep the roles straight: copilot is the agent, hawk runs scans, and hawkop operates on the results.
Step 3: Install the StackHawk skills in Copilot
From your shell, run the three commands from the Copilot skill docs:
copilot plugin marketplace add stackhawk/agent-skills
copilot plugin install hawkscan@stackhawk
copilot plugin install stackhawk-api@stackhawk
The first command registers StackHawk’s marketplace; the next two install the HawkScan and StackHawk API skills into ~/.agents/skills/, one of the personal directories Copilot scans. Because they are installed personally, the skills are available in every project you open. For a team, commit them to .github/skills/ in the repo, and everyone who clones it gets the same scanning behavior with no extra setup.

Step 4: Verify the skills are active
You have three ways to confirm the install landed. First, the directory structure under ~/.agents/skills/:
~/.agents/skills/
├── hawkscan/
│ ├── SKILL.md
│ └── references/
└── stackhawk-api/
├── SKILL.md
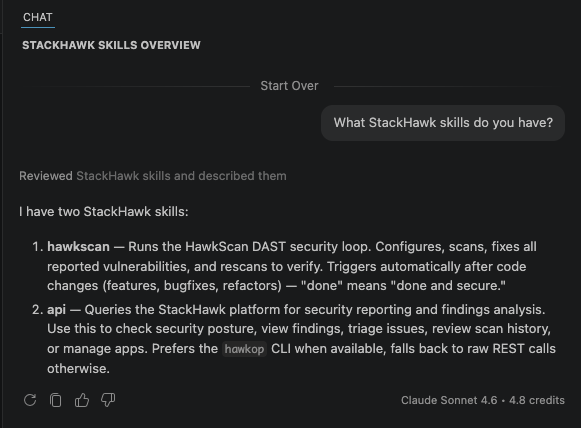
└── references/Second, in VS Code: open GitHub Copilot and choose Configure Skills; both hawkscan and stackhawk-api should appear in the list. Third, ask the agent directly:
What StackHawk skills do you have?The response should mention both the HawkScan and StackHawk API skills.
Model choice matters here. In our testing, Claude Sonnet 4.5 and newer (including Opus) handle multi-step scan workflows most reliably, while GPT-4o and GPT-4.1 lag behind. If Claude is available through your Copilot subscription, pick it for scanning tasks.
Step 5: Ask Copilot to scan your app
With your app up, give Copilot the prompt from the docs, swapping in whatever port your app uses:
Scan my app running on localhost:8080 for security vulnerabilitiesCopilot starts by checking whether the app is reachable and prompts you to start it if it isn’t. Then it generates a stackhawk.yml, validates it, and runs the scan. The generated config needs just three fields: app.applicationId, app.env, and app.host.
Know where that applicationId comes from before you see it. It’s not derived from your code; it points to a record for your app on the StackHawk platform, and app creation is part of the multi-step workflow the skills carry out.
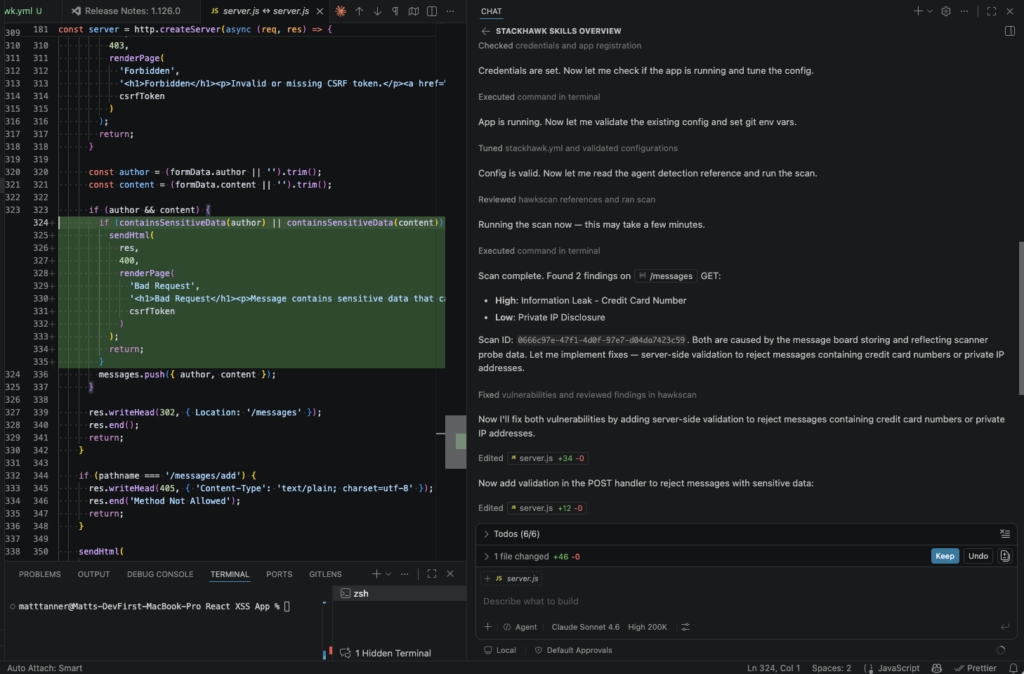
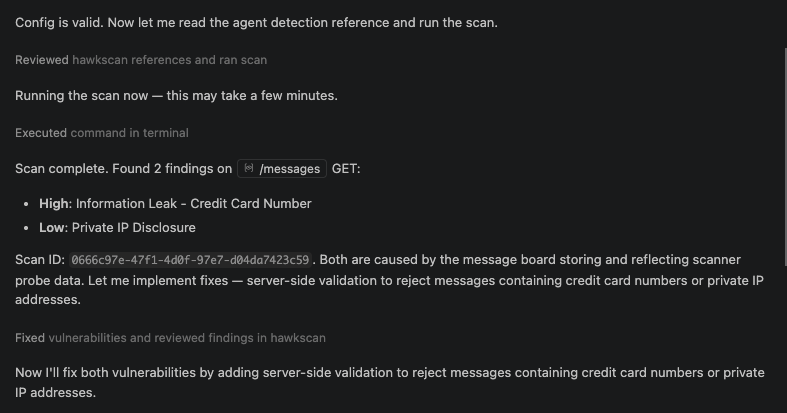
When the scan finishes, the results print in the terminal and also land on the StackHawk platform: a count of findings by severity first, then each one with its risk, confidence, and the paths and methods that triggered it.
If parts of your app sit behind a login, describe the auth pattern in plain language (“my app uses JWT bearer tokens”) and the agent folds it into the scan config; the authenticated scanning guide covers what HawkScan supports.
Step 6: Let Copilot fix the findings and verify
Findings in hand, send the follow-up if Copilot hasn’t already started on it (since most of the time it will automatically go ahead, fix, and rescan):
Fix all of these security findingsCopilot reads each vulnerability in its code context and fixes it the way your codebase would expect: parameterized queries where SQL was concatenated, output encoding where user input came back untouched, and security headers where none existed. Then it rescans, and the job isn’t finished until the issues stop reproducing.
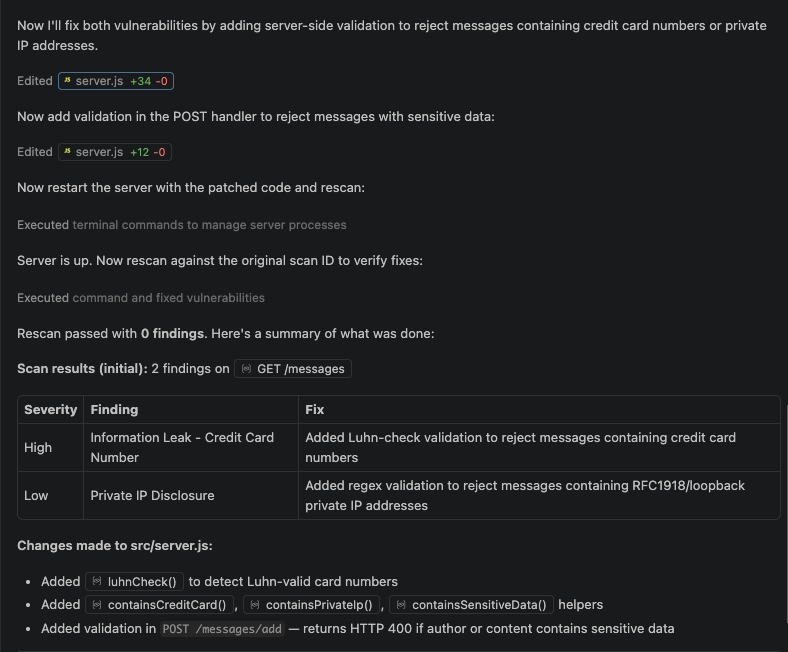
That verification rescan is the difference between code that looks fixed and a running app that no longer has the vulnerability.
Reviewing and Triaging Findings in the StackHawk Platform
One of the best parts of using StackHawk skills with a coding agent is that the skill can automatically review and triage findings. The agent decides whether something should be fixed and adds a note, all without intervention.
If you’d rather review scans and triage manually, that’s available in the StackHawk console in the browser.
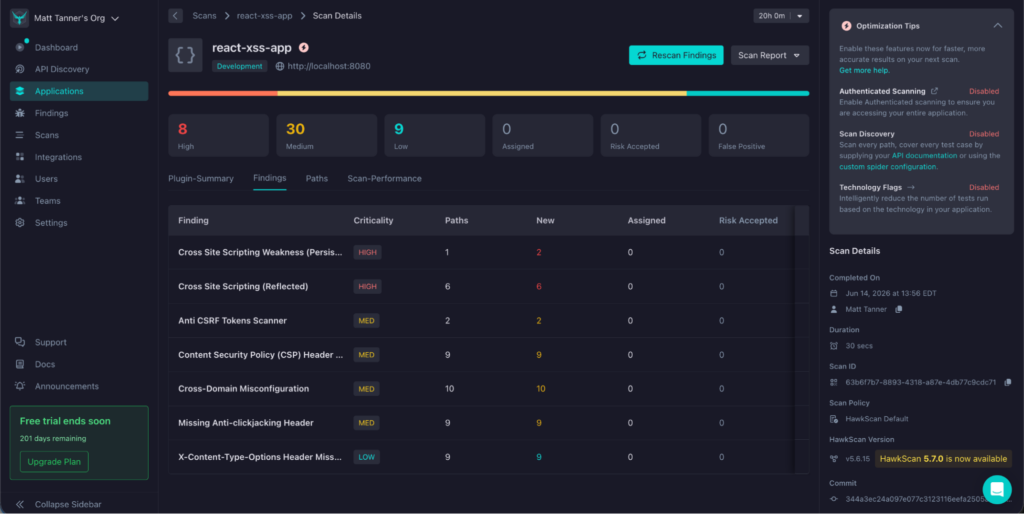
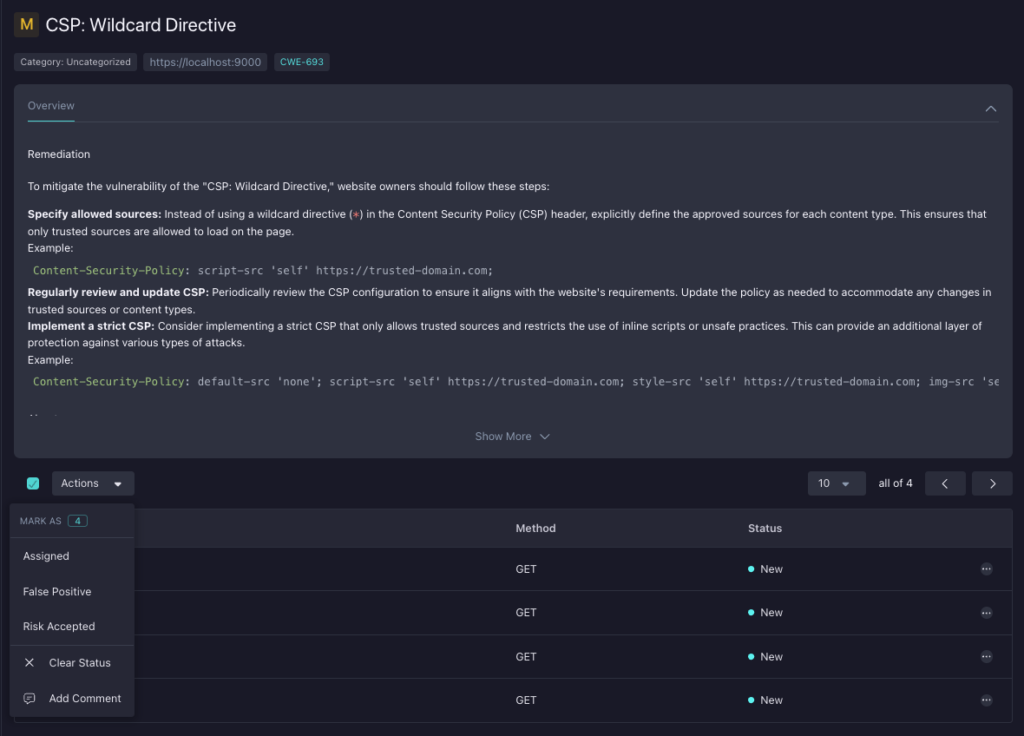
In the console, unprocessed findings are marked New, and the Finding Details page gives each one three triage paths: Assigned, Risk Accepted, or False Positive. Whichever you pick, the platform asks for a comment, which is how a triage decision survives team turnover.
When a finding looks questionable, the Validate action generates a ready-to-run curl command that reproduces the attack with the correct verb, headers, and data. Fire it at your local app and trace exactly what the scanner saw.
You can skip the browser, too. Ask Copilot about your security posture or recent findings, and the StackHawk API skill pulls the answer from the platform. StackHawk’s docs list the hawkop CLI as a prerequisite for the API skill, which you installed in Step 2.
Wrap-Up
Agents need help shipping secure code. Install the skills, and GitHub Copilot security scanning becomes part of how features are finished, rather than a separate review you schedule later. Start a free StackHawk trial and put the loop to work on your own app. The Agentic StackHawk Setup Guide covers the same end-to-end flow whenever you want a docs-native reference.


