For developers striving to build secure APIs, Broken Function Level Authorization (BFLA) is a crucial vulnerability demanding meticulous attention. BFLA belongs to the OWASP API Security Top 10 list and can pave the way to unauthorized access and manipulation of functionality within your API, compromising the overall integrity of your system. This occurs when applications lack adequate authorization checks focused on specific functions or features. This weakness enables attackers to manipulate calls to endpoints to which they shouldn’t have access, potentially escalating access to functions reserved for higher privilege levels (like administrative actions).
Let’s explore BFLA in more detail, including its nature, common root causes, and how to pinpoint BFLA vulnerabilities in your API code. Following this, we’ll use StackHawk to scan a susceptible Node.js application, locate a BFLA vulnerability in one of our endpoints, and then implement the necessary fix. Finally, we’ll re-scan to validate that the vulnerability has been patched. Let’s begin by digging into the foundations of BFLA vulnerabilities.
What is Broken Function Level Authorization (BFLA)?
Broken Function Level Authorization (BFLA) remains a significant risk to the security of APIs. This vulnerability surfaces when an API fails to implement robust controls, allowing users to access features and functions beyond their assigned permissions. Function-level authorization defines specific API actions that different user groups (or roles) can execute. For instance, a regular user of a banking app should not be able to perform administrative actions related to other user accounts. BFLA flaws emerge when these intended restrictions are weak or missing.
The pattern of BFLA attacks is straightforward. An attacker begins by analyzing API behavior to understand how API endpoints are named or structured. Then, they might attempt to alter HTTP methods (e.g., switch from GET to POST) or other elements in the function call requests. This is done in the hope of reaching unauthorized functionality. Weak authorization checks allow attackers to view, change, or execute commands with elevated privileges.
How Does BFLA Differ from BOLA?
You might encounter terms like “BFLA” and “BOLA” (Broken Object Level Authorization) in API security discussions. The overlap between these terms is significant, so understanding the subtle distinction is helpful. BOLA spotlights scenarios where an API directly exposes references or identifiers to internal objects, making them vulnerable to manipulation. BFLA takes a broader view, focusing on any breakdown in the logic that enforces function-level authorization within an API.
In short, BFLA is the broader category that encompasses BOLA-type issues. BFLA concerns go beyond the use of predictable IDs; they also stem from a failure to rigorously validate whether the user making a request is authorized to execute that particular API function.
What is The Root Cause of BFLA?
BFLA vulnerabilities typically stem from development practices that prioritize convenience over robust authorization. Here are several common contributing factors:
Oversimplification of Authorization: APIs that rely on basic checks without considering the full range of functions they expose are vulnerable to exploitation.
Lack of Consistent Authorization: Inconsistent or absent authorization across various API endpoints creates potential entry points for attackers.
Blind Trust in User-Supplied Data: All information users provide must be treated cautiously and validated, including parameters that might influence the functionality being accessed.
“Security Through Obscurity”: Relying on hard-to-guess API paths or obscure naming conventions offers a false sense of security. Determined attackers can often bypass these.
At its core, BFLA arises from the absence of robust and function-specific authorization controls embedded directly into the API’s design.
Preventing Broken Function Level Authorization (BFLA) Vulnerabilities
The key to avoiding BFLA vulnerabilities lies in adopting a comprehensive approach encompassing secure design, robust authorization, and continuous monitoring. Here are some best practices:
Enforce Rigorous Authorization Checks: Validate users’ permissions with each attempted access to an API function.
Least Privilege Principle: Limit user and application access to the minimum necessary functions and data required.
Input Validation: Carefully scrutinize all input data from users, particularly values that can influence what API functions are accessed.
Regular Security Testing: Use automated security testing tools like StackHawk and employ penetration testing to uncover vulnerabilities like BLFA proactively.
Developer Education: Train your development team in secure coding practices with awareness of BFLA and similar vulnerabilities.
By following these guidelines, you’ll significantly reduce your application’s risk of BFLA vulnerabilities, ensuring users can only access what they’re supposed to. Now, let’s put this into practice by looking at a vulnerable NodeJS application and using StackHawk to identify the BFLA vulnerability and help us verify that the fix we will implement successfully remediates the issue.
Detecting and Fixing BFLA Vulnerabilities in NodeJS
Building The Vulnerable Endpoint
Below is an example of a simple Node.js API with a BFLA vulnerability. This API allows users to delete a user based on a user ID passed in the URL. However, it doesn’t perform any checks to ensure that the user making the request has the applicable role, being an “admin, before running the logic within the endpoint. This demonstrates a BFLA vulnerability in its most simple form, allowing an unauthorized user to perform a function they shouldn’t have access to.
Please note: This is an intentionally vulnerable API for demonstration purposes. Do not use this code in a real application, as it is not production-ready.
To run this app, first, ensure you have Node.js installed. Then, create a new directory for your project, ours is named “bfla-api-example”, and initialize the directory by running
npm init
You’ll also need to install Express, a popular web framework for Node.js, as well as a few other dependencies we will use in the project. You’ll do this by running the following npm command:
npm install express body-parser sqlite3 express-oas-generator jsonwebtoken
Note: The jsonwebtoken dependency will be used later, but we will install it now for ease.
Now, in the root of the project we just created, create a file named app.js and add the following code:
const express = require('express');
const bodyParser = require('body-parser');
const sqlite3 = require('sqlite3').verbose();
const expressOasGenerator = require('express-oas-generator');


const app = express();


expressOasGenerator.init(app, function (spec) {
 if (spec.paths["/users/{id}"]) {
   let path = spec.paths["/users/{id}"];
   if (path.get) {
     path.get.parameters = [
       {
         in: "path",
         name: "id",
         required: true,
         schema: {
           type: "integer",
         },
         description: "User ID to fetch",
       },
     ];
   }


   if (path.put) {
     // Exclude the PUT method from the OAS (admin-access only endpoint)
     delete spec.paths["/users/{id}"].put;
   }


   spec.basePath = "http://localhost:4000";
 }
 return spec;
});


app.use(bodyParser.json());


// Initialize SQLite database
const db = new sqlite3.Database(':memory:');
db.serialize(() => {
 db.run("CREATE TABLE users (id INT, name TEXT, role TEXT)");


 // Insert example users with roles
 const stmt = db.prepare("INSERT INTO users (id, name, role) VALUES (?, ?, ?)");
 stmt.run(1, "John Doe", "admin");
 stmt.run(2, "Jane Smith", "user");
 stmt.run(3, "Alice Johnson", "user");
 stmt.finalize();
});


app.get('/users/:id', (req, res) => {
 let userId = req.params.id;
 let sql = "SELECT id, name FROM users WHERE id = ?";
 db.all(sql, [userId], (err, rows) => {
   if (err) {
     res.status(500).send("Error in database operation");
   } else {
     res.json(rows);
   }
 });
});


app.put('/users/:id', (req, res) => {
 let userId = req.params.id;
 let { name, role } = req.body;
 let sql = "UPDATE users SET name = ?, role = ? WHERE id = ?";
 db.run(sql, [name, role, userId], function (err) {
   if (err) {
     res.status(500).send("Error in database operation");
   } else {
     if (this.changes === 0) {
       res.json({ message: "User does not exist" });
     } else {
       res.json({ message: "User updated successfully" });
     }
   }
 });
});


const PORT = 4000;
app.listen(PORT, () => {
 console.log(`Server running on port ${PORT}`);
});
Let’s run through a quick breakdown of the updated code, which demonstrates how to create a simple web server using Node.js, Express.js, SQLite3, and automated OpenAPI documentation creation with express-oas-generator. This code provides a REST API for accessing and modifying user information stored in an SQLite database, running in memory for simplicity and demonstration purposes. Here’s a detailed look at the key components and actions within the code:
1. Initialization of Express App
- The code begins with initializing an Express application (` const app = express();
`), the backbone for creating API endpoints.
2. Configuration for OpenAPI Documentation
- The ` expressOasGenerator.init(app, …);
` section is set up to generate OpenAPI documentation for the Express app automatically. This documentation dynamically adjusts based on the defined API paths. In this initialization, the documentation for the GET method at the `/users/{id}` endpoint is explicitly modified to detail the parameters expected.
The PUT method for the /users/{id} endpoint is excluded from the OpenAPI documentation, indicating that it is intended for admin access only, thus, not publicly documented.
3. Use of Middleware
- The ` app.use(bodyParser.json());
` configures the Express app to use `body-parser` middleware, enabling the app to parse JSON request bodies. This is essential for endpoints that accept data, such as PUT requests.
4. SQLite Database Setup
- An SQLite database is initialized in memory (` const db = new sqlite3.Database(‘:memory:’);
`), making it temporary and ideal for demonstrations without external database connections. - Inside ` db.serialize(…)
`, a table named ` users ` is created, and three example user records are inserted, setting up initial data with various roles.
5. API Endpoint Definitions:
- GET Endpoint: The route ` app.get(‘/users/:id’, …)
` defines an API endpoint that allows clients to fetch user data by ID. It uses a parameterized SQL query to retrieve user details, ensuring protection against SQL injection. - PUT Endpoint: The route ` app.put(‘/users/:id’, …
) ` provides a means to update user details, accept JSON input for name and role, and perform an SQL update operation. This endpoint is made exclusive for specific roles by excluding it from the publicly generated API documentation. Although this endpoint is excluded from the API spec output, it doesn’t have any actual authorization in place, meaning that it is still fully accessible.
6. Server Initialization:
Finally, the application listens to incoming requests on a specified port ( `const PORT = 4000;` ), making the API accessible to clients. A console log message confirms the server’s successful launch.
This setup provides a functional Express app with SQLite for handling simple user data operations. It illustrates how to selectively document API endpoints using OpenAPI specifications, hiding methods from the spec that shouldn’t be publicly available. That being said, there still is a gap when it comes to the actual authorization of the PUT endpoint and is where the BFLA vulnerability exists.
Running The Code
Now that our code is complete, it’s time to run the application and bring up our API. To run your API, run the following command in a terminal pointed to the root of your project:
node app.js
Once the application is up and running, you’ll notice that the PUT /user/:id endpoint allows anyone to update user data by simply specifying a user ID in the URL. This is one simple example of a BFLA vulnerability that we will need to remediate.
Detecting The Vulnerability With StackHawk and HawkScan
Now that our code is set up and our API is running, let’s get StackHawk to identify this vulnerability for us automatically. To do this, you’ll need to ensure you have a StackHawk account. If you need one, you can sign up for a trial account or log into an existing account.
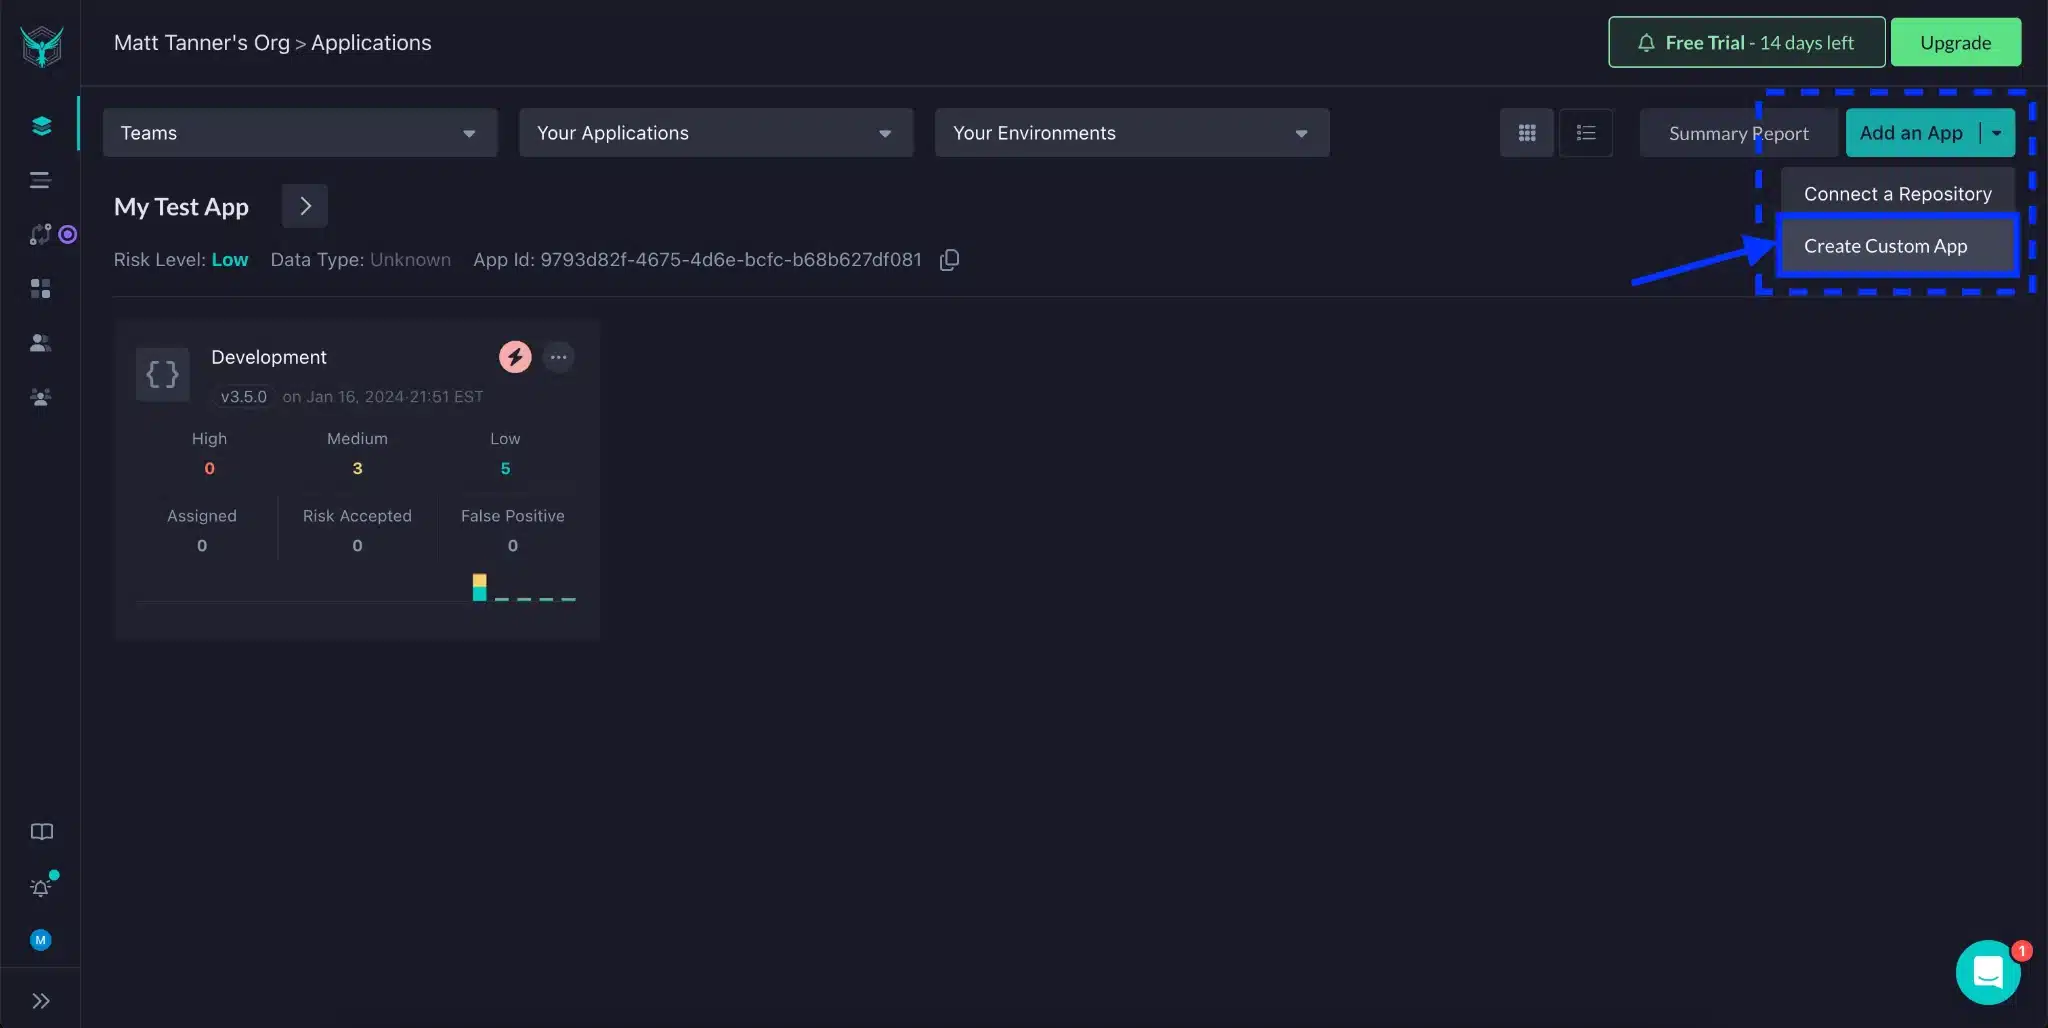
If you’re logging into an existing StackHawk account, from the Applications page, you’ll click Add an App -> Create Custom App
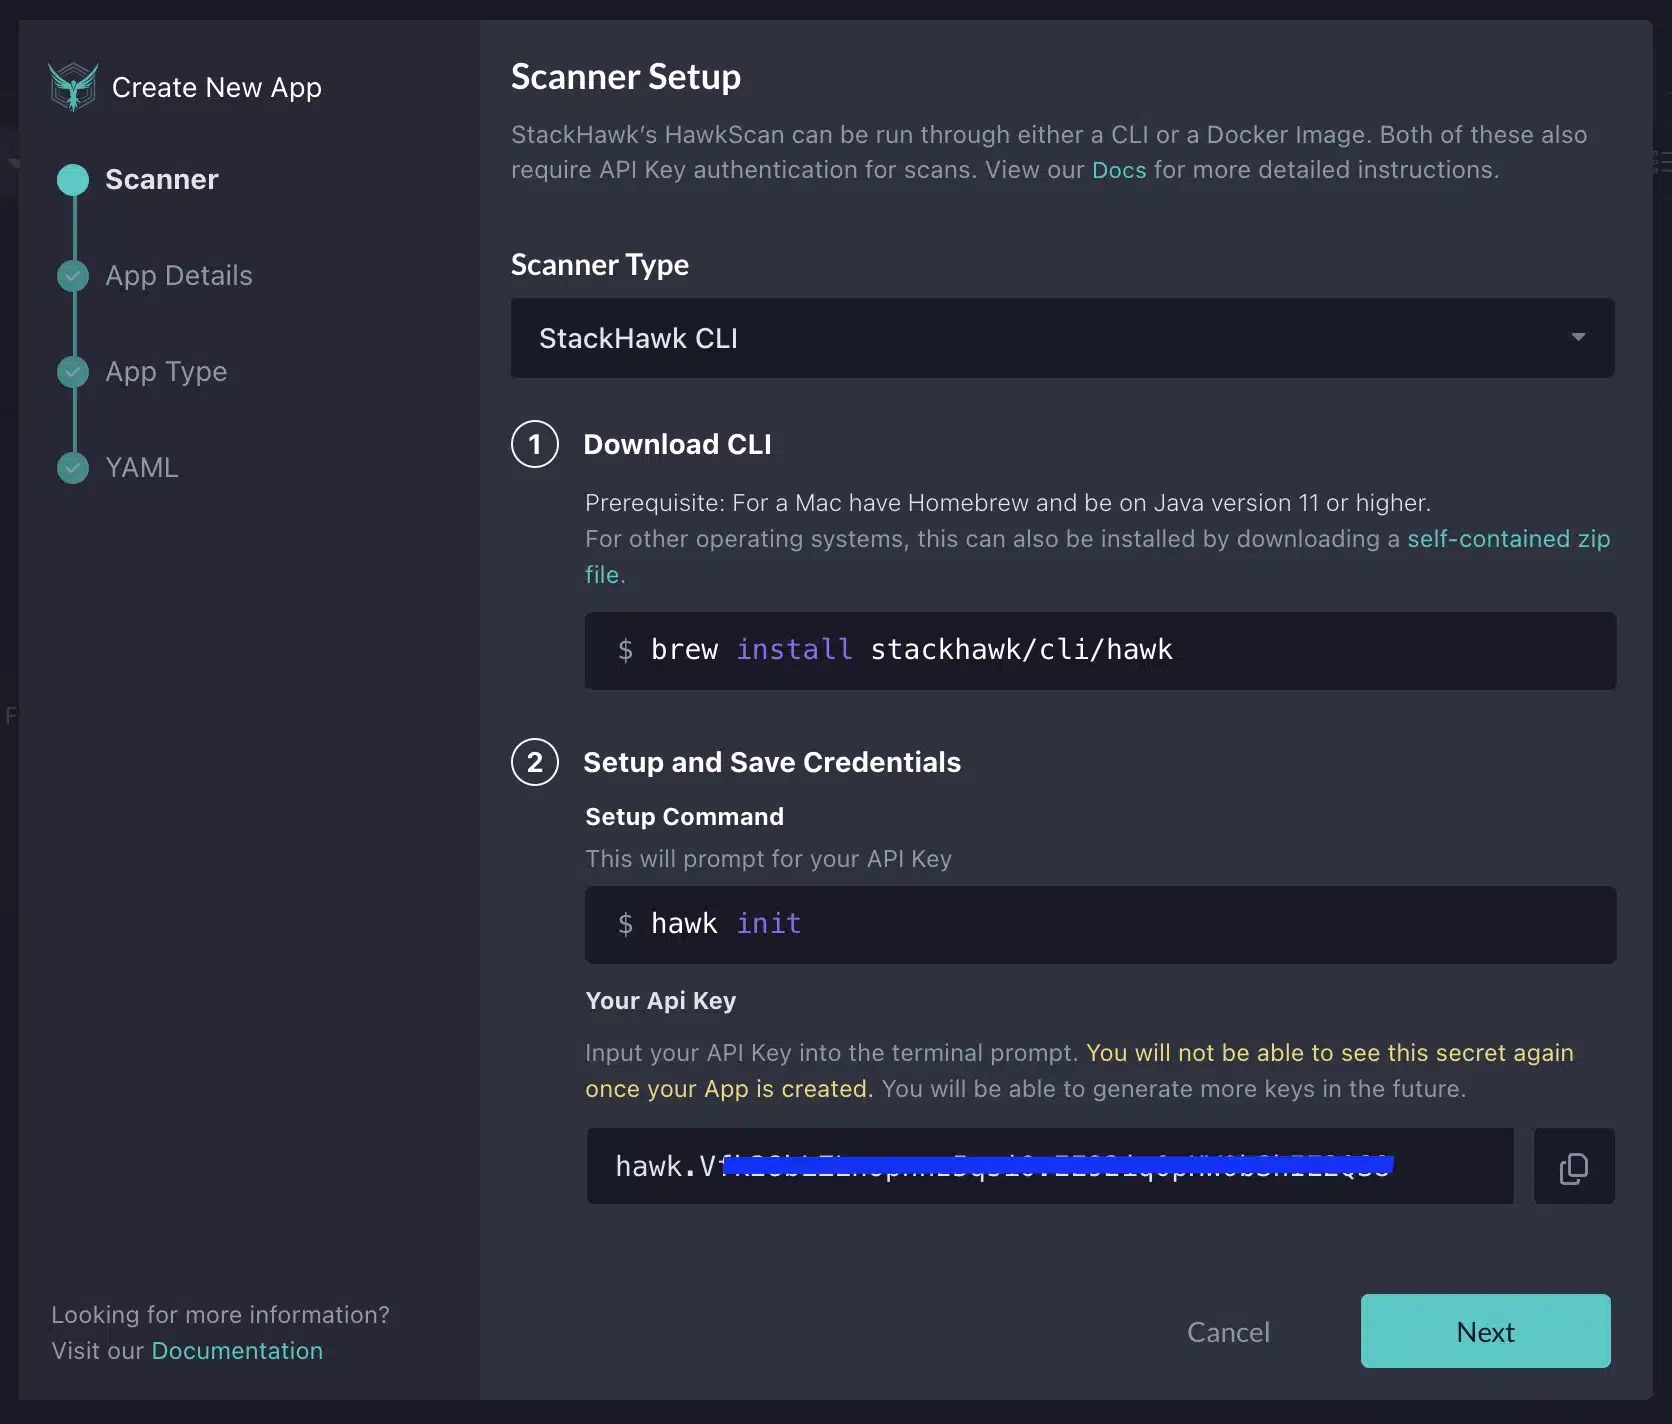
If you’re new to StackHawk, you’ll be automatically brought into the Add an App flow. On the Scanner screen, you’ll see the instructions for installing the StackHawk CLI. Since we will be running our testing locally, we will use this option. Once the hawk init command is executed successfully, click the Next button.
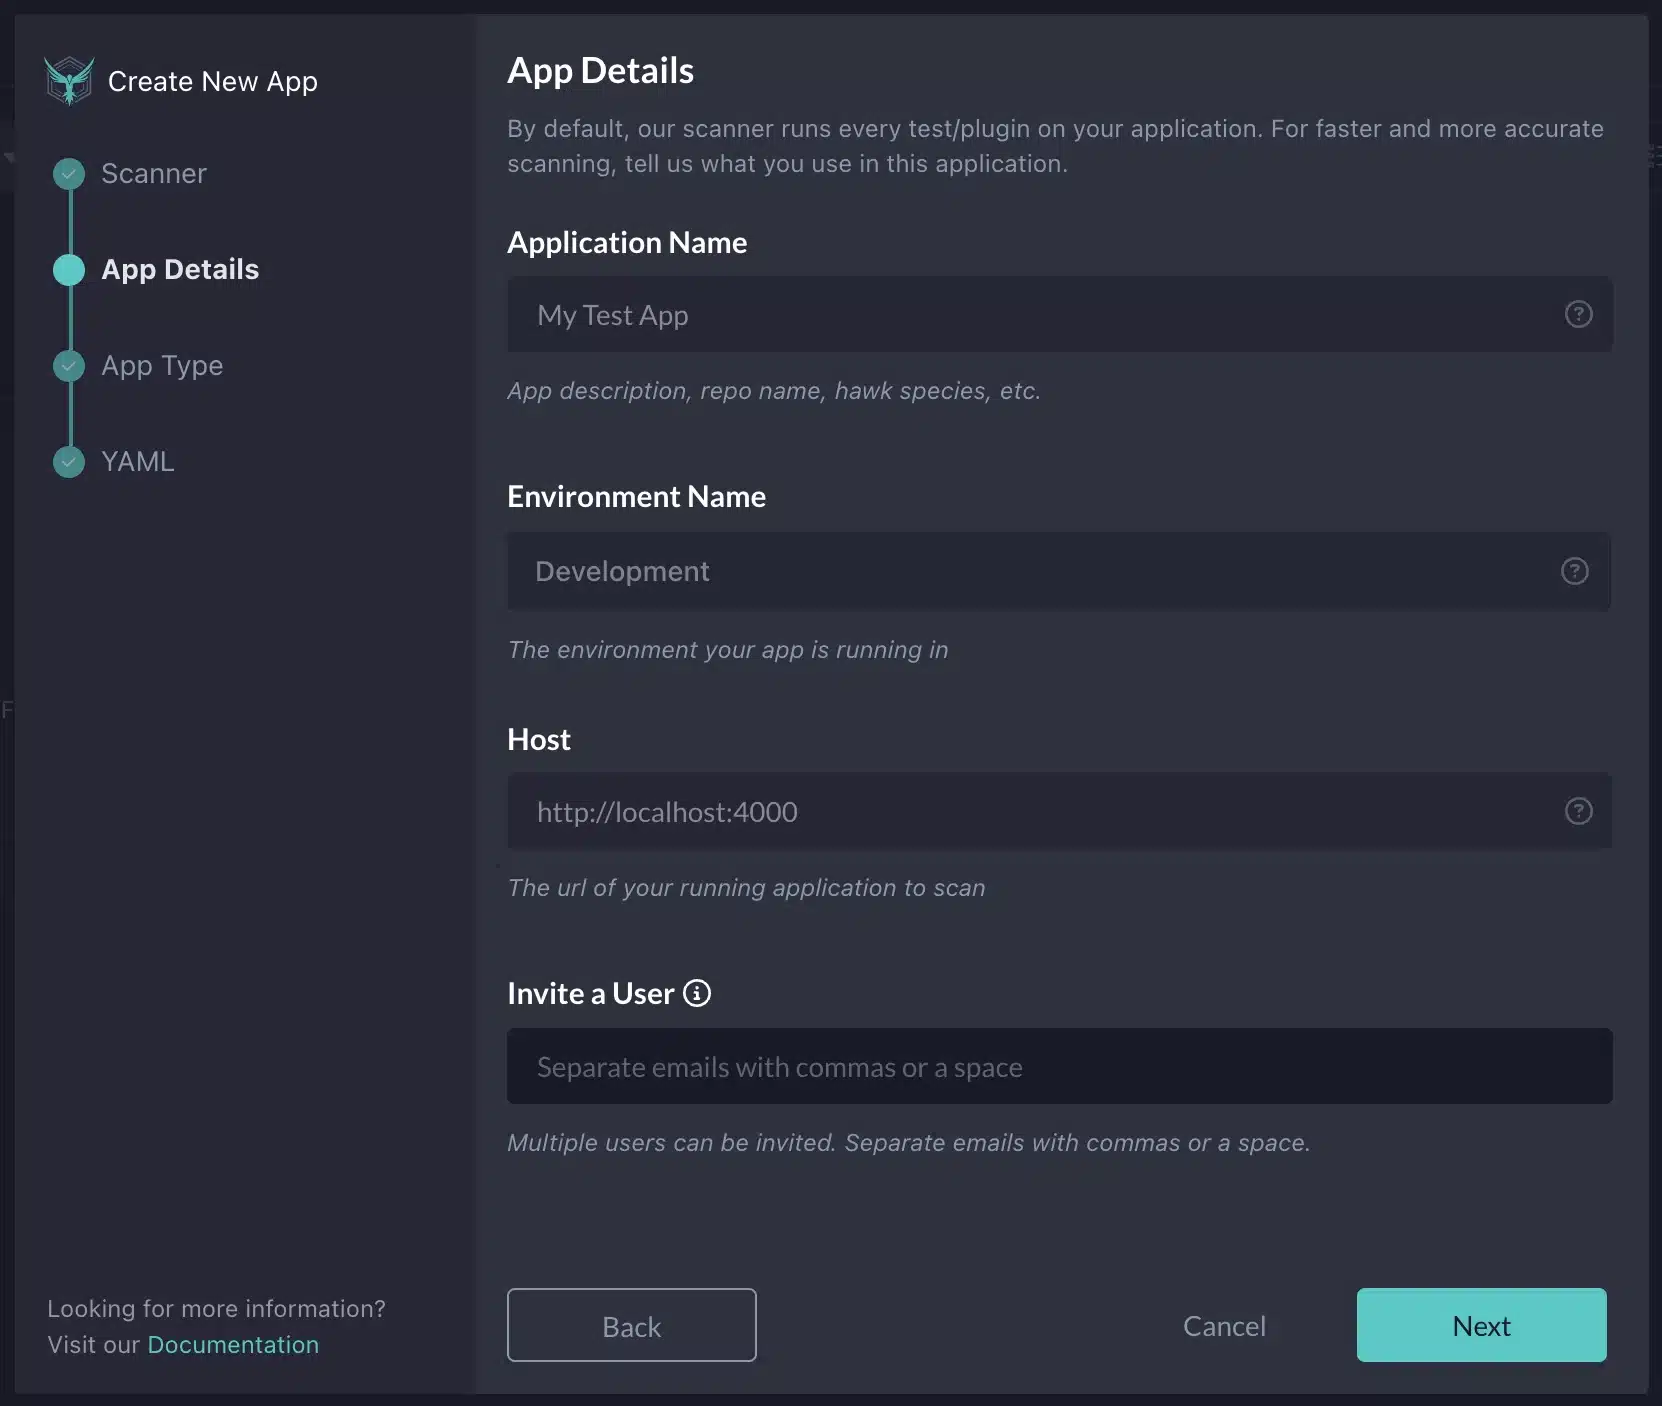
On the next screen, you will fill out an Application Name , Environment Name , and Host . Feel free to copy the default values I’ve added in the screenshot below for our purposes. Once filled out, click Next .
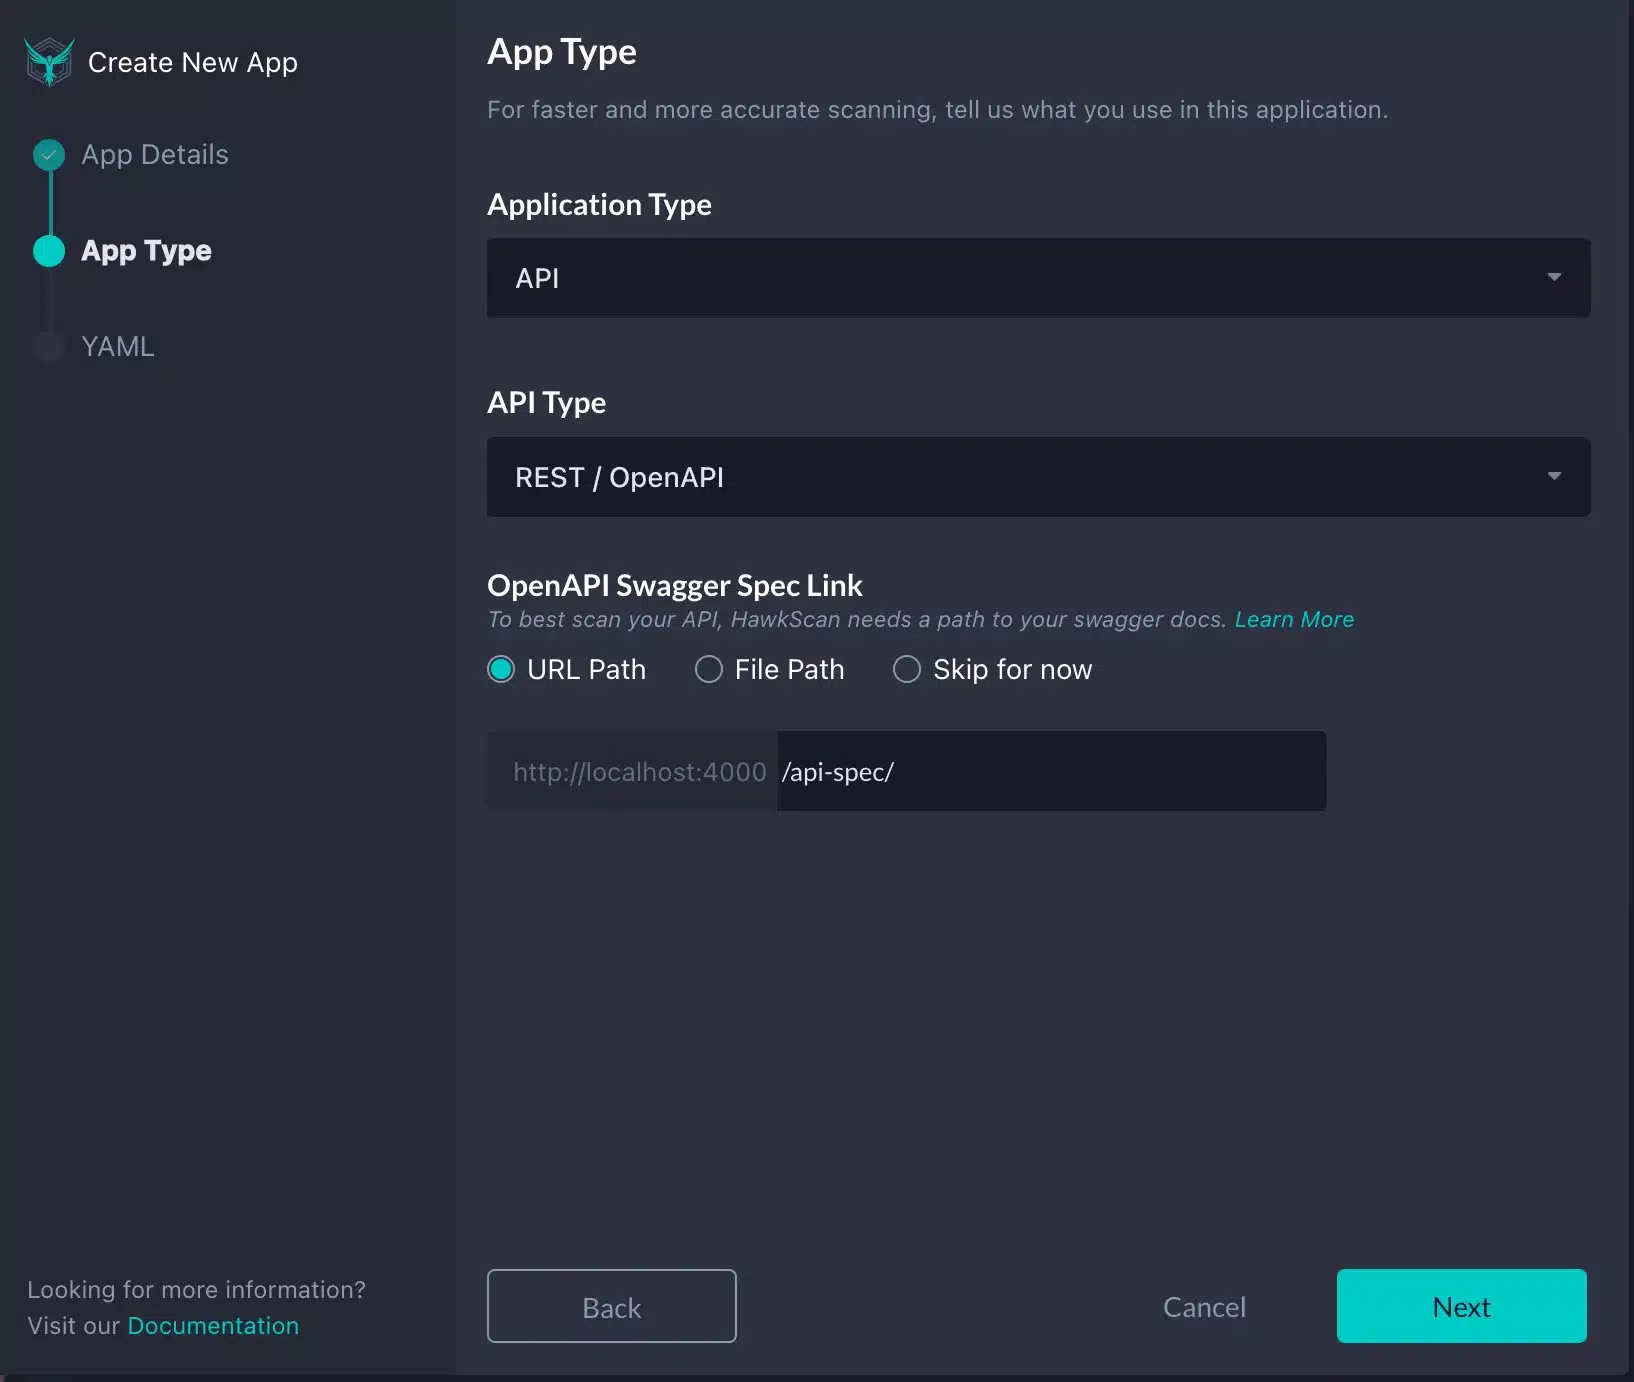
Since we will be testing a RESTful API, on the next page, we will choose our Application Type as “API”, the API Type as “REST / OpenAPI”, and point to our OpenAPI Specification file by selecting URL Path and adding in our endpoint, /api-spec/ , into the textbox. Once complete, click Next .
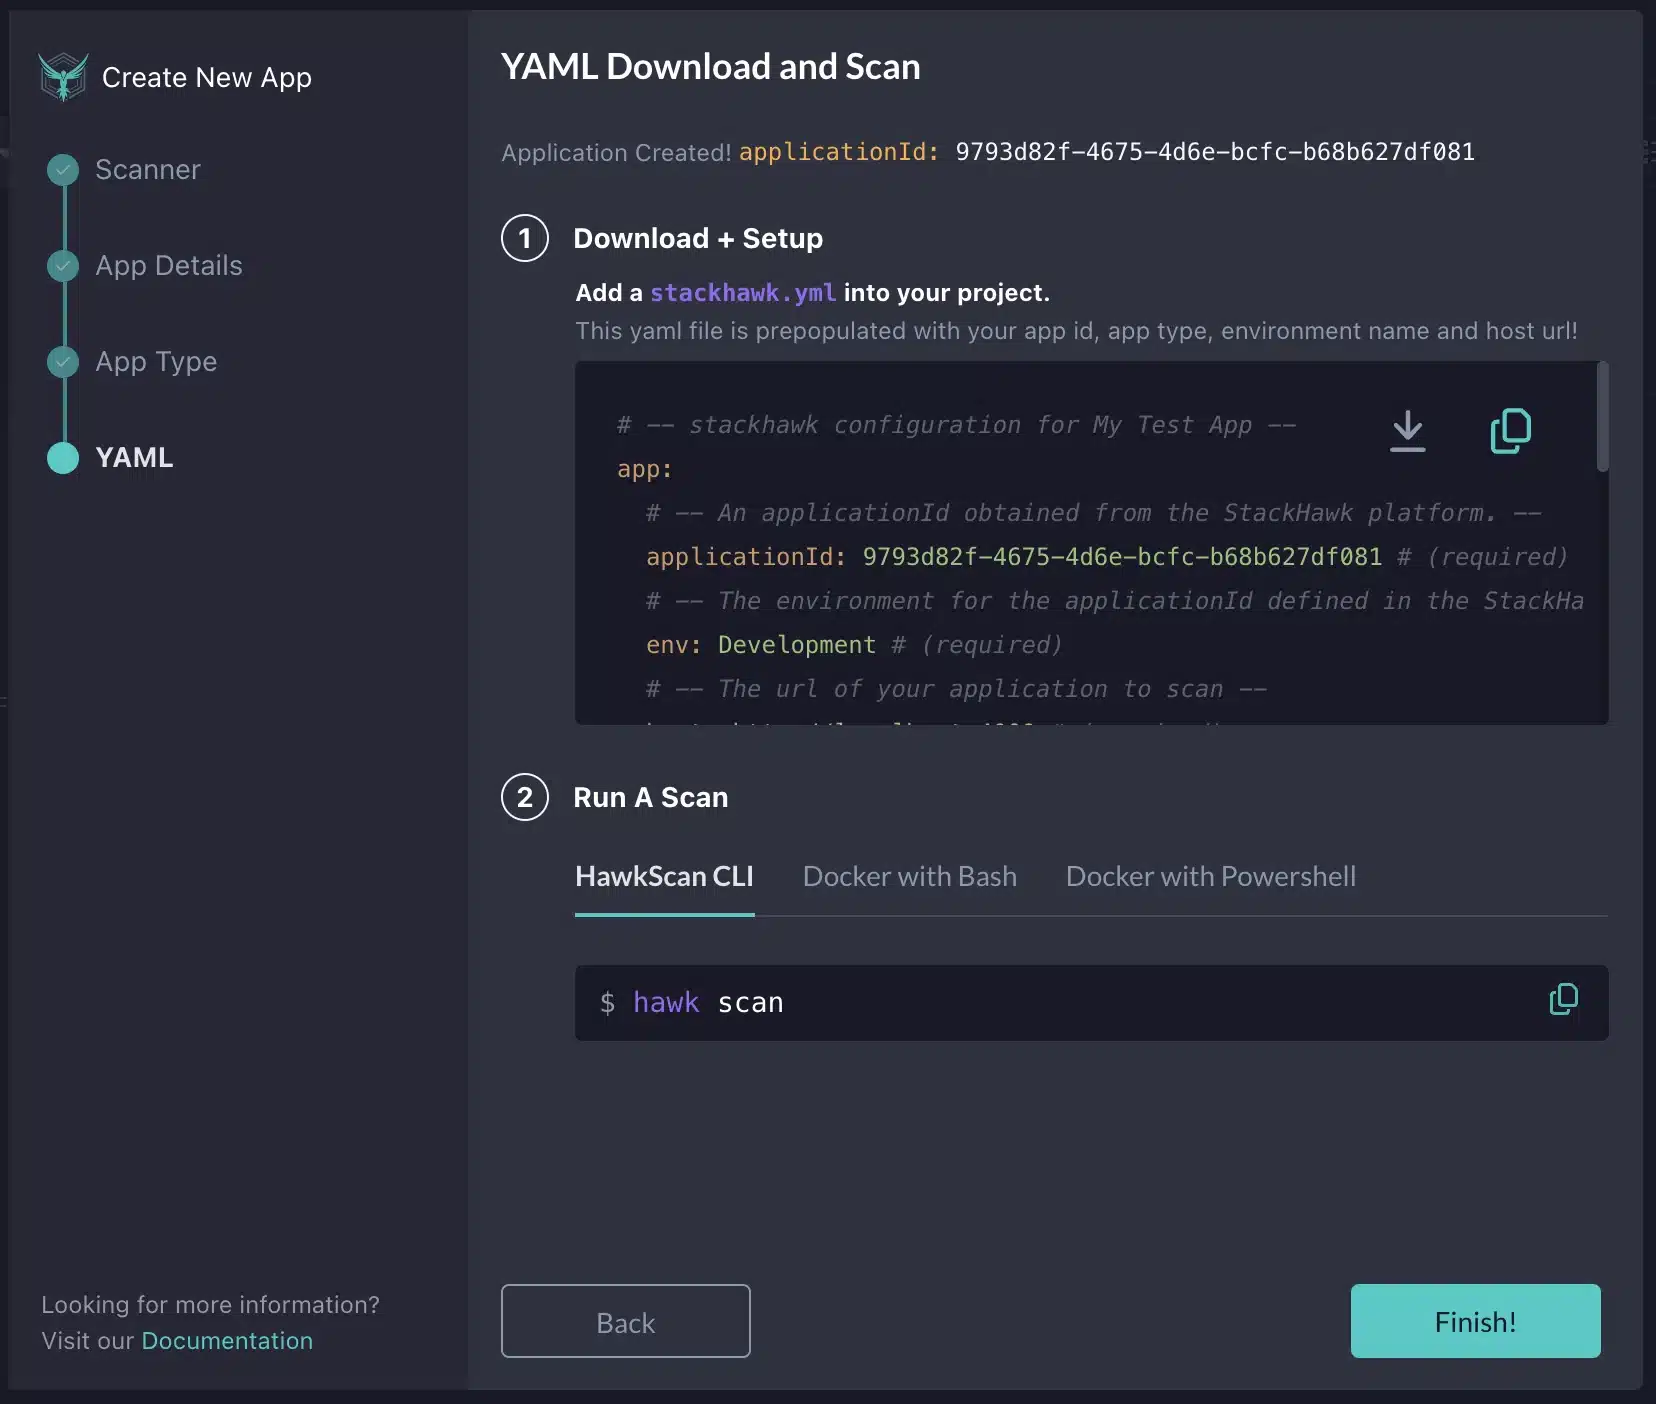
Lastly, we will need to add a stackhawk.yml file to the root of our project. Once the file is added, copy the screen’s contents, paste it into the file, and save it. Lastly, we can click the Finish button.
Enabling BFLA Detection in HawkScan
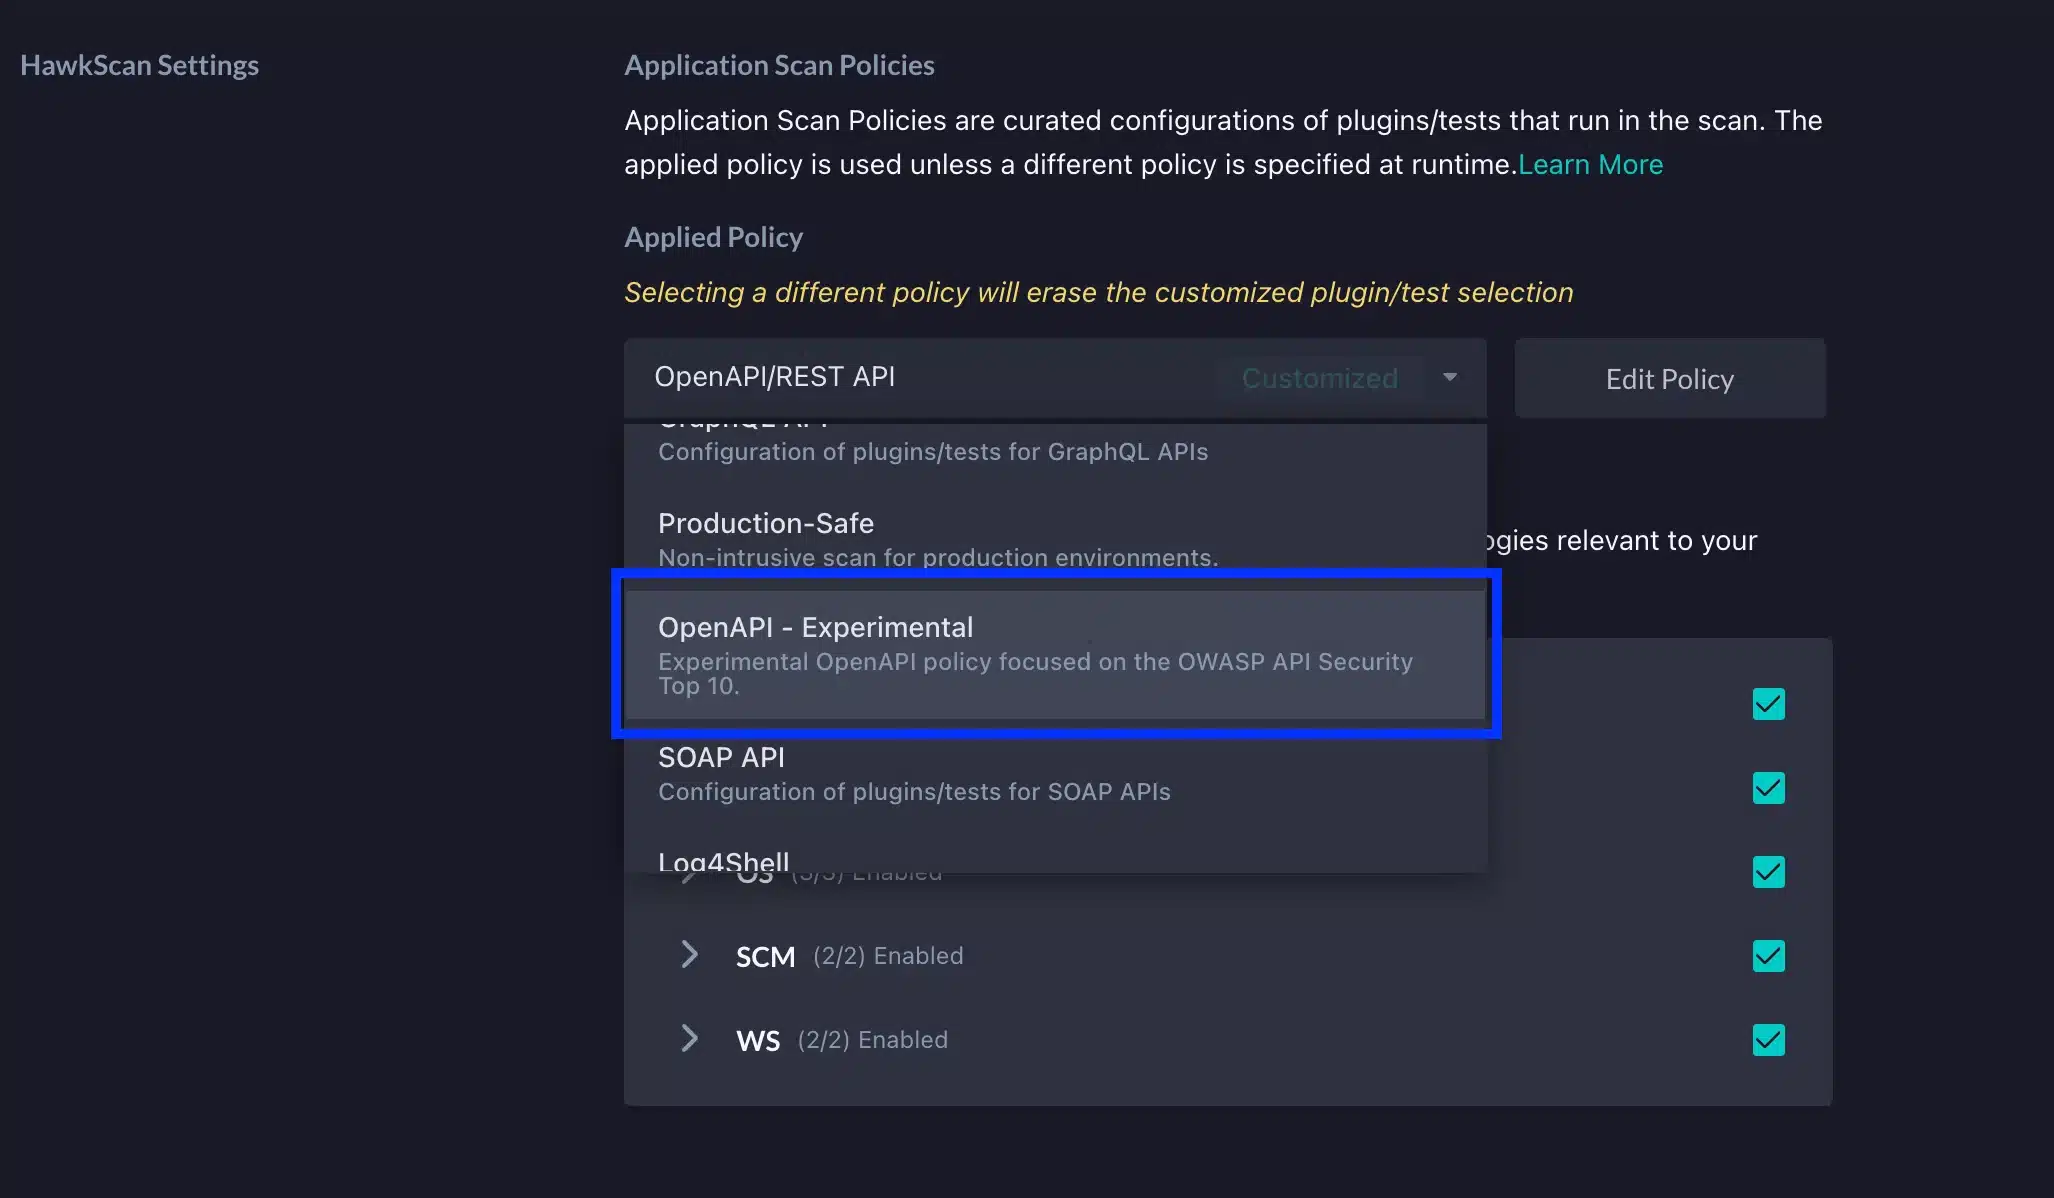
After creating the app in StackHawk, we need to do a few more steps to enable BFLA detection in StackHawk. Two ways to do this are using the ” OpenAPI – Experimental ” policy or customizing an existing policy. The ” OpenAPI – Experimental ” policy allows users to scan for the vulnerabilities outlined in the OWASP API Security Top 10.
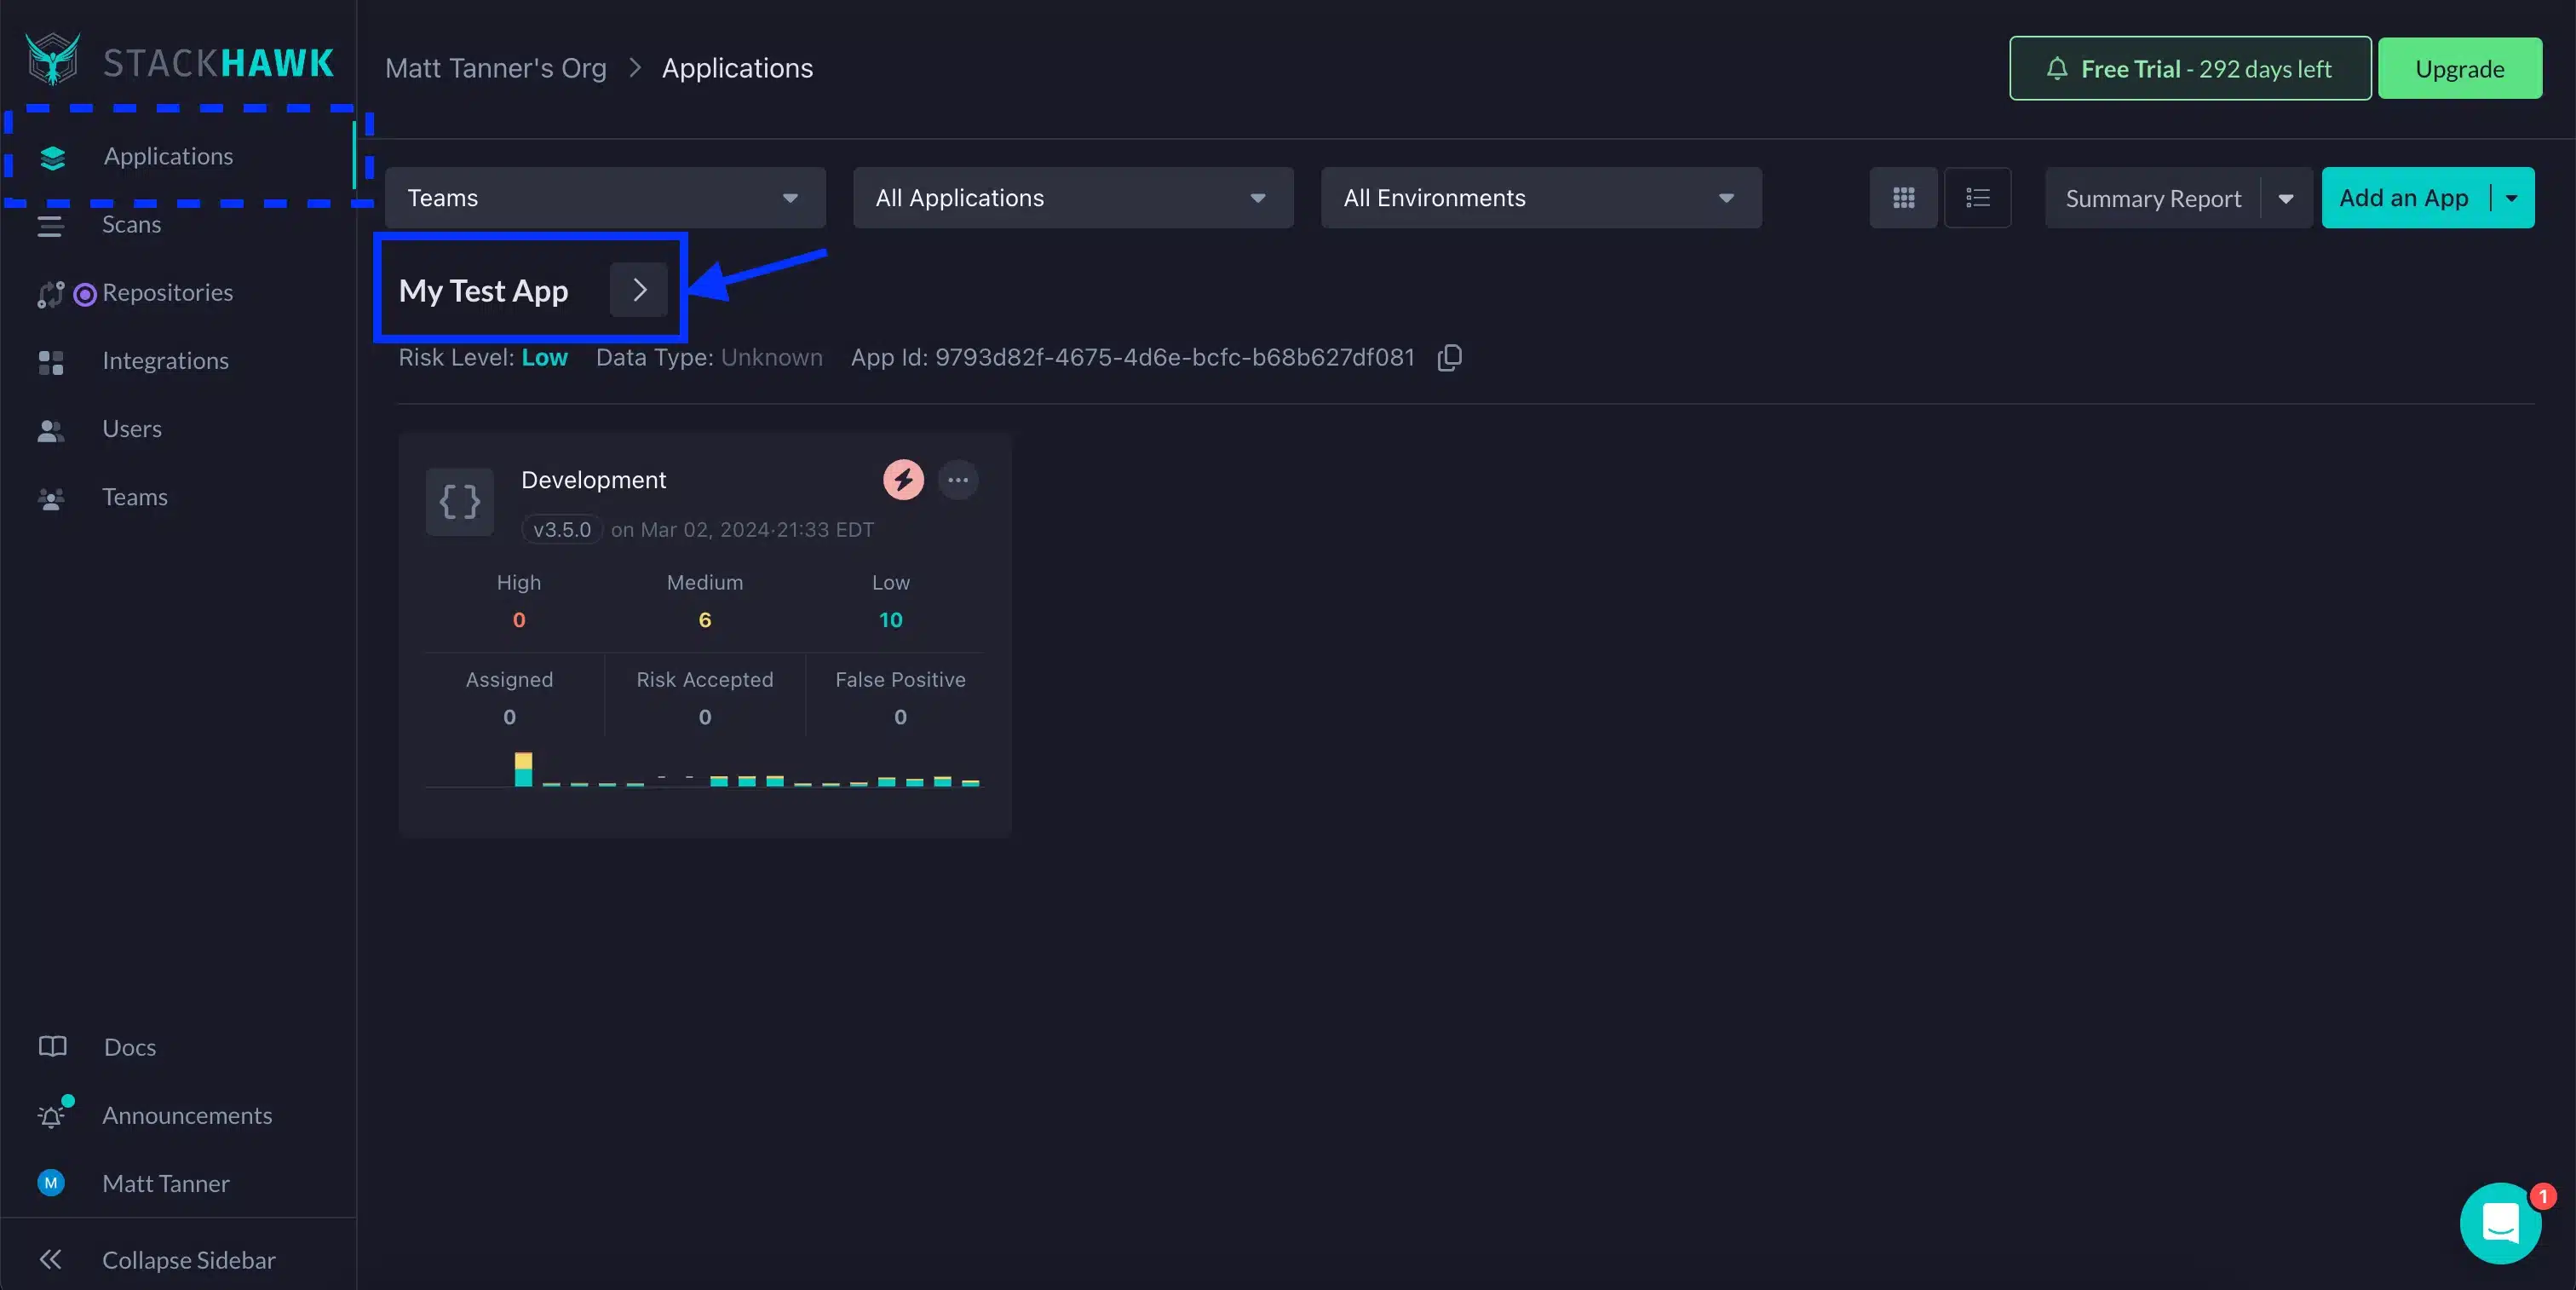
To set HawkScan up with the ” OpenAPI – Experimental ” policy, you will log into StackHawk, go to the Applications screen, and click on the settings link for your application.
Next, on the Settings screen, under HawkScan Settings , click the Applied Policy dropdown and select the ” OpenAPI – Experimental ” policy.
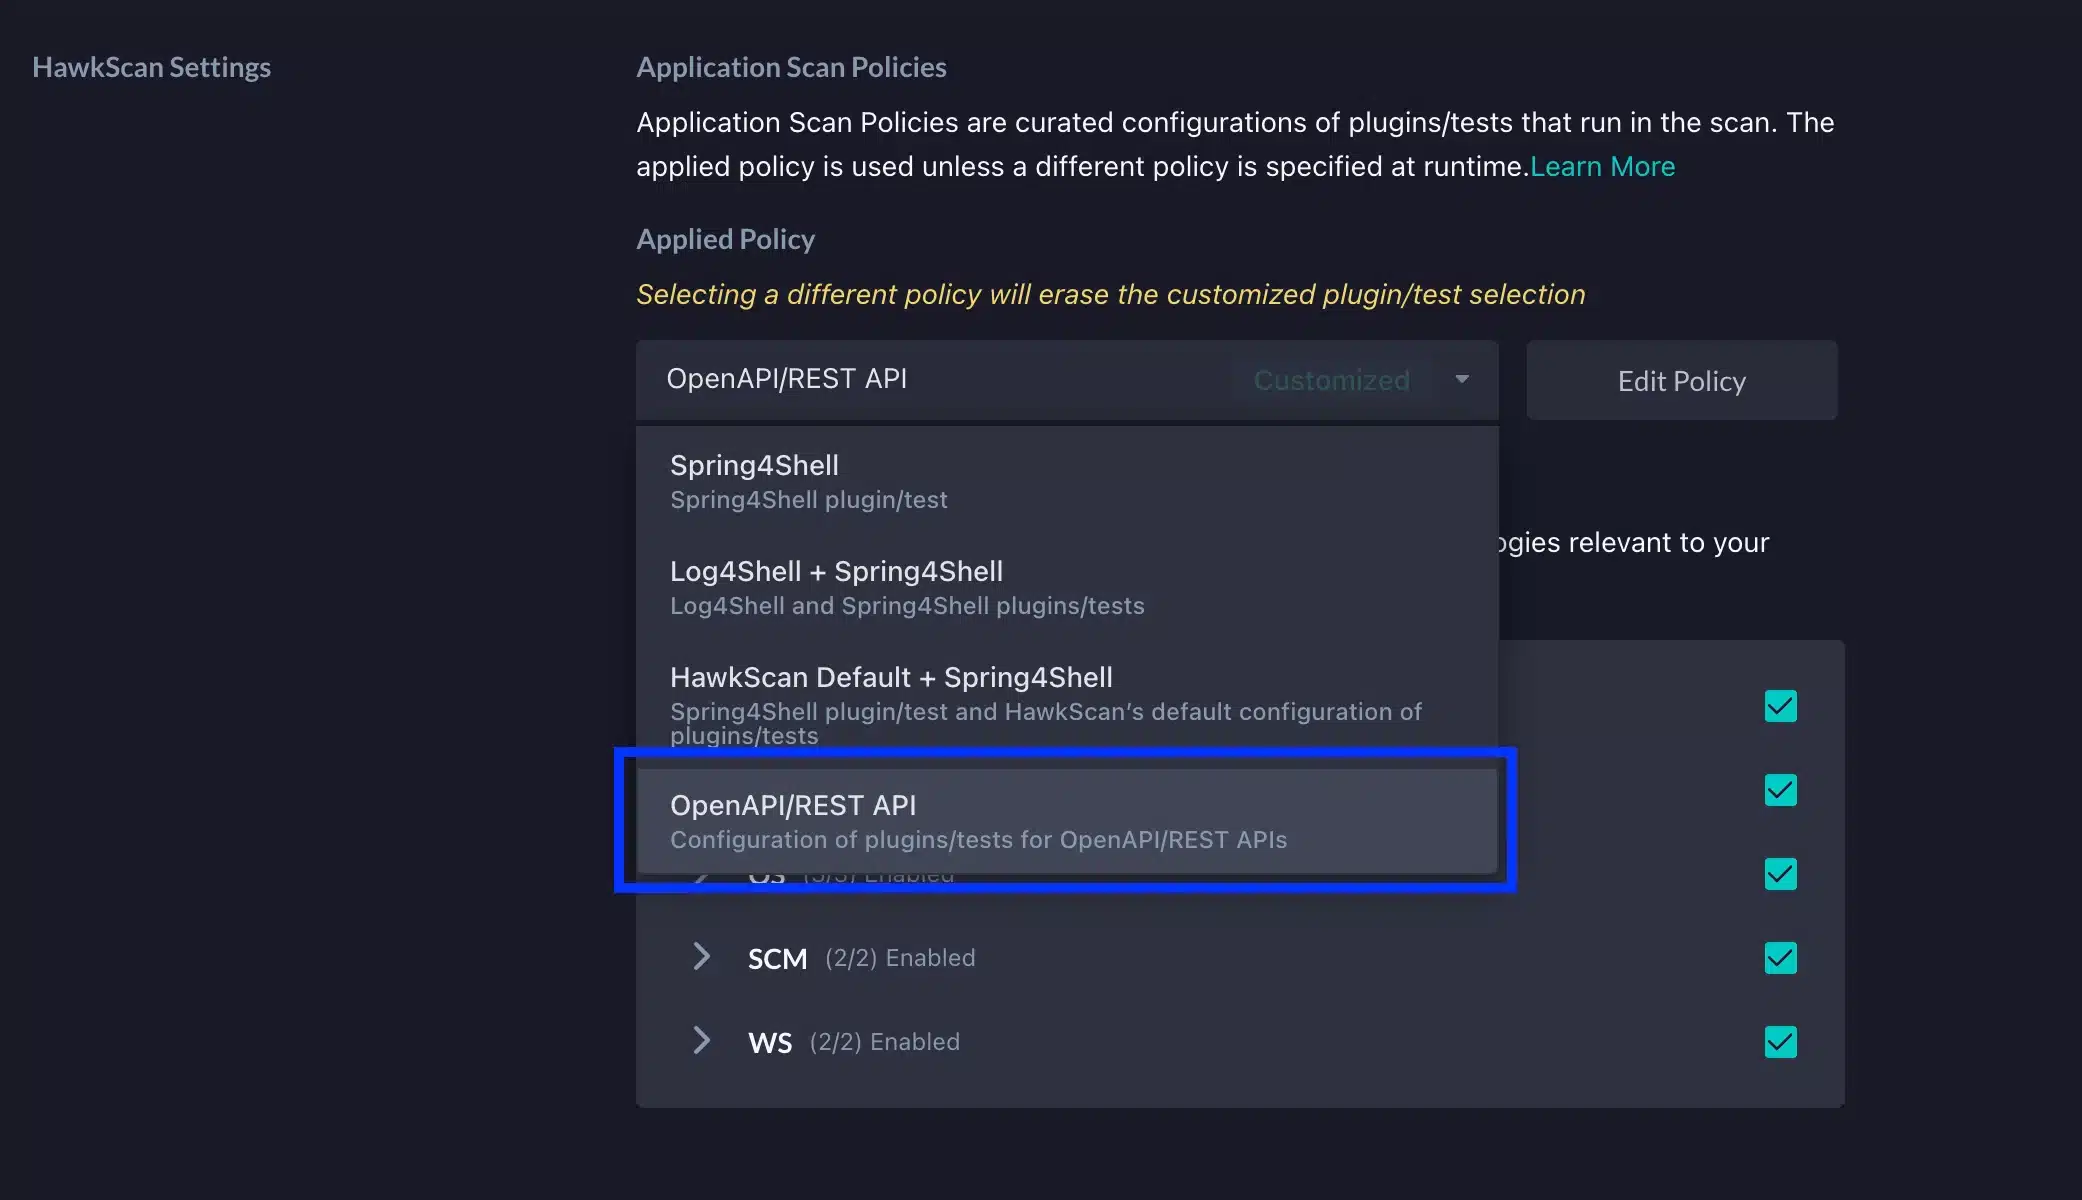
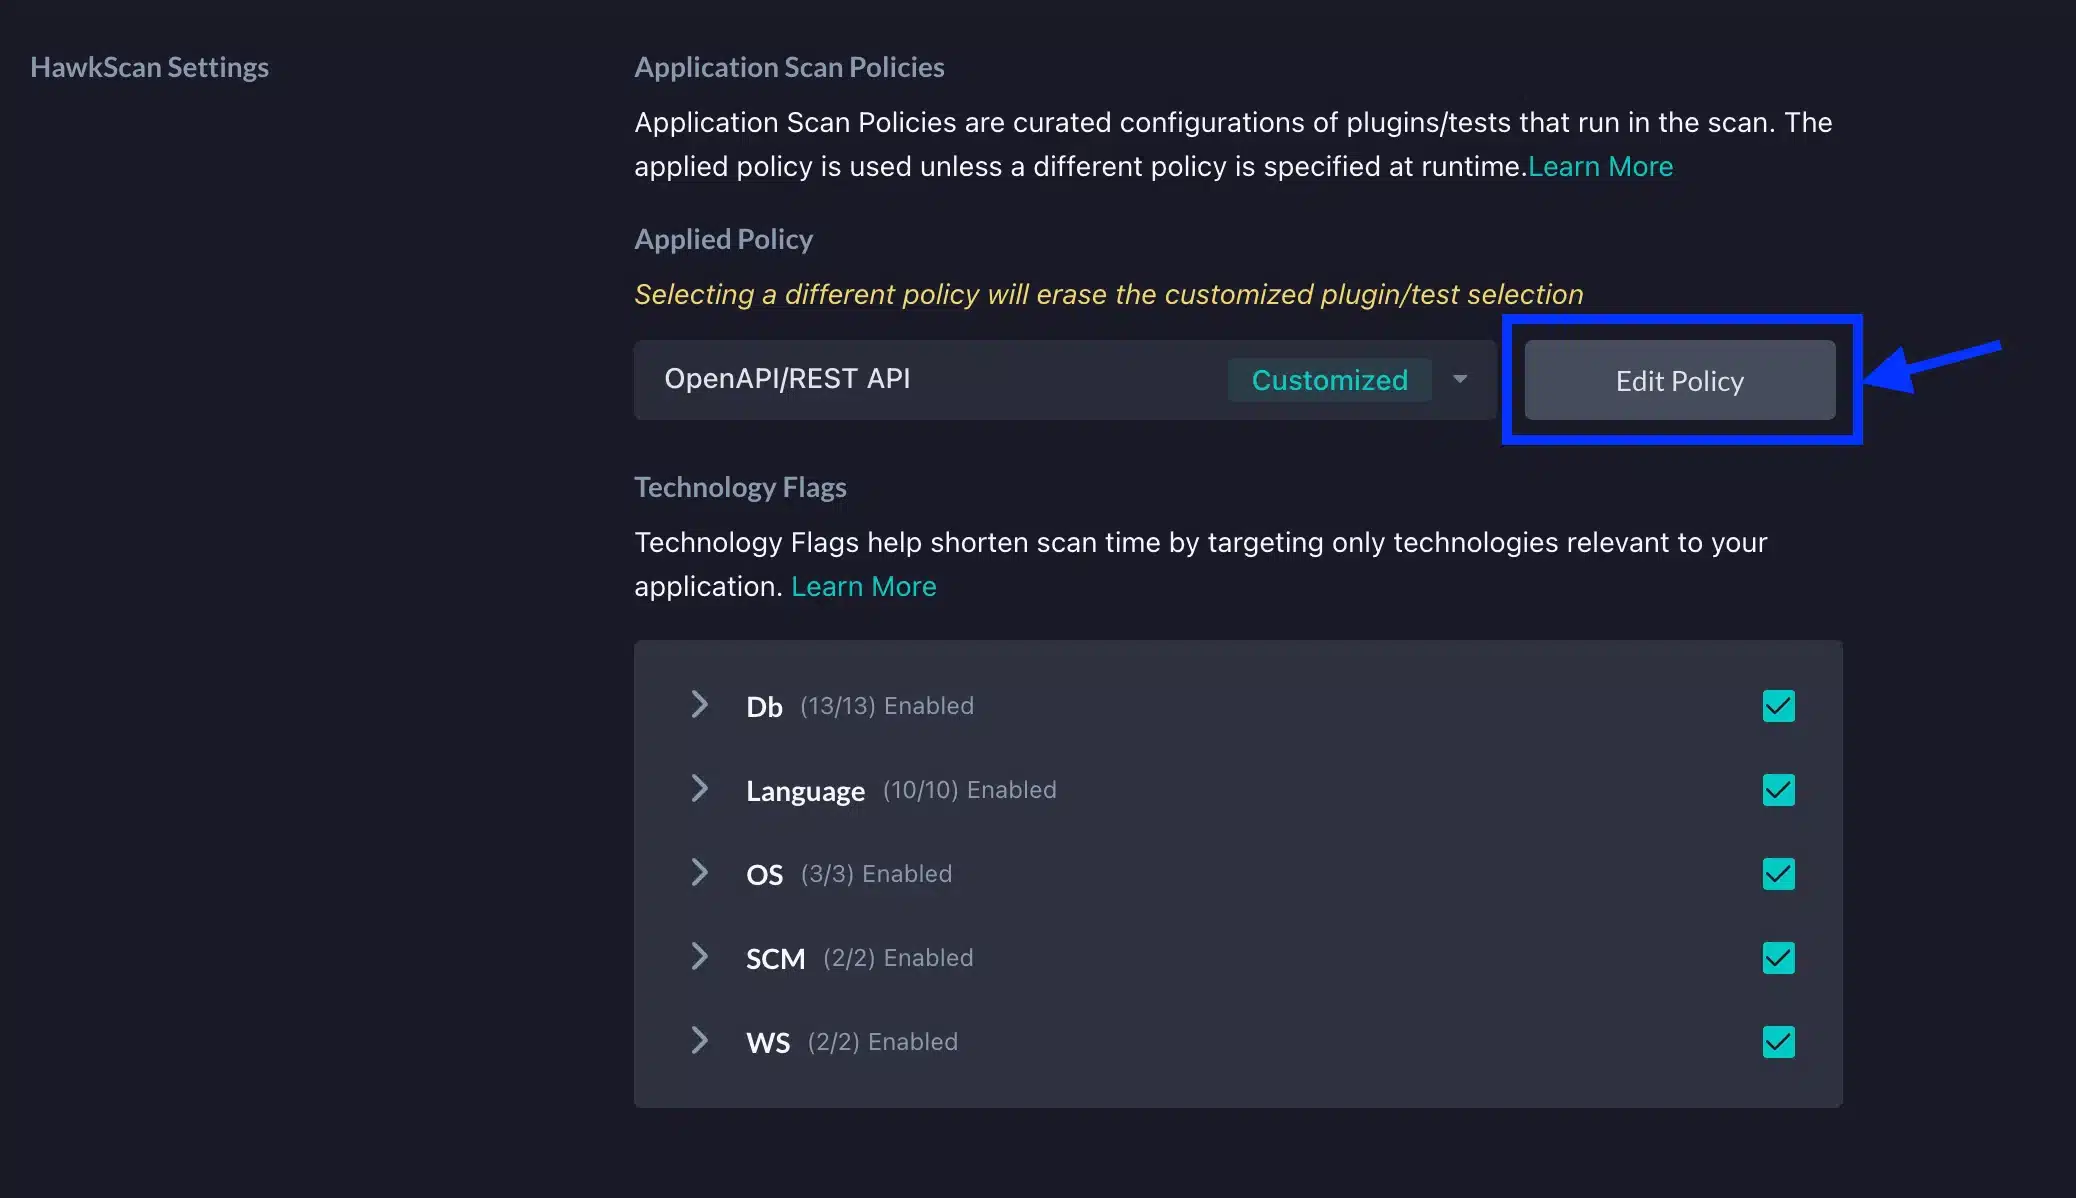
At this point, you can then run HawkScan and begin detecting potential BFLA vulnerabilities. Of course, another way to do this is to simply customize an existing policy to scan for BFLA vulnerabilities. To show how this can be done, we can navigate to the same HawkScan Settings section that we looked at above. From here, we will select the ” OpenAPI/REST API ” policy from the Applied Policy dropdown.
Next, click the Edit Policy button right beside the dropdown.
On the next screen, under the Plugins and Tests section, click on the BFLA entry to enable HawkScan to execute tests for potential BFLA vulnerabilities.
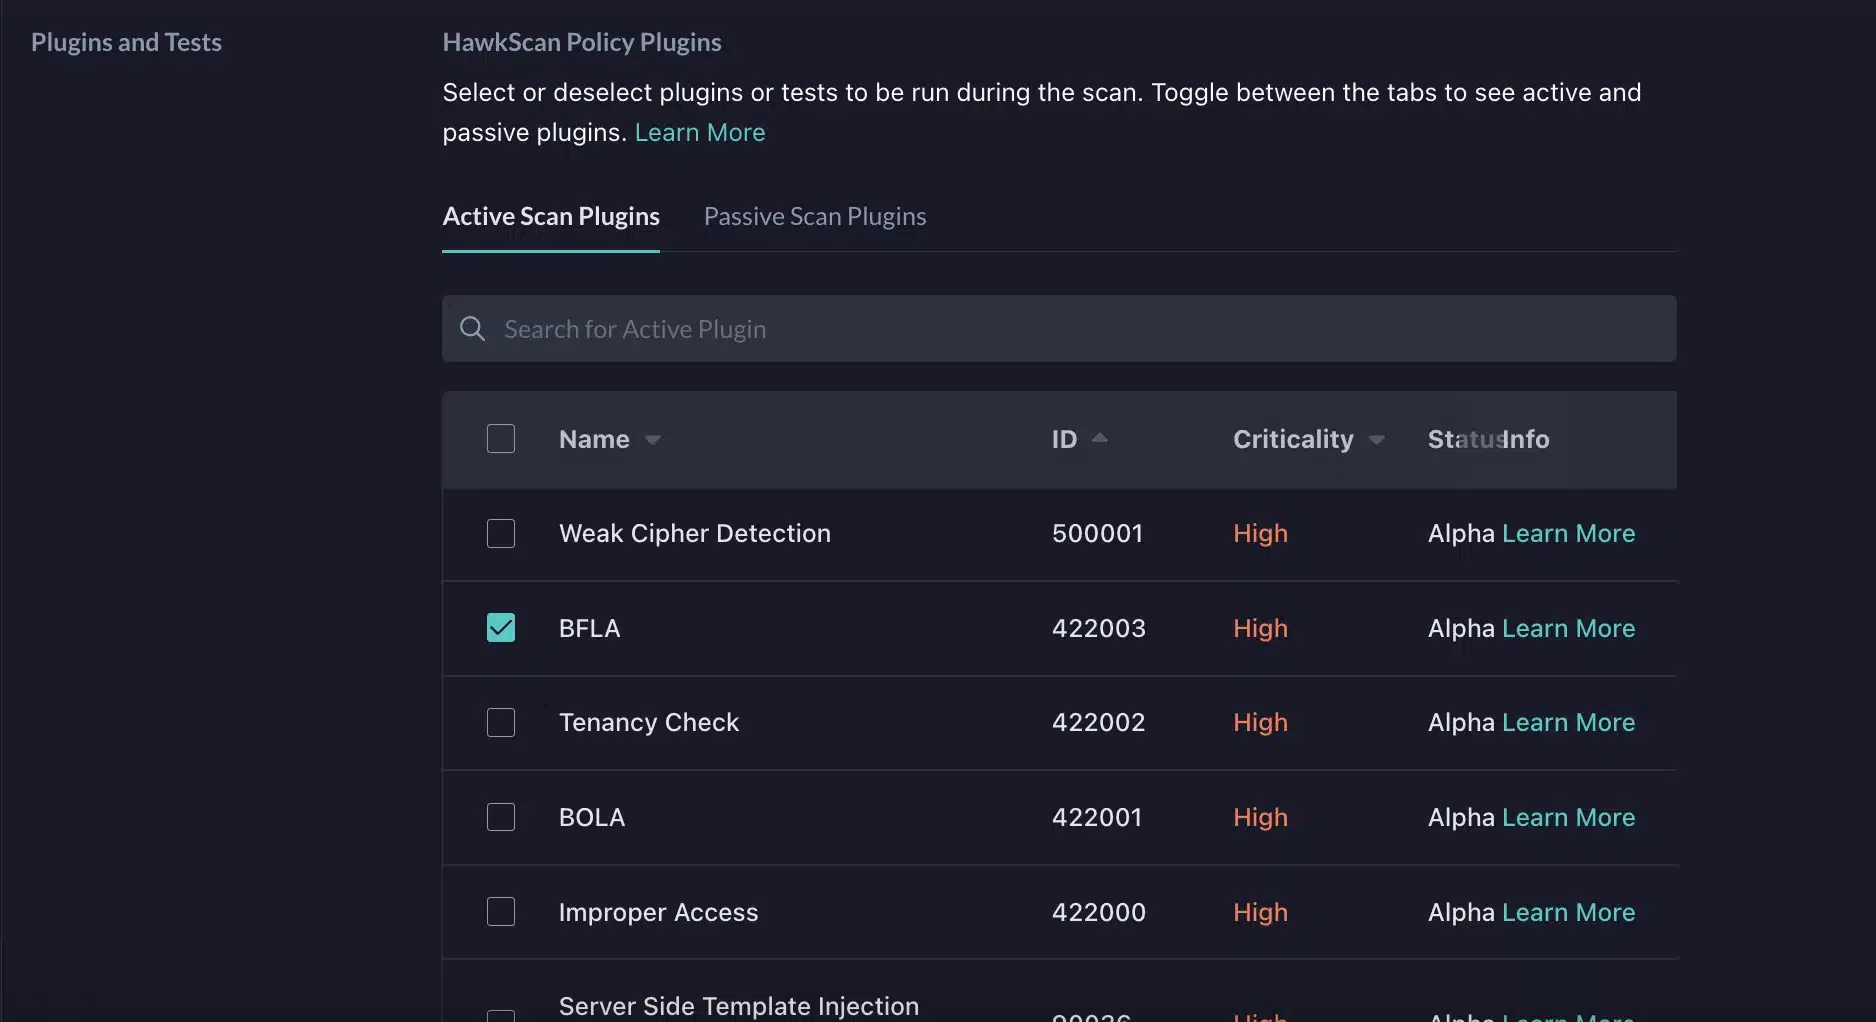
Now, with our application set up in StackHawk, our stackhawk.xml has been added to the root of our API project, and BFLA detection has been enabled, we can finally test our application.
Run HawkScan
To test our application, in a terminal pointing to the root of our project, we will run HawkScan using the following command:
hawk scan
After running the command, the tests should execute in the terminal.
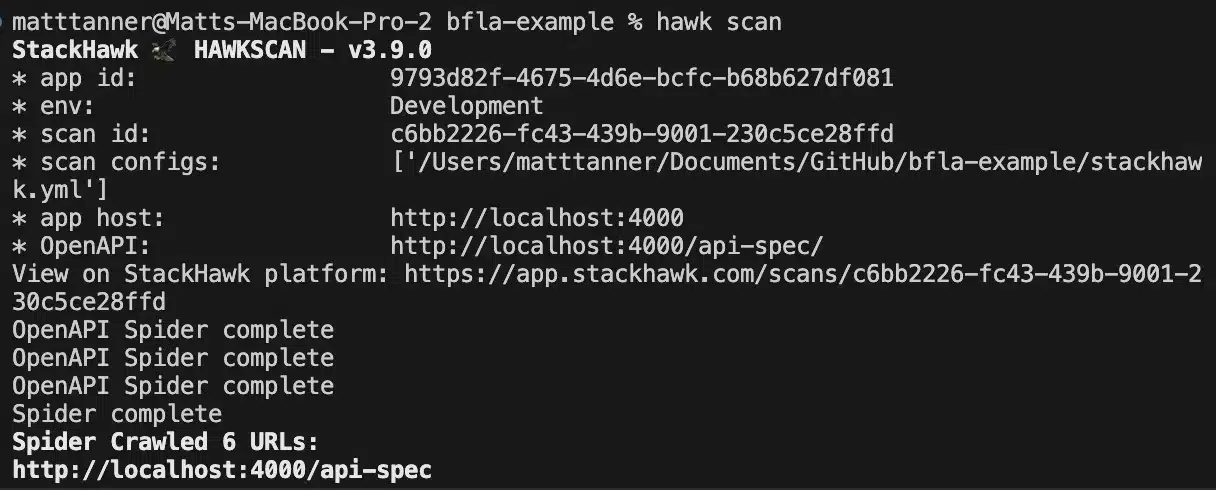
This will run tests against our API based on the OpenAPI spec using the OpenAPI Spider provided by StackHawk.
Explore The Initial Findings
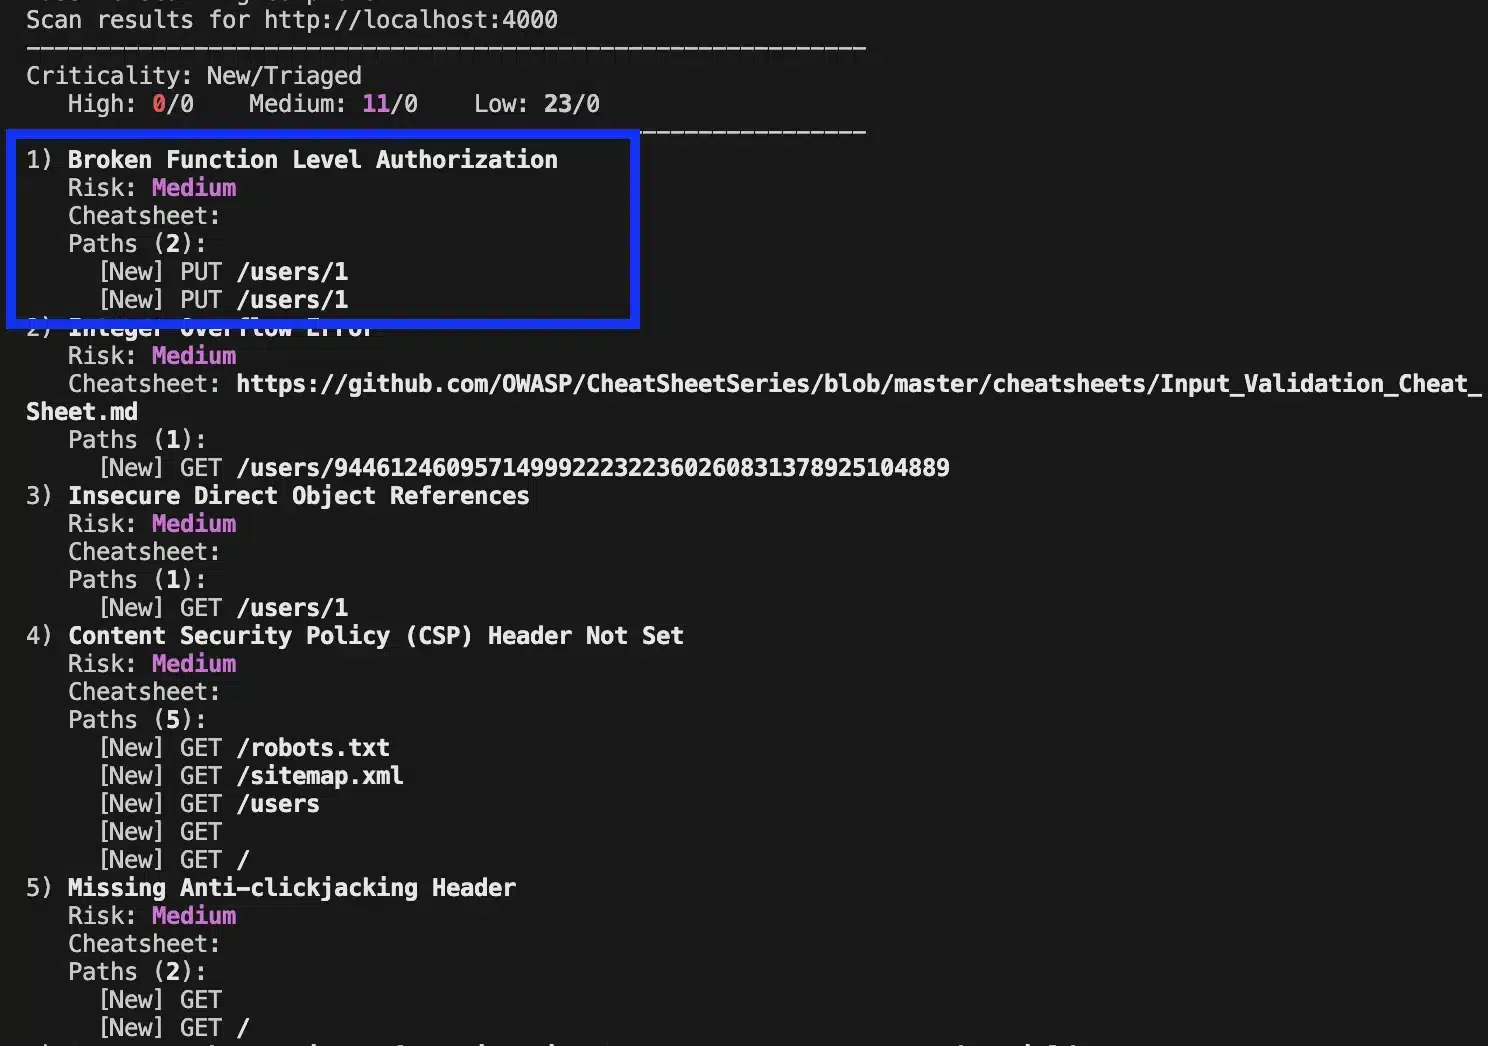
Once the tests are complete, the terminal will contain some information about any vulnerabilities found. Below, we can see that it has identified the BFLA vulnerability that we introduced in the code. To explore this further, we will click on the test link at the bottom of the output. This will take us into the StackHawk platform to explore further.
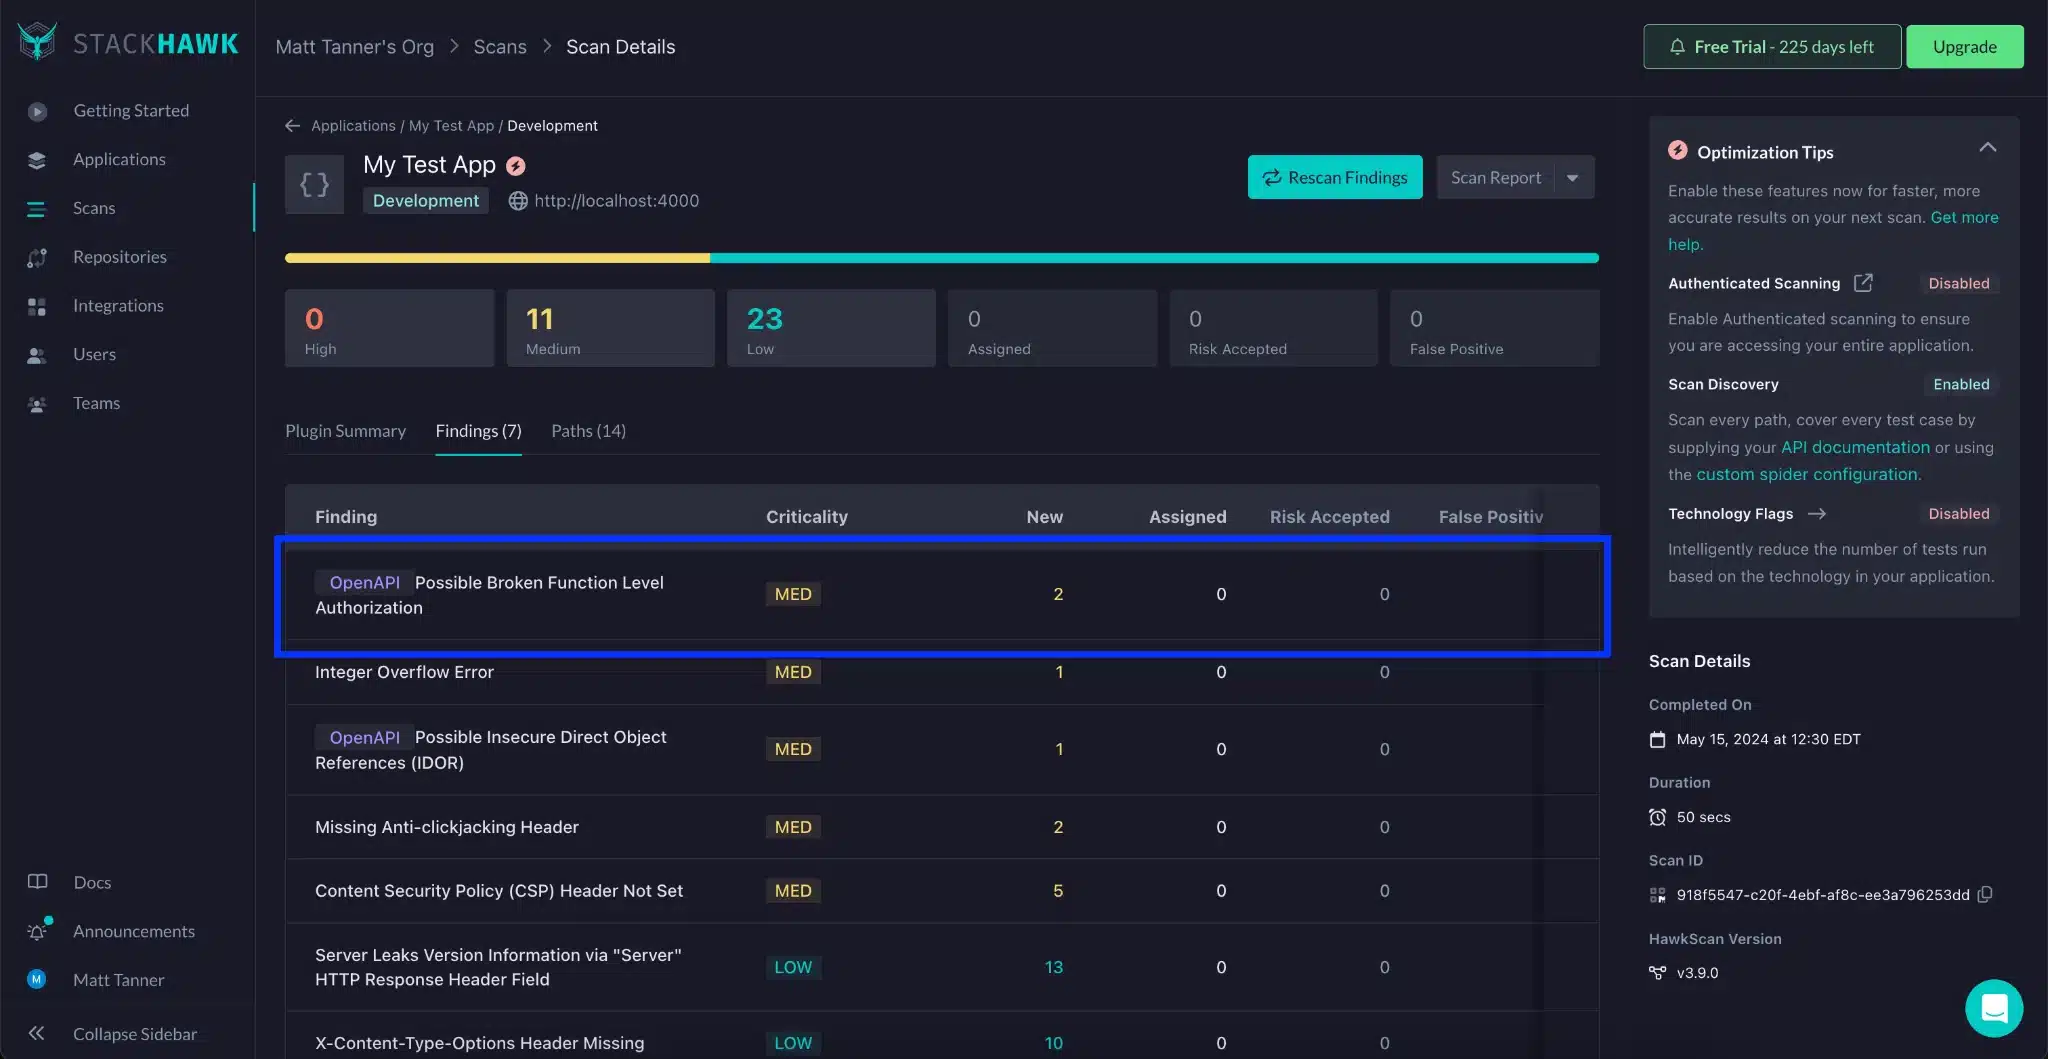
After clicking on the link, we can now see the test results nicely formatted. Next, we will click on the Possible Broken Function-Level Authorization (BFLA) entry.
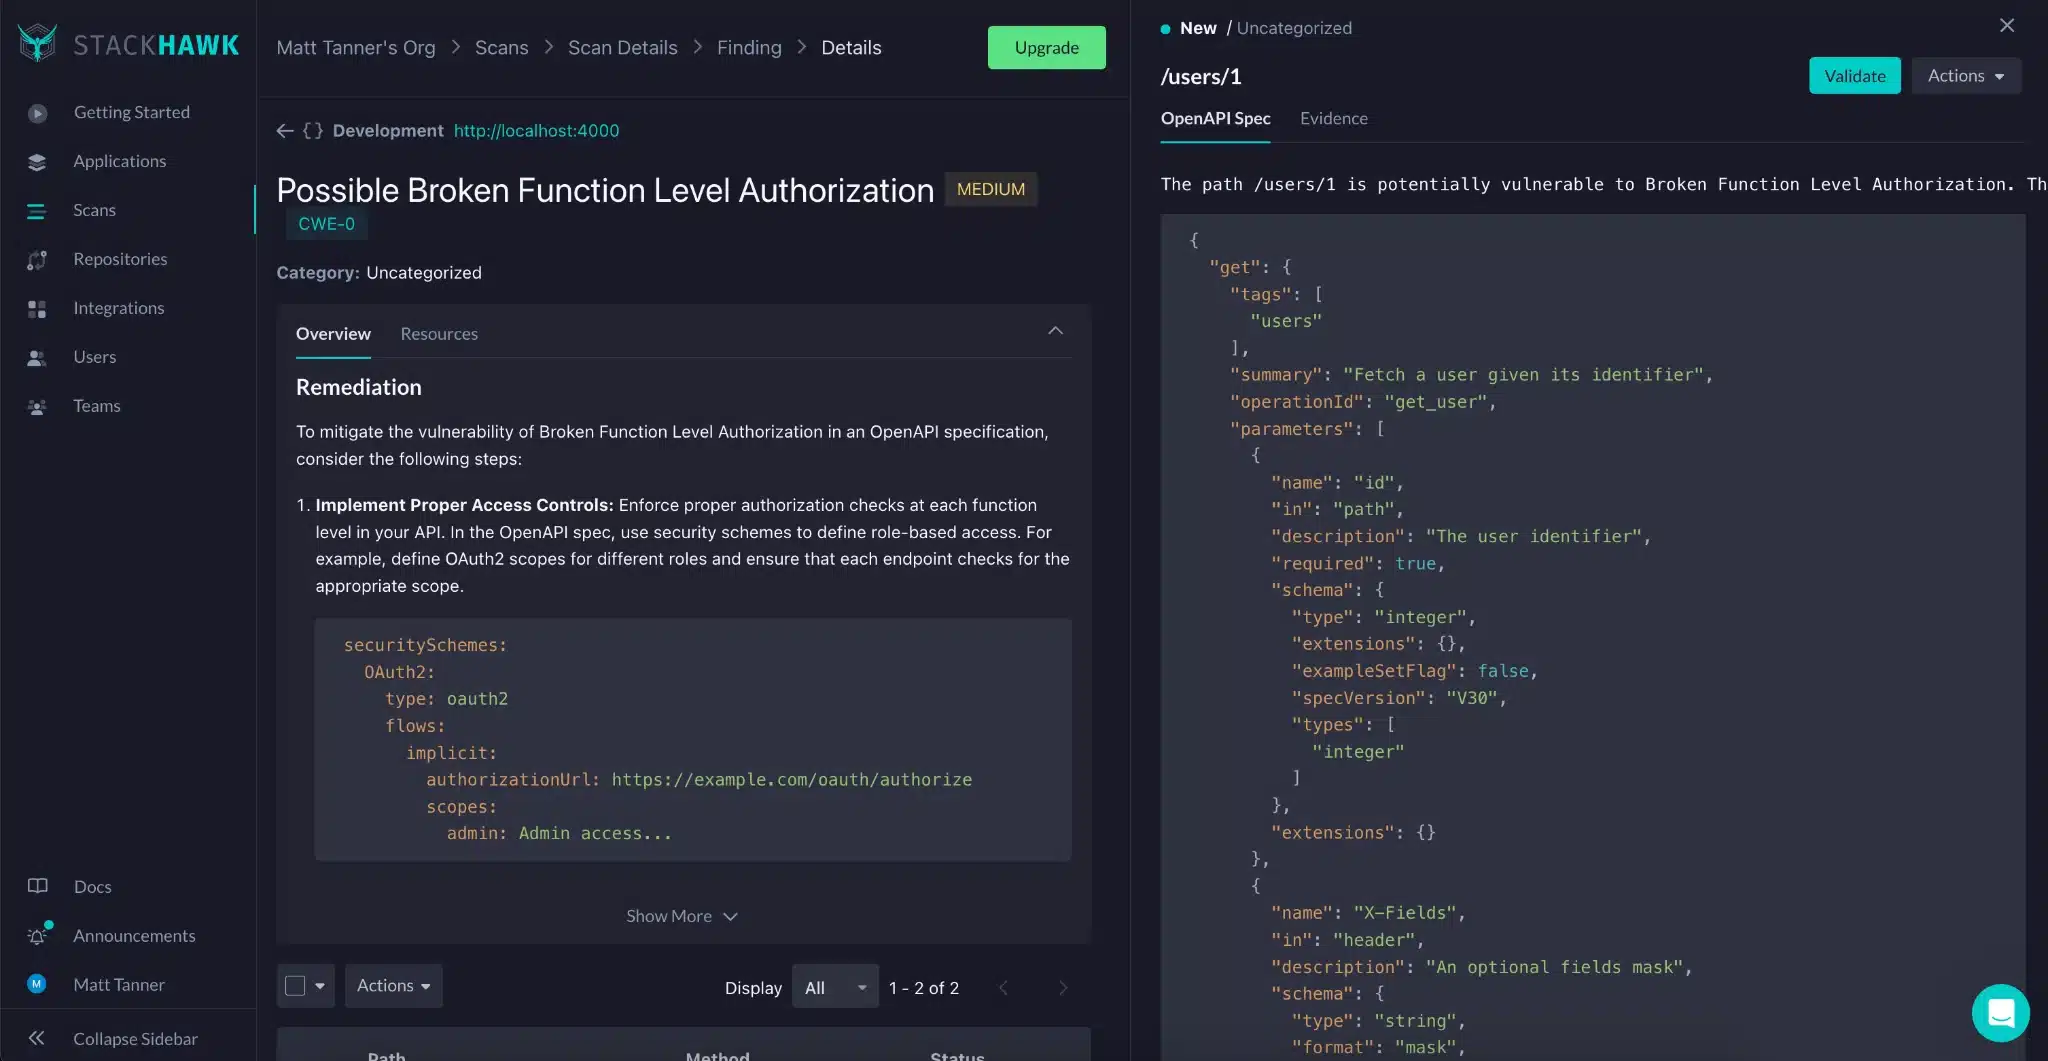
Within this entry, we can see an Overview and Resources that can help us with fixing this vulnerability as well as the Request and Response that the API returned. Above this, you will also see a Validate button, which will display a cURL command with the exact API request used to expose the vulnerability.
Fixing The BFLA Vulnerability
To fix the BFLA vulnerability in the Node.js API, you must implement authentication and authorization checks. This will ensure that users can only access the endpoints that their role permits. In this case, we will do a lookup in the database for the user, return their role, and then do the authorization check. This will be done within the ` authorizeAdmin ` function in the code below.
For simplicity, I’ll demonstrate a basic version of these checks. In a real-world application, you’d likely use more robust authentication and authorization mechanisms and platforms, such as Auth0 or Okta, to control access and handle credential creation.
To remedy our BFLA vulnerability, update your app.js with the following code:
const express = require("express");
const bodyParser = require("body-parser");
const sqlite3 = require("sqlite3").verbose();
const expressOasGenerator = require("express-oas-generator");
const jwt = require('jsonwebtoken');


const JWT_SECRET = 'your_jwt_secret_here';


const app = express();


expressOasGenerator.init(app, function (spec) {
 if (spec.paths["/users/{id}"]) {
   let path = spec.paths["/users/{id}"];
   if (path.get) {
     path.get.parameters = [
       {
         in: "path",
         name: "id",
         required: true,
         schema: {
           type: "integer",
         },
         description: "User ID to fetch",
       },
     ];
   }


   if (path.put) {
     // Exclude the PUT method from the OAS (admin-access only endpoint)
     delete spec.paths["/users/{id}"].put;
   }


   spec.basePath = "http://localhost:4000";
 }
 return spec;
});


app.use(bodyParser.json());


// Initialize SQLite database
const db = new sqlite3.Database(":memory:");
db.serialize(() => {
 db.run("CREATE TABLE users (id INT, name TEXT, role TEXT)");


 // Insert example users with roles
 const stmt = db.prepare(
   "INSERT INTO users (id, name, role) VALUES (?, ?, ?)"
 );
 stmt.run(1, "John Doe", "admin");
 stmt.run(2, "Jane Smith", "user");
 stmt.run(3, "Alice Johnson", "user");
 stmt.finalize();
});


// JWT authentication middleware as a function
const authenticateJWT = (req, res, next) => {
 const authHeader = req.headers["authorization"];
 const token = authHeader && authHeader.split(" ")[1];


 if (token == null) {
   return res.sendStatus(401); // If no token, return 401
 }


 jwt.verify(token, JWT_SECRET, (err, user) => {
   if (err) {
     return res.sendStatus(403); // If token is not valid, return 403
   }
   req.user = user;
   next();
 });
};


// Authorization middleware to check if the user can access the data
function authorizeAdmin(req, res, next) {
 db.get("SELECT role FROM users WHERE id = ?", [req.user.sub], (err, row) => {
   if (err) {
     return res.status(500).send("Error in database operation");
   }
   if (!row) {
     return res.status(404).send("User not found");
   }
   const userRole = row.role;


   if (userRole !== "admin") {
     return res
       .status(403)
       .send("Not authorized to access this resource. Admin access only");
   }
   next();
 });
}


app.get("/users/:id", (req, res) => {
 let userId = req.params.id;
 let sql = "SELECT id, name FROM users WHERE id = ?";
 db.all(sql, [userId], (err, rows) => {
   if (err) {
     res.status(500).send("Error in database operation");
   } else {
     res.json(rows);
   }
 });
});


app.put("/users/:id", [authenticateJWT, authorizeAdmin], (req, res) => {
 let userId = req.params.id;
 let { name, role } = req.body;
 let sql = "UPDATE users SET name = ?, role = ? WHERE id = ?";
 db.run(sql, [name, role, userId], function (err) {
   if (err) {
     res.status(500).send("Error in database operation");
   } else {
     if (this.changes === 0) {
       res.json({ message: "User does not exist" });
     } else {
       res.json({ message: "User updated successfully" });
     }
   }
 });
});


const PORT = 4000;
app.listen(PORT, () => {
 console.log(`Server running on port ${PORT}`);
});
The updated code above introduces several significant enhancements and changes compared to the original version, specifically focusing on security through the use of JSON Web Tokens (JWT) for authentication and authorization to eliminate the BFLA vulnerability.
The updated code introduces the jsonwebtoken package to implement JWT-based authentication and authorization. This is a significant enhancement over the original code, which did not include any form of user authentication or authorization. To use this, you’ll also see the addition of the constant JWT_SECRET defined, which is used to sign and verify JWTs. This key is essential for the security of the token-based system, ensuring that tokens are valid and issued by the server. Of course, the key is extremely simple since it is just for demonstration purposes. In a production system, you’ll want to have a longer and more complex key that is not directly defined in the code!
The updated code also defines a method called authenticateJWT , a middleware function that checks for the presence of a JWT in the Authorization header of incoming requests. It verifies the token using the JWT_SECRET . If the token is missing or invalid, it sends a 401 or 403 response, effectively securing the endpoint from unauthorized access.
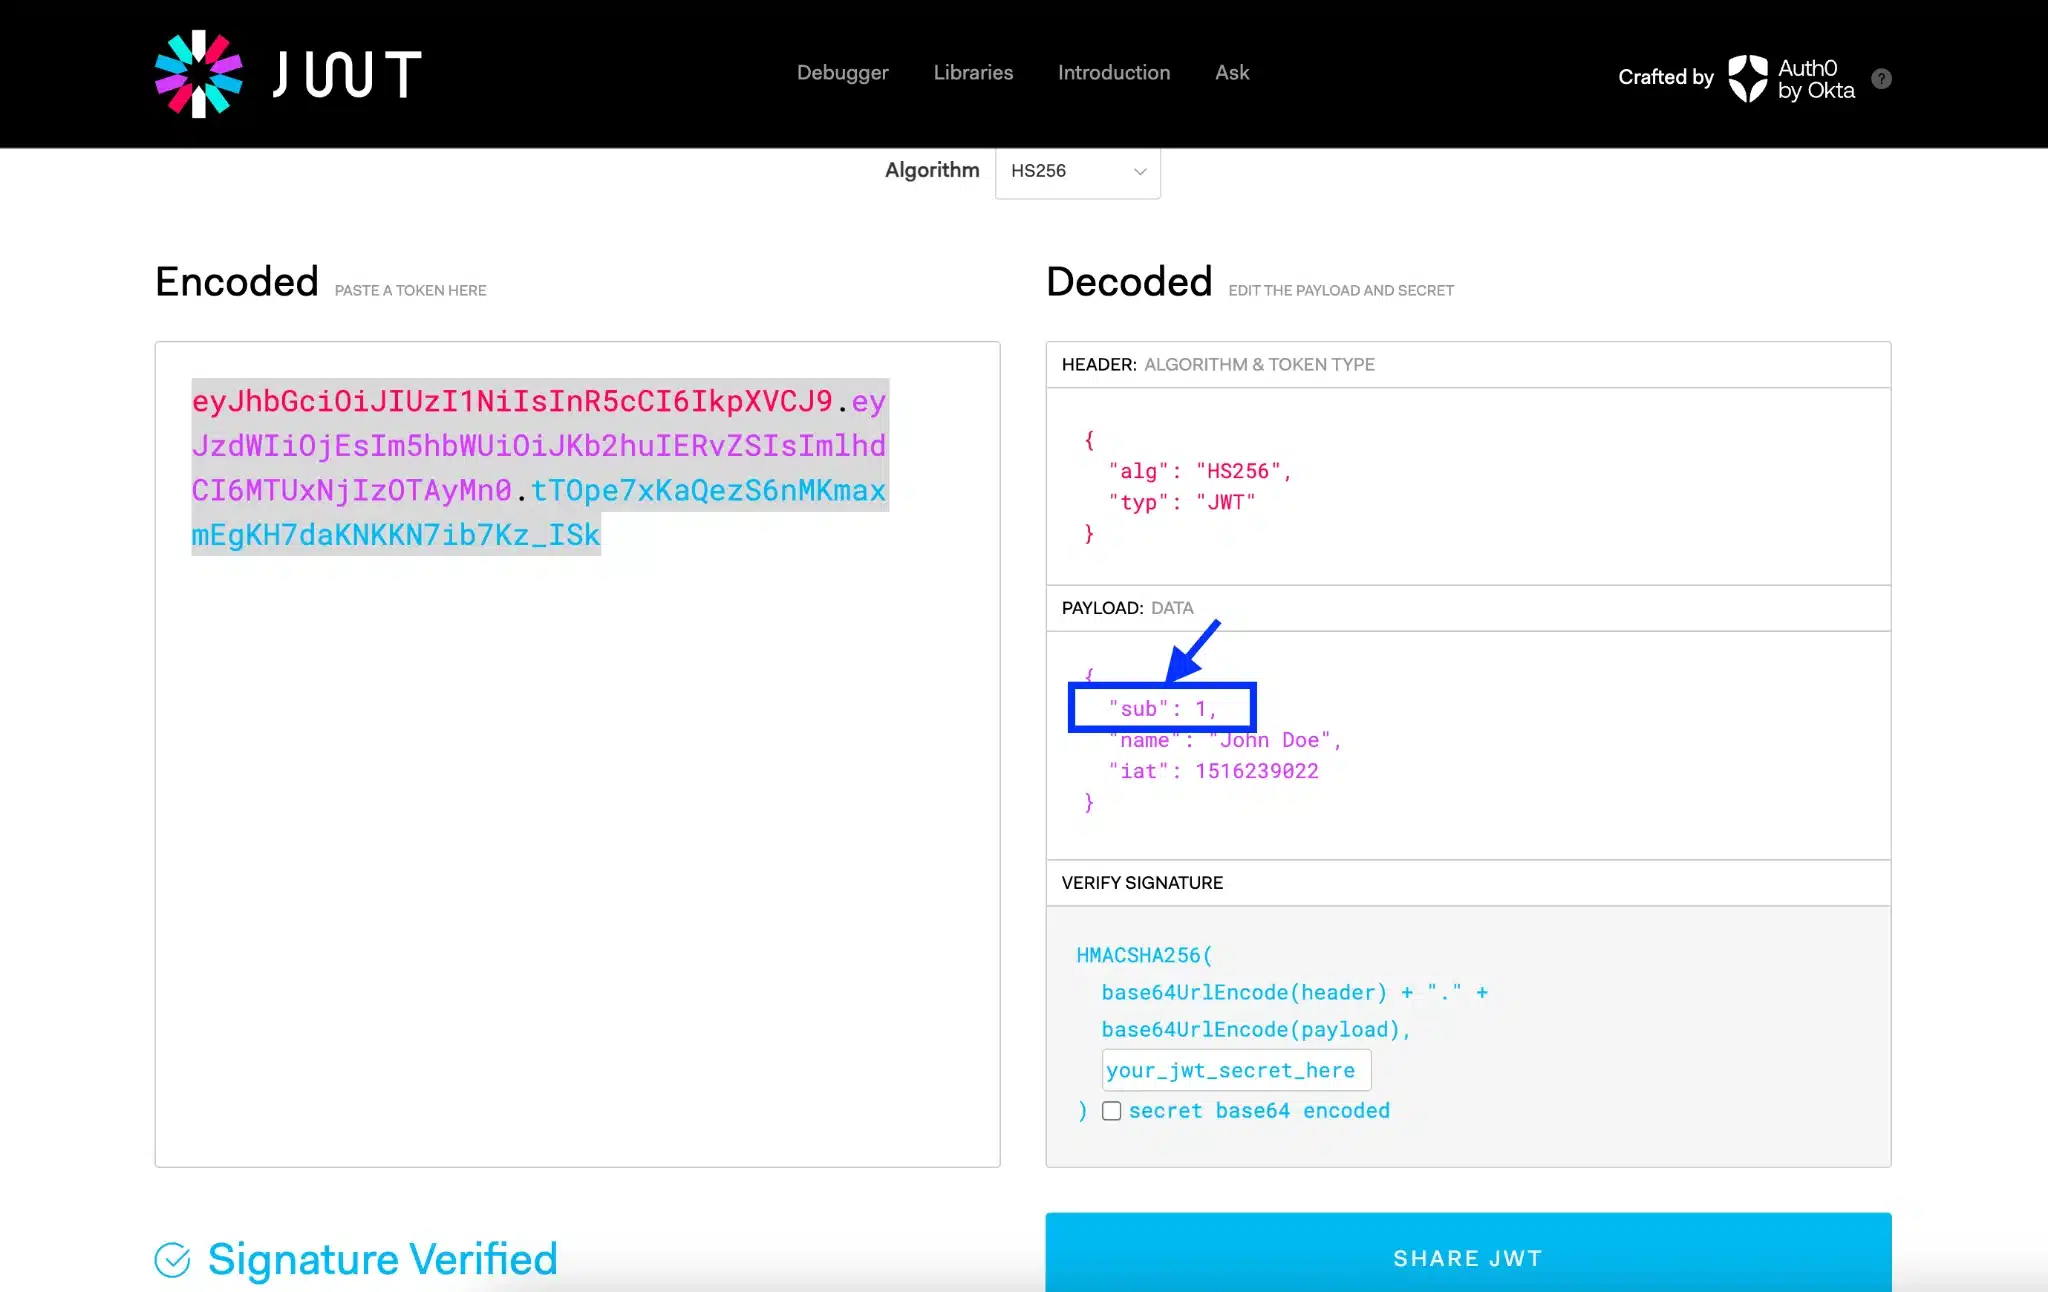
Next, the authorizeAdmin middleware function is defined, which checks if the authenticated user (decoded from the JWT) is authorized to access the admin-only endpoint. The comparison is made by retrieving the user’s role from the database, based on the sub/ID field in the JWT. With the role retrieved, we then check to ensure it equals “admin” . With this check in place, the PUT /users/:id endpoint is now protected by the authenticateJWT and authorizeAdmin middleware, arranged in an array. This sequential middleware arrangement ensures that every request to this endpoint is first authenticated and then authorized, a common pattern to enforce security on API endpoints.
Once the code has been updated on your side, you can stop the currently running server (by using ctrl + C in the terminal) and restart it with the new code using:
node app.js
The app should now be up and running with the updated code!
Confirm the fix!
With the latest code, users must send a JWT along with their request in the Authorization header. The code will then extract the sub field, retrieve the user’s role from the database, and then check to ensure they have the admin access needed to perform the function they are trying to do. In the JWT.io debugger, this is how such a token would look:
Now, let’s confirm the fix in StackHawk. To do this, we will click the Rescan Findings button back in StackHawk .
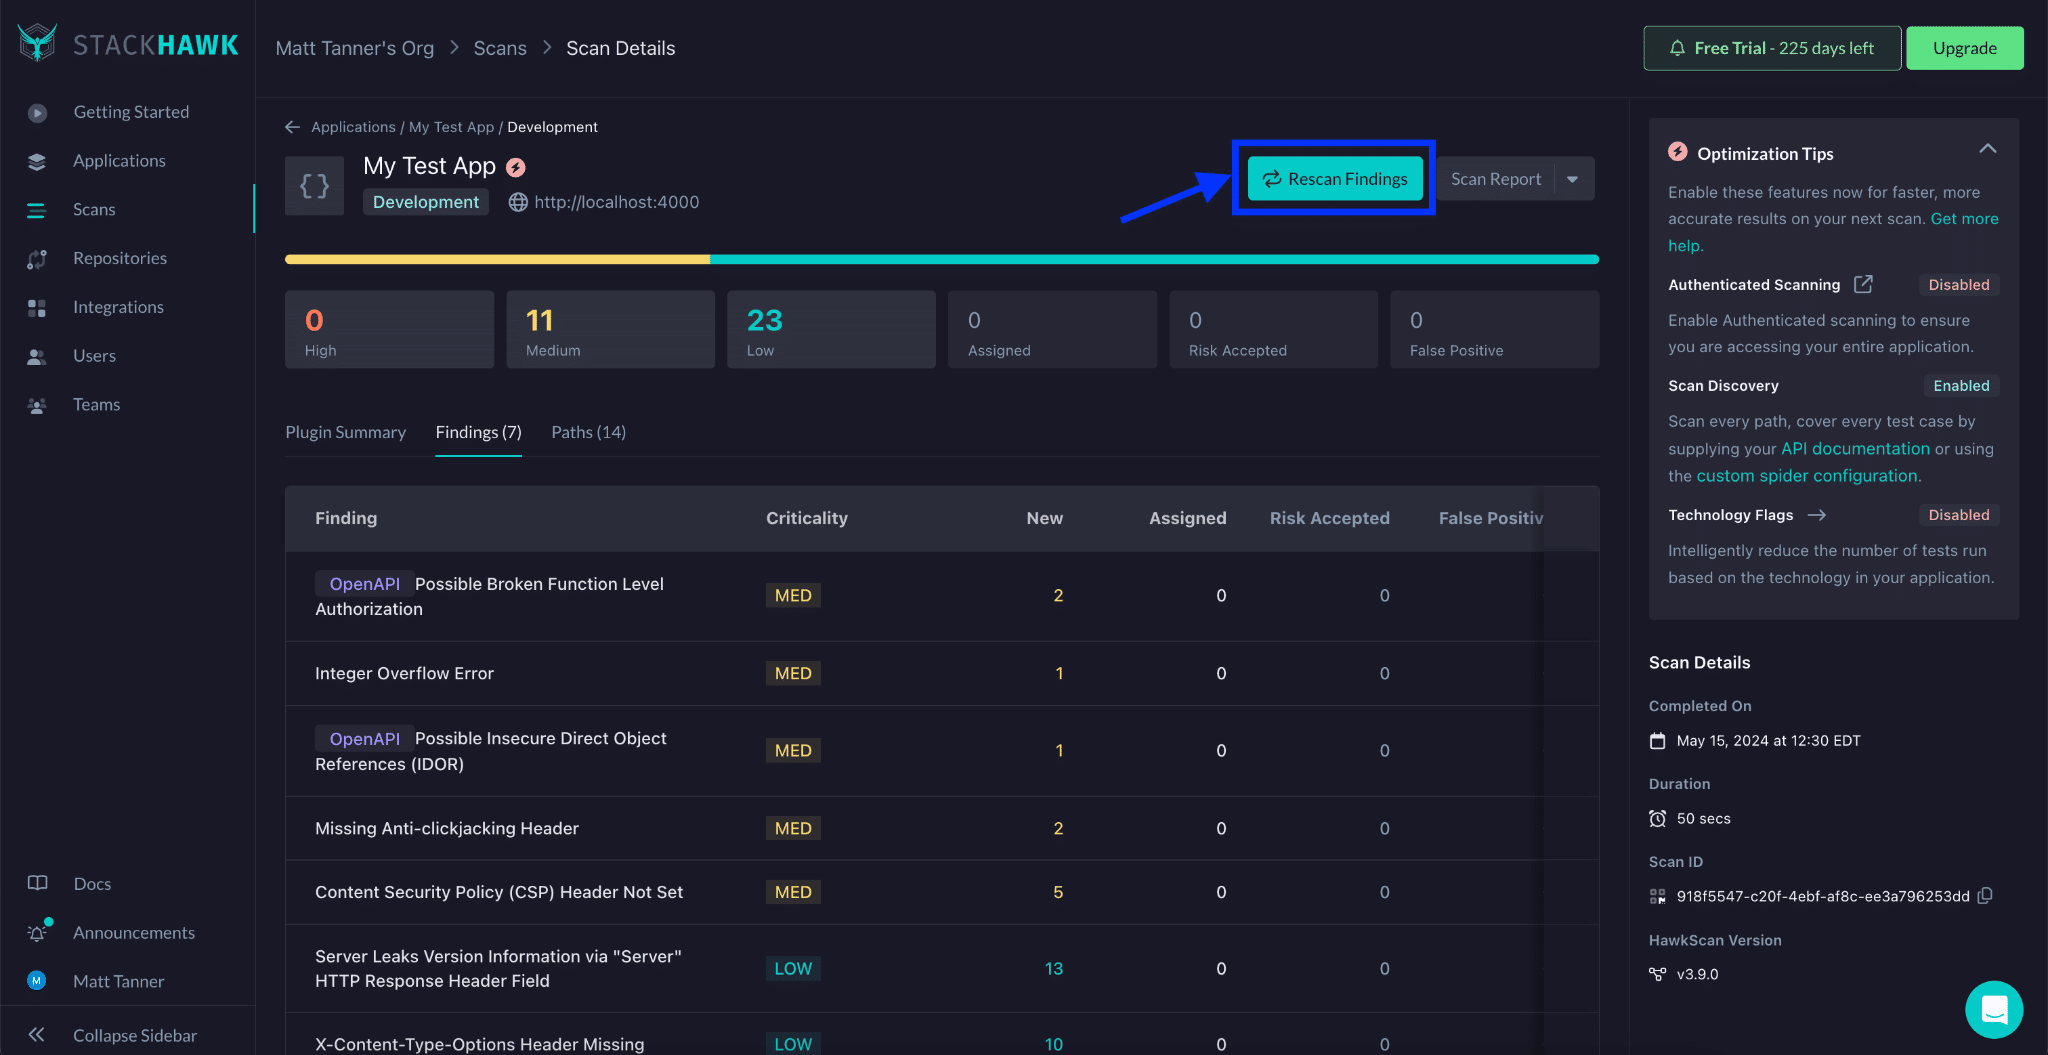
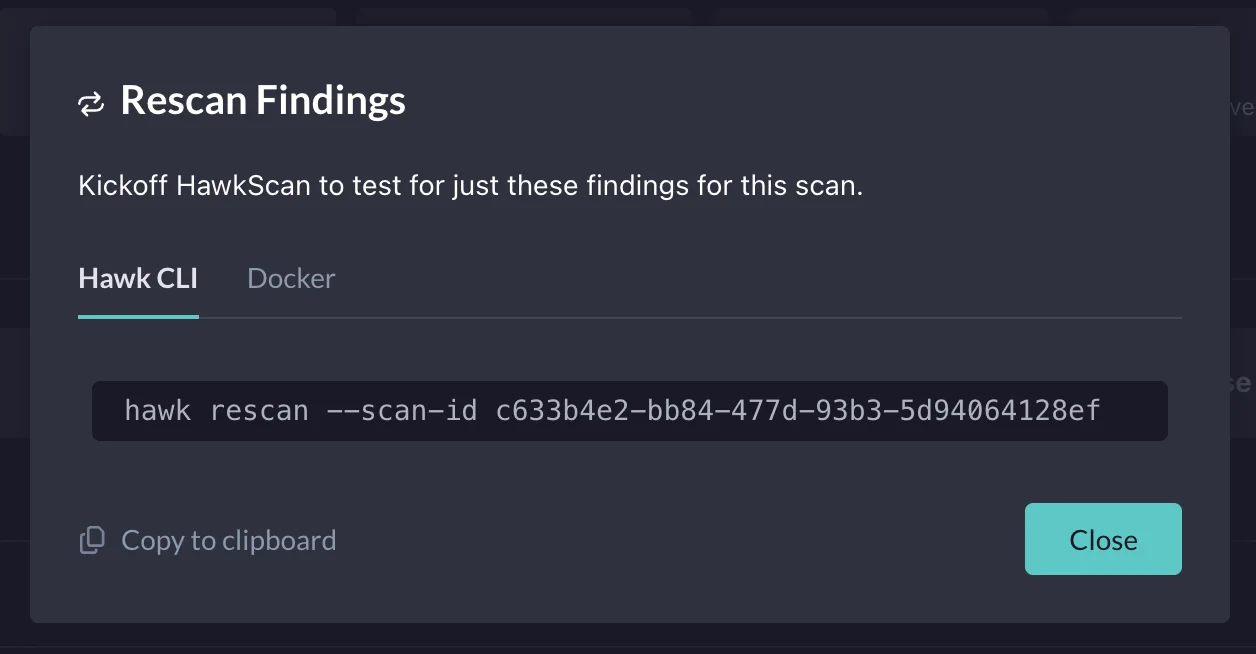
Then, we will see a modal containing the “hawk rescan” command that includes the correct Scan ID . You’ll run this command in the same terminal where you ran the initial set of tests.
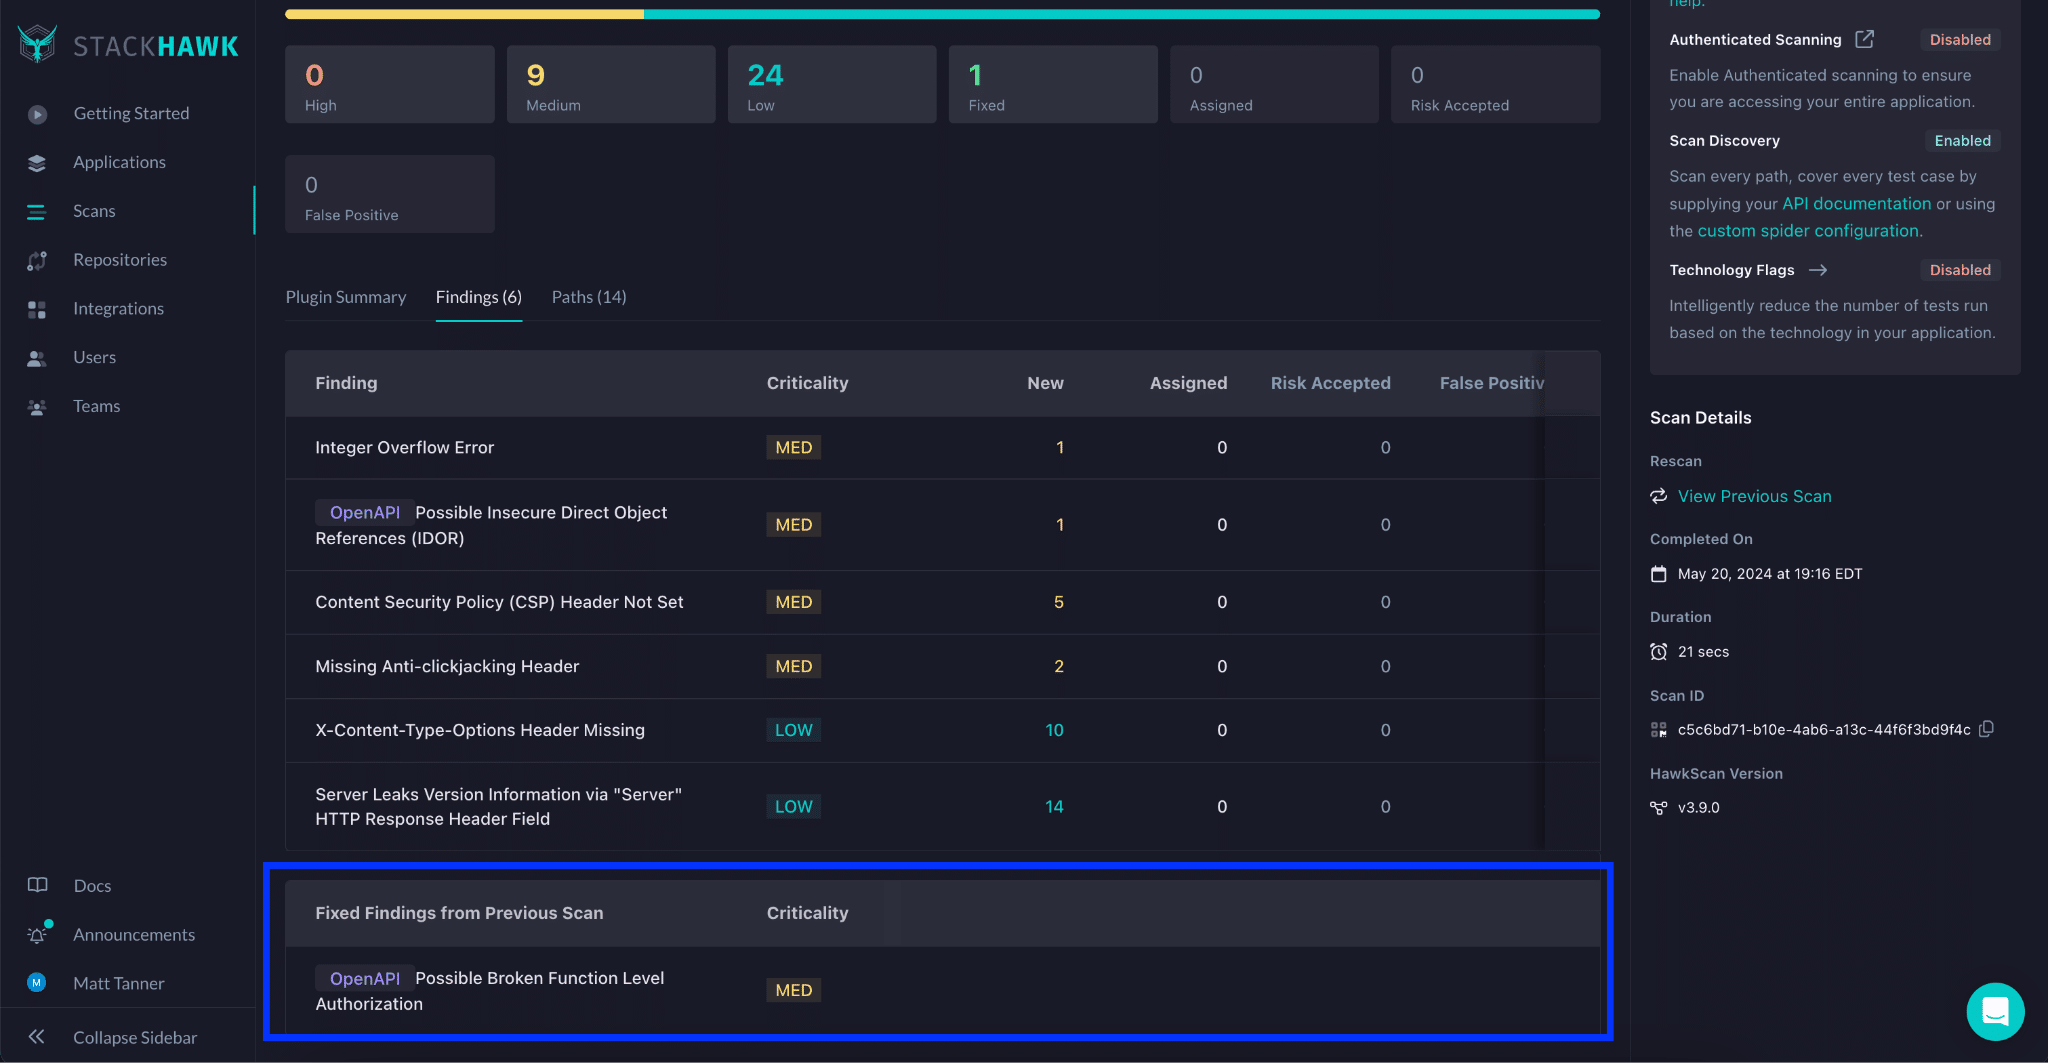
In the output, you will again see any vulnerabilities found in the scan. In this case, you’ll see that the BFLA vulnerability is no longer showing. Clicking on the link at the bottom of the terminal output, you can confirm that the BFLA vulnerability has now been added to the Fixed Findings from Previous Scan , confirming that the vulnerability has been successfully fixed and has passed any vulnerability tests.
With that, we’ve successfully remedied and retested our API to ensure its safety from potential BFLA attacks. Please remember that the code above is for demonstration purposes and that adding robust, production-grade authorization to an API endpoint is much more involved than we implemented above. Using an API gateway, Role-based Access Control (RBAC), and identity provider, such as Auth0, is one of the best ways to prevent BFLA and secure your APIs from unauthorized use.
Why StackHawk?
When it comes to preventing vulnerabilities, such as BFLA, StackHawk offers a comprehensive platform for developers to secure their applications and APIs. StackHawk is a modern, powerful DAST tool designed for developers to integrate application security testing seamlessly into their software development lifecycle. It is not just another security tool; it’s a developer-first platform emphasizing automation, ease of use, and integration into existing development workflows.
At its core, StackHawk is built around empowering developers to take the lead in application security. It provides a suite of tools that make it easy to find, understand, and fix security vulnerabilities before they make it to production. One of the critical components of StackHawk is HawkScan, a dynamic application security testing (DAST) tool that scans running applications and APIs to identify security vulnerabilities.
With StackHawk, developers and security teams can:
Automate Security Testing: Integrate security testing into CI/CD pipelines, ensuring every build is automatically scanned for vulnerabilities.
Identify and Fix Vulnerabilities: Receive detailed, actionable information about each vulnerability, including where it is in the code and how to fix it.
Test in All Environments: Use StackHawk in various environments, including development, staging, and production, to catch security issues at any stage of the development process.
Customize Scans: Tailor scanning configurations to suit specific applications and environments, ensuring more relevant and accurate results.
By focusing on a developer-first approach to security testing and integrating smoothly into existing dev tools and practices, StackHawk demystifies application security, making it a more approachable and manageable part of the software development lifecycle.
Conclusion
In this blog, we have looked deeply into the complexities of Broken Function Level Authorization (BFLA) vulnerabilities. We unpacked the essence of BFLA, revealing how it emerges from insufficient authorization checks, allowing attackers to access functions beyond their permissions. The discussion illuminated the root causes, mainly seen through the lack of validation and authorization in API requests. We looked into understanding BFLA’s mechanics and the significance of adopting a defense strategy encompassing strong authorization checks, RBAC, and a zero-trust approach, among other security best practices.
From a practical perspective, we looked at how to identify a BFLA vulnerability within a NodeJS application using StackHawk, a cutting-edge Dynamic Application Security Testing (DAST) tool designed for developers. By integrating security testing directly into the development workflow, StackHawk pinpointed the BFLA vulnerability and provided actionable insights to remediate it effectively. Through a simple example, we showcased the power of adding authentication and authorization middleware to secure API endpoints against unauthorized access, thus mitigating the BFLA threat we introduced in the original code.
Embracing StackHawk in your development cycle equips your team with the necessary tools and insights to tackle security vulnerabilities, including BFLA, preemptively. This approach not only enhances the security posture of your applications but also fosters a culture of security mindfulness among developers. Experience firsthand how StackHawk’s seamless integration and developer-centric solutions can transform your application security testing workflow, ensuring your applications are robust against common API threats outlined in the OWASP API Security Top 10. Sign up for a free trial of StackHawk today and join the ranks of proactive developers who are “shifting left” and making API security an integral part of their development process with StackHawk.


