Have you ever put JavaScript code on a website that was supposed to fetch data from your Laravel API, only to realize that it didn’t work? Then you looked at your browser’s developer tools and noticed an error message referring to CORS or the same-origin policy.
If you’re dealing with a Laravel application that needs to handle cross-origin requests, this guide is for you. In this guide, we will cover how Laravel handles CORS and when you need it, how to fix common CORS errors during development, how to securely configure Laravel’s CORS settings for production, and best practices for testing your configuration with tools like curl and StackHawk. Let’s begin by looking at what CORS is!
What Is CORS?
CORS stands for Cross-Origin Resource Sharing. It’s a security mechanism that controls how web pages from one domain can access resources from another domain.
In a browser context, the term “origin” refers to the combination of protocol, hostname, and port of a URL. For example, if your full URL is:
Then the origin would be:
https://api.example.com:443/usersTherefore, the origin groups a set of URLs under the control of the same individual or organization.
https://api.example.com:443By default, browsers enforce the same-origin policy, which restricts websites from making HTTP requests to different origins. CORS provides a way to relax this restriction through HTTP headers that specify which cross-origin requests are allowed. So the actual CORS configuration for the app is defined on the server side, but it is enforced at the browser level.
However, it’s important to note that not all cross-origin requests require CORS. Simple requests (such as GET, HEAD, or POST with standard headers and content types, like application/x-www-form-urlencoded, multipart/form-data, or text/plain) can be sent directly to the server. Only requests with custom headers, non-standard HTTP methods (like PUT or DELETE), or content types other than these three will trigger a preflight OPTIONS request. For example, a POST request with the application/json content type will trigger a preflight (which is when a potential CORS issue arises).
Understanding CORS Errors in Laravel Applications
If you’re reading this, you’ve likely encountered CORS errors when your frontend application tries to access your Laravel API. Here’s what these errors typically look like:
Access to XMLHttpRequest at 'https://api.myapp.com/users' from origin 'https://myapp.com' has been blocked by CORS policy: No 'Access-Control-Allow-Origin' header is present on the requested resource.Or
Access to XMLHttpRequest at 'http://localhost:8000/api/data' from origin 'http://localhost:3000' has been blocked by CORS policy: Request header field authorization is not allowed by Access-Control-Allow-Headers in preflight response.If you’re seeing these Access-Control-Allow errors pop up in your app or console, you’ve got a CORS configuration issue on your hands!
Where CORS Issues Occur with Laravel
Generally, the same culprits cause these types of issues, and fortunately, they are relatively easy to fix. Here are some common scenarios where you’ll encounter CORS issues within a Laravel application:
- Frontend calling Laravel API: React/Vue/Angular app at https://myapp.com calling Laravel API at https://api.myapp.com
- Development setup: Frontend dev server at http://localhost:3000 calling Laravel at http://localhost:8000
- SPA authentication: Single-page applications trying to send cookies or authentication headers
- Mobile app development: Testing APIs from different development environments
Quick Diagnosis
Of course, since there can be a few causes, it’s good to narrow down whether what you’re seeing is a CORS issue. So, before implementing any CORS fixes, use the following steps to confirm it’s actually a CORS issue:
- Check the Network tab – You’ll see the request, but no response data
- Look for preflight OPTIONS requests – Complex requests show an OPTIONS call before the actual request
- Test the API directly – Try the same endpoint with curl or Postman
If the API responds normally but fails in the browser, you have a CORS issue.
Do You Need CORS?
Because CORS is a security feature, your default strategy should be to enable it only when you’re sure that you need it, and only where necessary.
Not every cross-origin request requires CORS. Embedding an image, media file, iframe, CSS stylesheet, or JavaScript library from another domain isn’t subject to the same-origin policy. Only direct requests from scripts, such as API calls through fetch() or XMLHttpRequest, require CORS configuration.
We’ll look at two scenarios where you need CORS:
- Your Laravel website exposes a clearly defined (RESTful) API for others. You also expect your application programming interface consumers to make API calls directly on their websites through the user’s browser (instead of their servers).
- Your Laravel project exposes APIs or other endpoints only for internal use, but your website spans multiple domains or subdomains. A particular case of this is when you want to access the production back end while developing the front end on localhost or a staging server.
In both cases, you should expose the minimum number of endpoints to foreign origins. If you don’t want others to use your APIs, make sure that they can’t. Imagine you have two HTTP endpoints—one for internal and one for external use. According to Hyrum’s Law, even if you only document the external endpoint, someone will eventually discover the internal endpoint and start using it.
If your website has neither of these use cases, then you don’t need CORS.
Where Should You Configure CORS?
Configuring CORS in your Laravel project is just one option among many. Here are some others:
- You can also configure CORS at the web server level or on a reverse proxy, CDN, or any other intermediary between your Laravel code and the user.
- If you’re on Apache, you can create an .htaccess file.
- If you use Cloudflare, you can deploy a Worker that handles CORS.
Sometimes these options are better, for example, when you host a static web font on your server and need to add the CORS headers to it. That file might bypass your web server altogether and not go through Laravel and PHP.
In every other case, however, it would be best practice to configure CORS in Laravel. The advantage is that you keep it close to the development and ensure you can configure the minimal surface area according to your application’s needs.
The most unfortunate thing would be if multiple layers of your stack tried to handle CORS independently. Such a setup could lead to duplicate headers and ultimately result in unexpected and undocumented behavior.
Once you’ve decided to let Laravel handle your cross-origin operations, ensure that you communicate this to your system administrator or DevOps person, and refrain from allowing anyone to modify it at the web server or CDN layer.
Which Version of Laravel Do You Use?
The standard way to add CORS support in Laravel used to be a third-party package from Dutch developer Barry vd. Heuvel. But starting with version 7, CORS became a first-class citizen in Laravel. The same library became part of the main distribution, so it works the same way.
Hence, if you are on Laravel 7 or a newer version, CORS support is already enabled. In some cases, you don’t even need to change the default configuration. Review all the options and make the necessary adjustments by editing the configuration file. You can skip ahead to the next section, where we’ll explain how to locate and edit this file.
What if you’re on Laravel 6 or older and upgrading the framework is not an option? In that case, you need to install and configure the library separately before the configuration file becomes available. To do so, open a terminal or command prompt, navigate to your project directory, and run the following command:
composer require fruitcake/laravel-corsThen, make sure that the CORS class is part of your global middleware stack. Again, adding the middleware is only necessary for the older versions of Laravel, in which you installed the library yourself.
Open the file app/Http/Kernel.php in your IDE or code editor. The file will have a different configuration for each project, of course, but it will generally look like this:
<?php

namespace App\Http;

use Illuminate\Foundation\Http\Kernel as HttpKernel;

class Kernel extends HttpKernel {

    /**

     * The application's global HTTP middleware stack.

     *

     * @var array

     */

    protected $middleware = [

        \Illuminate\Foundation\Http\Middleware\CheckForMaintenanceMode::class,

        \Illuminate\Cookie\Middleware\AddQueuedCookiesToResponse::class,

        \Illuminate\Session\Middleware\StartSession::class,

        \Illuminate\View\Middleware\ShareErrorsFromSession::class

    ];

    /**

     * The application's route middleware.

     *

     * @var array

     */

    protected $routeMiddleware = [

        'auth.basic' => \Illuminate\Auth\Middleware\AuthenticateWithBasicAuth::class,

    ];

}
What you need to pay attention to is the $middleware array. Add the following line to the array, ideally on top as the first middleware in the stack:
\Fruitcake\Cors\HandleCors::class

The file should look like this afterward:

<?php

namespace App\Http;

use Illuminate\Foundation\Http\Kernel as HttpKernel;

class Kernel extends HttpKernel {

    /**

     * The application's global HTTP middleware stack.

     *

     * @var array

     */

    protected $middleware = [

        \Fruitcake\Cors\HandleCors::class,

        \Illuminate\Foundation\Http\Middleware\CheckForMaintenanceMode::class,

        \Illuminate\Cookie\Middleware\AddQueuedCookiesToResponse::class,

        \Illuminate\Session\Middleware\StartSession::class,

        \Illuminate\View\Middleware\ShareErrorsFromSession::class

    ];

    /**

     * The application's route middleware.

     *

     * @var array

     */

    protected $routeMiddleware = [

        'auth.basic' => \Illuminate\Auth\Middleware\AuthenticateWithBasicAuth::class,

    ];

}
A middleware intercepts every request. During execution, it inspects its request headers, handles preflight requests itself, and adds the necessary response headers that the browser expects. In other words, it handles everything you need to grant third-party access. The advantage of the middleware is that you can configure CORS in a single place in your code. Hence, you don’t have to worry about it on every route.
Which of Your Routes Need Third-Party Origin Access?
Go to the config directory in your Laravel project and open the file cors.php. It contains all the necessary configuration options, which we’ll discuss throughout this article. The following example shows the file as it looks in a fresh Laravel 8 install:
<?php

return [

    /*

    |--------------------------------------------------------------------------

    | Cross-Origin Resource Sharing (CORS) Configuration

    |--------------------------------------------------------------------------

    |

    | Here you may configure your settings for cross-origin resource sharing

    | or "CORS". This determines what cross-origin operations may execute

    | in web browsers. You are free to adjust these settings as needed.

    |

    | To learn more: https://developer.mozilla.org/en-US/docs/Web/HTTP/CORS

    |

    */

    'paths' => ['api/*', 'sanctum/csrf-cookie'],

    'allowed_methods' => ['*'],

    'allowed_origins' => ['*'],

    'allowed_origins_patterns' => [],

    'allowed_headers' => ['*'],

    'exposed_headers' => [],

    'max_age' => 0,

    'supports_credentials' => false,

];
The most crucial option is paths, which defines all the routes that need cross-origin access. As of Laravel 8, the default path entries are ['api/*', 'sanctum/csrf-cookie']. With this, all API routes, but none of the web routes, are accessible with CORS. There’s also support for Laravel Sanctum, which handles CSRF (Cross-Site Request Forgery) for SPAs (Single-Page Applications). You can remove it if you don’t need it.
By the way, just like CORS, CSRF is a cross-site request forgery (CSRF) security issue that you should always keep in mind.
If you want to be on the safe side, you can be even stricter and replace api/* with all the API routes for which you expect cross-origin traffic. That could be a smaller subset of your API.
Closely related to this is the allowed_methods option, which defines the allowed HTTP verbs (such as GET and POST) and defaults to ['*'], allowing all verbs to be permitted. Keep it that way, as the HTTP method choice isn’t the best way to define your exposed cross-origin API’s surface area anyway.
Which Origins Need Access to Your API?
Using CORS, you can define the origin hostnames that you permit to access your endpoints. Generally, there are two approaches. One is to allow just about any origin by using the asterisk (*) as a wildcard. The other is to list the hostnames explicitly.
The choice brings us back to the two scenarios we mentioned above:
- Suppose you use your API endpoints internally on a website spread over multiple domains and subdomains or from a development environment. In that case, you can list them all explicitly in the
allowed_originsconfiguration option. In this way, you ensure that nobody else can access them. CORS doesn’t support wildcard subdomains (such as*.example.org) natively, but the Laravel CORS middleware does. Therefore, you can use wildcards to enable all subdomains on your primary domain, for example. If you need more advanced templating, you can useallowed_origins_patternsand write a regular expression. - If you have a public API endpoint, you can use the general wildcard (
*) in theallowed_originsconfiguration option. Thus, you allow anyone to make CORS requests for that endpoint.
Here’s an example of a custom CORS configuration file:
<?php

return [

    'paths' => ['api/getList', 'api/getDetails/*'],

    'allowed_methods' => ['GET'],

    'allowed_origins' => ['example.com', '*.example.org'],

    'allowed_origins_patterns' => [],

    'allowed_headers' => ['*'],

    'exposed_headers' => [],

    'max_age' => 0,

    'supports_credentials' => true,

];
In the example above, the developer decided to grant access to two specific API endpoints to two different origins. One of each is a wildcard.
Pro tip: As an API provider, you may want to hand out API keys to your consumers. You could tie every API key to the specific origin that the consumer provides. Sadly, this is not in the standard CORS middleware’s scope, so you’d have to set your allowed_origins to * and check the Origin header in another place. That place could be your controller code or a custom middleware. Due to the complexity of this option, we can’t go deeper into it in this article.
Which Other Configuration Options Are Relevant?
There are four more configuration options:
allowed_headersexposed_headersmax_agesupports_credentials
The allowed_headers and exposed_headers options control the HTTP request and response headers that your Laravel application and a browser on a different origin can exchange. The defaults are ['*'] for allowed_headers and false for exposed_headers. As a result, clients can send any request headers, but the server can only use standard response headers.
These defaults are probably sensible. Check your API implementation, though. If you ever send custom headers, you’ll need to expose them as well.
Some CORS requests require preflights, which are HTTP OPTIONS requests that precede the actual API call. To minimize caching, change the default max_age value to a higher number than the default 0. That comes in handy when you expect many round trips between client and server. Most browsers cap this value, though, so a value like 600 seconds (10 minutes) is reasonable.
Finally, the supports_credentials option indicates whether you can use cookies or other credentials with your requests. Once again, think about your scenario.
An open API endpoint doesn’t require cookies because it’s either publicly accessible or uses API keys for authentication and control. For those, you can keep this as false.
For an SPA where users log in, you probably need credentials, so make sure to set this to true.
Are There Other Caveats?
Laravel middleware relies on processing your HTTP requests through the framework. If you use PHP commands like echo, die, or exit in your routes, then you’re shortcutting the framework. This may result in incorrect HTTP headers. If you rely on cross-origin requests during debugging, avoid using any PHP methods that generate output and prevent the framework’s workflow from being fully executed.
Why Automated CORS Testing Matters
CORS misconfigurations are among the most common security issues in modern web applications. Manual testing often overlooks edge cases, and it’s easy to create security gaps while attempting to resolve functionality issues inadvertently.
A common mistake when fixing CORS errors is implementing overly permissive configurations that work but create security vulnerabilities. For example, setting allowed_origins to ['*'] with supports_credentials to true (which Laravel actually prevents) or using overly broad origin patterns.
One of the most trusted security platforms for this type of testing is StackHawk. By using StackHawk to test for vulnerabilities in your Laravel applications and APIs, you get:
- Early detection of CORS issues during development
- Automated testing of complex CORS scenarios you might not think to test manually
- Clear remediation guidance with specific examples of vulnerable requests
- Verification that fixes don’t introduce new security issues
By integrating CORS security testing into your development workflow, you can ensure that your cross-origin requests work reliably while maintaining your application’s security.
Getting Started with StackHawk
To start testing applications for CORS vulnerabilities with StackHawk, you’ll need an account. You can sign up for a trial account. If you’re using an AI-coding assistant like Cursor or Claude Code, sign up for our $5/month single-user plan, Vibe, to find and fix vulnerabilities 100% in natural language.

Validating Your Laravel CORS Configuration with StackHawk
Once you’ve implemented CORS headers in your Laravel application, it’s crucial to ensure your configuration is both functional and secure. A common mistake is fixing the immediate CORS error but inadvertently creating security vulnerabilities, such as allowing credentials from any origin or being overly permissive with allowed domains.
This is where automated security testing becomes invaluable. Instead of manually testing every possible CORS scenario and hoping you haven’t introduced security gaps, you can use StackHawk to automatically validate that your CORS implementation works correctly without creating new attack vectors.
StackHawk will test your Laravel CORS implementation for common security issues, including:
- Wildcard origin acceptance with credentials: Testing if your API dangerously accepts * as an origin while allowing credentials
- Origin reflection vulnerabilities: Checking if your API blindly reflects the Origin header without proper validation
- Missing security headers: Identifying CORS setups that lack proper CSRF protection
- Overly permissive configurations: Finding CORS policies that are broader than necessary
Instead of waiting for your security team to discover these issues later in development, let’s use StackHawk to identify potential vulnerabilities for us automatically. To do this, you’ll need to ensure you have a StackHawk account. If you need one, you can sign up for a trial account or log into an existing account.
If you’re logging into an existing StackHawk account, from the Applications screen, you’ll click Add Application.

If you’re new to StackHawk, you’ll be automatically brought into the Add an App flow. On the Scanner screen, you’ll see the instructions for installing the StackHawk CLI. Since we will be running our testing locally, we will use this option. Once the hawk init command is executed successfully, click the Next button.
On the next screen, you will fill out an Application Name, Environment, and URL. Once filled out, click Next.

Since we will be testing a Laravel application with API endpoints, on the next page, we will choose our Application Type as “Dynamic Web Application/Single Page Application”.

Depending on your Laravel API setup, you’ll also configure the API details. For example, if you have a REST API running, you would set the API Type as “REST / OpenAPI”, and point to your OpenAPI specification file by selecting URL Path and adding the path to where your OpenAPI spec is located. Alternatively, you can click “Skip for now” if you’re unsure. Once complete, click Next.

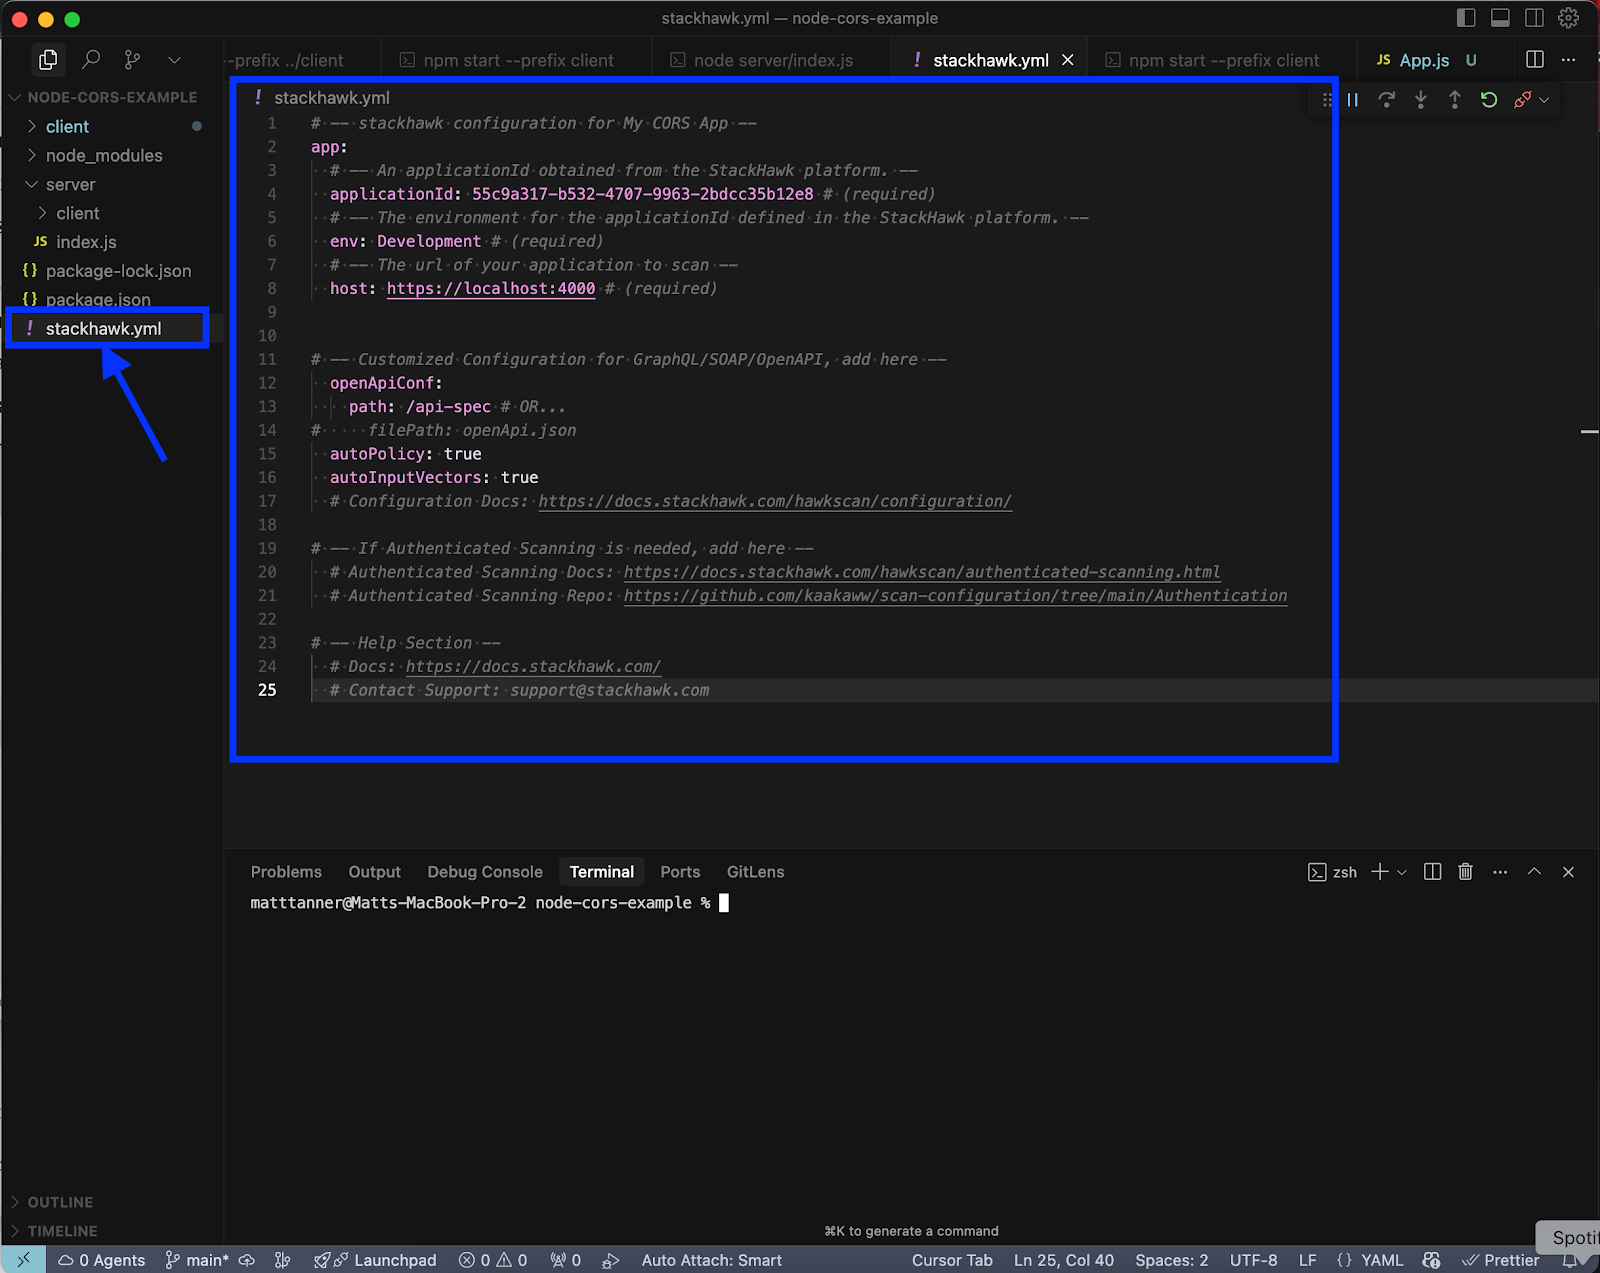
Lastly, we will need to add a stackhawk.yml file to the root of our Laravel project. Once the file is added, copy the screen’s contents, paste them into the file, and save it. Lastly, we can click the Finish button.

In our root directory, you should see the stackhawk.yml file we’ve added:
Lastly, depending on our scan policy, CORS misconfiguration detection may not be enabled. To ensure this, go back to StackHawk, navigate to the Applications page, and select your app. Once on the configuration page, click on the Settings tab, then the Active Scan Plugins tab, located just below it. Then, locate the CORS Header plugin in the list and check it off. You can find it easily by typing “cors” into the plugin search bar.
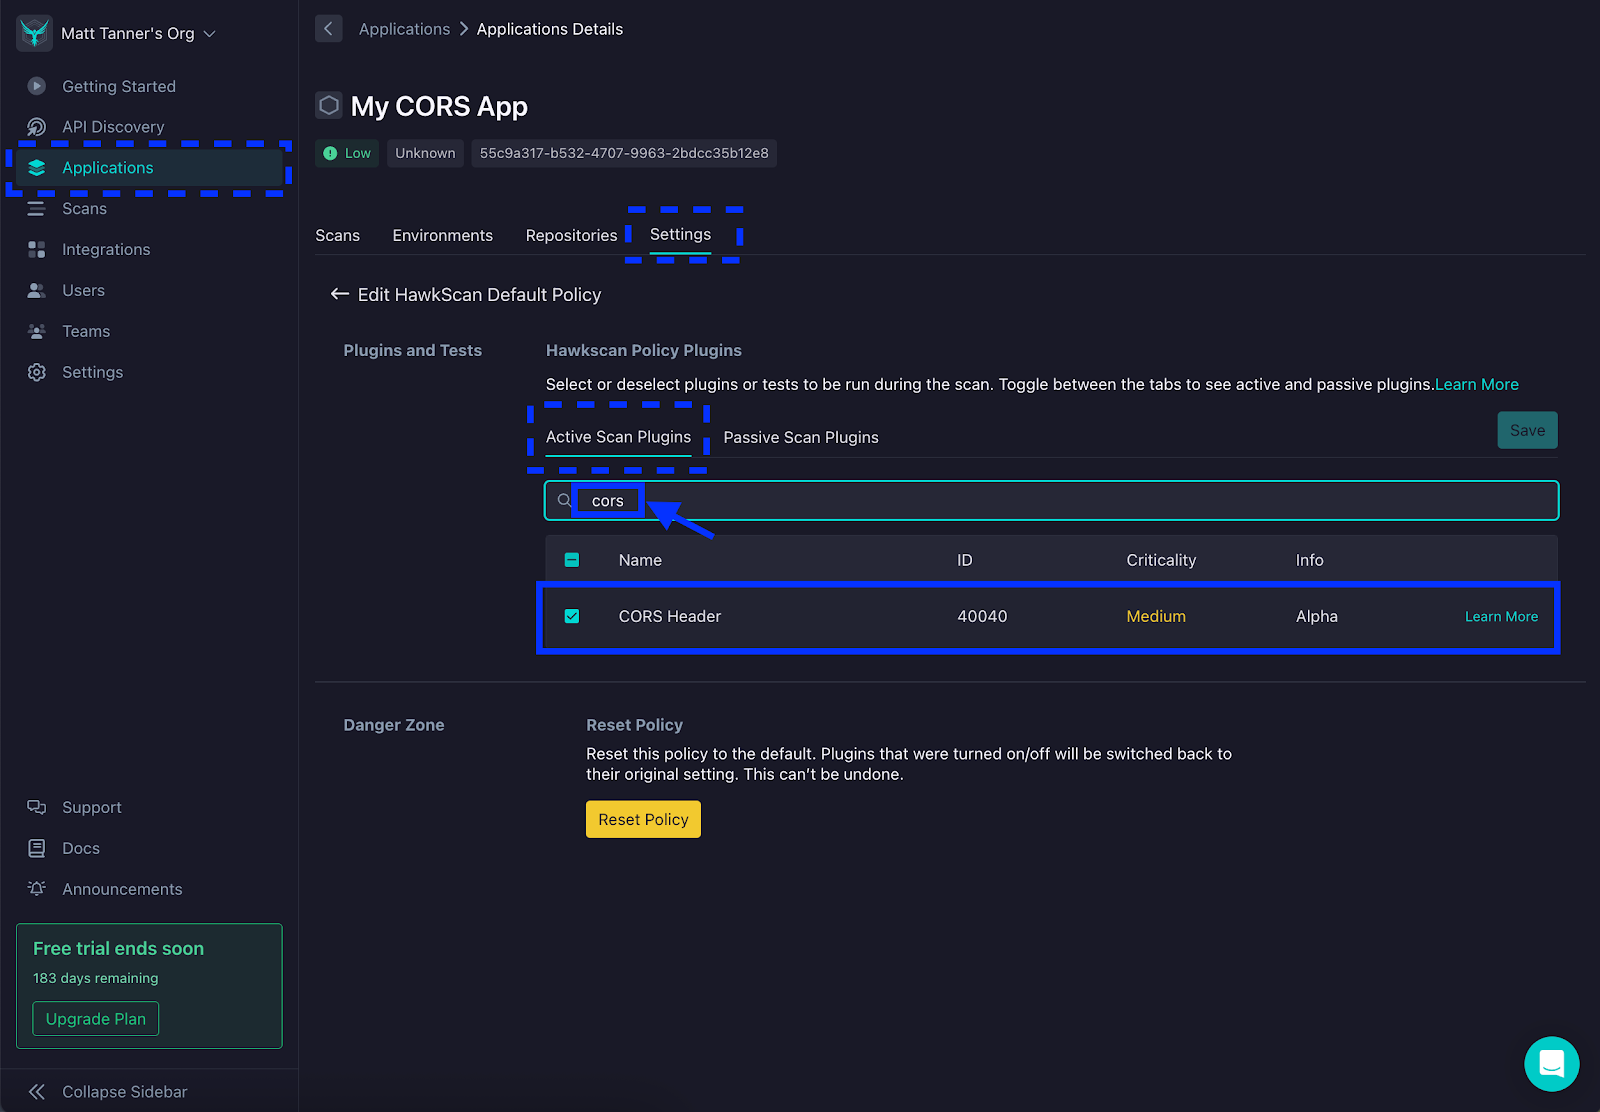
Lastly, click Save, located just above the Plugins list, to save the new configuration.
Run HawkScan
Next, we can go ahead with testing our Laravel application. In a terminal pointing to the root of our project, we will run HawkScan using the following command:
hawk scanAfter running the command, the tests should execute in the terminal.

Note: If you get an error similar to:
HawkScan Target Not Found Error: Unable to access https://localhost:4000. Check if the web server is listening on the specified port.
This means that your Laravel application is not running in HTTPS, and that is how HawkScan is trying to call the API. To fix this, either add HTTPS capabilities to your Laravel app or, more simply, change the host entry in your stackhawk.yml to use “http”.

This will run tests against your Laravel application and its API endpoints. Once the tests have run, we can begin to explore anything that was found.
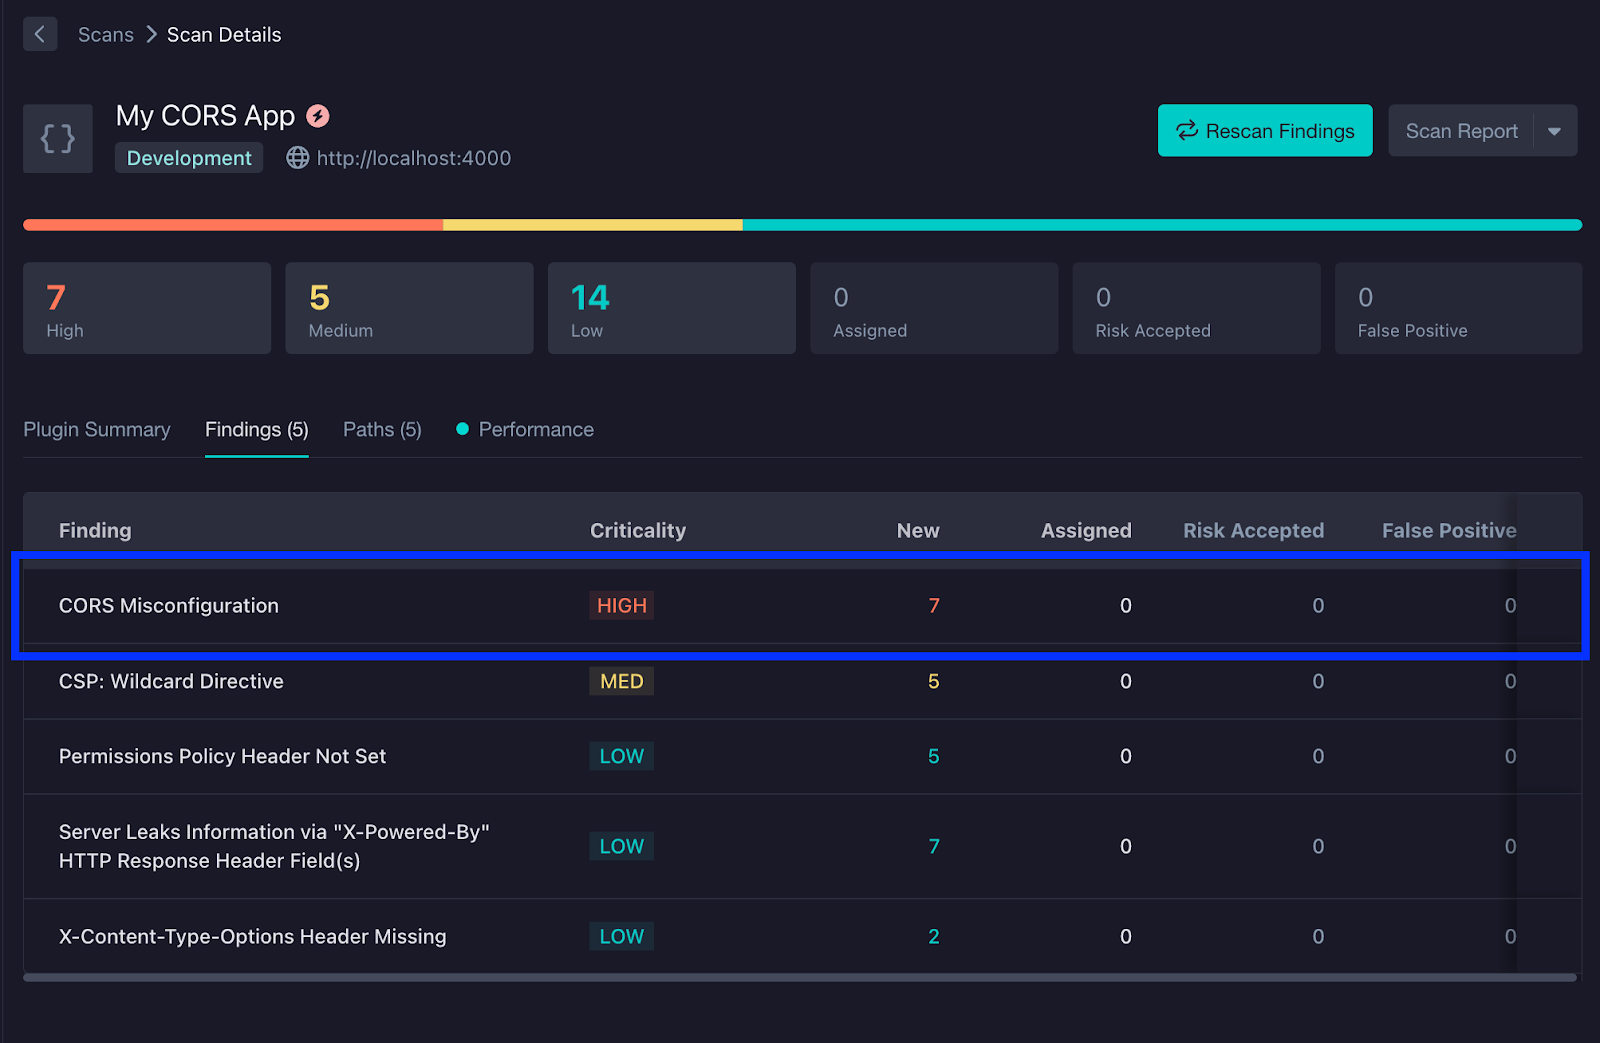
Explore The Initial Findings
Once the tests are complete, the terminal will contain some information about any vulnerabilities found. You might see that StackHawk has found CORS vulnerabilities within your Laravel application that are present on multiple API endpoints.

To explore this further, we will click on the test link at the bottom of the output. This will take us into the StackHawk platform to explore further.

After clicking on the link, we can now see the test results nicely formatted. Next, we will click on the CORS Misconfiguration entry.
Within this entry, we can see an Overview and Resources that can help us with fixing this vulnerability, as well as the Request and Response that the API returned on the right side of the screen. Above this, you will also see a Validate button, which will display a cURL command with the exact HTTP request used to expose the vulnerability.

Understand and Fix the Laravel CORS Security Issue
When StackHawk identifies CORS vulnerabilities, you’ll see detailed findings that indicate which paths are affected and provide potential remediation techniques (as shown in the image above). Using the techniques in this guide or the remediation advice provided by StackHawk for the vulnerability, you can then make the necessary adjustments to your code and configuration. Once fixed, ensure that you stop your web servers and redeploy the latest code. Next, we can ensure that the fix implemented actually resolves our CORS misconfiguration issues and is secure.
Confirm the Fix!
With the latest configuration deployed, let’s confirm the fix in StackHawk. To do this, we will click the Rescan Findings button back in StackHawk.

Then, we will see a modal containing the “hawk rescan” command that includes the correct Scan ID. You’ll run this command in the same terminal where you ran the initial set of tests.

In the output, you will again see any vulnerabilities found in the scan. In this case, you’ll see that the CORS misconfiguration vulnerabilities are no longer showing. Clicking on the link at the bottom of the terminal output, you can confirm that the CORS misconfiguration vulnerabilities have now been added to the Fixed Findings from Previous Scan, confirming that the vulnerability has been successfully fixed and has passed any vulnerability tests.

With that, we’ve successfully remedied and retested our Laravel application to ensure its safety from potential CORS misconfiguration attacks.
Secure Your Laravel CORS Configuration with StackHawk
Implementing CORS in Laravel requires striking a balance between functionality and security. While Laravel makes it easy to configure CORS through the built-in middleware and configuration file, it’s important to understand the security implications of each setting.
Key takeaways:
- Only enable CORS where you actually need it
- Use specific origins instead of wildcards when possible
- Be careful with credential support and ensure proper origin validation
- Test your configuration thoroughly in both development and production environments
- Regularly audit your CORS settings for security vulnerabilities
Remember that fixing CORS errors correctly means ensuring your API works for legitimate requests while blocking potential security threats. Tools like StackHawk help automate this security validation, giving you confidence that your Laravel CORS implementation is both functional and secure.
Want to ensure your Laravel CORS configuration is secure? Sign up for StackHawk today for a free 14-day trial to automatically test your CORS configuration and detect potential vulnerabilities.