
With more and more of our lives shifting online, malicious entities look to compromise websites in ever more inventive ways. While some techniques are extremely technical in nature and require weeks of planning, some attack vectors are less sophisticated — but no less damaging — and require only a tiny gap in a website’s defenses to get through. In this post, you’ll learn what CSRF is and how you can protect your Laravel websites against this kind of vulnerability.
This type of attack relies on websites trusting requests made by authenticated users, regardless of the source of the request. We’ll have a look at how this vulnerability works and how to protect yourself using CSRF middleware that ships with Laravel.
CSRF? What’s That?
Now, let’s find out more about the CSRF vulnerability.
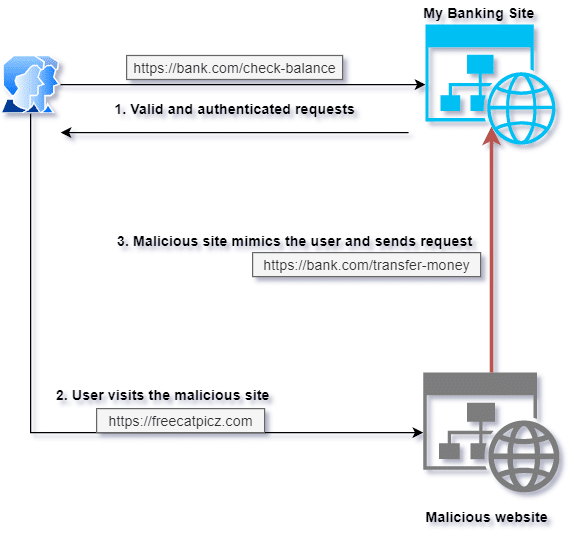
CSRF stands for cross-site request forgery. It’s a type of malicious exploit that allows a third-party website to mimic a trusted user on the target website.
Browsers use HTTP methods such asGET
,POST
, andDELETE
to communicate with websites. This communication takes the form of requesting a webpage or carrying out an action on the server. While most of these requests could be benign (e.g., “Give me the homepage”), protected requests need to be hidden away behind some type of an authentication mechanism.
These authentication systems would then use cookies in each request to identify users and mark them as trusted.
Problems arise when a bad actor creates a malicious request for a page or action without the user’s knowledge and tricks the source website into thinking it’s a legitimate request.
Working With Examples
Now that we understand what a CSRF attack is, let’s see how it could be carried out by way of an example.
Install Laravel
The first step is to install Laravel. I’m on macOS, so I’m going to use Docker desktop to set up a Laravel 8 project. Full installation instructions for other environments are listed here . Start by running the following commands:
curl -s "https://laravel.build/csrf-example-app" | bash
cd csrf-example-app
./vendor/bin/sail up3e
Once the commands finish processing, there should be a new csrf-example-app folder, and you should see something like the following when you visit http://localhost :
Set Up Authentication
Before we get started, you should remember that Laravel Sail runs inside a Docker container. This means it’s isolated from your local development environment. However, Sail offers an easy way to run any arbitrary commands such as artisan, PHP, or npm against your application. To run a command, simply prepend the path to Sail in front of your command. You can find more about running different commands here . If you’re not running your application inside Docker, then you don’t have to worry about this and can omit the Sail command.
The latest version of Laravel makes it very easy to set up a simple authentication system using Laravel starter kits. We’ll be using the Laravel Breeze starter kit to set up basic authentication.
cd /path/to/laravel/app/
./vendor/bin/sail artisan migrate
./vendor/bin/sail composer require laravel/breeze --dev
./vendor/bin/sail php artisan breeze:install
./vendor/bin/sail npm install && npm run dev
./vendor/bin/sail php artisan migrate
Once these commands complete, Laravel will have installed Laravel Breeze and set up some basic scaffolding to build an authentication-enabled app. Since we don’t need anything more than the basic scaffolding, we can leave things as they are. You should now have the following pages available to you:
http://localhost/register, where you can create your account.http://localhost/login, where you can sign in to Laravel with an account you created.http://localhost/dashboard, which is available only once you log in.
Set Up Simulated Functionality
Now we need to set up some functionality that the malicious website can take over. Let’s keep things simple and allow the user to update their name via the dashboard. To do this, we’ll need the following:
- A new UserController
to handle the form submission. A view to input the user’s name. We’ll use the existing dashboard view for this.
An update to the route file to link it all together.
First, let’s create a new controller to handle the update for the user object. Create a new controller /app/Http/Controllers/UserController.php and put the following code in it:
<?php
namespace AppHttpControllers;

use AppHttpControllersController;
use IlluminateHttpRequest;
use AppModelsUser;
use IlluminateSupportFacadesSession;

class UserController extends Controller
{
    public function update(Request $request)
    {
        $user = User::findOrFail(auth()->user()->id);
        $user->name = $request->name;
        $user->save();
        Session::flash('message', 'Name updated!');
        return back();
    }
}
Now, let’s update the view so that we can update our name when we’re logged in. Open up the /resources/views/dashboard.blade.php file and update it so it looks something like what’s shown below:
<x-app-layout>
    <x-slot name="header">
        <h2 class="font-semibold text-xl text-gray-800 leading-tight">
            {{ __('Dashboard') }}
        </h2>
    </x-slot>

    <div class="py-12">
        <div class="max-w-7xl mx-auto sm:px-6 lg:px-8">
            <div class="bg-white overflow-hidden shadow-sm sm:rounded-lg">
                <div class="p-6 bg-white border-b border-gray-200">
                    You're logged in!
                </div>

                {{-- This is the new code block to be added to the file --}}
                @if(Session::has('message'))
                    <div class="bg-green-100 border-t-4 border-green-500 px-4 py-3">
                        <p class="text-sm">{{ Session::get('message') }}</p>
                    </div>
                @endif
                <div class="p-6 bg-white border-b border-gray-200">
                    <form method="POST" action="/users/">
                        @method('PATCH')
                        <div class="mt-4 max-w-xs">
                            <x-input value="{{ auth()->user()->name }}" id="name" class="block mt-1 w-full" type="text" name="name" placeholder="Your name here" required />
                        </div>
                        <x-button class="mt-3">
                            {{ __('Update Name') }}
                        </x-button>
                    </form>
                </div>
                {{-- End of the new code block --}}
            </div>
        </div>
    </div>
</x-app-layout>
If some of the syntaxes look a little strange, don’t worry! I’m using Blade components to make sure my form looks like the rest of the application. The example will work just fine if you use plain HTML markup instead. You can learn more about Blade components here .
Finally, let’s connect it all using a route. Update the routes/web.php route file and add the following to it:
//add this to the top of the file
use AppHttpControllersUserController;

//This goes with the other routes
Route::patch('/users/', [UserController::class, 'update'])->middleware(['auth']);
We’ve now created a route that captures calls to /users using the PATH HTTP method and routes them to the update method of the UserController
class.If you navigate your browser to http://localhost/dashboard , you should see your updates reflected on the dashboard page:
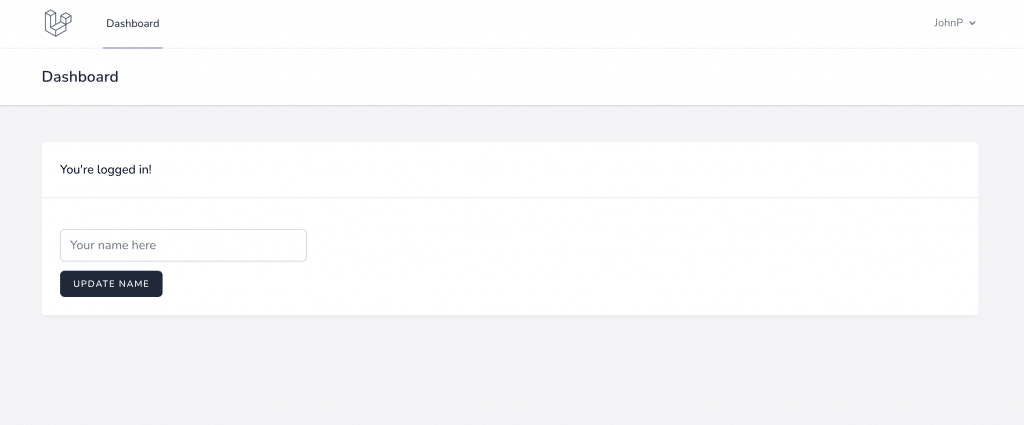
Logged in users should now be able to update their name.
Disable CSRF Protections
If you try to update your name using the form, you’re going to be shown a strange error message.

If you try updating your name, Laravel shows you an error message.
This happens because Laravel comes with CSRF middleware enabled out of the box. Since we haven’t set up our form to use CSRF middleware yet, Laravel is telling us that the form cannot be processed. Let’s disable CSRF protection for now so we can see how the vulnerability works. Open up the app/Http/Middleware/VerifyCsrfToken.php file and add an exclusion for all routes as shown below.
<?php

namespace AppHttpMiddleware;

use IlluminateFoundationHttpMiddlewareVerifyCsrfToken as Middleware;

class VerifyCsrfToken extends Middleware
{
    /**
     * The URIs that should be excluded from CSRF verification.
     *
     * @var array
     */
    protected $except = [
        '*' // <---- disable CSRF for all routes. Very dangerous!
    ];
}
Now that we’ve disabled the CSRF middleware, we can update our name using the form we created. Have a go — it should result in something like the below:
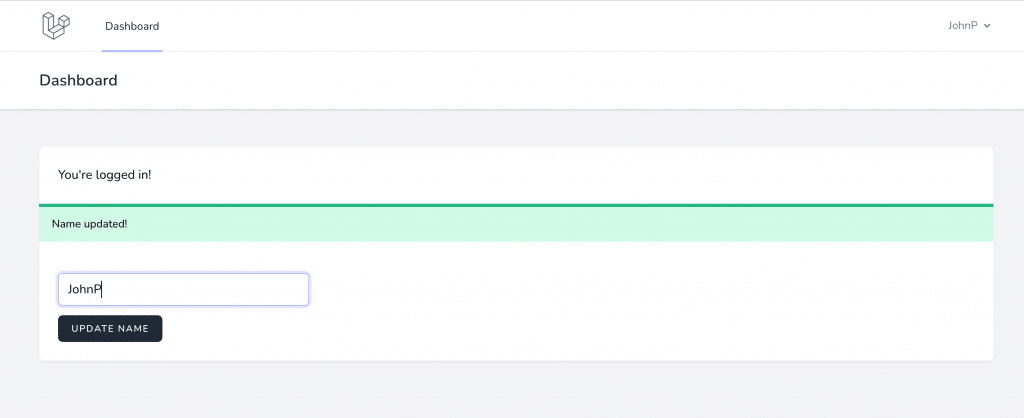
You can now update your name in the database.
Exploit the Weakness
Now that we have everything set up and CSRF protection is disabled, we can examine how a CSRF vulnerability can be exploited by malicious actors. Let’s have a look at a very basic example of the attack. Create an HTML file with the following content:
<html>
<head>
    <title>Bad Website</title>
    <script>
		/**
		This page simply creates a hidden form that matches the payload that our Laravel web app is expecting.
		When the user clicks the button, the payload is then sent to the Laravel app
		**/
        function carryOutBadAction() {
            let timer = 3;
            let timerInterval = setInterval(() => {
                document.getElementById('timer').innerHTML = `Attack carried out in : ${timer}`;
                timer--;
                if (timer === 0) {
                    clearInterval(timerInterval);
                    document.forms[0].submit();
                }
            }, 1000);
        }
    </script>
</head>
<body>
    <p><span id="timer"></span></p>
    <form method="post" action="http://localhost/users">
        <input type="hidden" name="_method" value="PATCH" />
        <input id="name" name="name" type="hidden" value="Attacked!">
        Innocent looking button : <button type="button" onclick="carryOutBadAction()">Click me</button>
    </form>
</body>
</html>
You can use PHP’s built-in web server to serve this page. If you have PHP installed, simply type php -S localhost:8000 in the directory that the file is stored in and access it via http://localhost:8000/bad-site.html . You should see something like what we see below:
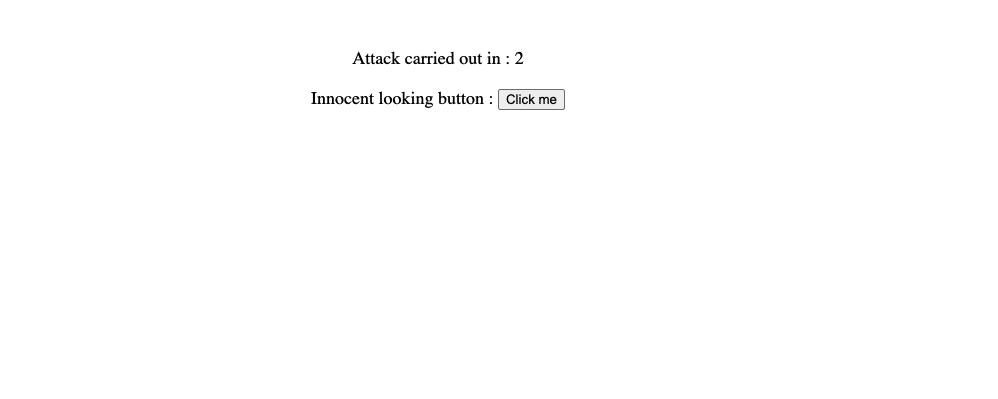
Clicking the button will update your name on our test website.
Now, if you go back to our test website and look at the dashboard page, you’ll see that your name has been changed to Attacked! Our malicious website was able to send a payload to the legitimate website without the user explicitly intending to. This attack can even be done in the background, without the need for the user to click a button.
Protect Yourself from CSRF Attacks
Now that we’ve seen how easy it is to carry out a CSRF exploit on a weakened website, how do we protect ourselves from this type of attack vector? Thankfully, Laravel makes this very easy for us. As mentioned before, Laravel comes with CSRF protection enabled out of the box. So, let’s go back to our middleware file app/Http/Middleware/VerifyCsrfToken.php and update it so that it looks like the following:
<?php

namespace AppHttpMiddleware;

use IlluminateFoundationHttpMiddlewareVerifyCsrfToken as Middleware;

class VerifyCsrfToken extends Middleware
{
    /**
     * The URIs that should be excluded from CSRF verification.
     *
     * @var array
     */
    protected $except = [
    ];
}
Now that we’ve removed all exceptions from the middleware, it will check for the CSRF token in every request. If we try using our bad site example now, you’ll see that the exploit no longer works. But you’ll also find that our form that legitimately updates the name is also broken.
To fix our own site’s form, we need to let the CSRF middleware know that the request is valid. We can use the @csrf Blade directive for this. Update your markup with the CSRF token directive and add it to the Blade view stored at resources/views/dashboard.blade.php .
<form method="POST" action="/users/">
    @csrf {{-- <------- The Blade directive for CSRF token generation--}}
    @method('PATCH')
    <div class="mt-4 max-w-xs">
        <x-input value="{{ auth()->user()->name }}" id="name" class="block mt-1 w-full" type="text" name="name" placeholder="Your name here" required />
    </div>
    <x-button class="mt-3">
        {{ __('Update Name') }}
    </x-button>
</form>
And now everything should be working as intended. As long as you add the CSRF Blade directive to your forms, Laravel can identify the validity of the request and process it, or discard it in the case of malicious requests.
Underneath the Hood
But what exactly is going on here? If we look at the form HTML, we can see that there’s a hidden token field.
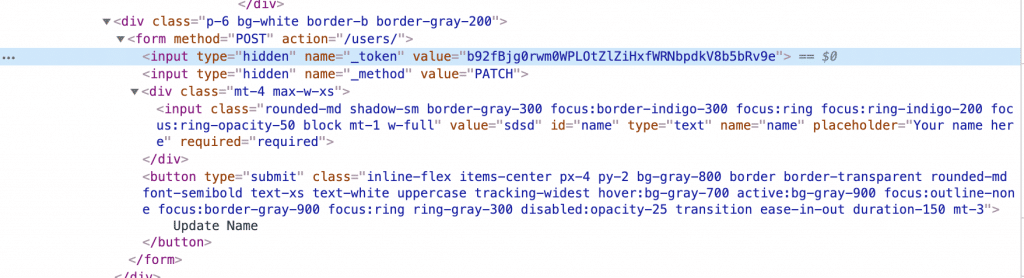
The hidden field contains the token that the middleware uses to validate the request.
Whenever a page is generated, Laravel creates a time-sensitive, one-time use token and adds it to the form. The CSRF middleware examines the token whenever a form is submitted, and it verifies that the application generated the token before letting the request go through. If the token has expired or doesn’t match a value that Laravel is expecting, it will display an HTTP 419 code page expired error.
Sometimes you’re not working with HTML forms and you want to access this token in other places. For example, when you want to make an Ajax call from your application, what do you do then? One option is to move it to an HTML meta tag and access that value from your JavaScript code:
<meta name="csrf-token" content="{{ csrf_token() }}">
You can find more details about this approach here .
Conditionally Disable CSRF Protection in Laravel
Sometimes you may want to disable CSRF protection for certain routes or entire route groups. For example, if your endpoints are functioning as an API endpoint, you will want to disable CSRF protection and add other layers of protection. To disable specific URLs, you can modify the app/Http/Middleware/VerifyCsrfToken.php middleware file and add exclusions so that Laravel doesn’t apply the protection to those URLs. An example from the Laravel docs is shown below, and you can find more information about this here :
<?php
namespace AppHttpMiddleware;
use IlluminateFoundationHttpMiddlewareVerifyCsrfToken as Middleware;

class VerifyCsrfToken extends Middleware
{
    /**
     * The URIs that should be excluded from CSRF verification.
     *
     * @var array
     */
    protected $except = [
        'http://example.com/foo/bar',
        'http://example.com/foo/*',
    ];
}
Know Your Enemy

In this post, we briefly looked at the nature of CSRF attacks, created an example that exploited a weakened website, and learned how to protect ourselves from the most common forms of attack. Using a framework such as Laravel that handles the most common exploits for you is the first step. However, application security is an ongoing battle against an ever-growing list of automated and manual tools.
To learn more about how Laravel handles CSRF vulnerabilities, you can head over to its official documentation .
This post was written by John Pereira. John is a technology enthusiast who’s passionate about his work and all forms of technology. With over 15 years in the technology space, his area of expertise lies in API and large scale web application development, and its related constellation of technologies and processes.


