
The web has grown vastly over the years in terms of technologies, frameworks, complexity, and utility. Today, more than a billion people browse through thousands of websites every day. As a result, the internet is always flooded with sensitive data like user credentials, credit card details, etc.
Therefore, developers must be aware of common vulnerabilities that hackers can exploit to misuse their users’ data. One such vulnerability is cross-site scripting (XSS). In this post, you’ll understand what XSS is and how it impacts your users. You’ll also learn how far React protects your app from XSS attacks, steps to make your React application immune to XSS, and how you can leverage tools like StackHawk to proactively identify and fix these vulnerabilities.
XSS Attacks: An Overview
JavaScript lies at the heart of the client-side of any application. This is because your application’s front end roughly amounts to some JavaScript code running on your browser.
To illustrate this, let’s take a simple example of an online transaction. When you carry out a transaction on a website, it runs some JavaScript to grab your credentials from the user input fields and process them. However, the developers can easily run some additional malicious JavaScript code to do something detrimental with that information.
That’s precisely what XSS is. An attacker can exploit your application’s vulnerability to inject some malicious script into your user’s browser, carrying out an XSS attack. Now that you know what an XSS attack is, let’s understand how it can happen with an example.
How Can an XSS Attack Happen?
One of the most common types of XSS attacks is a DOM-based XSS attack. When you mutate DOM directly, it becomes easy for an attacker to inject it with data containing malicious JavaScript.
Consider the following HTML code. It simply renders some basic markup with an empty <div> element.
<html>
   <body>
       <div id="validation">
       </div>
       <input placeholder="Enter your referral code below" />
       <button>Submit</button>
   </body>
</html>
The above code renders an <input> element on the page with a submit button. On pressing the submit button, you fire a function. Inside the function, you evaluate what the user has entered. You then provide a feedback message to the user based on the result inside the empty <div> element.
const validationElement=document.getElementById('validation');
const validationMessage=`Oops! This seems like an invalid referral code.`
validationElement.append(validationMessage);
Using the append() method, you render a message inside your empty <div> element. However, this exposes a vulnerability in your application. Consider the following JavaScript code:
Oops! This seems like an invalid referral code.
<script>
  ...
  alert('Congrats! You've won a prize');
  ...
</script>
The attacker basically renders the validation message along with a malicious <script> . This was possible because the application was modifying DOM directly using the append() method on the <div> . Inside the <script> , the attacker can write code that steals your confidential and sensitive information. On similar grounds, if you use innerHTML to mutate DOM directly, you’re exposing your application to a potential XSS attack.
Thus, an XSS attack can be an alarming sight for your users. However, front-end frameworks have come a long way and provide some protection against such attacks out of the box. Let’s look at how React handles these situations for you and how far it secures your application against an XSS attack.
Is React XSS Foolproof?
Luckily, React does a few things under the hood to safeguard your application against XSS attacks. Let’s rewrite the code in the previous section in React as shown:
import './App.css';
import {useState} from 'react';

function App() {
  const [validationMessage,setValidationMessage]=useState('');
  const validateMessage=async()=>{
   setTimeout(()=>{
    setValidationMessage('Invalid referral code')
   },1000)
  }
  return (
    <div className="App">
      <input placeholder="Enter your referral code"/>
      <button onClick={validateMessage}>Submit</button>
      <div>
        {validationMessage}
      </div>
    </div>
  );
}

export default App;
Just like before, I have an <input> element with a <button> that fires the validateMessage function. I have created a state validationMessage that I set inside the validateMessage function using a setTimeout. Finally, I output the validationMessage inside an empty <div> element using JSX.
<div>
        {validationMessage}
      </div>
React outputs elements and data inside them using auto escaping.It interprets everything inside validationMessage as a string and does not render any additional HTML elements. This means that if validationMessage was somehow infiltrated by an attacker with some <script> tags, React would simply ignore it and render it as a string.
To demonstrate this, I’ll make a slight modification to the validateMessage method as shown below:
  const validateMessage=async()=>{
   setTimeout(()=>{
    setValidationMessage(`Invalid referral code, <script></script>`)
   },1000)
  }
If you check now, the <script> tags get rendered as strings instead of a DOM element.
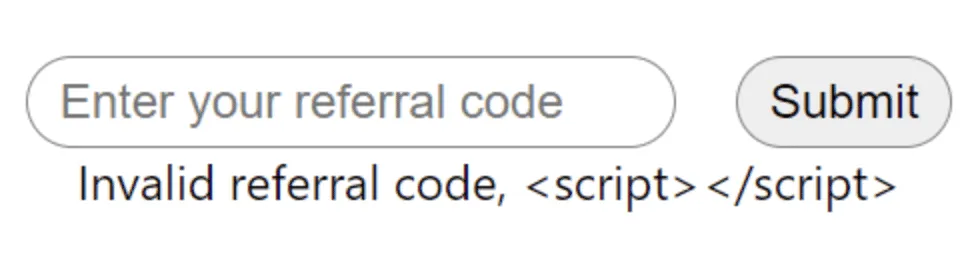
Now, any JavaScript enclosed by the <script> tags will not be executed. Thus, the above behavior protects your application from an attacker trying to execute a DOM-based XSS attack. React’s official docs also mention this here. Thus, using JSX to conditionally output some content or data to your DOM safeguards it against an XSS attack.
But does that mean your React application is safe from all kinds of XSS attacks? We only considered the use case of outputting an element or a string using JSX. What if we actually need to render HTML elements directly on the DOM from inside the JSX?
Render HTML Elements Dynamically in React
The most common use case where you’d want to render HTML elements directly is a blogging application. In typical blogging applications, you receive your blogs as a combination of HTML elements. These elements wrap your blog’s content, preserving its formatting.
Let’s say you have a small React component that gets a blog from the server and renders it on the DOM. Consider the following code:
import './App.css';

function App() {
  const blog=`
   <h3>This is a blog title </h3>
   <p>This is some blog text. There could be <b>bold</b> elements as well as <i>italic</i> elements here! <p>

  `
  return (
    <div className="App">
      <div>
        {blog}
      </div>
    </div>
  );
}

export default App;
Inside the component, I have a blog variable that stores your blog’s content wrapped in proper HTML elements. If you directly output the blog variable inside your JSX, it would be interpreted as a string.

Rendering a blog using JSX.
While that safeguards your application against a DOM-based XSS attack, it ruins the experience for your users. Therefore, you need to render your blog as a markup instead of rendering it as a string. This will render your content along with its dedicated HTML tags.
React allows you to do that using a prop called dangerouslySetInnerHTML . You can pass this prop to any generic container element. It takes in an object with a key _html whose value is the HTML markup you wish to render inside the container.
<div className="App">
    <div dangerouslySetInnerHTML={{__html:blog}}>
    </div>
</div>
If you check back now, you should see your blog with its intended formatting.

Rendering formatted blog using dangerouslySetInnerHTML
All HTML elements contained by the blog variable are properly rendered on the DOM. However, this puts us back at square one! We again have an XSS vulnerability in our application, and the attacker could inject some malicious scripts into the blog variable. In fact, the dangerouslySetInnerHTML prop intentionally has the word “dangerous” in it to remind you that you should be cautious while using it. React’s official docs also mention this here.
Sanitize Data in React
In order to protect your application from a DOM-based XSS attack, you must sanitize data that contains HTML elements before rendering it on the DOM. There are a number of libraries out there that you can use. One such library is DOMPurify. Let’s see how we can use it in our React application.
Let’s first install DOMPurify inside our React application by running the following command:
npm i dompurifyTo use it, import DOMPurify from the library at the top as shown:
import DOMPurify from 'dompurify';Let’s create a new variable, sanitizedBlog , that contains the sanitized version of our blog.
const sanitizedBlog=DOMPurify.sanitize(blog)Finally, we can now use sanitizedBlog instead of blog inside the dangerouslySetInnerHTML prop as shown:
<div className="App">
      <div dangerouslySetInnerHTML={{__html: sanitizedBlog}}>
      </div>
</div>
Everything should still work the same, but your sanitizedBlog is now protected against any malicious XSS injections. There are other libraries out there that do this, like sanitize-html-react. You can try them out or learn more about how DOMPurify works here.
Escape Hatches in React Can Cause an XSS Attack
A lot of times, you want to get a reference to a DOM element in your React application. React provides you with findDOMNode and createRef as escape hatches. These methods give a direct reference to the DOM elements. Consider the following code:
import './App.css';
import {useEffect, createRef} from 'react';

function App() {
  const divRef=createRef();
  const data="lorem ipsum just some random text"

  useEffect(()=>{
    divRef.current.innerHTML="After rendering, this will display"
  },[])

  return (
    <div className="App">
      <div className="container" ref={divRef}>
        {data}
      </div>
    </div>
  );
}
export default App;
I have a simple <div> with the ref divRef . When the component’s DOM loads, I change the content inside this <div> using the innerHTML property on its ref. An attacker can easily inject some malicious script by overriding the innerHTML of the <div> inside the useEffect.
The trick here is simple. Don’t use innerHTML to mutate the DOM at all! This is yet again a similar situation where you’re modifying the DOM directly. If you are using refs to add some content inside your HTML elements, use innerText instead.
useEffect(() => {
  divRef.current.innerText = myName;
}, [myName])
Now, even if the attacker is able to inject some <script> tags through divRef, it will be rendered as a string in your application. This kind of pattern is rare, and you should always avoid mutating the DOM directly using refs.
Unsure if you’re application is secure from XSS? Let’s see how we can use StackHawk to identify potential XSS vulnerabilities in such scenarios.
Finding and Fixing XSS in a React Application with StackHawk
Now, let’s understand how to detect XSS vulnerabilities more easily. To do this, we will configure StackHawk to test the application and identify these vulnerabilities as we are developing the application (or in CI/CD if you so prefer). Once the vulnerabilities are reported, we will discuss how to fix them and retest to ensure they’re truly fixed.
Detecting The Vulnerability With StackHawk and HawkScan
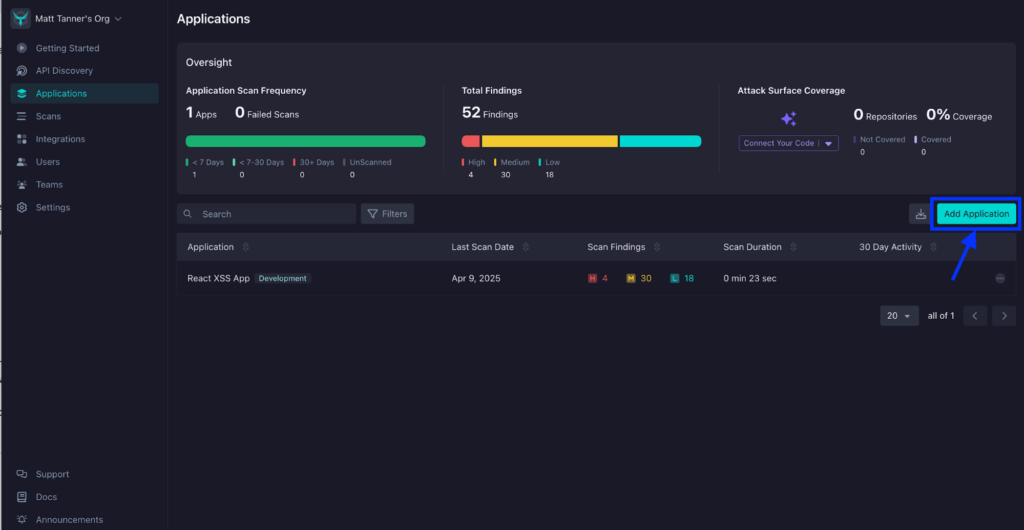
Instead of waiting for our AppSec team to let us know we have an issue later in development, let’s get StackHawk to identify this vulnerability for us automatically. To do this, you’ll need to ensure you have a StackHawk account. If you need one, you can sign up for a trial account or log into an existing account.
If you’re logging into an existing StackHawk account, from the Applications screen, you’ll click Add Application.
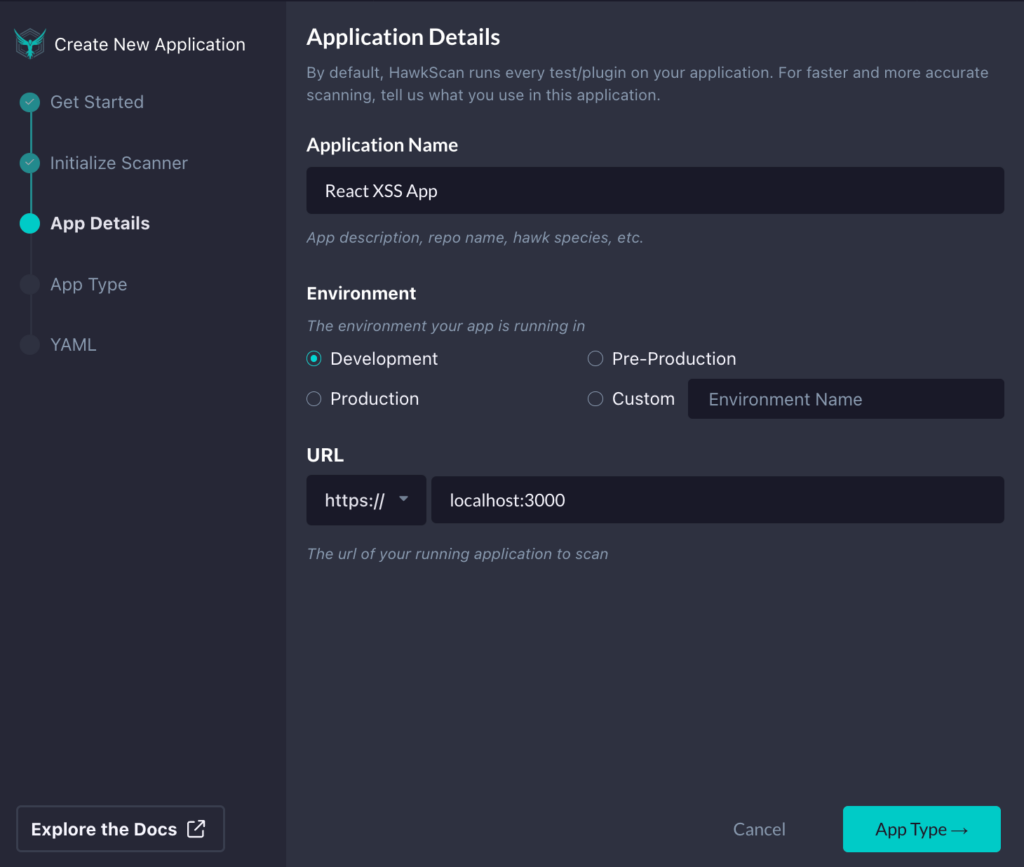
If you’re new to StackHawk, you’ll be automatically brought into the Add an App flow. On the Scanner screen, you’ll see the instructions for installing the StackHawk CLI. Since we will be running our testing locally, we will use this option. Once the hawk init command is executed successfully, click the Next button.
On the next screen, you will fill out an Application Name , Environment , and URL. Once filled out, click Next.
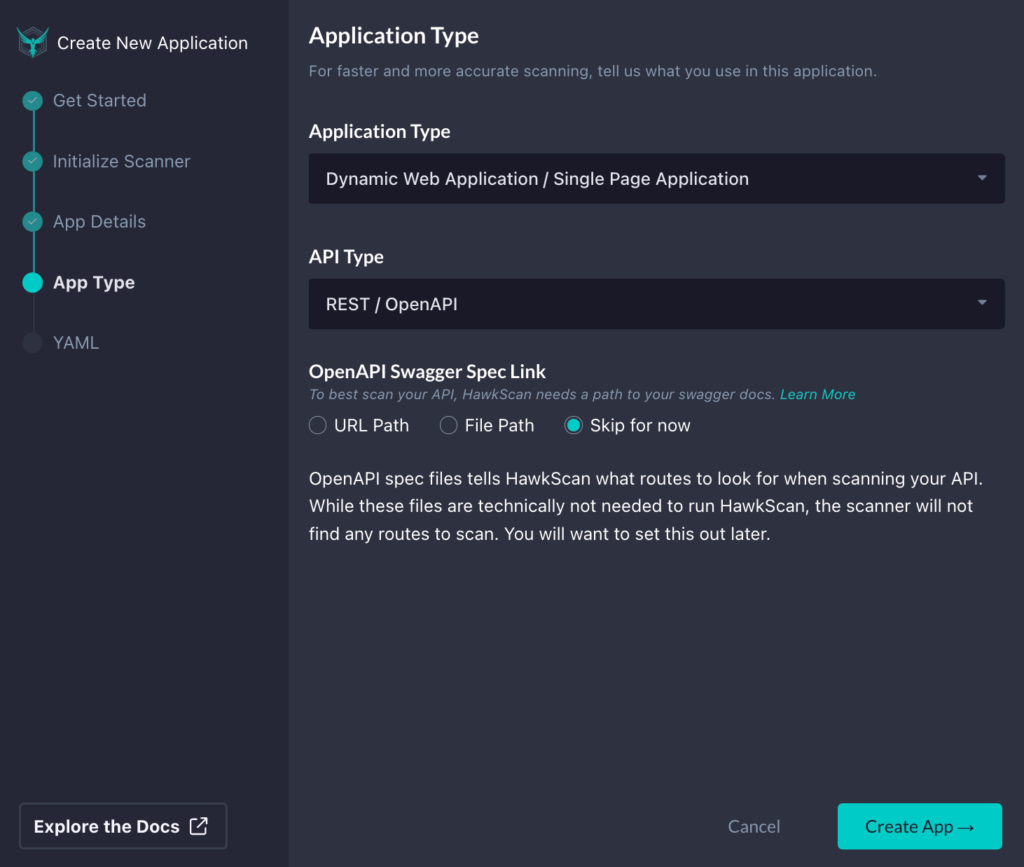
Since we will be testing a RESTful API, on the next page, we will choose our Application Type as “Dynamic Web Application/Single Page Application”.
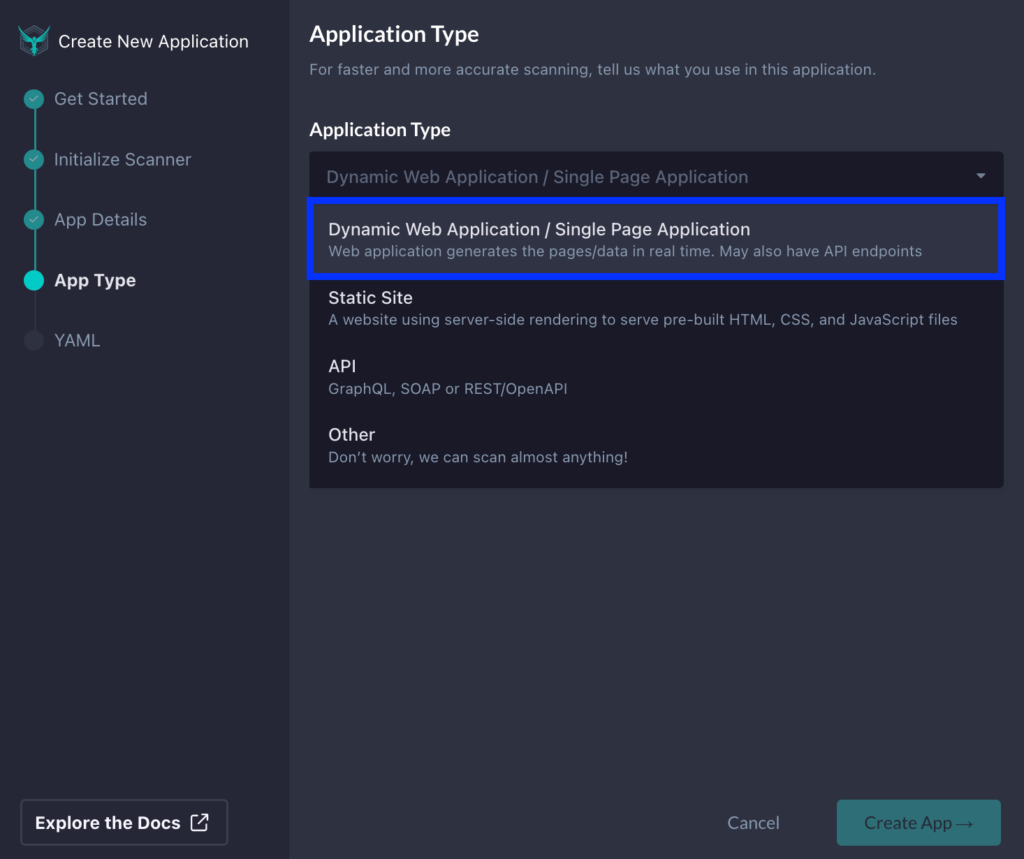
Depending on what you have set up as a backend API, you’ll also plug these details in. For example, if you have a REST API running, you would set the API Type as “REST / OpenAPI”, and point to our OpenAPI Specification file by selecting URL Path and adding the path to where your OpenAPI spec is located in the textbox. Alternatively, as I’ve done here, we can also click “Skip for now” if you’re unsure. Once complete, click Next.
Lastly, we will need to add a stackhawk.yml file to the root of our project. Once the file is added, copy the screen’s contents, paste them into the file, and save it. Lastly, we can click the Finish button.
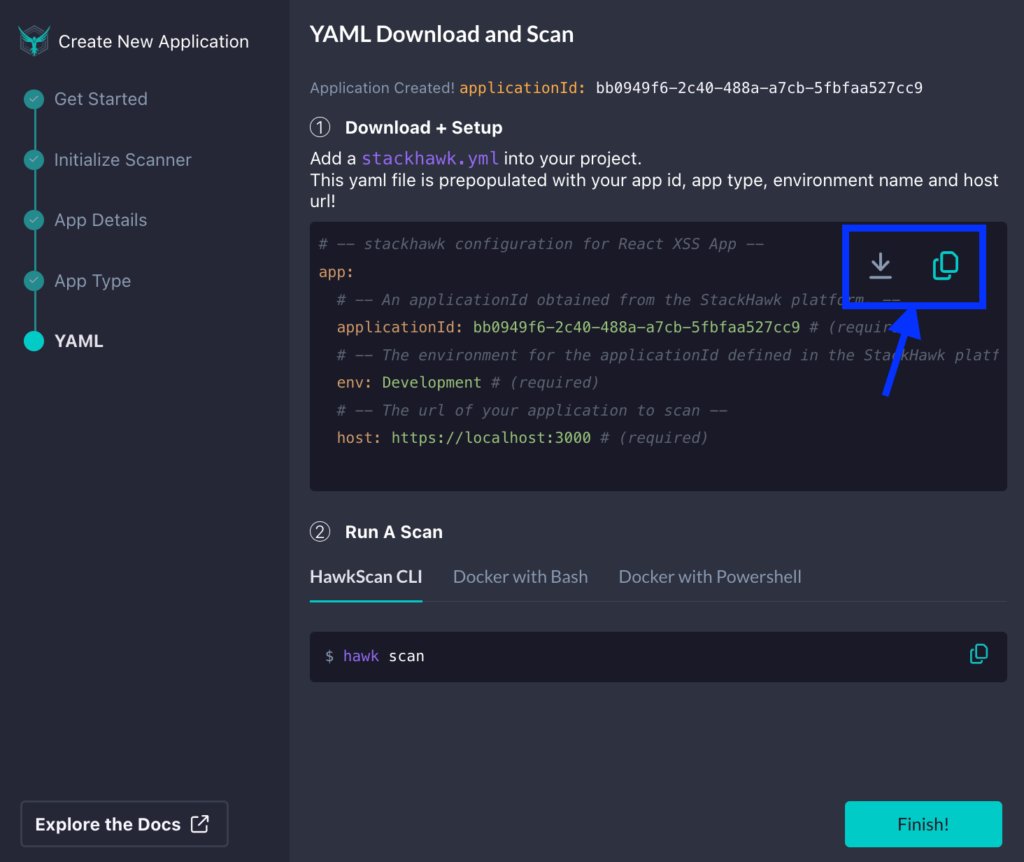
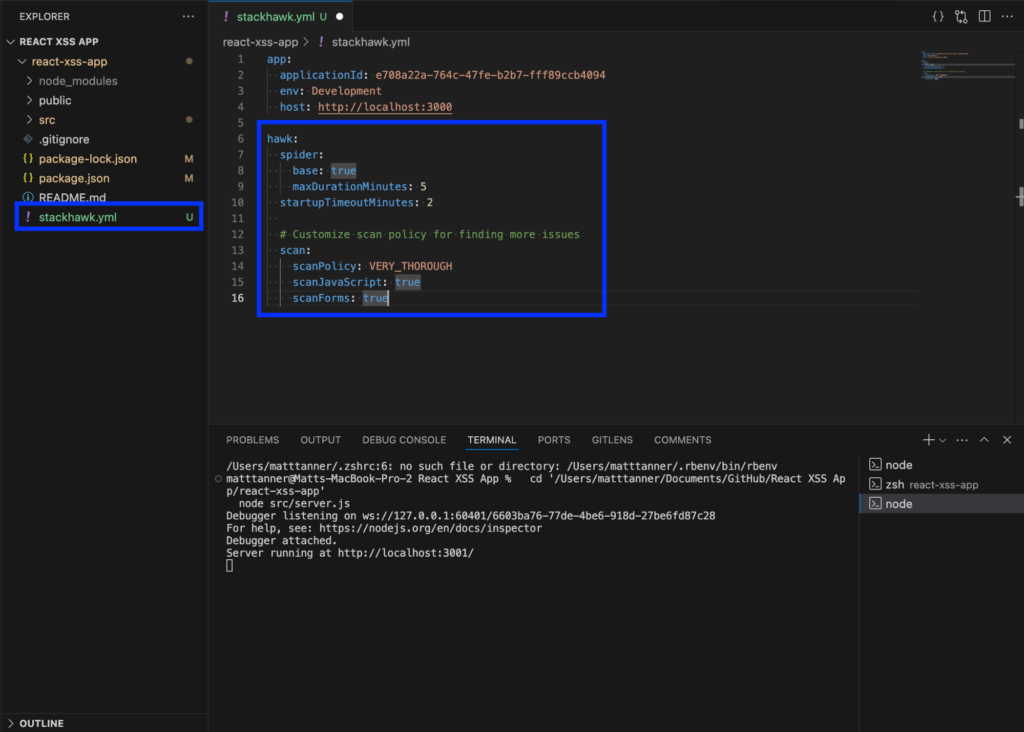
In our root directory, we should see the stackhawk.yml file we’ve added. Here I’ve also added some additional lines to the file that you are free to add:
Run HawkScan
Next, we can go ahead with testing our application. In a terminal pointing to the root of our project, we will run HawkScan using the following command:
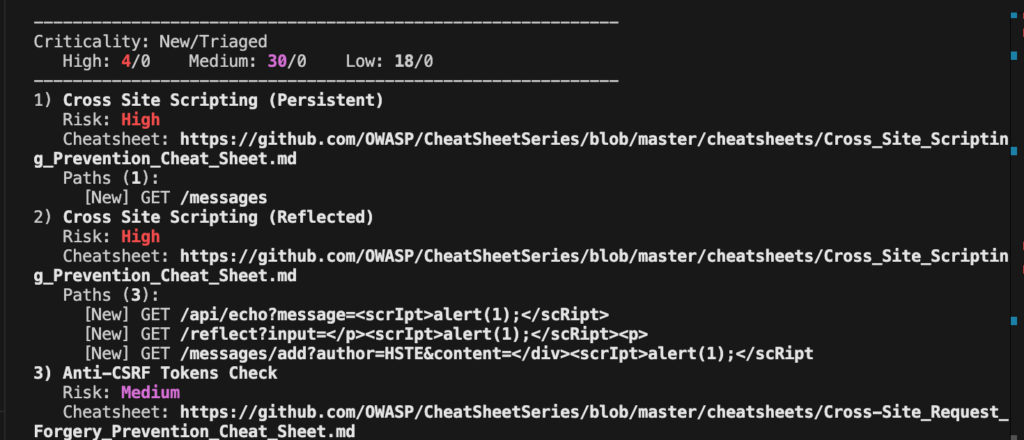
hawk scanAfter running the command, the tests should execute in the terminal.

This will run tests against our React application and the corresponding backend. Once the tests have run, we can begin to explore anything that was found.
Explore The Initial Findings
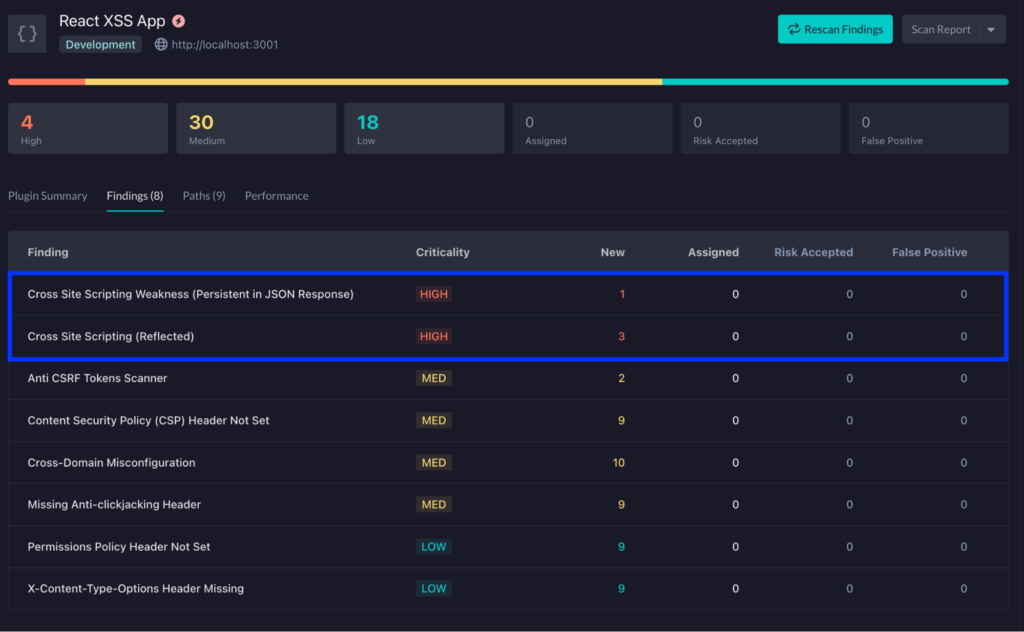
Once the tests are complete, the terminal will contain some information about any vulnerabilities found. Below, we can see that StackHawk has found a few XSS vulnerabilities within my code, including persistent XSS and reflected XSS.
To explore this further, we will click on the test link at the bottom of the output. This will take us into the StackHawk platform to explore further.

After clicking on the link, we can now see the test results nicely formatted. Next, we will click on the Cross-Site Scripting entries.
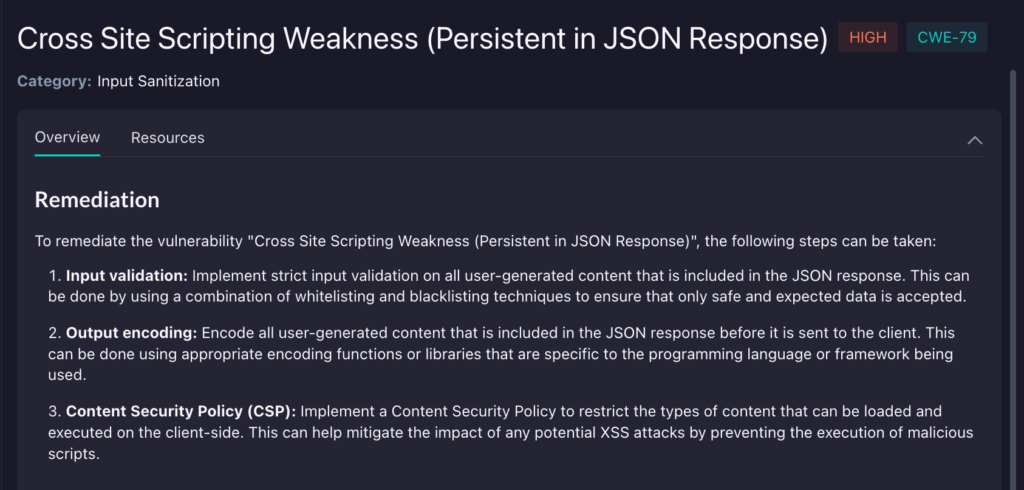
Within this entry, we can see an Overview and Resources that can help us with fixing this vulnerability, as well as the Request and Response that the API returned on the right side of the screen. Above this, you will also see a Validate button, which will display a cURL command with the exact HTTP request used to expose the vulnerability.

Fixing The XSS Vulnerabilities
Now that we’ve found some issues, we can go ahead with fixing them. You can use StackHawk to give guidance on how to fix it through the fix guides shared in the results on the StackHawk portal, or, if you know what you’re doing already, go in and put in your fix. For the vulnerability we were looking at before, you’ll see in the overview that there are some steps you can take to remediate the vulnerability.
Once fixed, make sure to stop your web servers and redeploy the latest code. Next, we can make sure that the fix implemented actually fixes our XSS issues.
Confirm the fix!
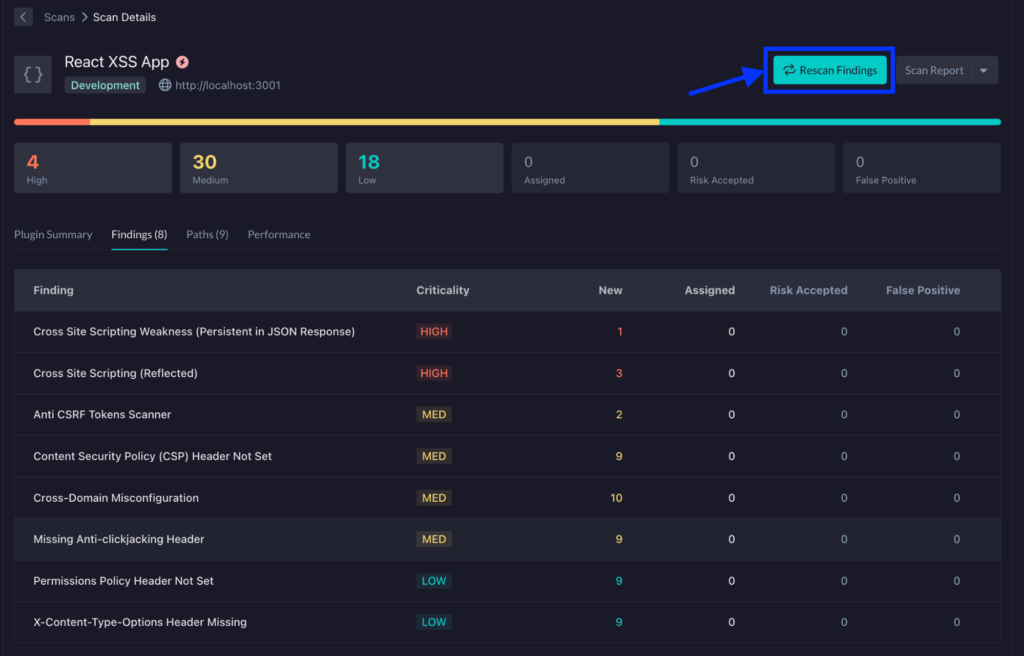
With the latest code deployed, let’s confirm the fix in StackHawk. To do this, we will click the Rescan Findings button back in StackHawk.
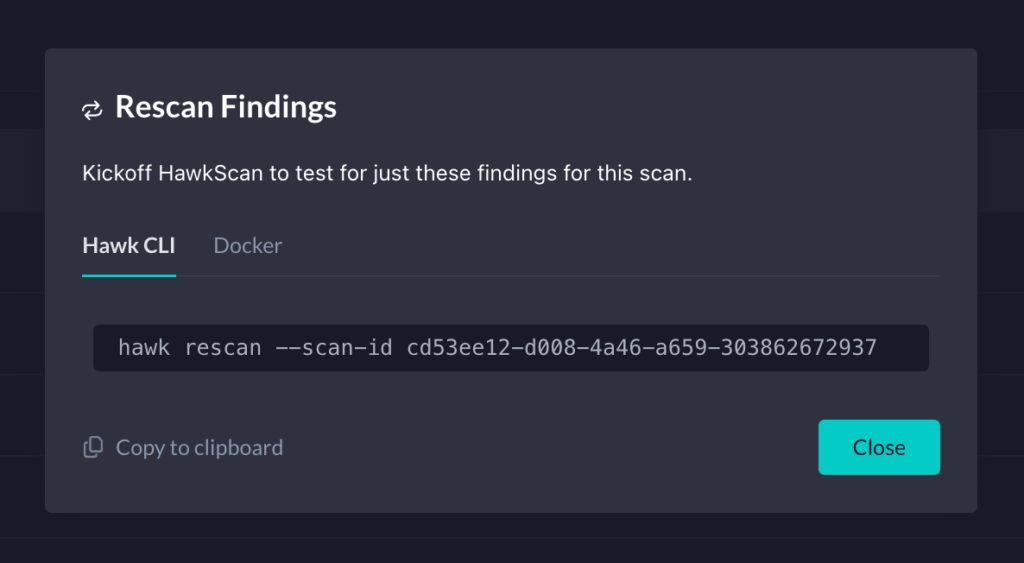
Then, we will see a modal containing the “hawk rescan” command that includes the correct Scan ID. You’ll run this command in the same terminal where you ran the initial set of tests.
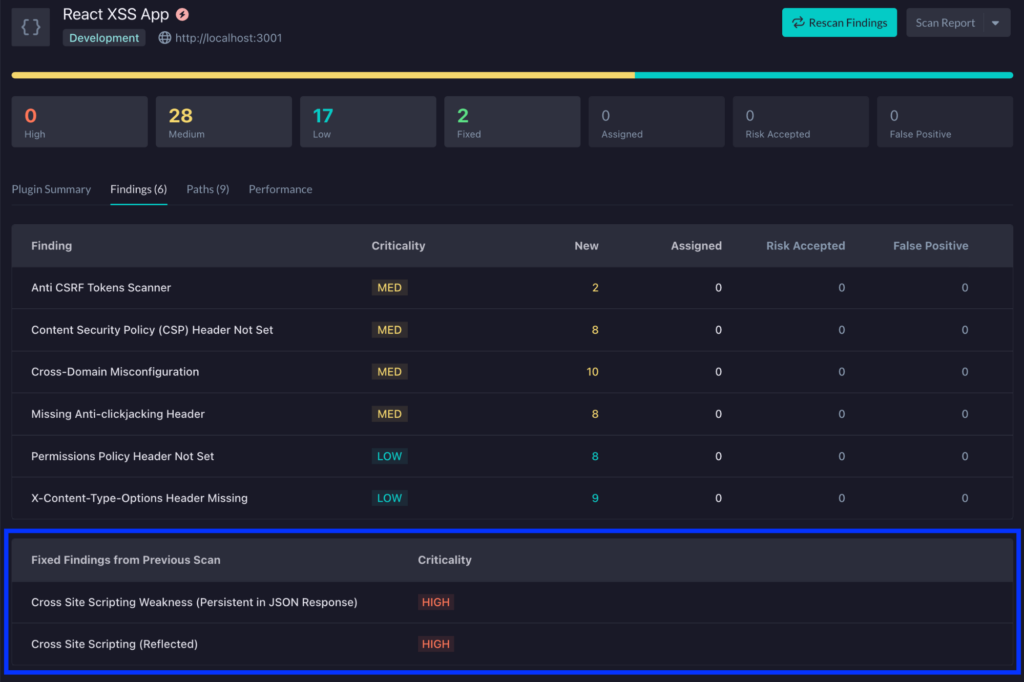
In the output, you will again see any vulnerabilities found in the scan. In this case, you’ll see that the XSS vulnerabilities are no longer showing. Clicking on the link at the bottom of the terminal output, you can confirm that the XSS vulnerabilities have now been added to the Fixed Findings from Previous Scan, confirming that the vulnerability has been successfully fixed and has passed any vulnerability tests.
With that, we’ve successfully remedied and retested our application to ensure its safety from potential XSS attacks.
Why StackHawk?
When it comes to preventing vulnerabilities, such as XSS, StackHawk offers a comprehensive platform for developers to secure their applications and APIs. StackHawk is a modern, powerful DAST tool designed for developers to integrate application security testing seamlessly into their software development lifecycle. It offers a developer-first platform emphasizing automation, ease of use, and integration into existing development workflows.
At its core, StackHawk is built around empowering developers to take the lead in application security. It provides a suite of tools that make it easy to find, understand, and fix security vulnerabilities before they make it to production. One of the critical components of StackHawk is HawkScan, a dynamic application security testing (DAST) tool that scans running applications and APIs to identify security vulnerabilities.
With StackHawk, developers and security teams can:
- Automate Security Testing: Integrate security testing into CI/CD pipelines, ensuring every build is automatically scanned for vulnerabilities.
- Identify and Fix Vulnerabilities: Receive detailed, actionable information about each vulnerability, including where it is in the code and how to fix it.
- Test in All Environments: Use StackHawk in various environments, including development, staging, and production, to catch security issues at any stage of the development process.
- Customize Scans: Tailor scanning configurations to suit specific applications and environments, ensuring more relevant and accurate results.
By focusing on a developer-first approach to security testing and integrating smoothly into existing dev tools and practices, StackHawk demystifies application security, making it a more approachable and manageable part of the software development lifecycle.
Conclusion
As developers, we must learn how to build safe and secure applications. XSS is one of the most common application vulnerabilities that has existed for a long time. We discussed DOM-based cross-site scripting attacks, how malicious code can be injected into an application, and, more importantly, how to use StackHawk to find and fix these vulnerabilities in your React applications. By integrating security testing tools like StackHawk into your development workflow, you can proactively identify and address security concerns, ensuring the safety and security of your users’ data.
Want to give StackHawk a try for yourself and make your React applications more secure? Sign up for StackHawk today for a free 14-day trial to detect cross-site scripting vulnerabilities and much more within minutes.


