
")
The rise of AI-powered development tools has changed how we write code, but it’s also introduced new security challenges. While tools like Cursor can speed up development, using them can also introduce vulnerabilities that can be easily missed.
In this guide, we’ll show you how to combine the power of Cursor’s AI-powered coding with StackHawk’s dynamic application security testing (DAST) to create a secure development workflow that works well whether you’re using AI to augment your development workflow or full-on vibe coding your latest app.
Securing Your Cursor AI Development Workflow
Like most cybersecurity strategies, it’s important to understand that securing AI-generated code requires a multifaceted approach. While this guide focuses on Cursor and dynamic security testing with StackHawk, effective AI code security involves multiple layers regardless of what AI coding tool you’re using. The four most important things to focus on are:
- Configuration: Setting up your AI tools with security-first rules and guardrails to guide code generation toward secure patterns from the start.
- Automated Testing: Integrating security testing directly into your development workflow to catch vulnerabilities as code is created.
- Production Monitoring: Implementing real-time monitoring to detect security issues that reach production environments.
- Maintaining Skills: Building security knowledge that helps teams work effectively with AI while recognizing potential security gaps.
For a complete overview of these strategies with detailed implementation guidance, check out 4 Best Practices for AI Code Security: A Developer’s Guide.
This article focuses specifically on the automated testing component. We’ll show you two practical ways to integrate StackHawk’s dynamic security testing into your Cursor-based development process for immediate vulnerability detection and remediation.
Building Secure AI-Generated Applications: Two Integration Approaches
AI-powered development tools like Cursor have fundamentally changed how we write code, and they enable developers to build applications at unprecedented speed. However, this acceleration presents a major challenge: how can we ensure the security of AI-generated code without slowing down development velocity? The vulnerabilities AI produces show up in human-generated code too—AI’s speed and scale simply compound the issues.
We don’t need to abandon AI-assisted development, but we do need to stop treating security as a post-deployment concern. The solution is to prioritize security testing that integrates seamlessly into AI-powered workflows, and provides immediate feedback that developers can act on without breaking their flow.
StackHawk offers two approaches to integrate dynamic security testing into your Cursor-based development process:
1. Pipeline Integration: Perfect for teams that want to add security testing to their existing CI/CD workflows. This approach runs comprehensive security scans when code is committed, identifies vulnerabilities, and provides detailed remediation guidance that you can feed directly back into Cursor for AI-powered fixes.
2. MCP Server Integration: Ideal for developers who want security testing built directly into their IDE. By installing the StackHawk MCP server, you can run security scans, analyze vulnerabilities, and get remediation suggestions without ever leaving Cursor, turning your development environment into a security-aware workspace.
Both approaches leverage StackHawk’s comprehensive API testing capabilities and developer-friendly reporting to ensure that AI-generated code meets enterprise security standards. Whether you prefer testing in your pipeline or directly in your IDE, you’ll get the same thorough vulnerability detection and actionable remediation guidance.
Let’s explore both integration methods so you can choose the method that best fits your development workflow.
Getting Started with StackHawk
To start testing applications built using AI-powered workflows with StackHawk, you’ll need an account. You can sign up for a trial account. If you’re using an AI-coding assistant like Cursor, sign up for our $5/month single-user plan, Vibe, to find and fix vulnerabilities 100% in natural language.

Approach 1: How to Use Cursor and StackHawk Together
In this approach, we will use a combination of insights from StackHawk and security-informed prompting to create a more secure application. We will use a workflow that will essentially use StackHawk to test the application, feed the results into Cursor, let the Cursor agent fix the security issues, and then retest with StackHawk to ensure that the fixes created actually solve the underlying issue.
To do this, we will need:
- Cursor installed on your machine with an active license
- A StackHawk account and active license
The steps below can be used with any type of application or API; however, in this example, we will use a simple Node.js application to show how the workflow would work. You can even begin to use this workflow from the onset of a vibe-coded project to make sure that the application is secure as it evolves.
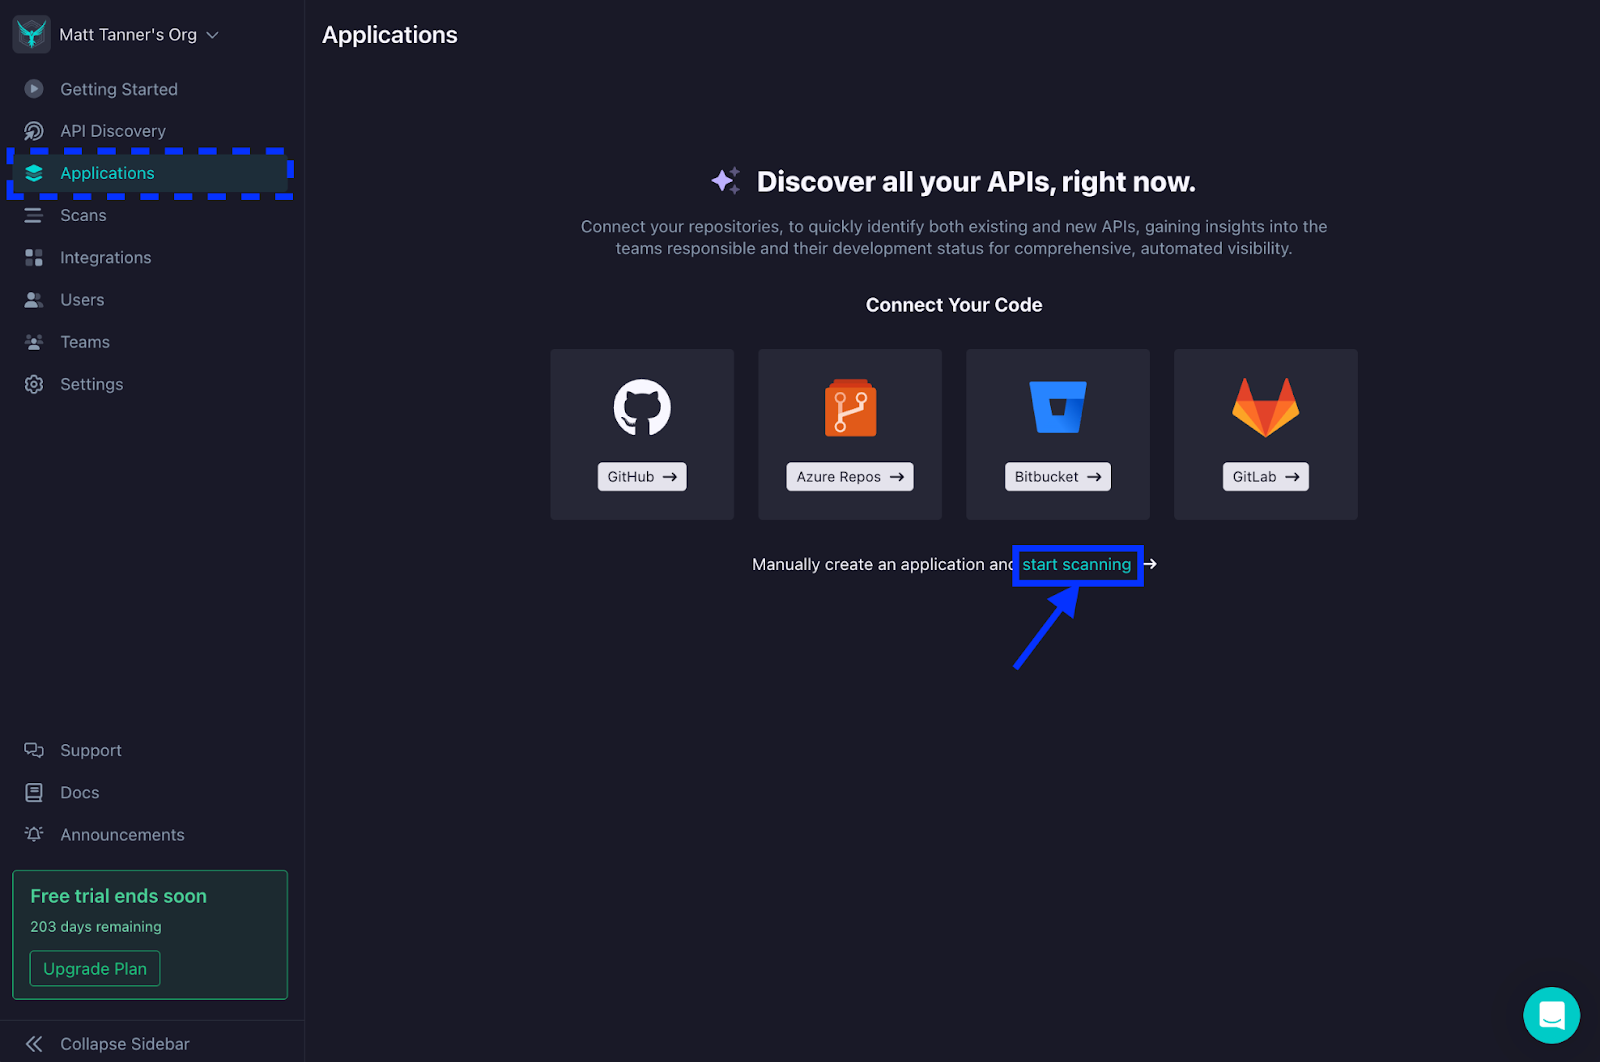
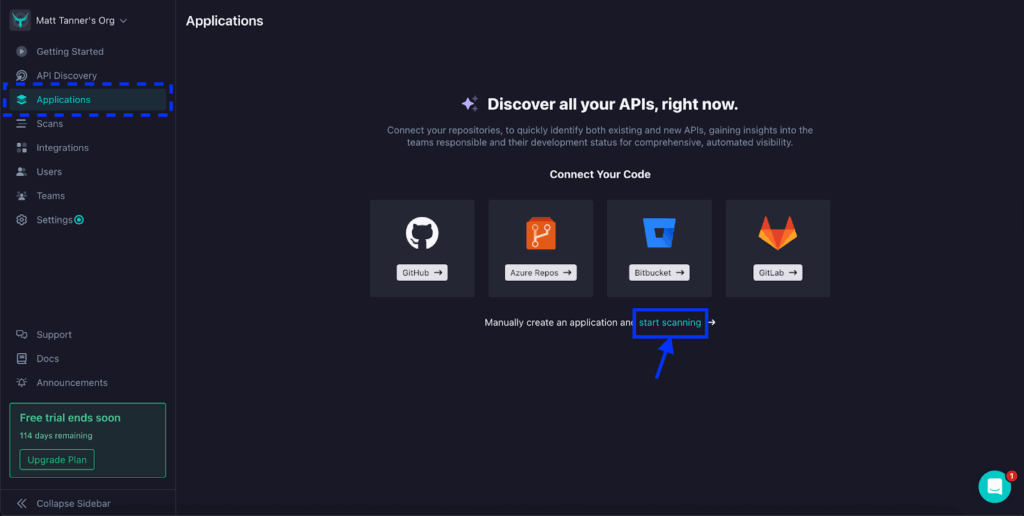
First, let’s create a StackHawk app for our application. Once you’ve created an account and logged into StackHawk, your next step will be to create an app by either connecting your repository, such as GitHub or Bitbucket, or manually creating an app. For simplicity in this tutorial, we will forego adding our repository (although it’s highly recommended to do so to get the full functionality of StackHawk). For that, let’s click the link to manually set up an app.
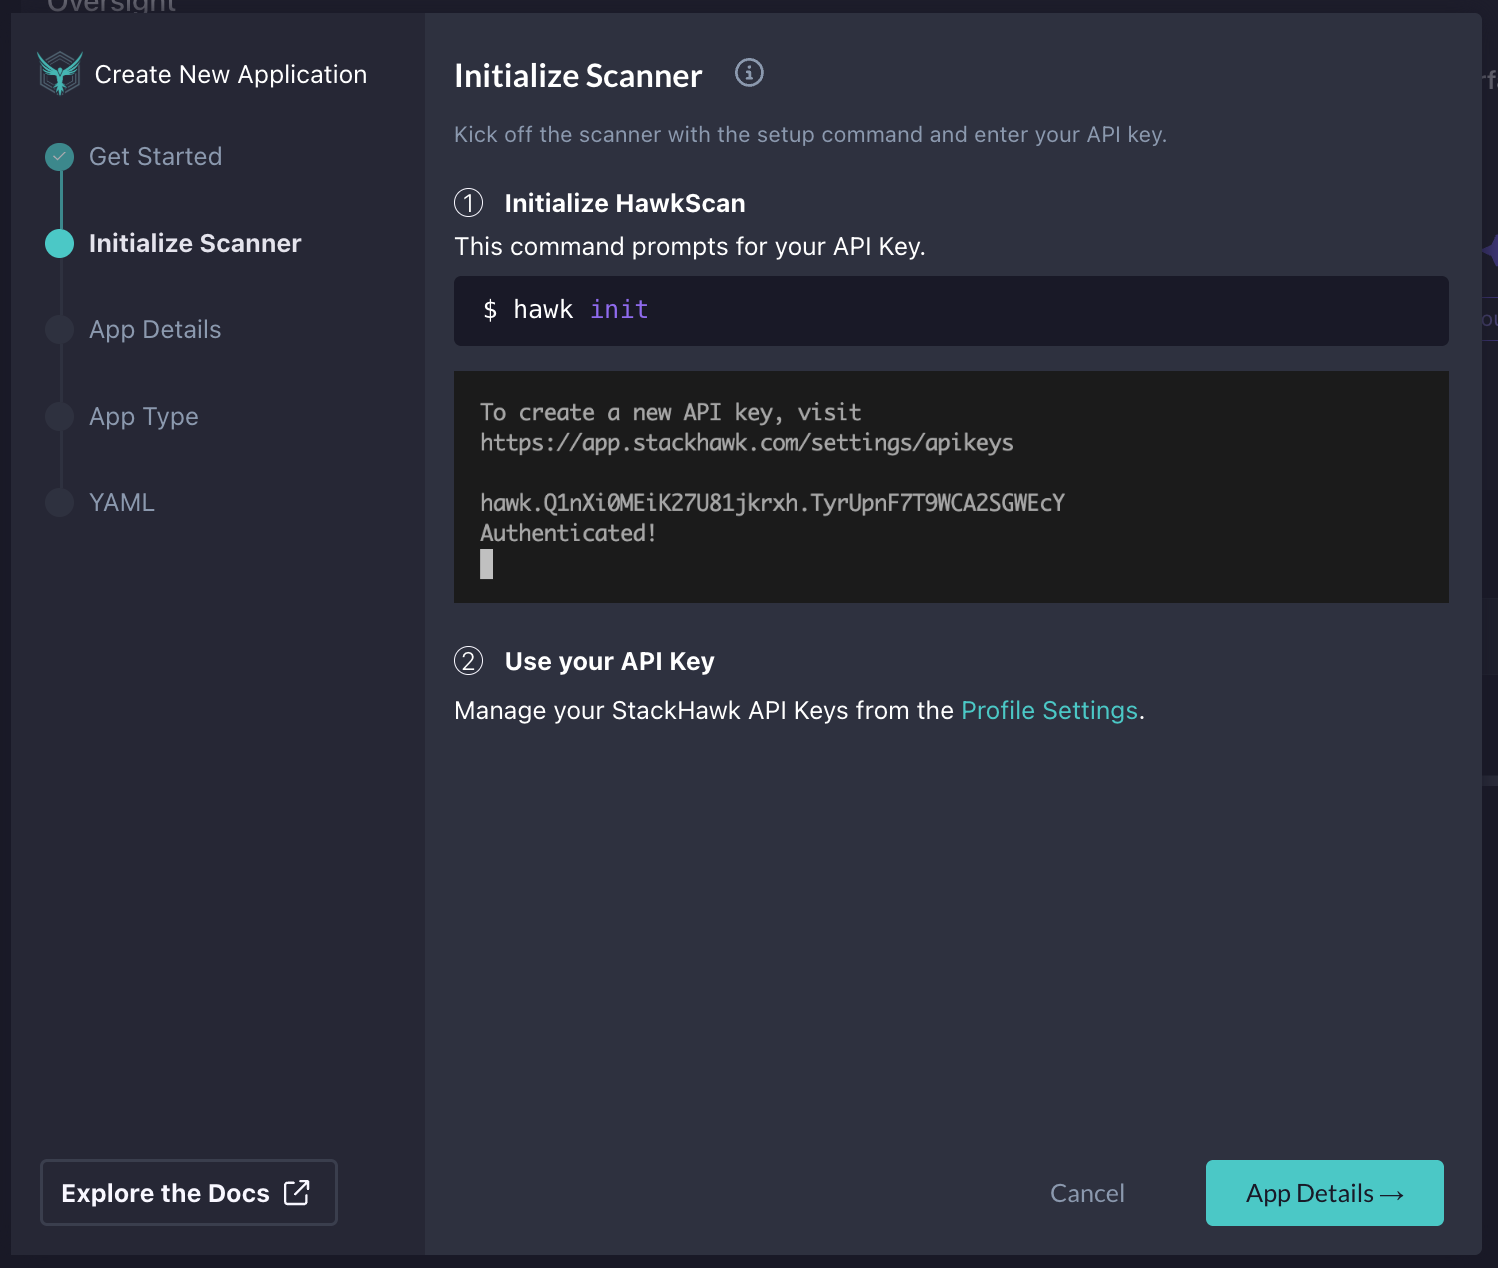
Next, a modal will appear, walking you through each step. In the first screen, you’ll be prompted to download StackHawk. Since I’m running this locally, I will download the PKG installer for macOS. However, if you want to run this on a different OS or in CI/CD, you can check the downloads page to get the right version. Once you have it downloaded and installed, click Initialize Scanner in the bottom right.

After this, we will initialize StackHawk by running hawk init in a terminal. Once successfully completed, click App Details in the bottom right corner of the modal.
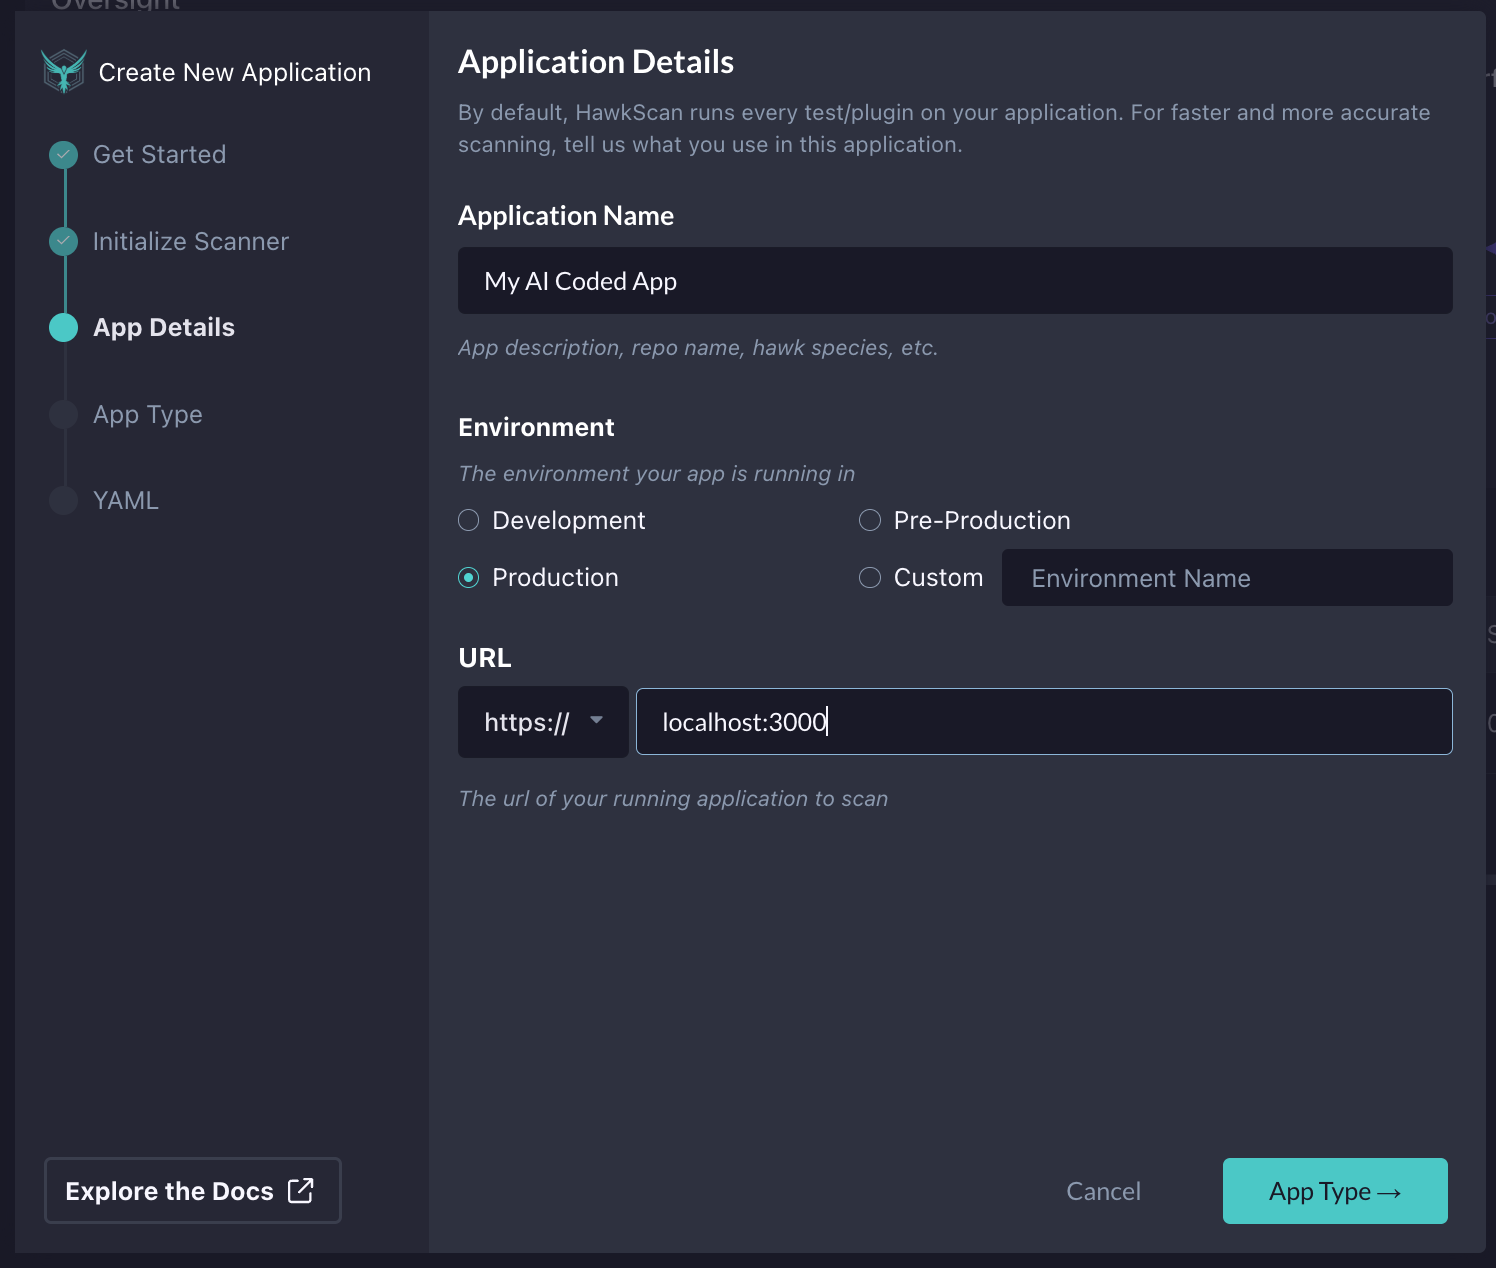
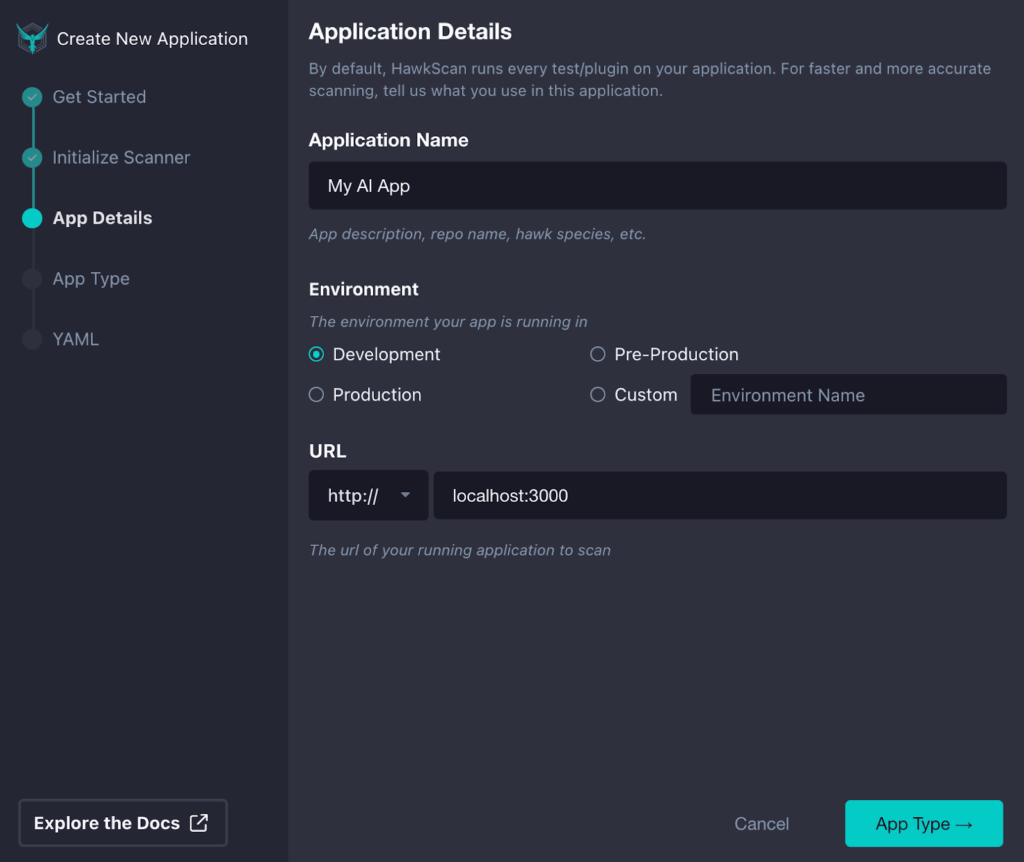
After it has been initialized, we can finally put in the details for our app. Here we will set our Application Name, Environment, and the base URL of our app or API. Once you’ve filled in the details, click App Type in the bottom right.
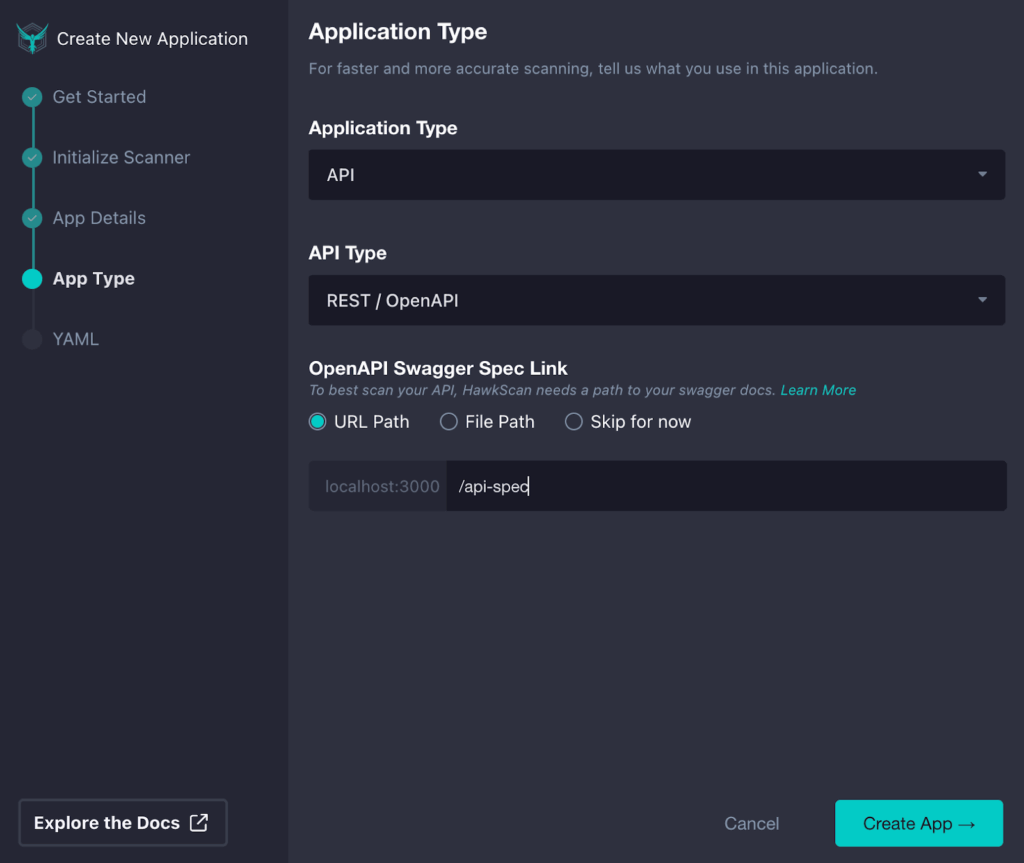
In StackHAwk, depending on what type of application we want to test, we can select the type. Here, we can choose from a single-page app, static site, API, or other options.
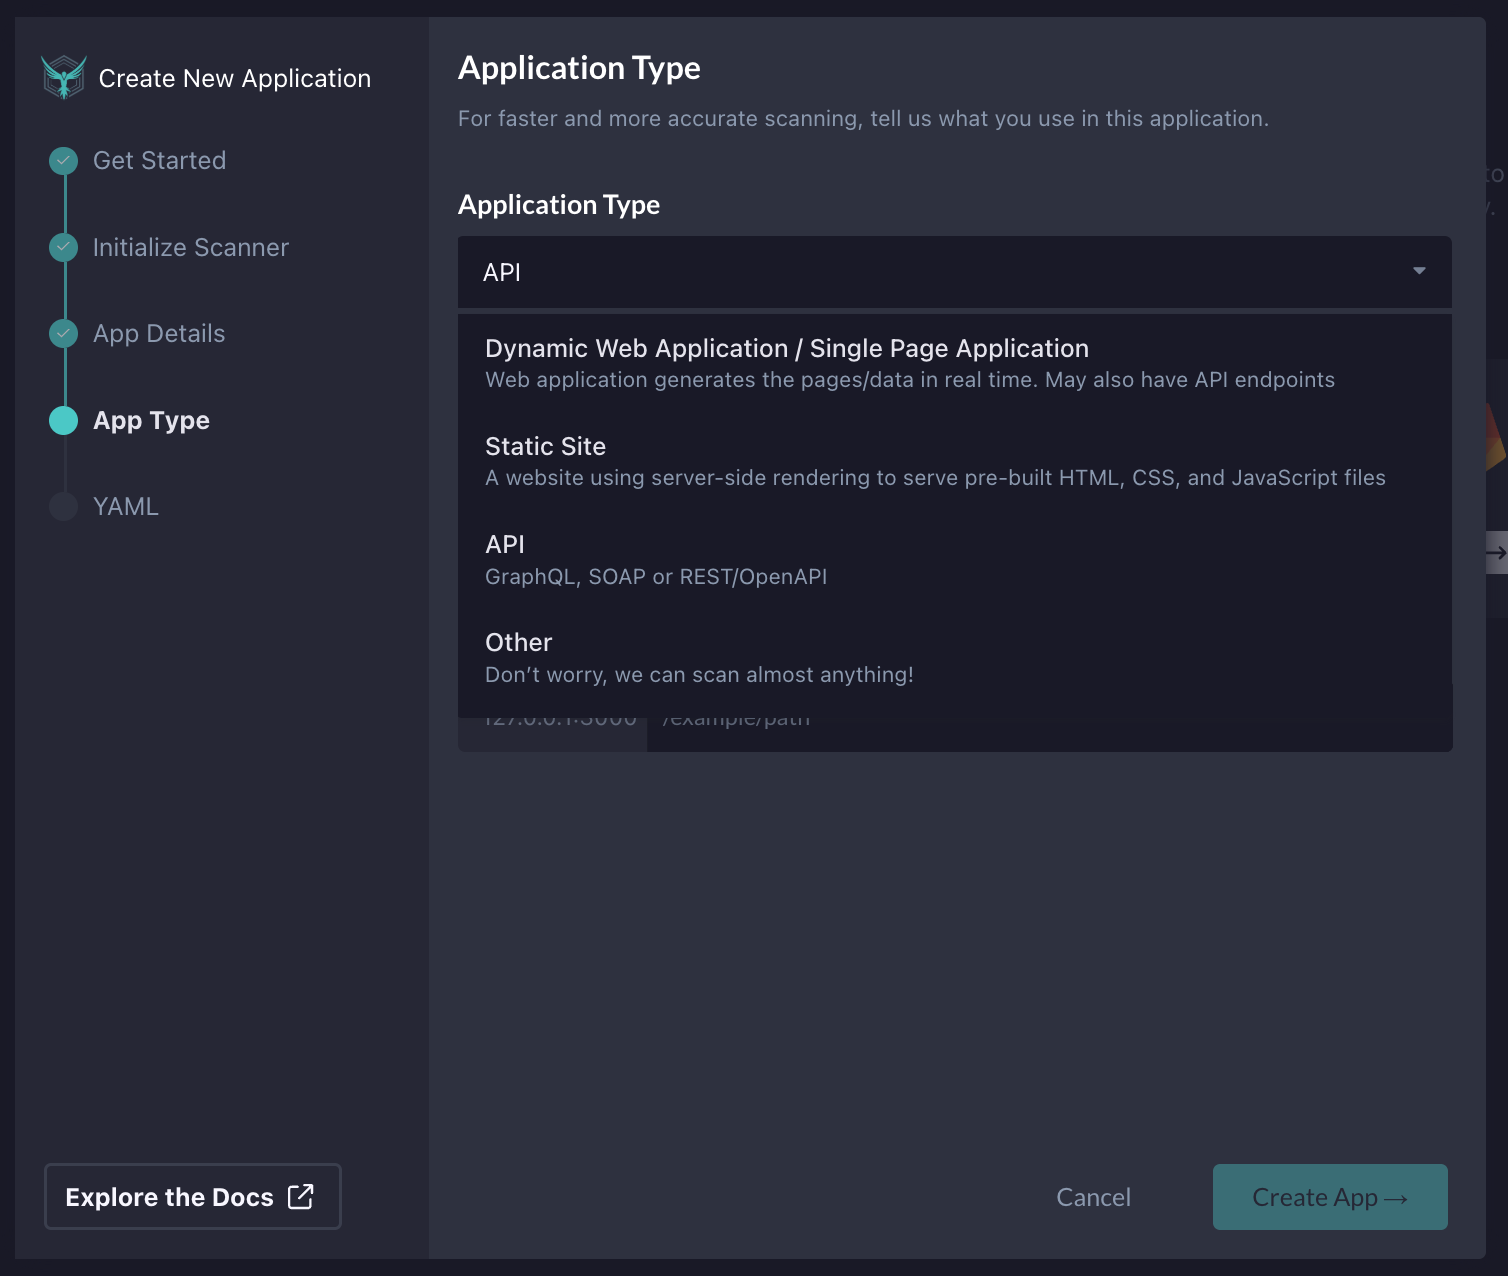
In our case, we will select API since the code we will test in Cursor is a NodeJS API. We will then need to select the type of API we will be testing. Since our Node.js project contains REST APIs, we will pick REST / OpenAPI.

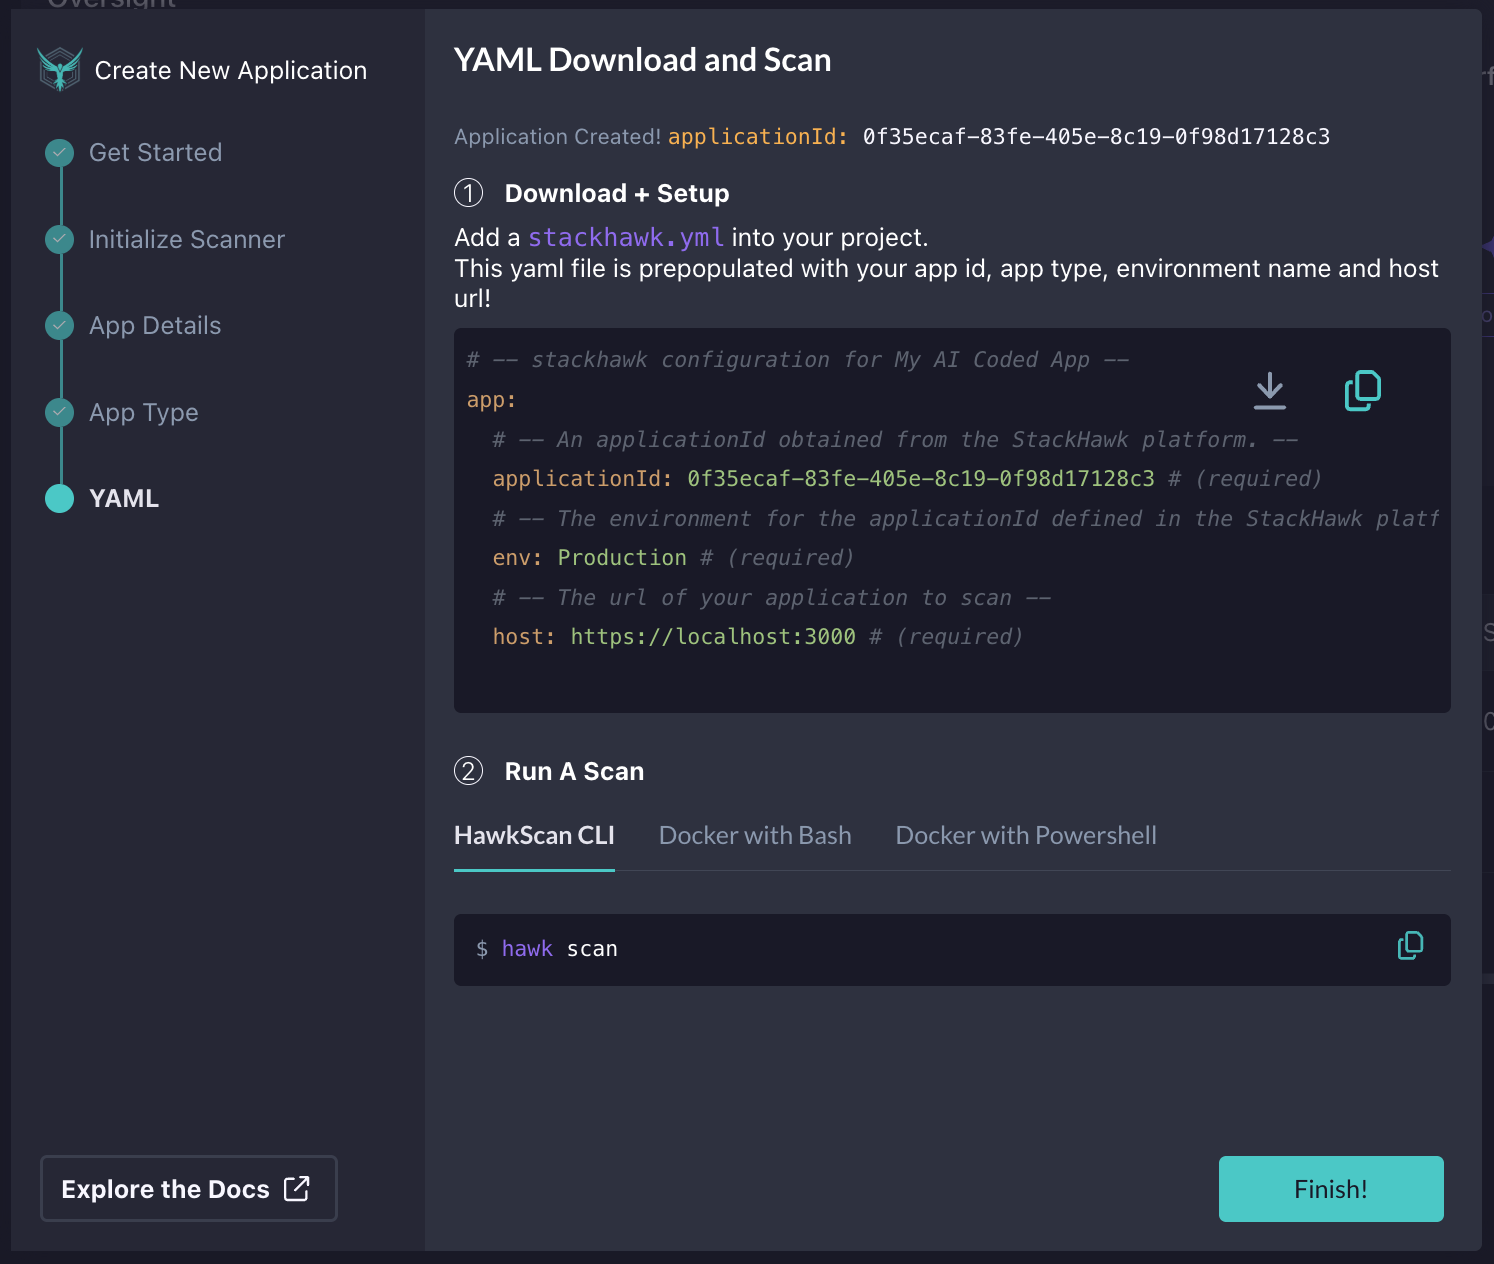
Lastly, we will add the path to our OpenAPI spec, since this is the best way to get accurate testing with StackHawk when testing REST APIs. I can either supply a URL path if the OpenAPI spec is hosted and available at a particular URL, specify a file path within the project where the tests will run, or skip this configuration section. In this case, I will specify where the OpenAPI spec is within my project so that StackHawk can pick it up to assist with testing the API. Once you have the app config dialed in, click Create App in the bottom right corner.

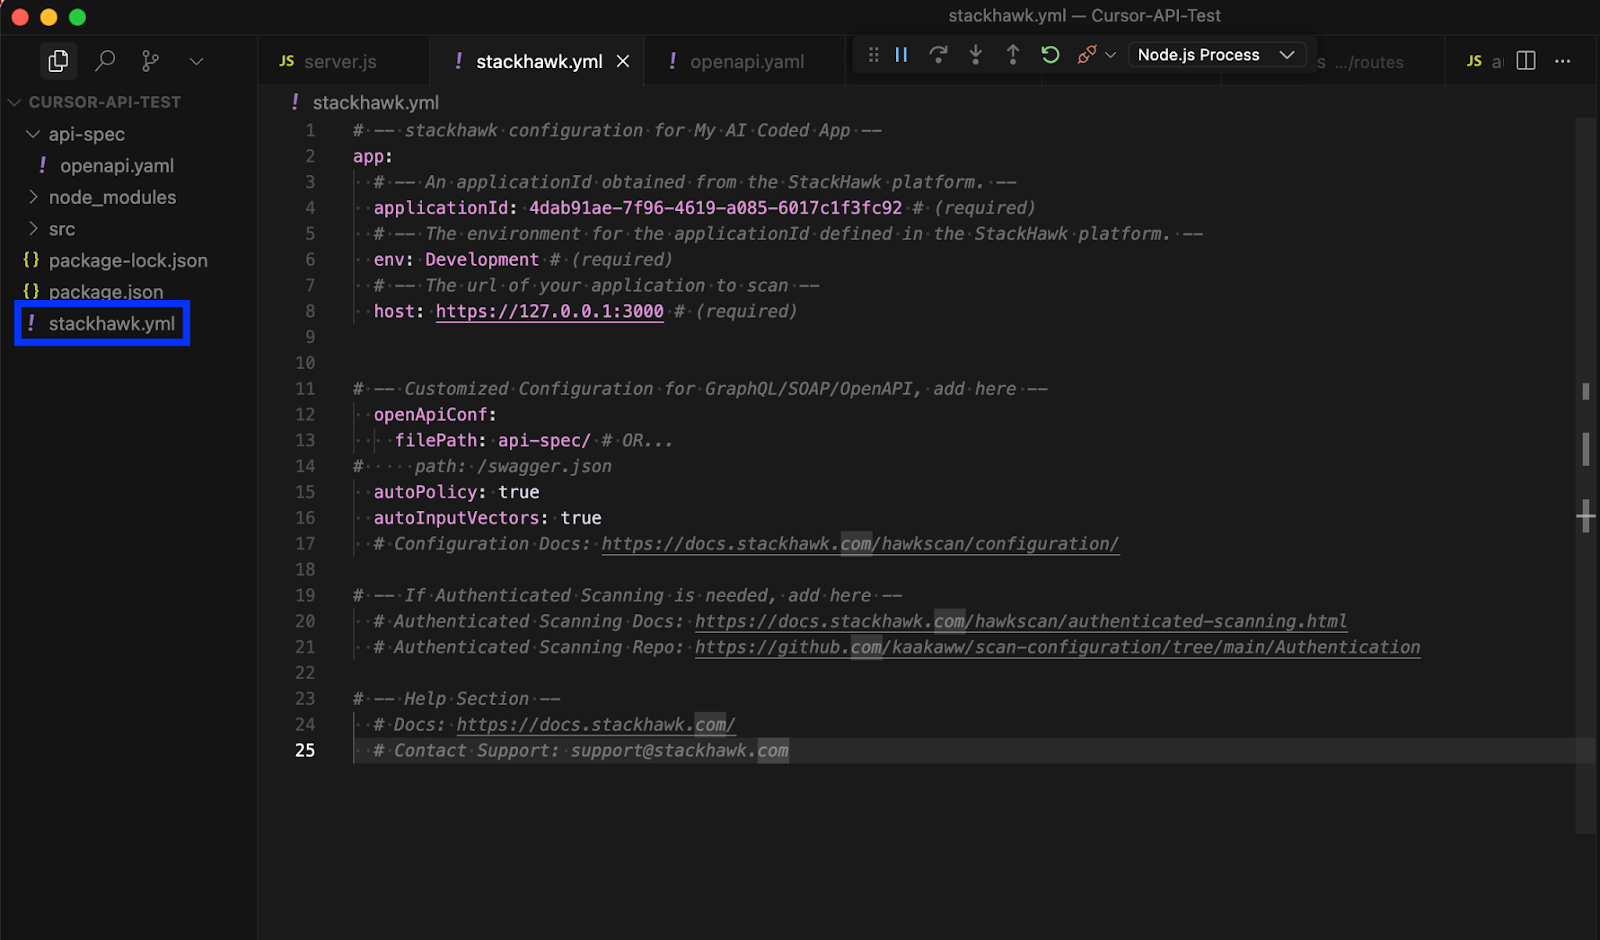
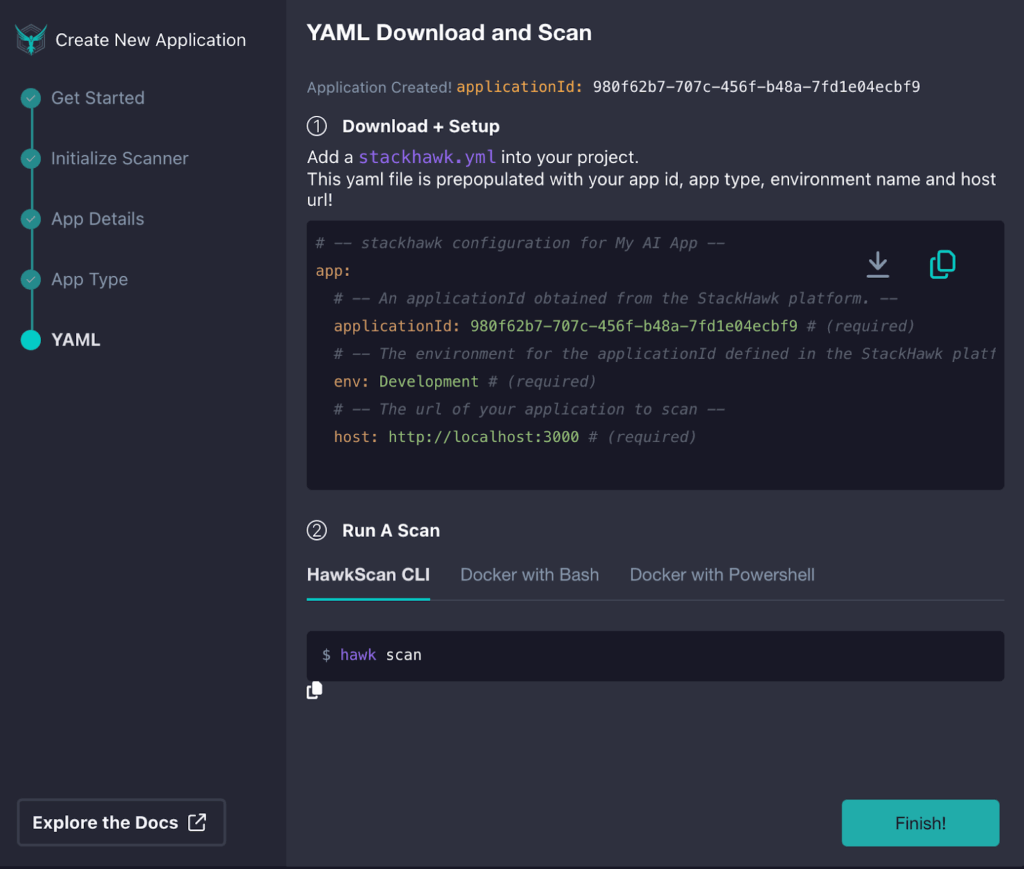
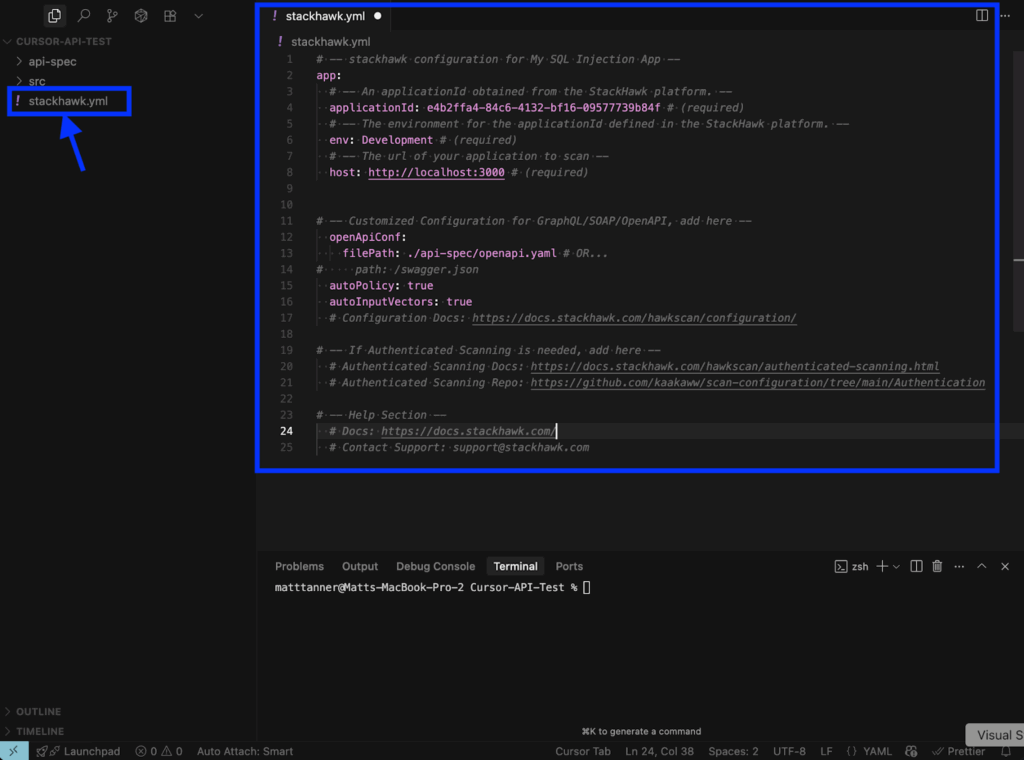
Now, we need to download or copy the generated stackhawk.yml file and add it to our project.
In my case, I’ve added it in the root directory of my app in Cursor.
Once you’ve added the stackhawk.yml file to your project, you can return to StackHawk and click Finish to exit the modal. From here, you’ll now see the app is created, and StackHawk is waiting for you to run your first scan.
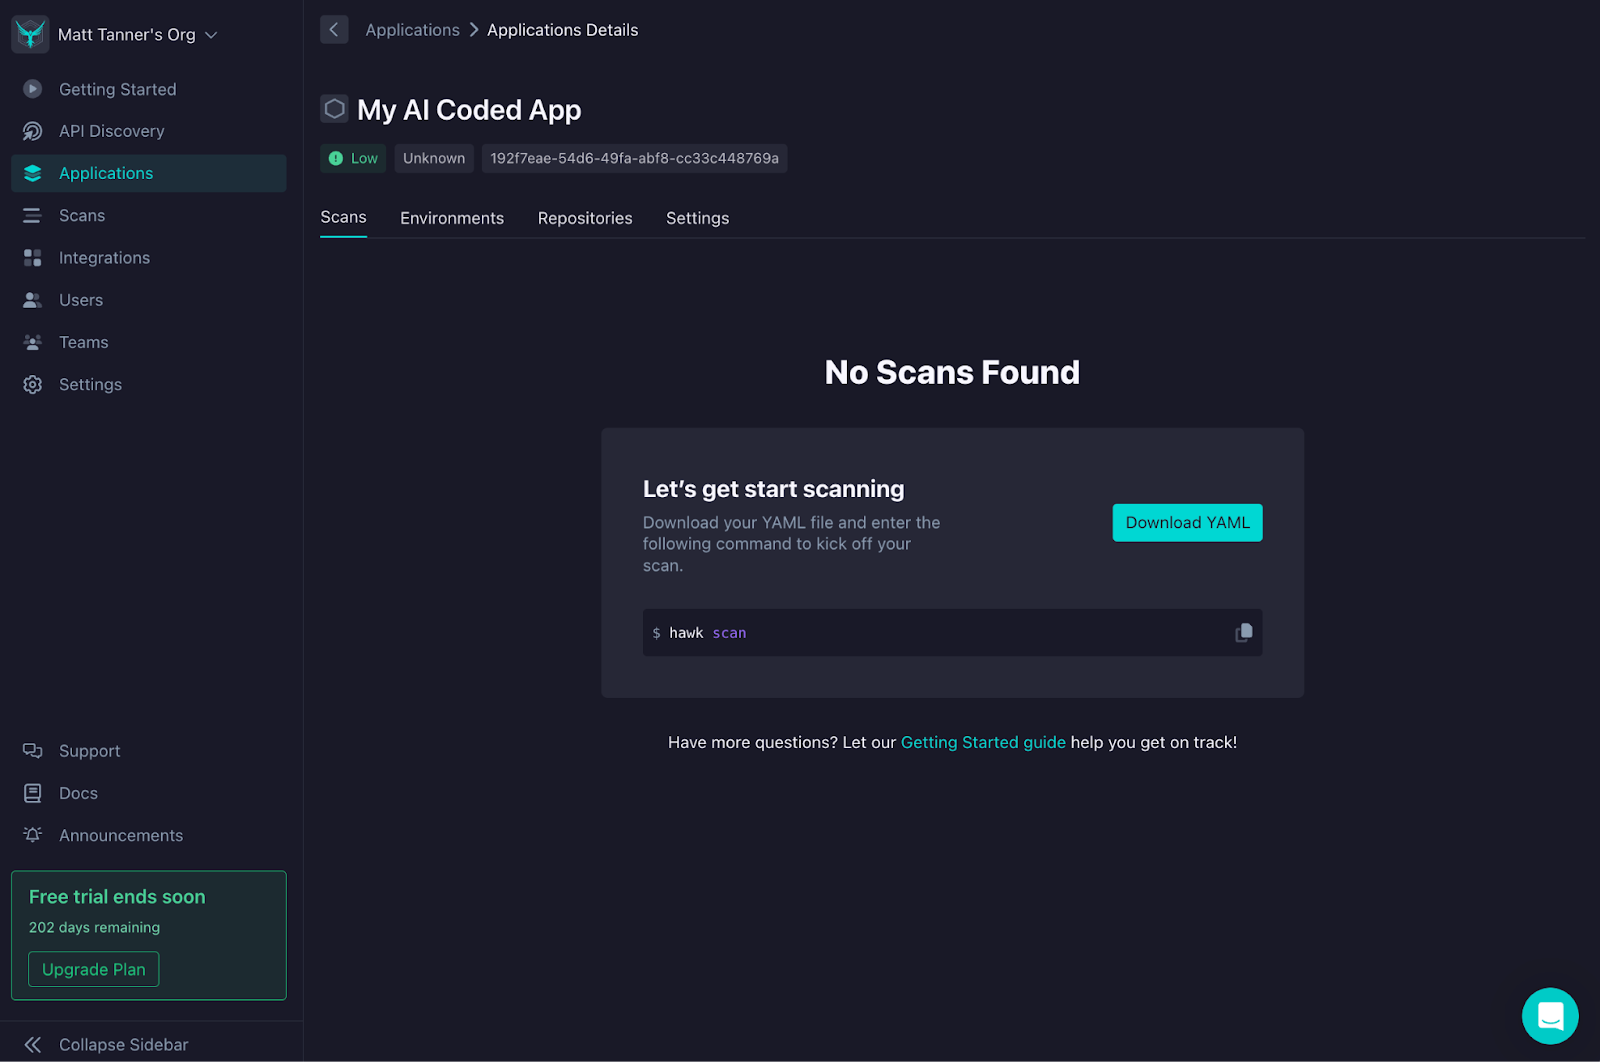
Now, heading over to your project in Cursor, we can do the initial scan of the app. In a terminal, run:
hawk scan
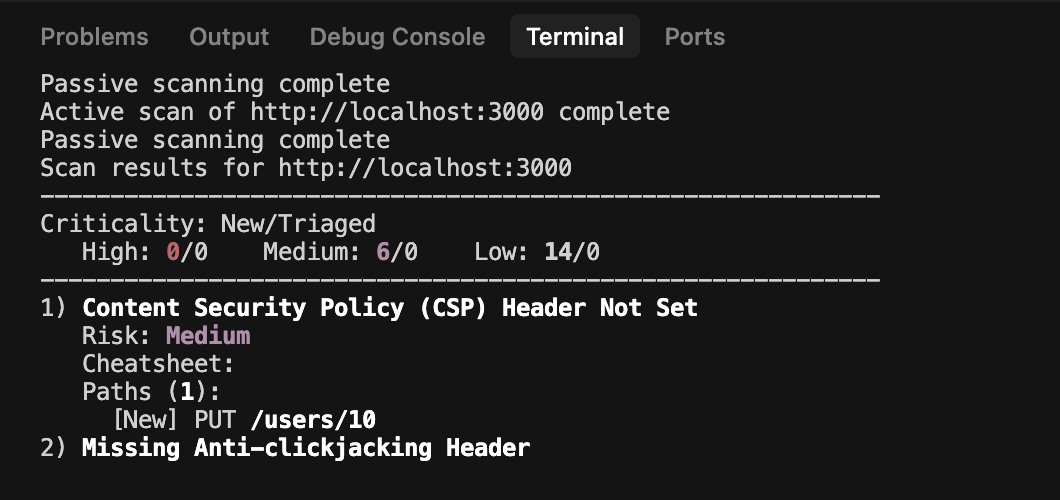
This will run the first round of tests to get the base state of the application and detect any security vulnerabilities in the API.
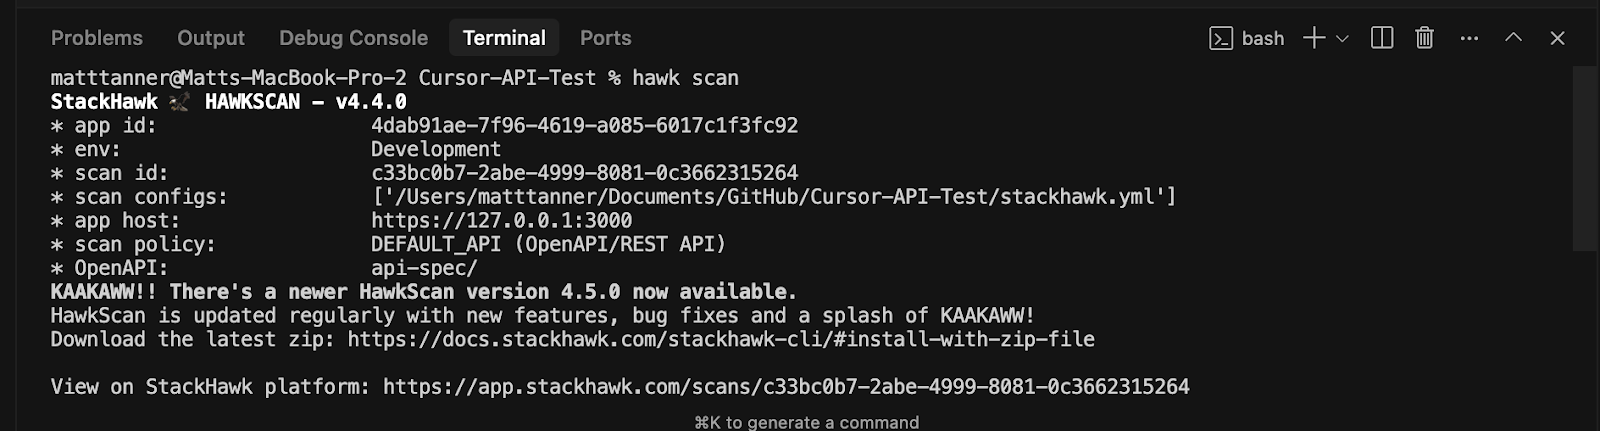
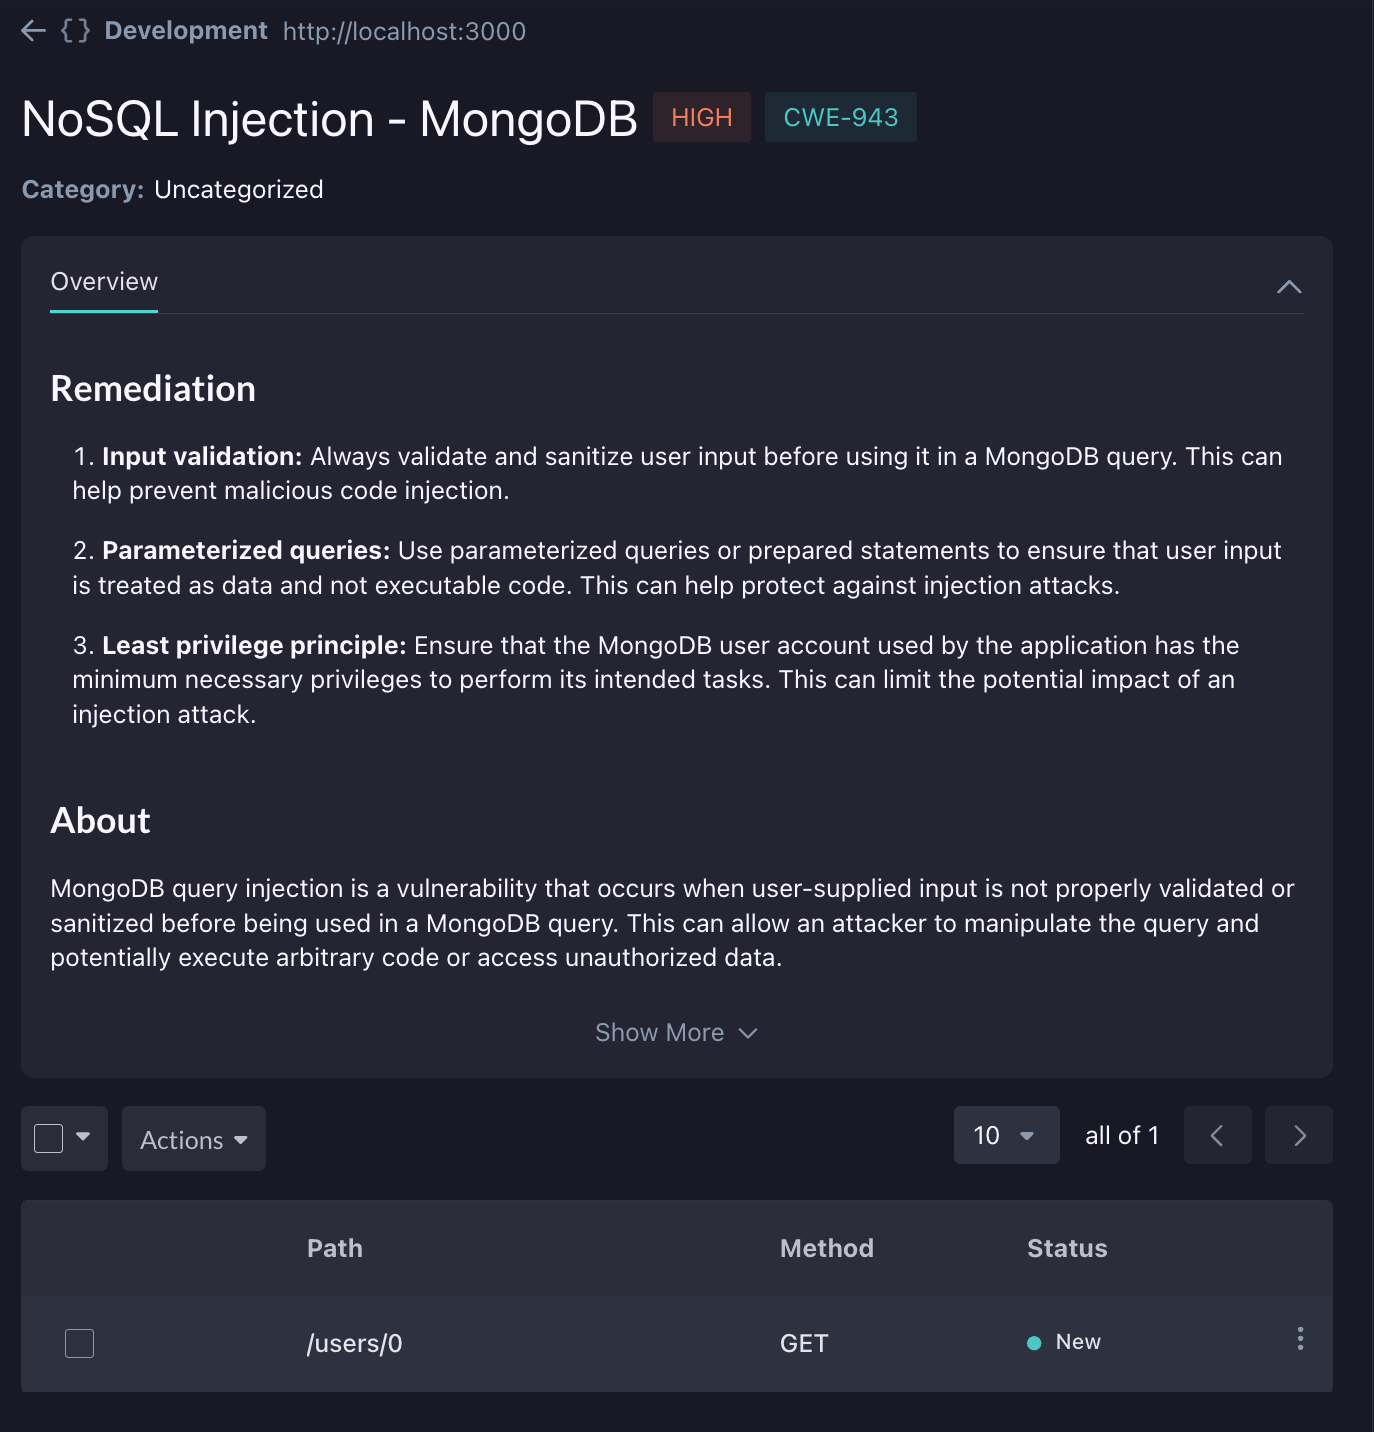
Once the scan is completed, in the case of my application, I can see that an SQL injection vulnerability has been introduced in the code.
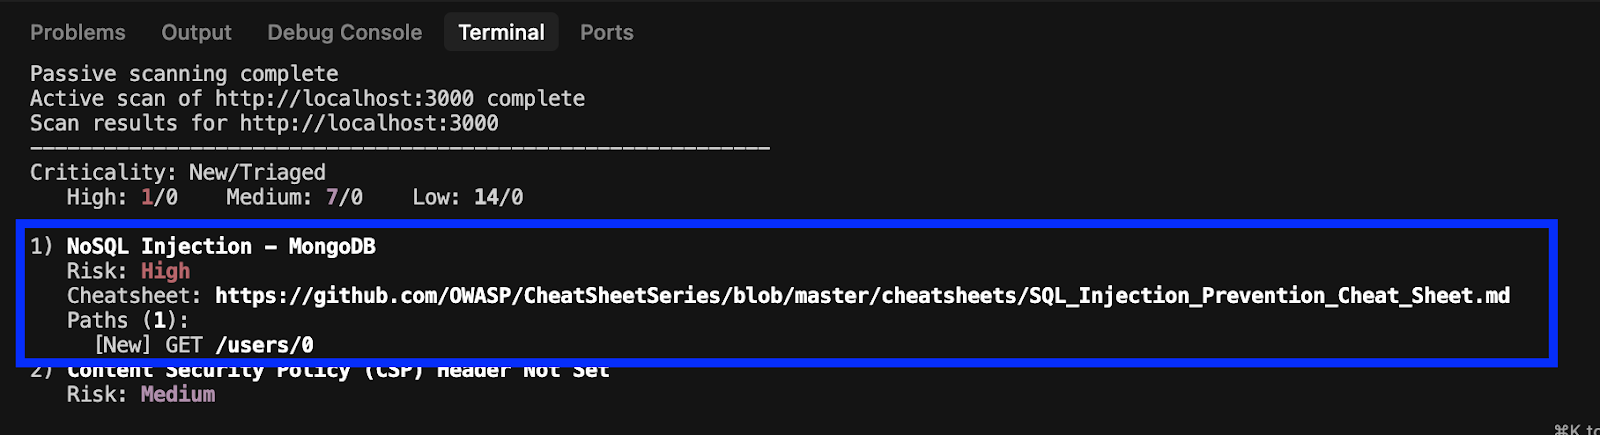
If I scroll to the bottom of the console output, I’ll see a link to the complete scan report.
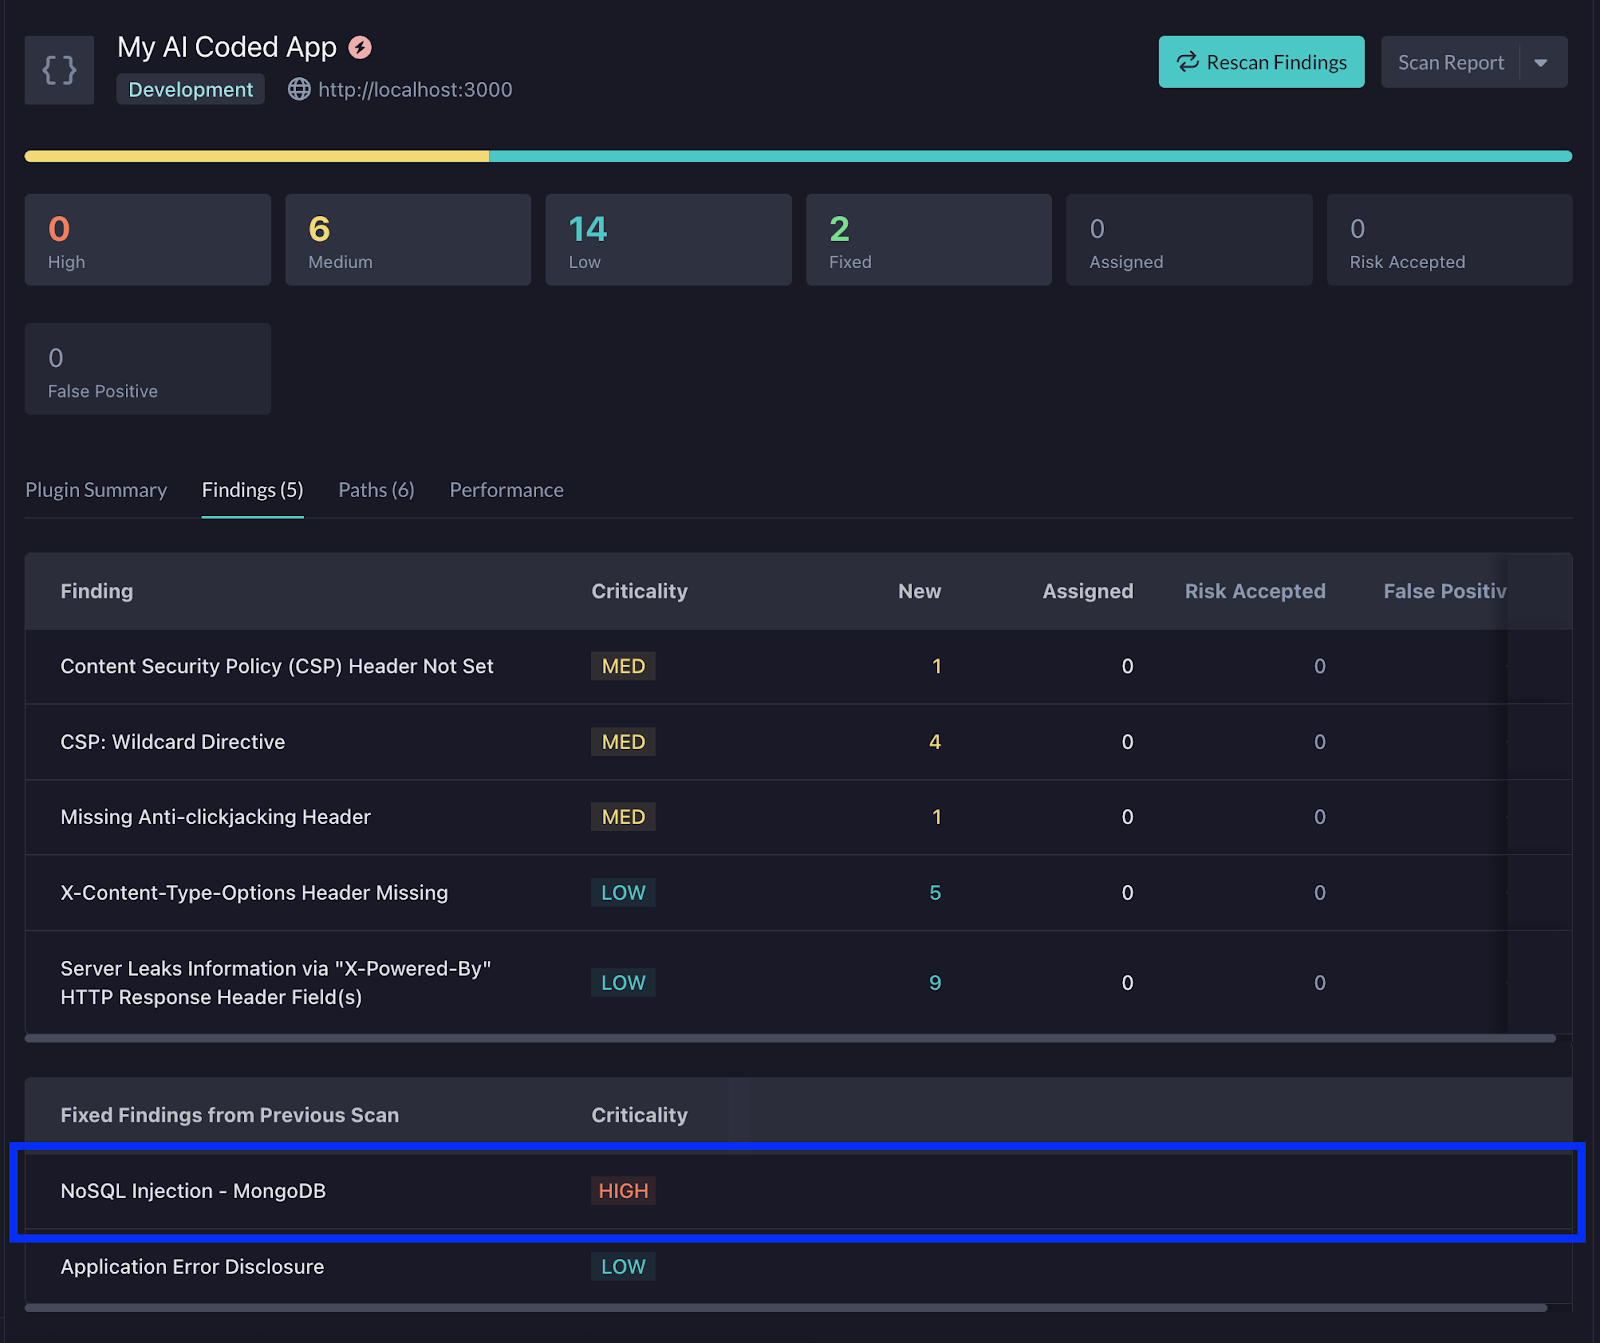
Clicking on this, I’ll be taken to the StackHawk app to explore things further in a more comprehensive report.
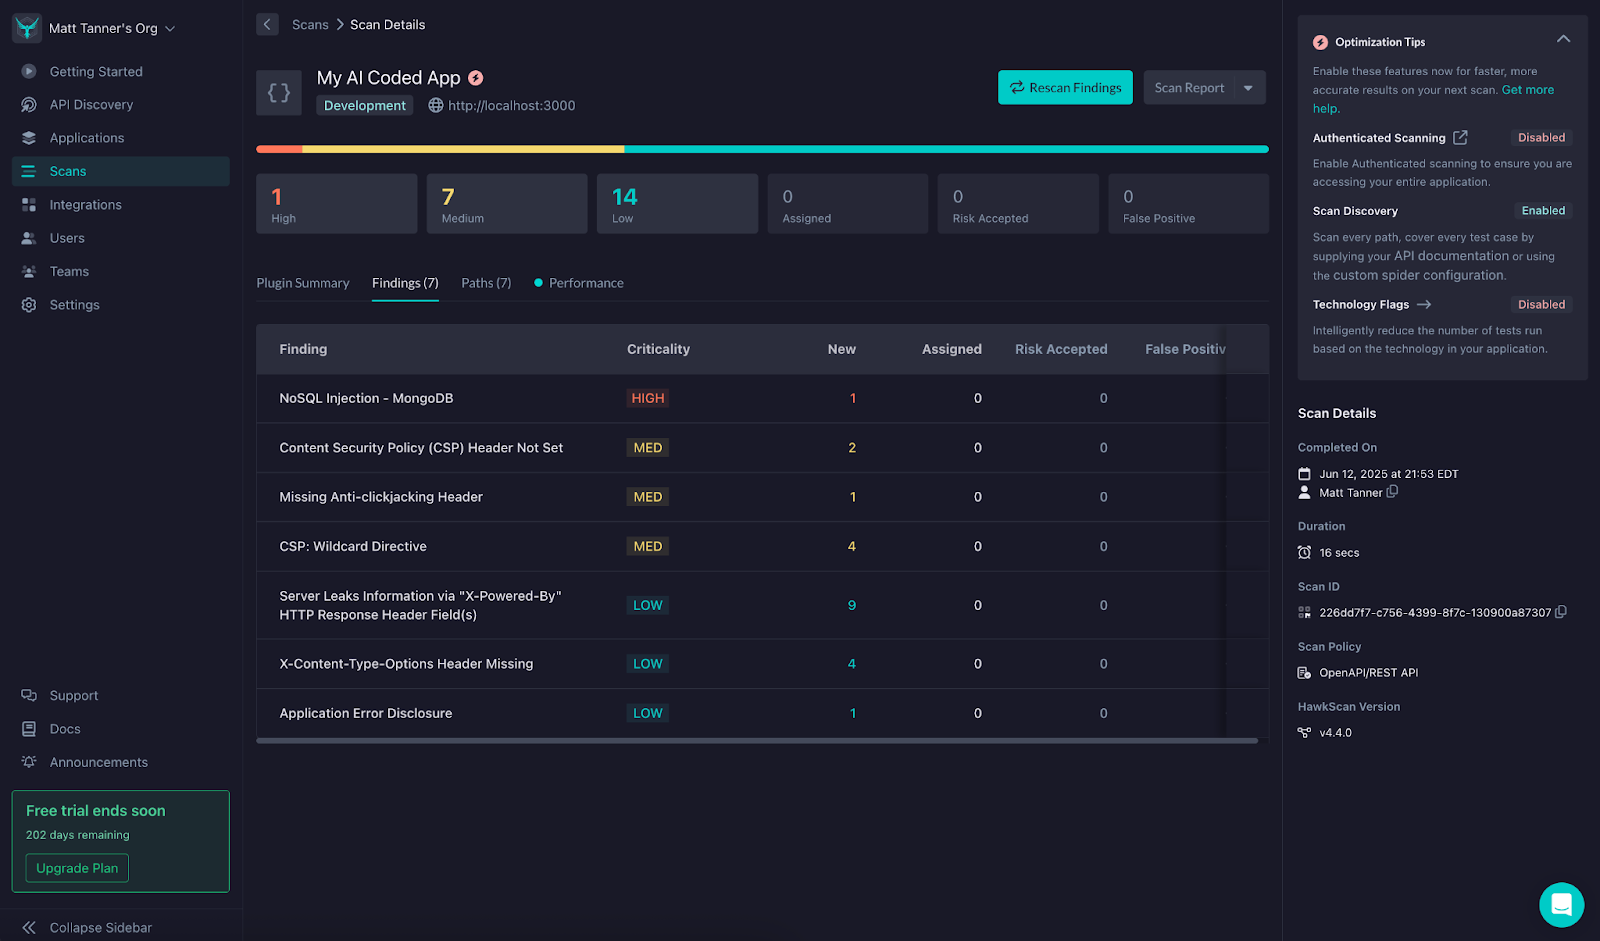
Clicking on the vulnerability, you can see more details about the cause and steps for remediation. OF course, the nice part is that using Cursor, we don’t need to worry about manually fixing this and can rely on Cursor to make the correct fix. Optionally, you can take any of the remediation advice here and feed it into Cursor; however, it’s generally pretty good at figuring it out on its own.
Back in Cursor, I’m going to feed in the SQL injection finding as context to my prompt and ask Cursor to fix the issue. In this case, my prompt will look like this:
Stackhawk has found a SQL injection vulnerability I would like you to fix. Here are the details on it:

1) NoSQL Injection - MongoDB

   Risk: High

   Cheatsheet: https://github.com/OWASP/CheatSheetSeries/blob/master/cheatsheets/SQL_Injection_Prevention_Cheat_Sheet.md

   Paths (1):

     [New] GET /users/0
Then, send this off to Cursor for the agent to get started on the fix.
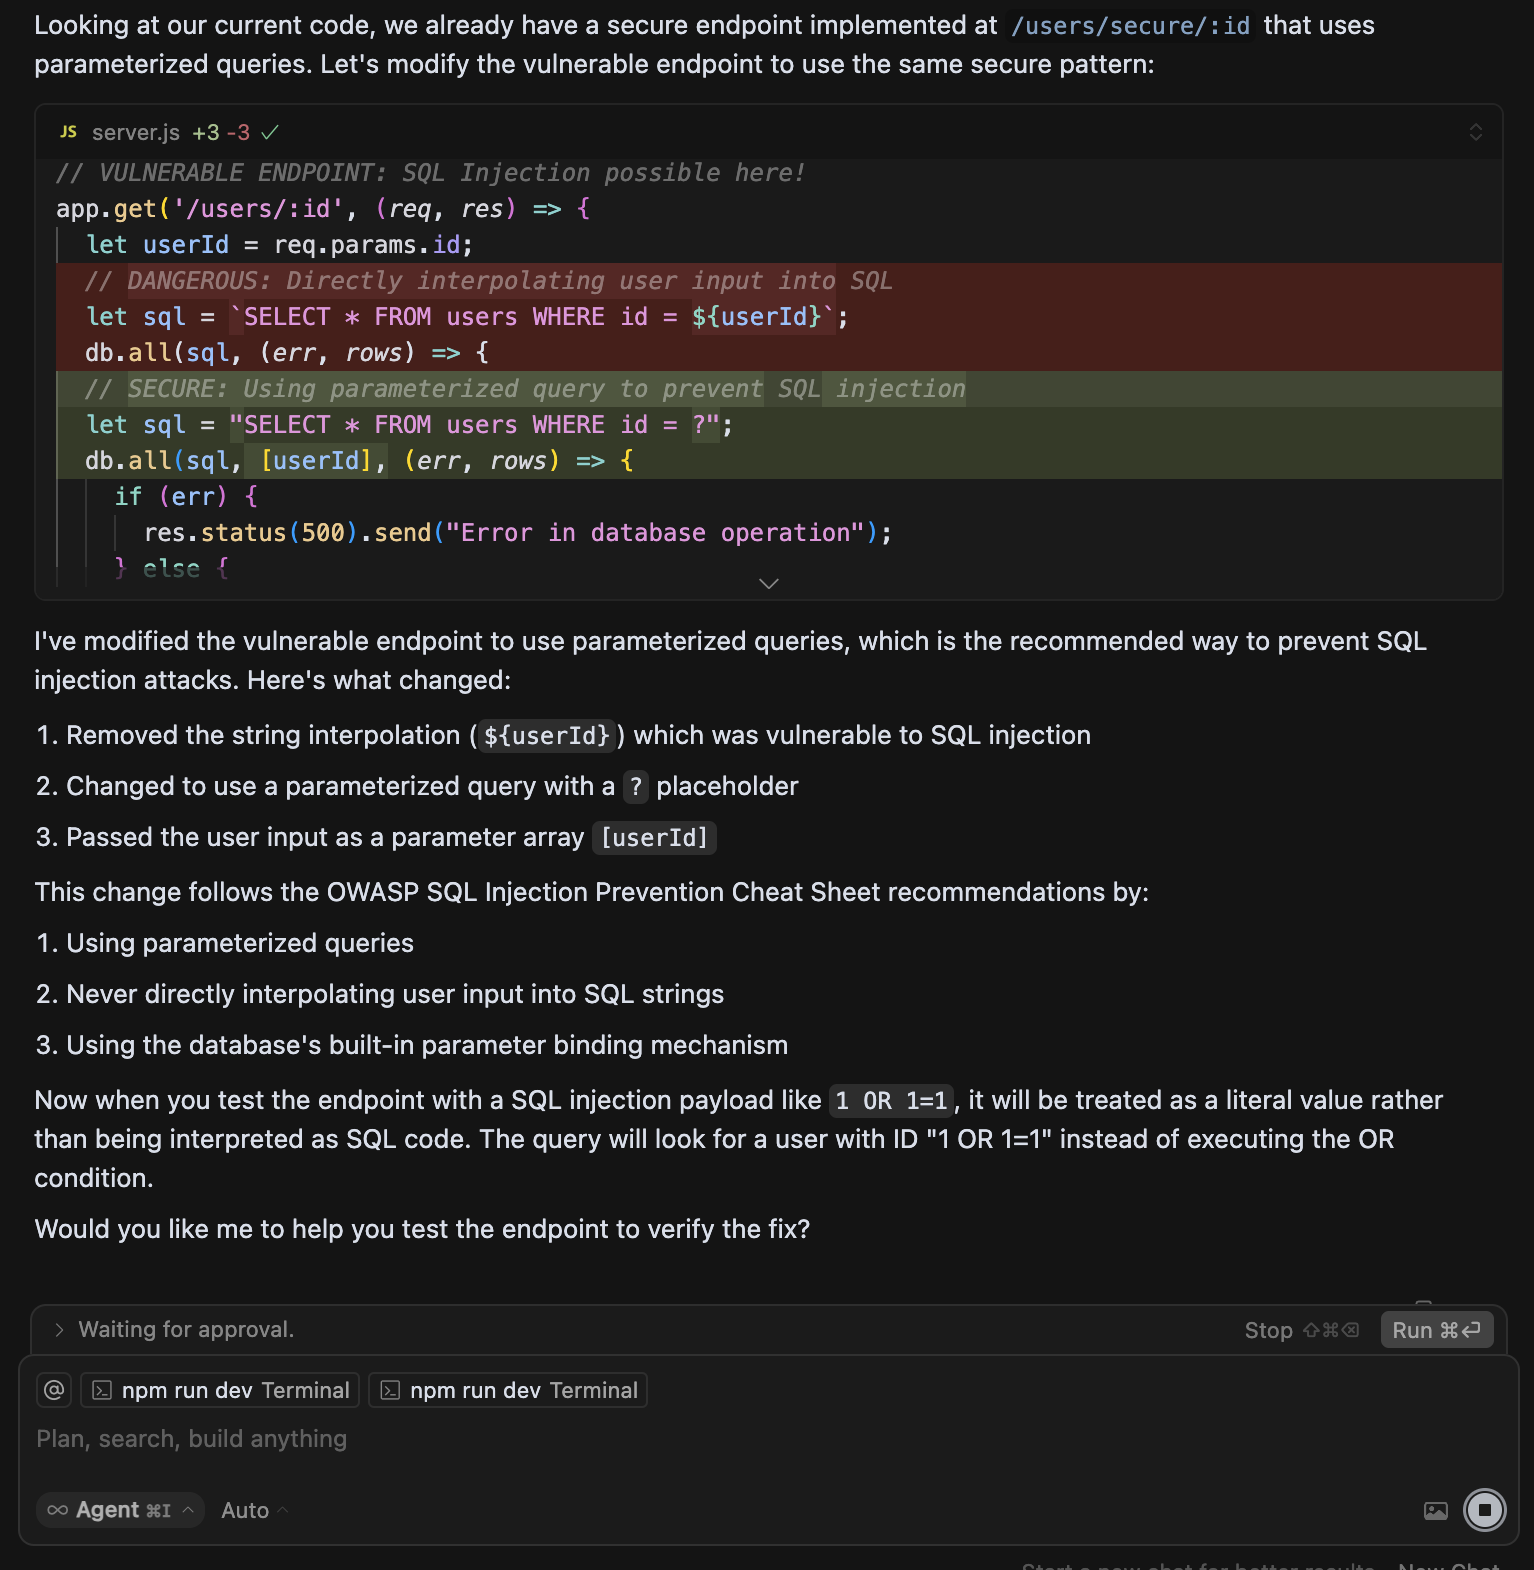
Although I won’t go into depth here, once Cursor has performed the fix, you’ll want to run any tests to ensure that there has not been any impact on functionality. With your functionality confirmed and tests still passing, let’s rescan the application to make sure it is, in fact, fixed.
Back in StackHawk, in the Findings screen, click the Rescan Finding button in the top right.
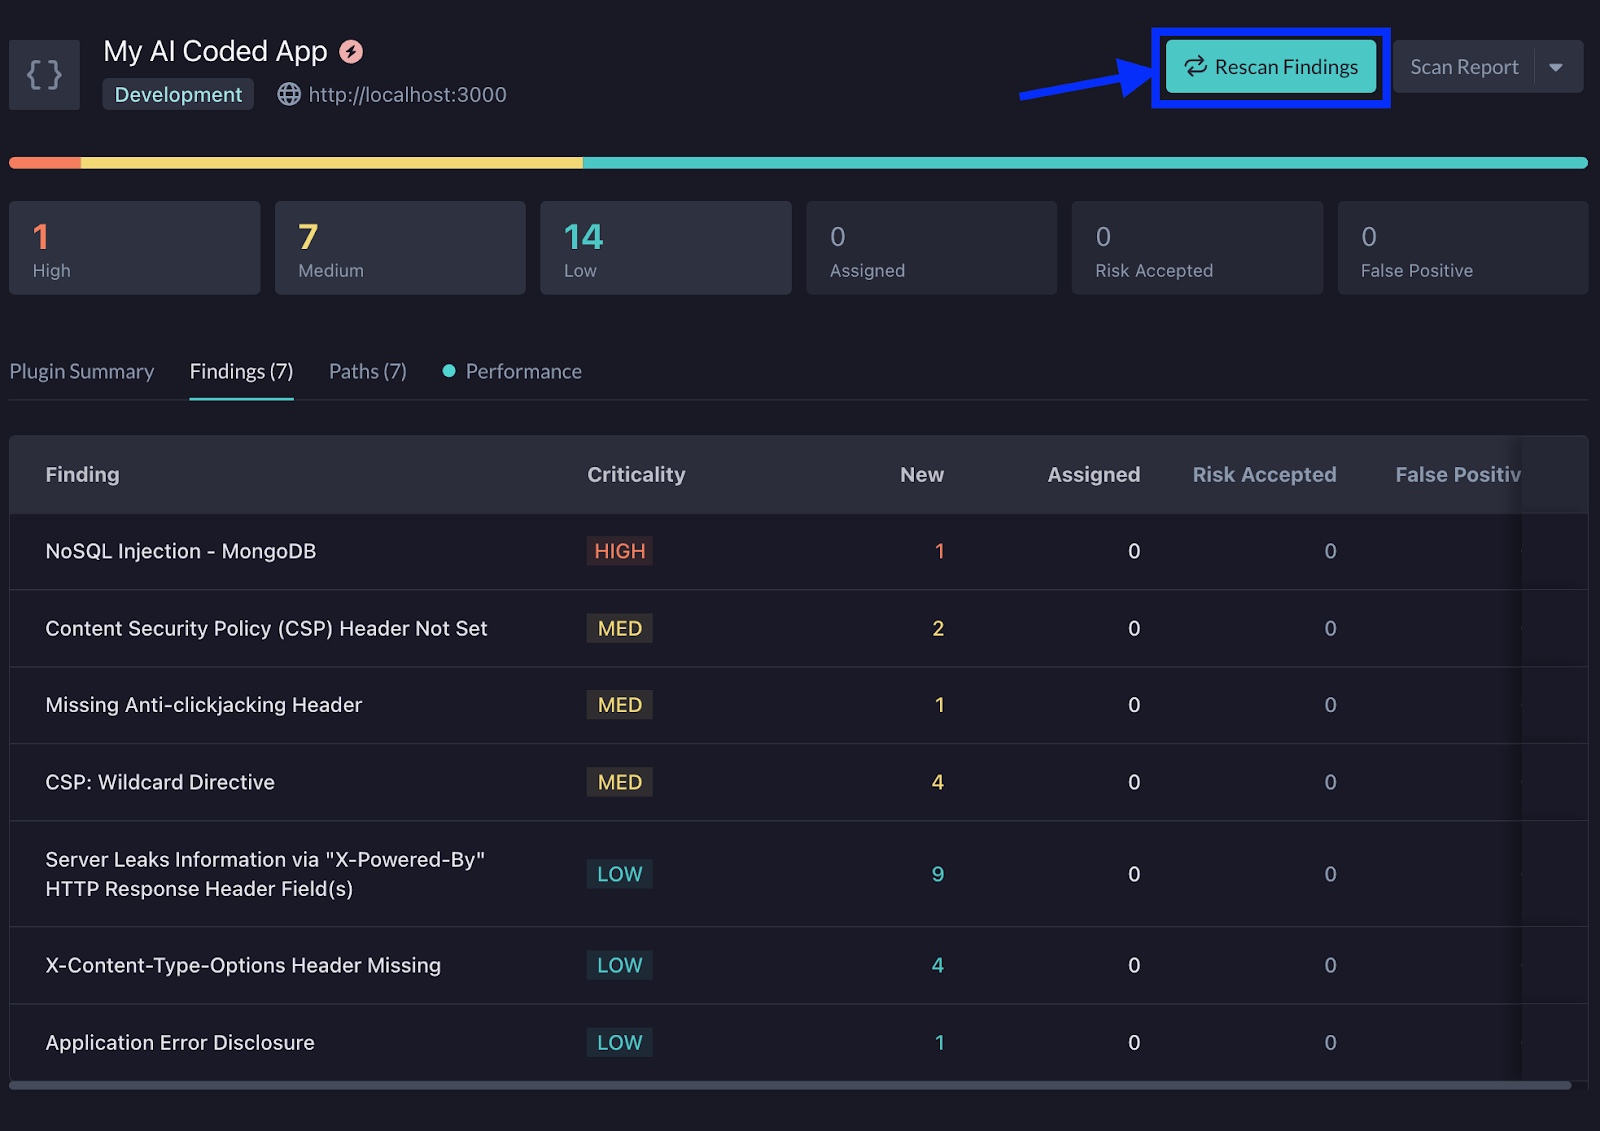
This will bring up a modal that will show a command you can run in the terminal to rescan the application. Copy this CLI command.

Back in your terminal, paste in the command and press Enter to run it. This will kick off another scan of the application and help you to identify if the previous finding has now been remediated.
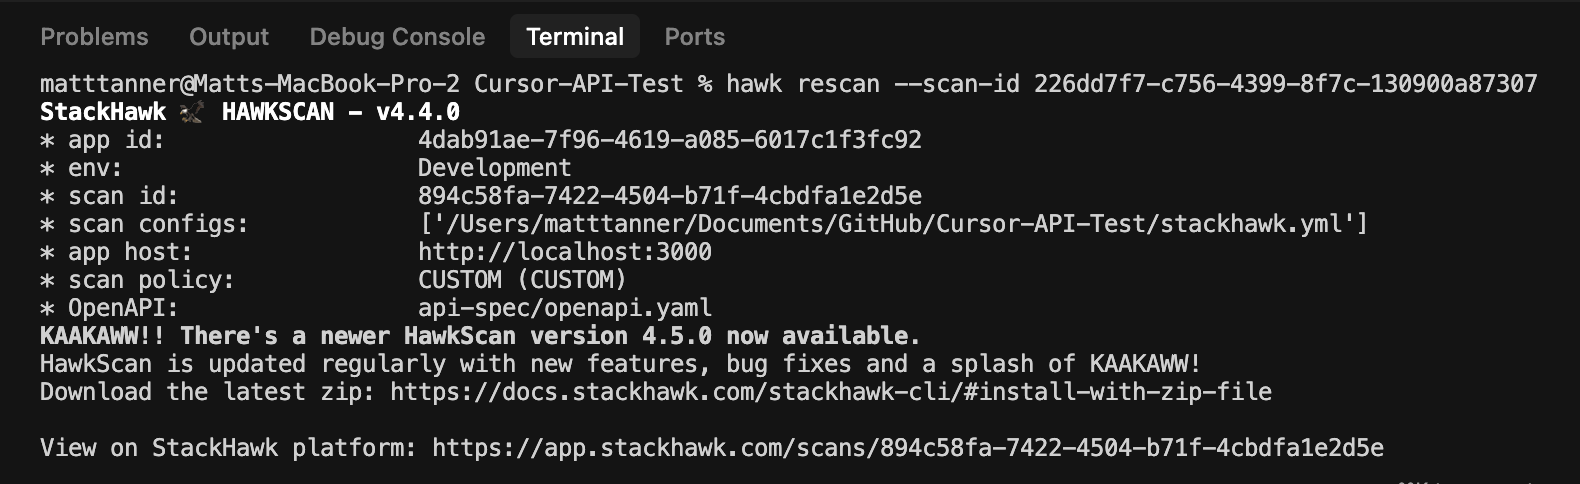
In this particular instance, we can see that Cursor’s changes have fixed the SQL injection vulnerability that StackHawk found earlier.
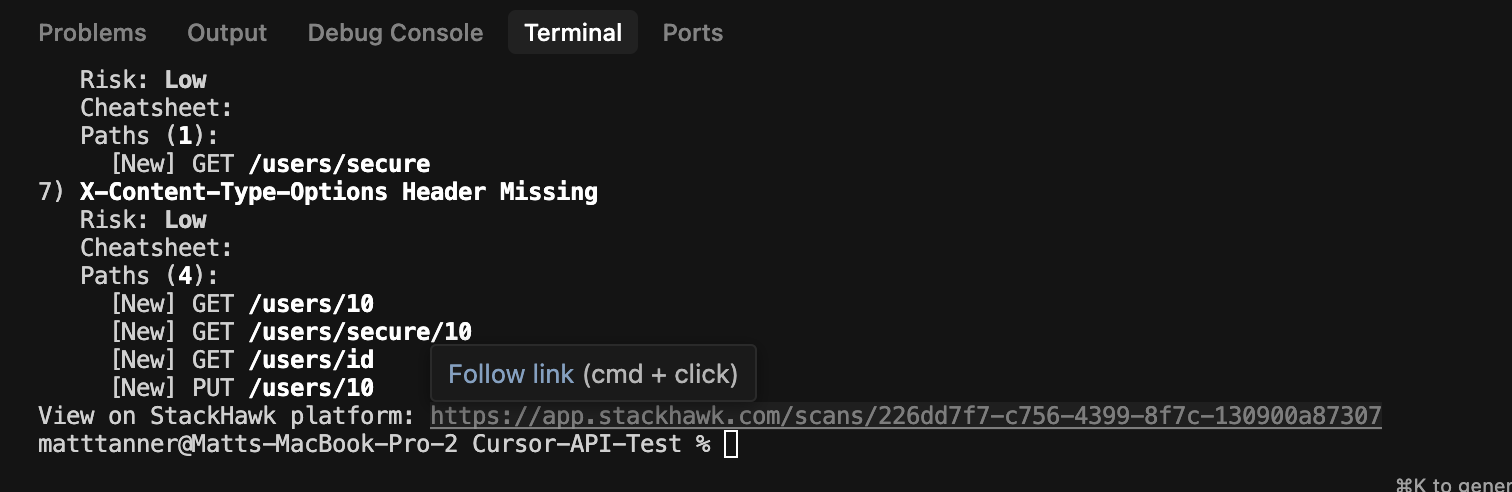
By clicking on the link at the bottom of the terminal output, like we did previously, we can then see the updated report. Just as we saw in the terminal output, StackHawk is now showing that the SQL injection vulnerability has been fixed and marked as such.
If you are still finding that the fix did not remediate the vulnerability, you can let Cursor know, allow the agent to try and fix it again, and then rescan until it’s successfully remediated.
Of course, in this case, we only remediated a single vulnerability. If there are multiple that are of concern, you can feed in a larger prompt containing multiple vulnerabilities you’d like to remediate at once, if doing everything in one fell swoop is your thing. That being said, there can be a benefit to tackling vulnerabilities one at a time or clustering related ones together so that code changes are more targeted and the underlying agent is less likely to get confused. That said, at this point, you’ve seen how StackHawk can be used with AI agents to vibe code fixes for your applications. Easy? right!
Approach 2: How to Use The StackHawk MCP Server with Cursor
By integrating the StackHawk MCP server directly into Cursor, you can transform your IDE into a security-aware development environment. Instead of treating security as an afterthought, you’ll have real-time vulnerability detection and remediation suggestions flowing directly into your coding workflow. This integration bridges the gap between AI-assisted development and enterprise-grade security practices.
In this section, we’ll walk through setting up your StackHawk account, configuring the MCP server integration with Cursor, and demonstrating how to use these security capabilities seamlessly within your development process. Let’s get started!
Step 1: Create a StackHawk Account and Application
In order to use the MCP server and StackHawk’s capabilities, we will need to create a StackHawk account. If you already have an account, you can go ahead and log in.
Once you’re in the platform, then go to the Applications screen through the left-side menu. From here, you can either connect to a repository directly or, as in the case of this tutorial, I’ll manually create an application by clicking on the start scanning link.
Next, if you haven’t set up a project in StackHawk before, you’ll be asked to initialize the StackHawk scanner in the modal that appears, and then bring you further into the application setup. If you have initialized the scanner previously, the modal will appear allowing you to add in some details such as your Application Name, Environment, and the URL of your running application. Once you’ve filled in these details, you can click App Type in the bottom right corner to proceed to the next step.
On the next screen, we will input our Application Type. In the case of this tutorial, I’ll select the Application Type as “API”, the API Type as “REST / OpenAPI”, and then supply a URL Path where my Open API spec will be served. You can also specify a file path (relative to your root directory of the project), or skip this for now. Once complete, click Create App in the bottom right of the modal.
Now, our stackhawk.yml file is created and ready for download. This file contains the configuration needed for StackHawk to run the scan (and can be further customized if required). You can either manually create the file in the root of your code project and paste in these details, or download the file and add it that way. Once you’ve done this, click Finish.
Step 2: Add the stackHawk.yml File to Your Application
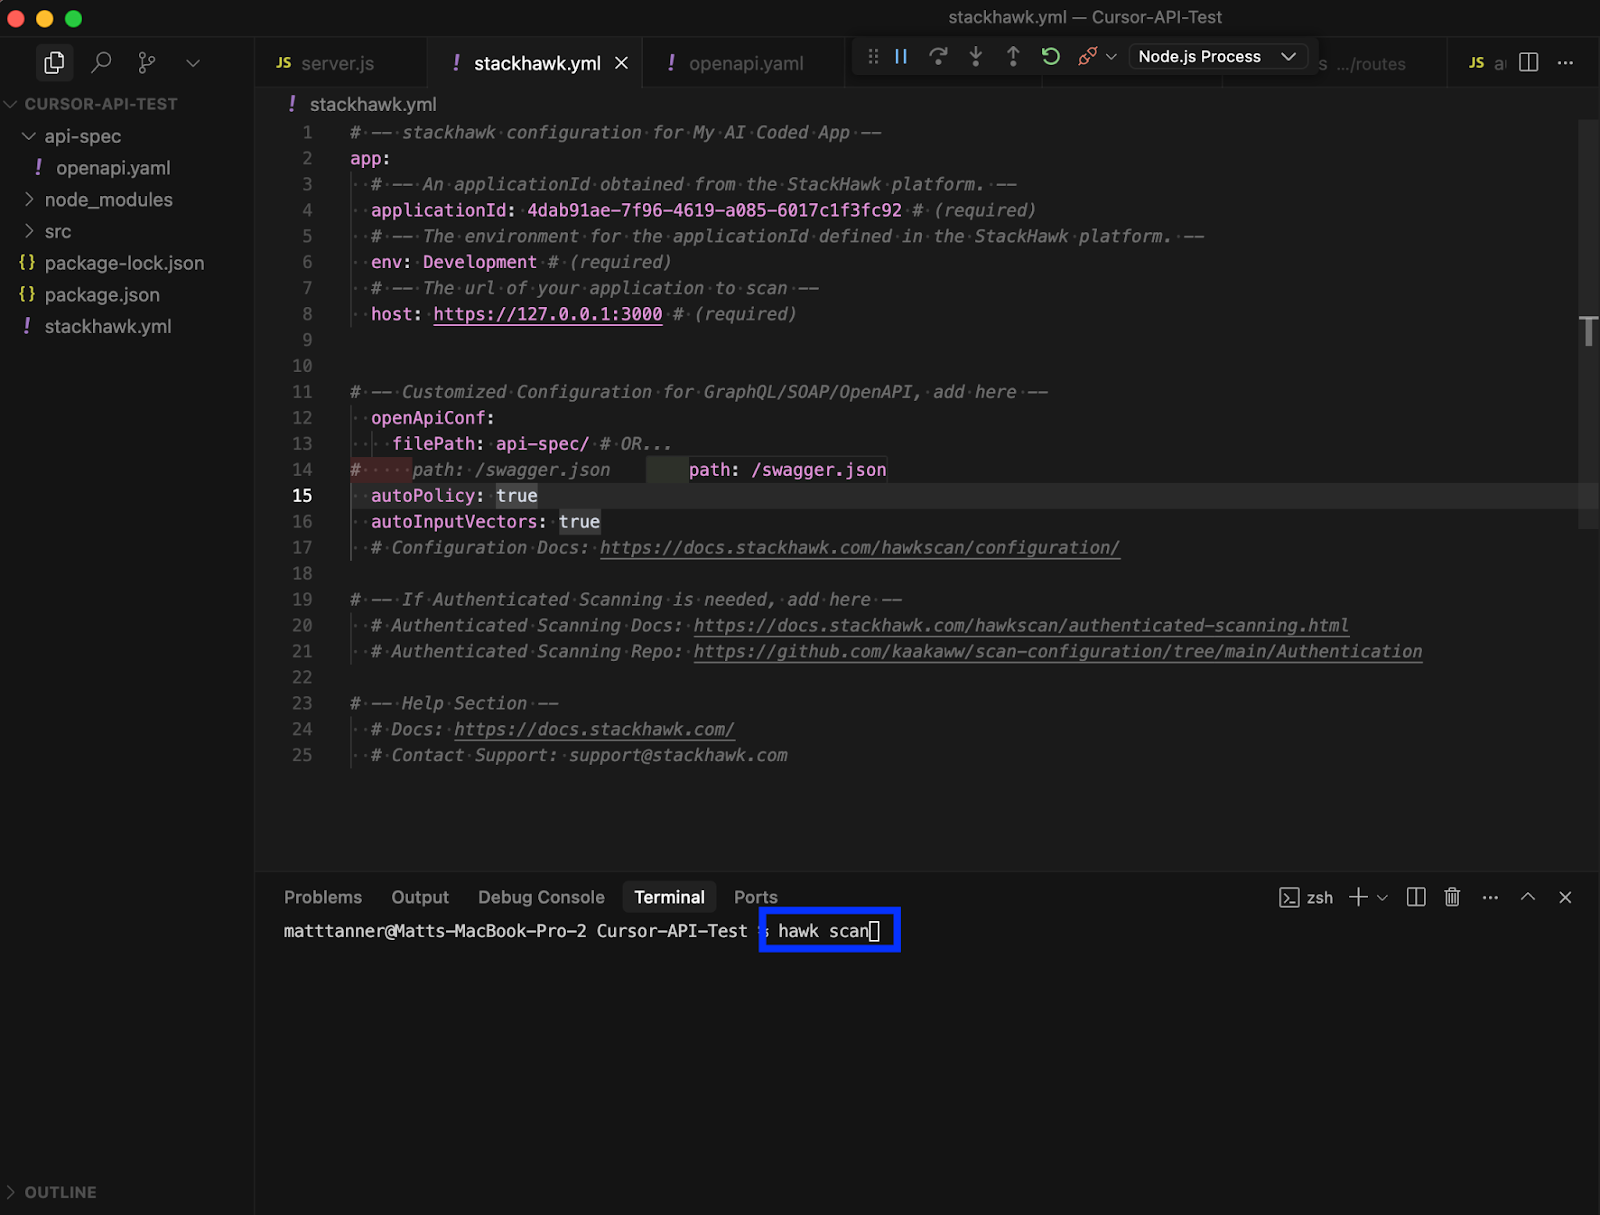
Before proceeding, you’ll want to make sure that the stackhawk.yml file is correctly added to your project. In the example below, you can see that I’ve added it to the root of my API project and the relevant details can be seen in the file viewing pane in Cursor.
Step 3: Get a StackHawk API Key
With our application created and stackhawk.yml added into our project, now we need to grab a StackHawk API key for use with our MCP server. This gives the server’s tools access to the StackHawk platform via StackHawk’s APIs. To get an API key, click Settings in the left-side menu, then click API Keys in the menu that appears. On the API Keys screen, click the Create API Key button in the top right corner.
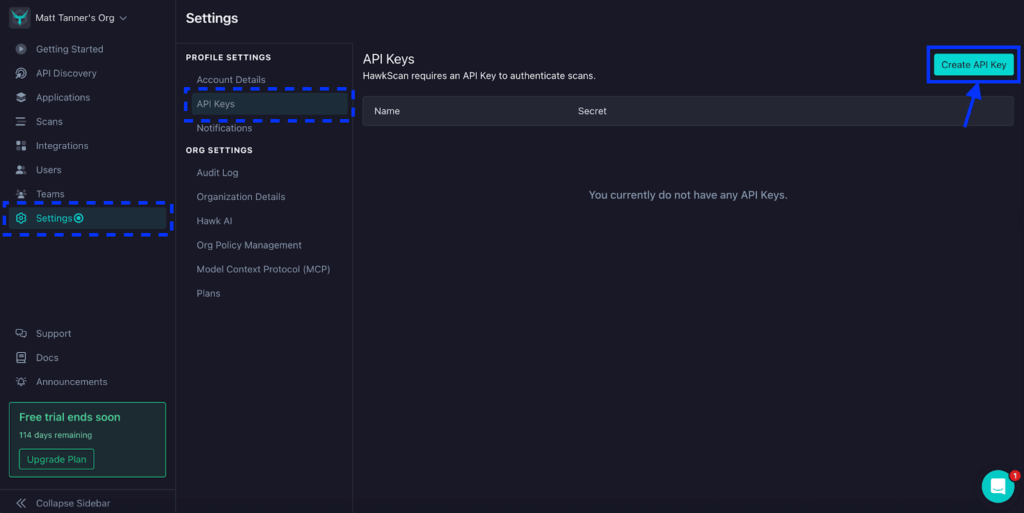
From here, a modal will appear asking you to give your API key a name. We can call it “Cursor MCP” and then click the Continue button.
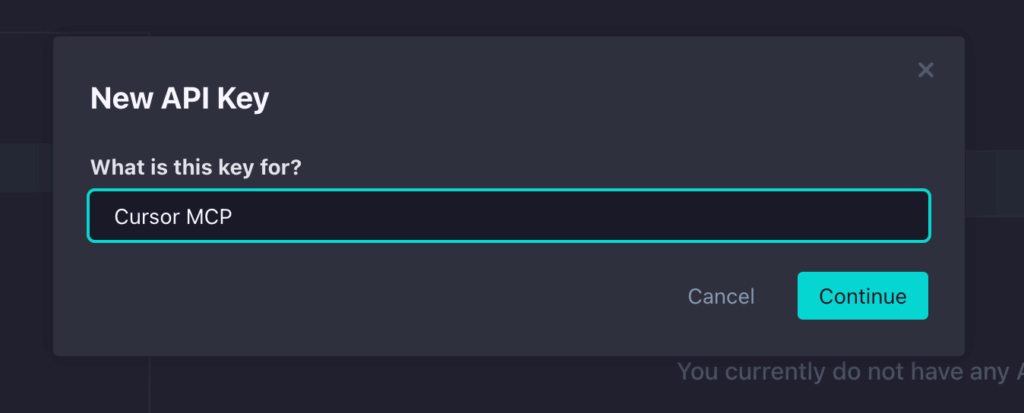
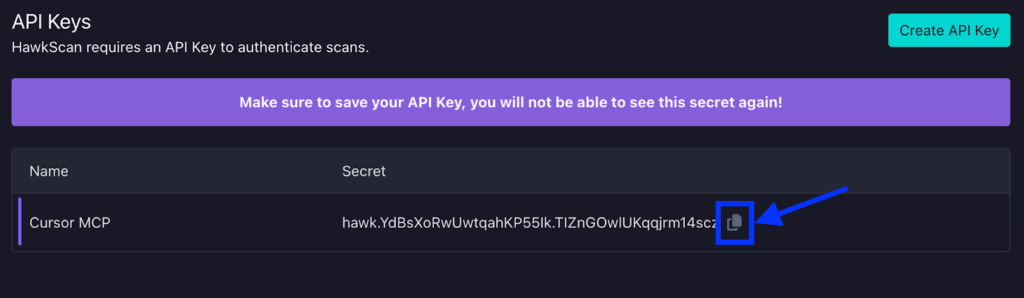
Now, the API key is created. For now, you can either leave this screen open or copy the API key somewhere temporarily (making sure it is secure) so it can be used within our MCP config. If you exit this screen before copying the key, you’ll need to delete this key and create a new one.
Step 4: Add a StackHawk MCP Entry to Your mcp.json File
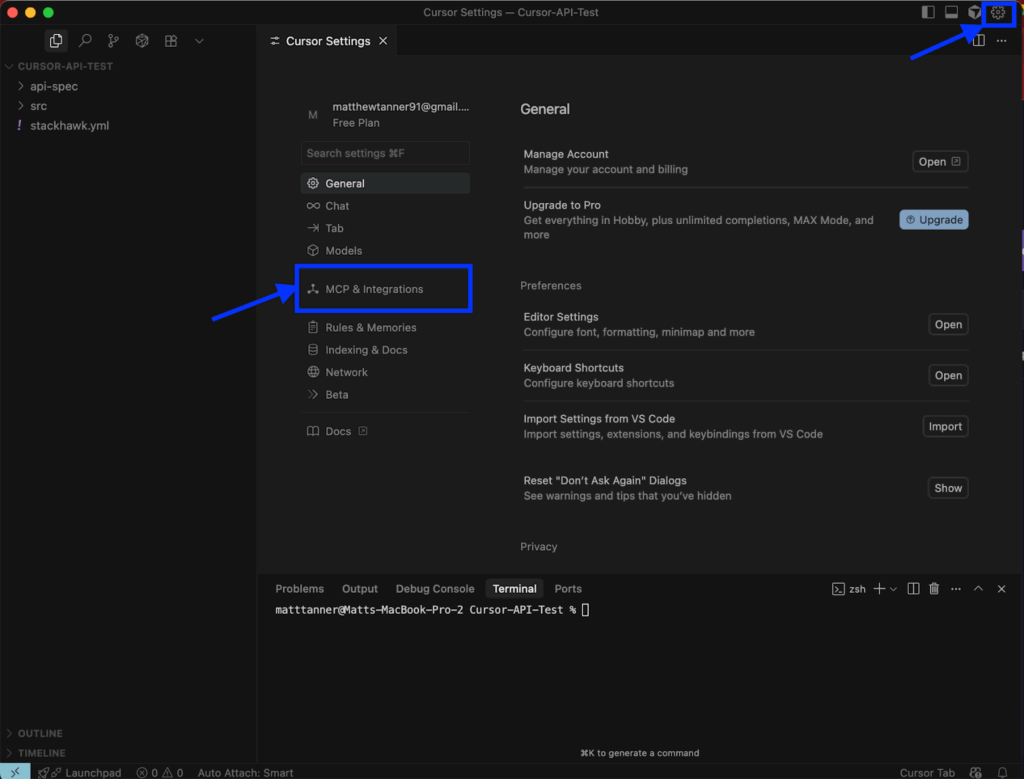
Now, let’s open up Cursor and begin configuring the MCP server. To add the StackHawk MCP server into Cursor, we need to click on the Settings cog in the top right of the screen and then select MCP & Integrations in the left-side menu.
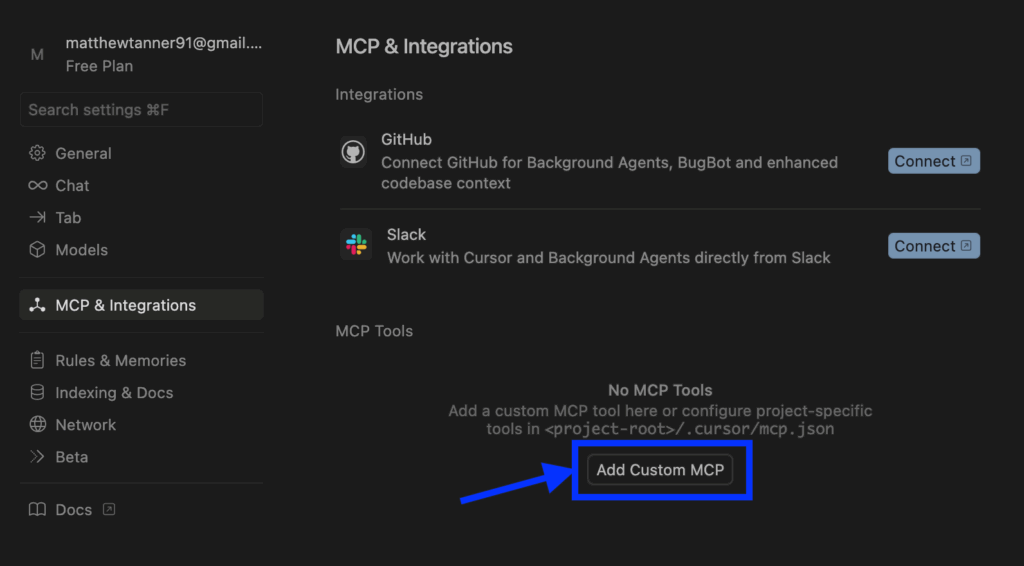
On the MCP & Integrations screen, we will click Add Custom MCP to open up the mcp.json config file.
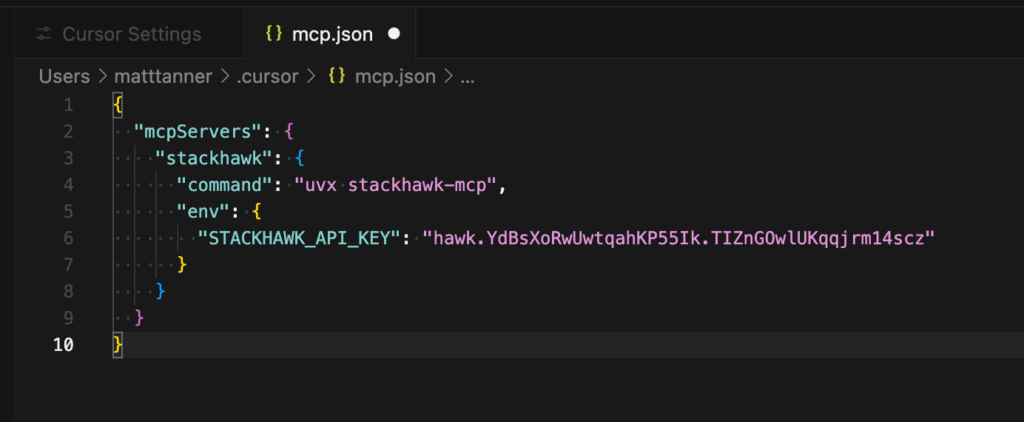
In the mcp.json file, we need to add a stackhawk entry to the mcpServers object. We will add the following to the config file, including adding your API key as the STACKHAWK_API_KEY field’s value:
"stackhawk": {

     "command": "uvx stackhawk-mcp",

     "env": {

       "STACKHAWK_API_KEY": "hawk.YOUR_STACKHAWK_API_KEY"

     }

   }
In Cursor, the populated file should look similar to this:
Now, we will save the file to make sure the config is persisted to Cursor.
Step 5: Check That The MPC Server is Recognized
Now, back in the MCP & Integrations screen should show stackhawk as an available tool.
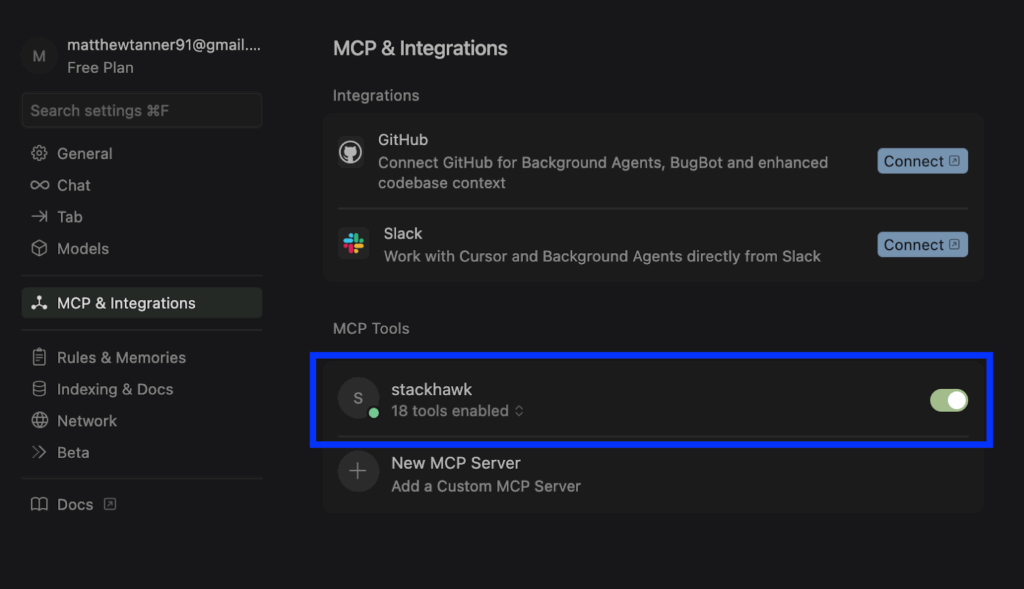
At this point, we are ready to try out the MCP tool within the Cursor agent.
Step 6: Secure Your Code!
To get the Cursor agent to use the StackHawk MCP tools, you can now just send a prompt into the agent and it should automatically begin using it. For example, you could use a prompt like this:
“Please scan my project for any security vulnerabilities using StackHawk”
The agent will then begin using the tools within its workflow. For example, we can see that multiple tools are called from the MCP server.
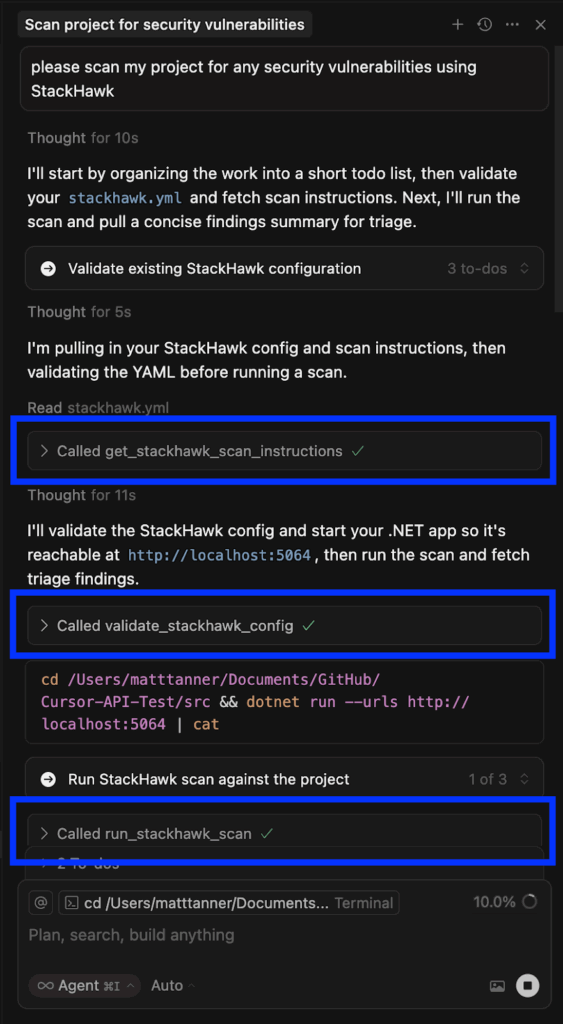
Now, you can ask the Cursor agent to remediate these vulnerabilities and re-test them using StackHawk, along with other possible ways to leverage the StackHawk MCP server within Cursor.
Why DAST is Critical for AI-Generated Code
Dynamic Application Security Testing (DAST) has become essential for validating the security of AI-generated code. Unlike static analysis tools that examine code at rest, DAST tests running applications to identify vulnerabilities that only manifest during execution. This approach to testing brings some very powerful value props to those using AI to build applications.
AI tools consistently introduce specific categories of vulnerabilities, especially when developers prioritize speed over security. Common security issues in AI-generated code include:
- Missing Input Validation: AI often generates endpoints and functions without proper input sanitization, leading to injection vulnerabilities
- Weak Authentication Implementation: When asked to create authentication systems without specific security requirements, AI may implement overly simplistic or flawed authentication mechanisms
- Inadequate Error Handling: AI-generated code frequently lacks proper error handling that prevents information disclosure to attackers
- Insecure Defaults: AI tends to use permissive configurations and defaults that prioritize ease of use over security
- Omitted Security Headers: Web applications generated by AI often lack essential security headers like Content-Security-Policy, X-Frame-Options, and others
The issue is the sheer volume and velocity at which AI-generated code can be deployed. Months of work can be done in hours, potentially even by non-technical or extremely junior developers. This is where adding security testing into the puzzle makes a lot of sense.
The Unique Value of DAST for AI Code
Runtime Vulnerability Detection: DAST identifies security issues that emerge when AI-generated code interacts with real data, user inputs, and system resources—scenarios that static analysis cannot fully simulate.
Black-Box Testing Approach: DAST doesn’t need to understand the code structure or AI generation patterns. It evaluates security from an attacker’s perspective, testing how the application actually behaves under malicious conditions.
API-First Testing: Modern applications are API-driven, and AI tools excel at generating API endpoints. DAST tools like StackHawk are designed to test APIs comprehensively, to ensure AI-generated endpoints are secure.
Validation of Security Controls: DAST can verify if security measures suggested by AI (authentication, input validation, etc.) actually work as intended in the running application.
Why Traditional Security Testing Falls Short with AI Code
Although traditional testing methods should still be deployed in certain scenarios, layering a modern DAST solution into the security stack is necessary. The traditional methods of testing tend to fall flat in the age of AI because of:
Speed of Development: AI accelerates development to the point where traditional security review cycles can’t keep pace. DAST automation helps bridge this gap by providing immediate security feedback.
Volume of Generated Code: AI can produce large amounts of code quickly, making manual security review impractical. Automated DAST scanning scales to match AI development speed.
Subtle Logic Flaws: AI-generated code may contain subtle security logic flaws that are hard to catch in code review but become apparent when testing the running application.
Integration Vulnerabilities: Security issues often emerge at the integration points between AI-generated components and existing systems – something DAST is good at identifying.
With DAST being a critical component of the AI-coding stack, finding your way through the multitude of solutions can be tough. Of course, at StackHawk, we have built one of the most comprehensive DAST and API security platforms on the market.
Why StackHawk is the Best DAST for AI Development
StackHawk is a new generation of DAST tools designed for modern development practices and AI-powered workflows:
Developer-Centric Design
Unlike traditional security tools built for security teams, StackHawk is designed for developers who are creating and deploying AI-generated code. It provides feedback in terms that developers understand and can act upon quickly.
Comprehensive API Testing
StackHawk tests REST, SOAP, GraphQL, and gRPC APIs – the types of services AI tools generate. This coverage ensures AI-generated endpoints are tested for vulnerabilities.
CI/CD Integration
StackHawk is designed to run in DevOps pipelines, so you can run security testing every time AI-generated code is committed. This ensures security is up to date with AI-accelerated development.
Fast Feedback Loops
Traditional DAST tools were designed for periodic scanning of production applications. StackHawk provides feedback during development so you can catch and fix AI-generated vulnerabilities before they hit production.
Want to see exactly how StackHawk can be injected into your Cursor workflow? Let’s look at a step-by-step tutorial on how it can be done in minutes!
Elevate Your Cursor IDE Security with Integrated Testing
The combination of Cursor’s AI-powered development capabilities with StackHawk’s modern DAST platform creates a powerful workflow for building secure applications in the age of AI-powered development. By understanding the security challenges inherent in AI-generated code and implementing robust testing practices, developers can harness the productivity benefits of AI while maintaining strong security postures.
The key is recognizing that AI tools like Cursor are powerful accelerators that require appropriate security guardrails. StackHawk provides those guardrails by offering comprehensive, automated security testing that scales with AI-accelerated development cycles.
As AI continues to transform software development, the organizations that successfully combine AI productivity with robust security practices will have a significant competitive advantage. Start implementing these practices today to build more secure software while taking full advantage of the incredible capabilities that AI-powered development tools provide.
Ready to get started? Sign up for a free StackHawk trial and download Cursor to begin building more secure applications with AI-powered development today.


