
Websites and applications are becoming more complex and optimized for each individual user. This creates the need for data that is used to control the user’s flow and permitted actions. One of the most common actions is redirecting the user to another page—whether that’s a login page, a checkout confirmation, or a third-party website. When the parameters are visible in the URL, this is open redirect .
So, how can users be sure that the website that they’re being redirected to is the one you intended to send them to?
This post is about open redirect. First, we’ll cover how bad actors could use it to attack users. Then, we’ll discuss some common ways to prevent it. To illustrate this, we’ll build a sample application with Spring Boot and Thymeleaf .
First, let’s learn a little more about what open redirect is and what kind of attacks it leaves users vulnerable to.

What Is Open Redirect?
Open redirect means having redirection links on the front end of the application, usually in the URL as a parameter. This leaves your users vulnerable to phishing attacks . Mainly, these redirects are forwarding to an external website outside your domain.
Phishing attacks operate by tricking users into thinking that the website shown is legitimate. Attackers do this to extract confidential information, such as credentials and identifying information.
Here’s an example of how a URL implementing open redirect would be structured: https://example.com/login?url=http://totallytrustworthy.guyfawkes.com
Giving users a way to detect an external website and choose if they want to be redirected to it is a great last wall of defense. Spring provides different methods to help you configure redirects.
How Can You Protect Users With Spring?
Spring provides different ways to handle redirection inside your app by intercepting requests. The methods we’ll discuss in this article are:
using the MVC controller
adding a filter
using an exit page
Now, let’s see how we can screen for this in Spring.
Sample App
Before we can start, we first need a sample Spring Boot project. Why use Spring Boot over regular Spring? Well, you can get a lot of default configurations right out of the box.
Now, head over to https://start.spring.io/ , and choose Java as your language. Feel free to customize as you wish.
Next, on the right-hand side, click the Add Dependencies button. After that, select the following:
Spring Web: This provides the web MVC components for the app.
Lombok : This reduces boilerplate code.
Thymeleaf: This provides a template engine to display your web pages.
Once you download the project, it’s important to make sure it runs. This demo was created using Gradle , but I’ll provide any commands you need for either Maven or Gradle.
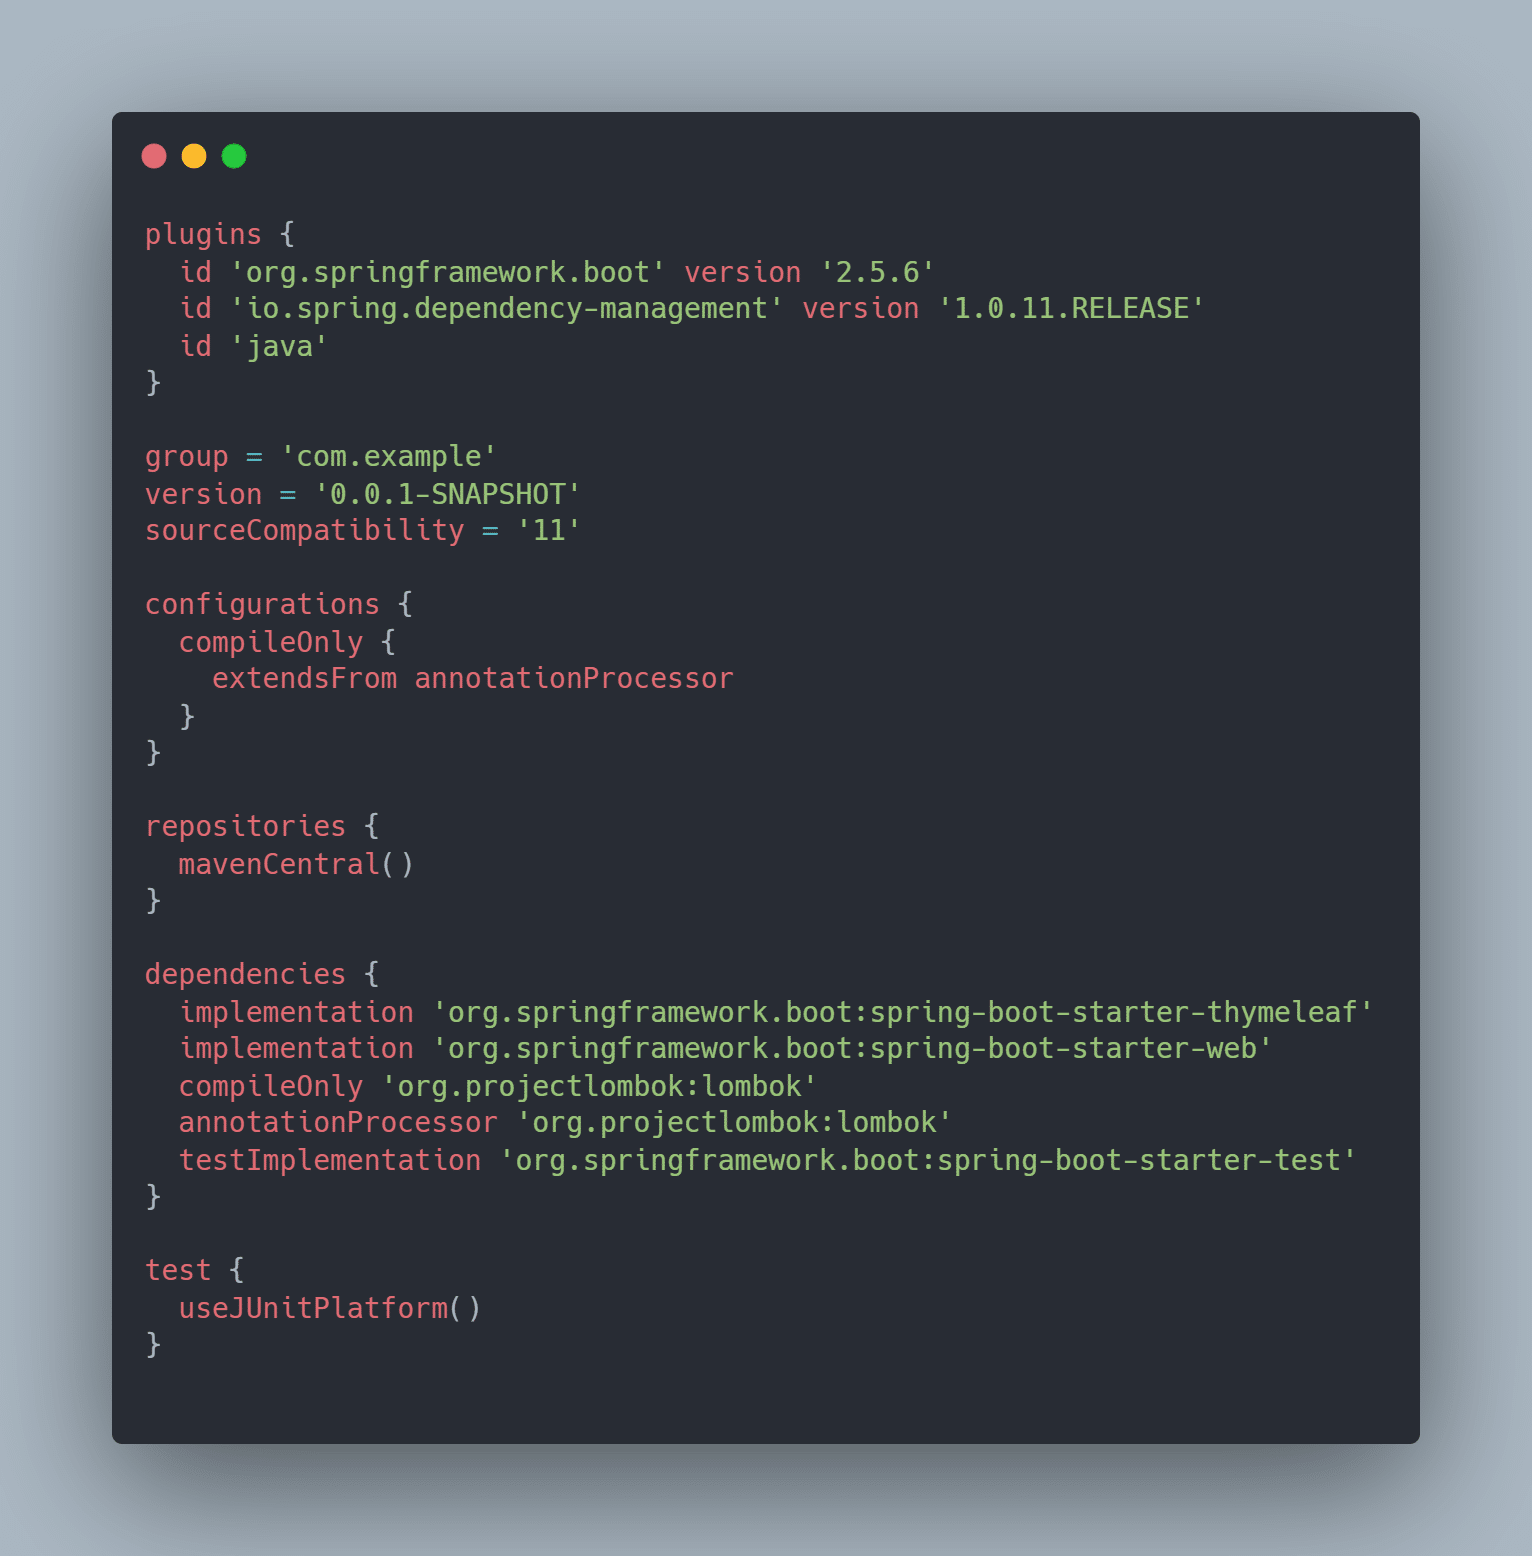
Here’s how the build.gradle file looks:
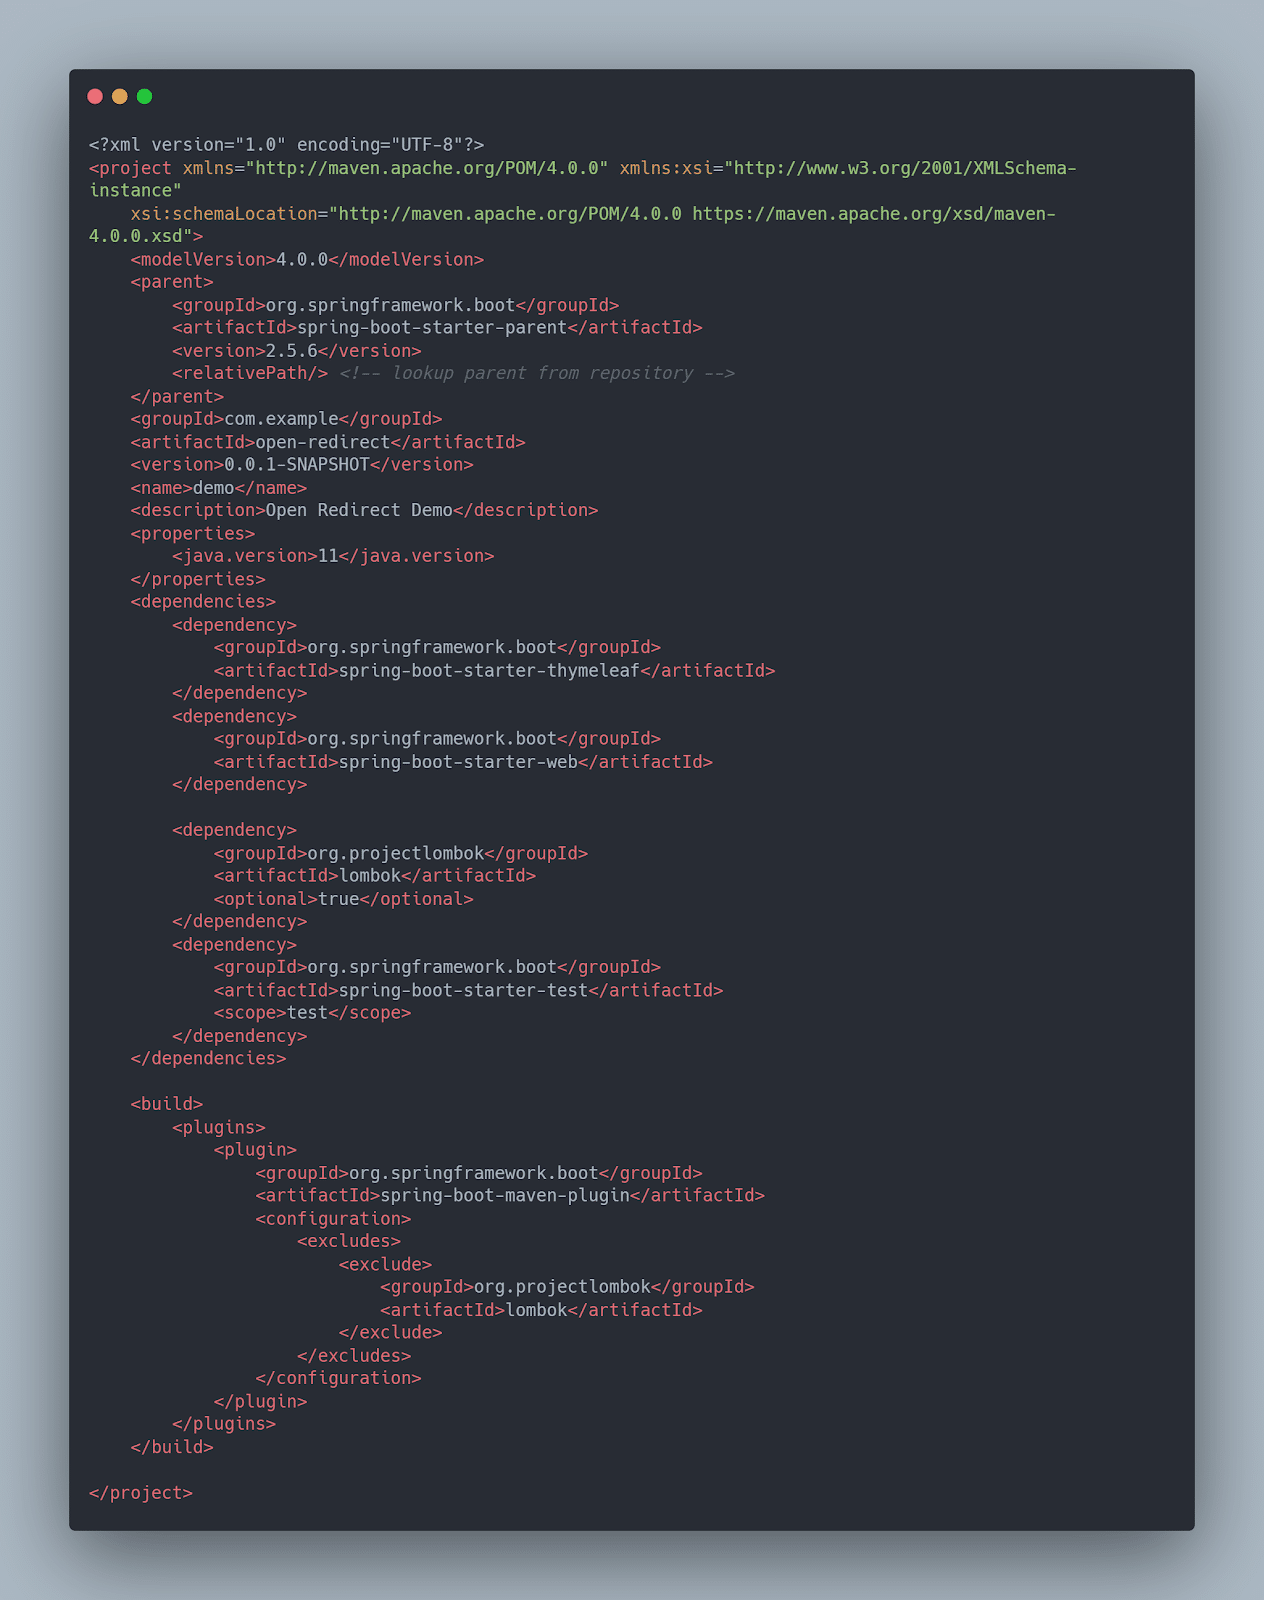
And here’s the pom.xml file:
Let’s keep moving!
Building the App
In the root folder, run one of these commands. Which one you choose depends on if you picked Maven or Gradle:
To run the application: mvn spring-boot:run (for Maven) or ./gradlew bootRun
To just build the jar: mvn clean package or ./gradlew bootJar
What if you prefer to manually run the jar file? In that case, after calling the build command, you can run java -jar target/project-name.jar for Maven or java -jar build/lib/project-name.jar for Gradle.
The default URL for your application will be http://localhost:8080.
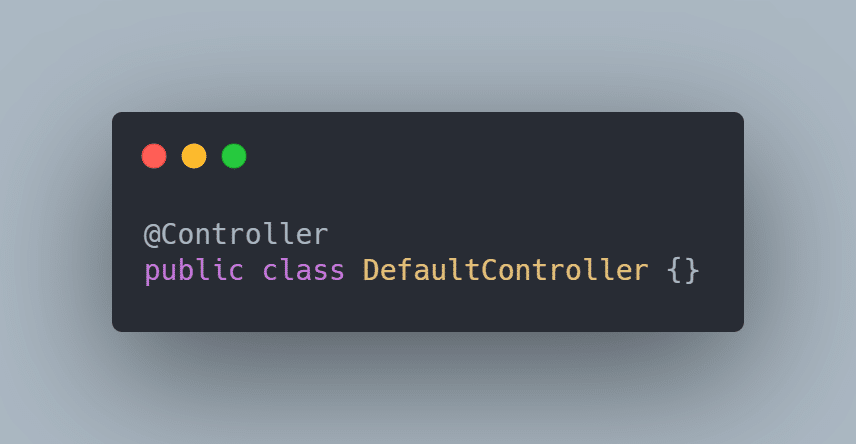
Default Controller
In your IDE, open the folder with the main class that contains the @SpringBootApplication annotation and create a new package called controllers .
Next, create a new Java class named DefaultController and add the @Controller annotation on top of the class definition. As a result, all methods inside will be mapped to HTTP requests based on their annotations.
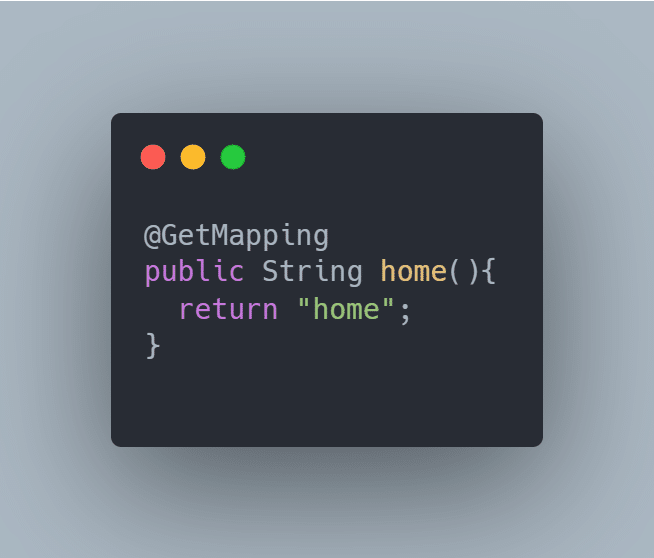
Create a method called home with the @GetMapping annotation and return the string home . This will translate into a route definition by Spring for the root URL.
Now, let’s create the template.
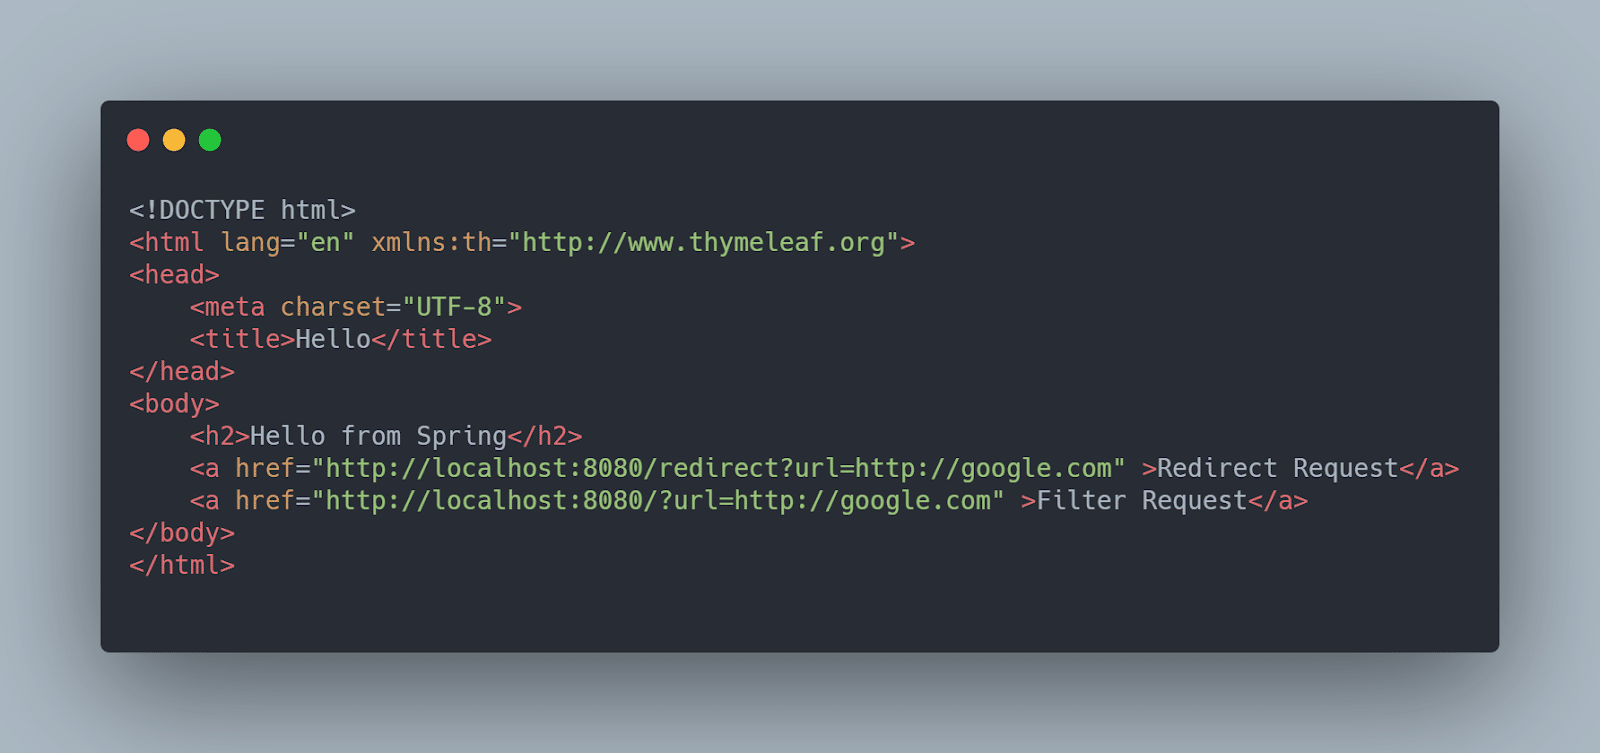
The Thymeleaf starter configures the templating system in Spring. Go to the src/main/resources/templates folder, and create a file called home.html . Add the following HTML code:
Now that we have a working website with a redirect request, let’s see how we can use controllers to intercept the requests.
Using Controllers
After you run the application and click the link, you’ll be redirected to the error page. No URL mapping is set up for the /redirect address—this appears as a fallback.
Going back to the DefaultController , add the following method signature to handle the call:
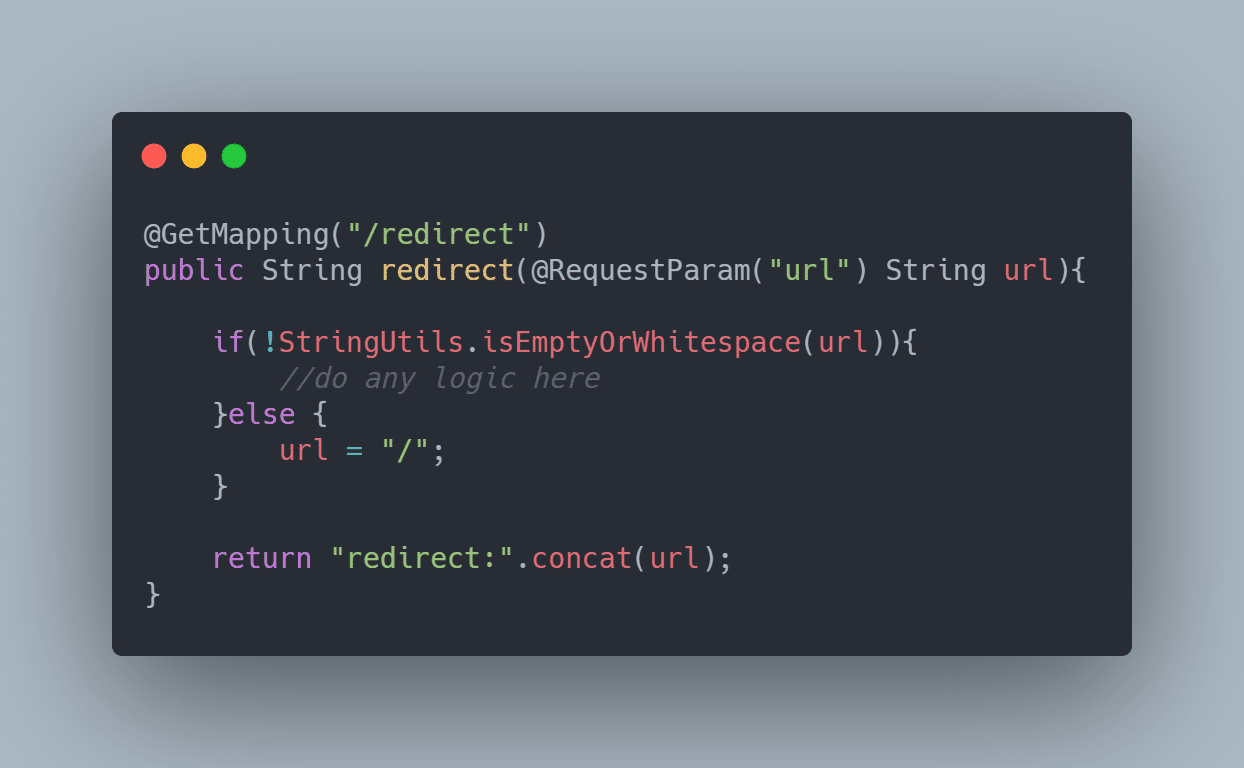
The method receives one argument: @RequestParam(“url”) String url . It takes the URL parameter from the request and provides it in a string for easier access. The return statement includes the redirect: string, which internally tells Spring that it should redirect to the URL passed after the colon.
In this code sample, I concatenate the destination address so that the redirection takes place. But if the URL is missing, it’ll return to the home page. Here, you can perform tasks such as determining whether it’s a redirect request to the same domain or to an external site (you’ll see a more detailed example of this in the next section). You can either block or approve the request, based on your business rules.
Run the application again, and click the link. Google’s home page should pop up.
But as you might have guessed, doing this with all potential methods will quickly get out of hand. If you want to process all requests from a single point, Filters will be your weapon of choice.
Using Filters
The Spring Filter interface lets you intercept all HTTP requests inside the app. With this approach, you can modify the behavior of all redirect requests in one place or implement multiple filters.
To start, go to your app root, and add a new package named filters . Inside, create a class named RedirectFilter with the following annotations:

The @Slf4j is a Lombok annotation that provides logging methods without the normal boilerplate code. To learn more about Lombok annotations, visit the docs .
What about the @Component annotation? It tells Spring to register this class in the IoC container to be available for dependency injection (DI) .
It’s important to override the doFilter() method to intercept the requests. In this example, I tell the system to check if the URL belongs to the same domain, and if it doesn’t, to ignore the redirection. The result will be a blank page with the text “No escaping the domain!”
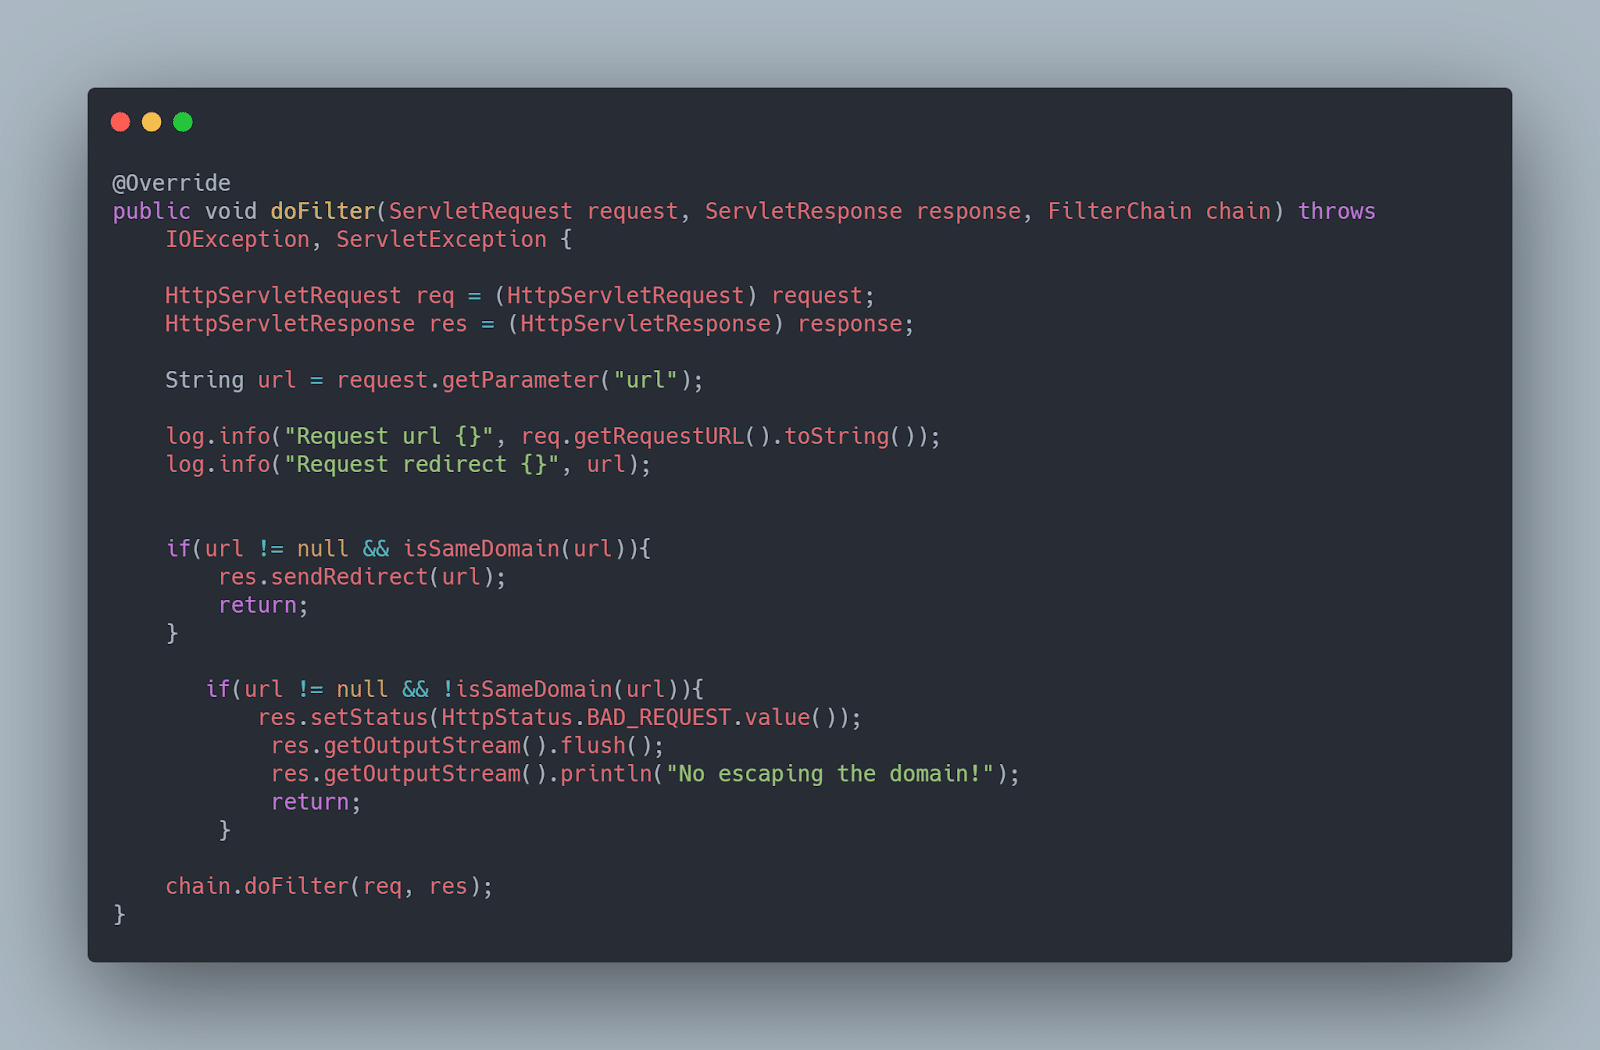
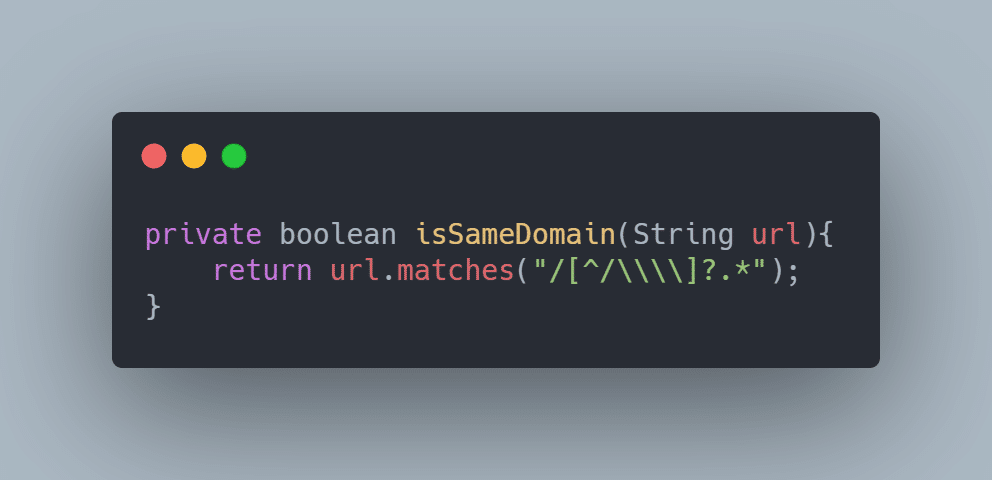
We use the isSameDomain() method to check where the URL is redirecting:
There are cases in which preventing redirections isn’t possible. In those cases, you can alert users that they’re leaving your app by creating an exit page. Let’s explore how to do that.
Exit Page
If your app has a lot of user-generated content, there may be links to external sites. Instead of blocking all requests, you could ask the filter you previously made to redirect to an exit page, which is a page that alerts users of the redirection.
First, go to your DefaultController . Add the following method:
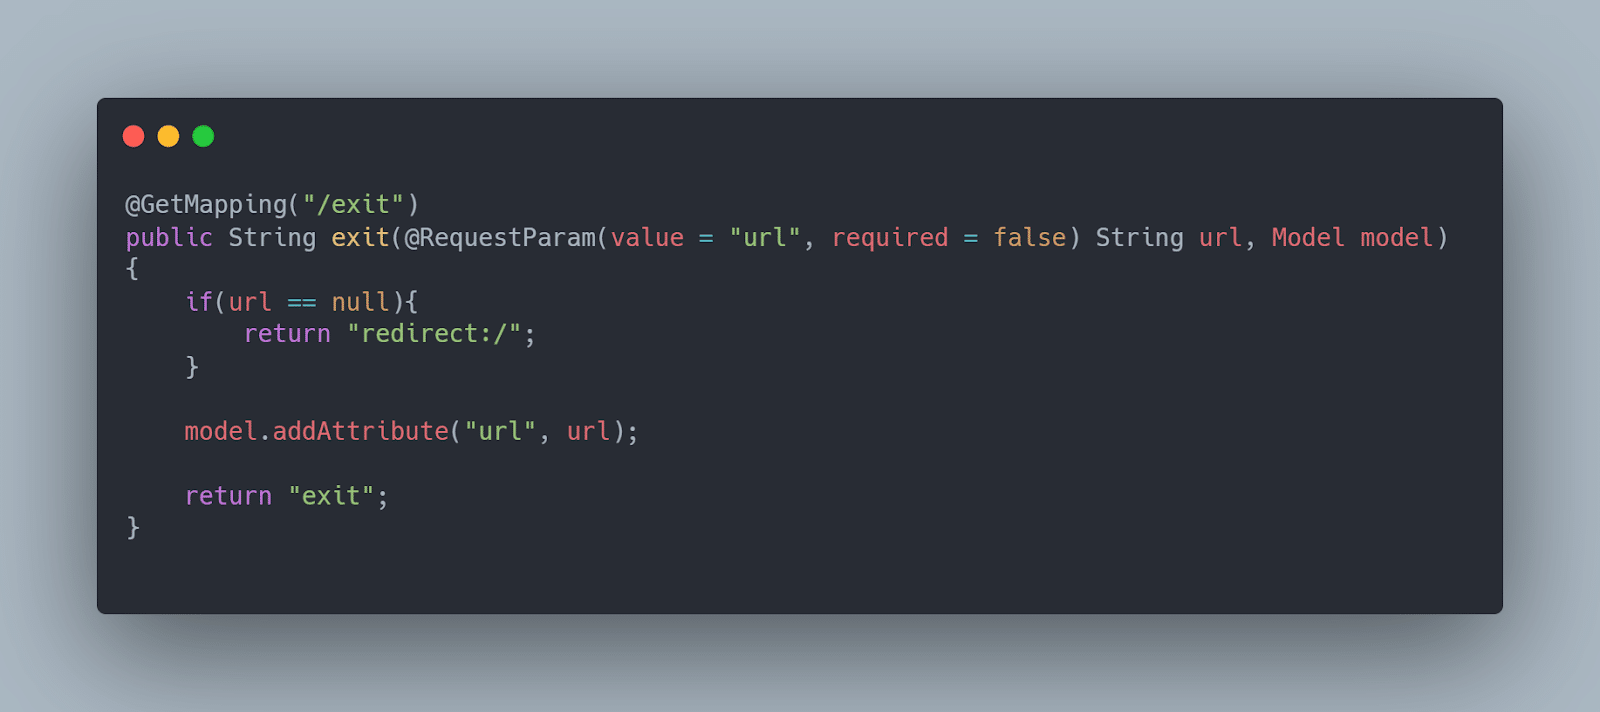
Here, you’re telling the controller: If you get an exit request with no URL, then either redirect to the homepage or open the exit page. The Model parameter in the method signature allows you to pass variables to your templates so that Thymeleaf can parse them.
Now, let’s create the exit page template.
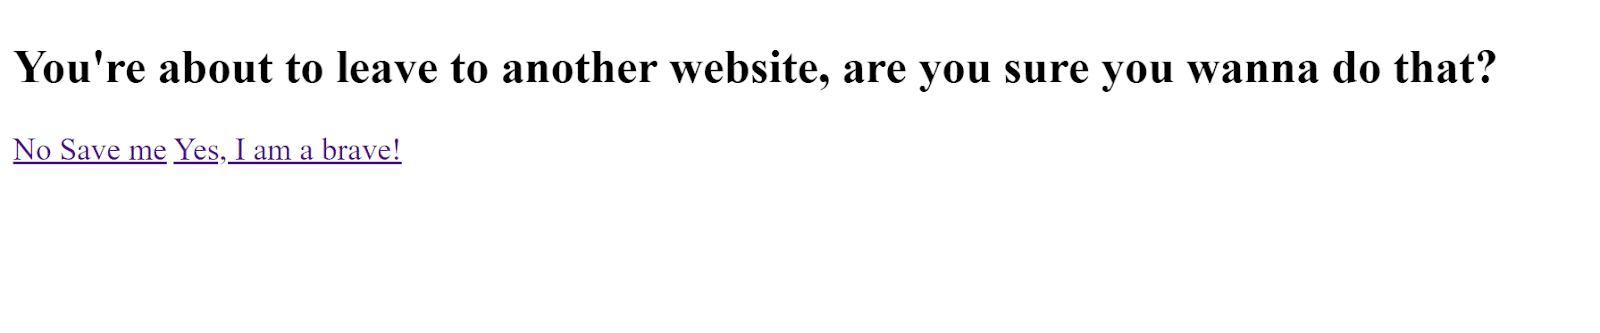
Go to the src/main/resources/templates folder. Create a file called exit.html , and add the following HTML code:
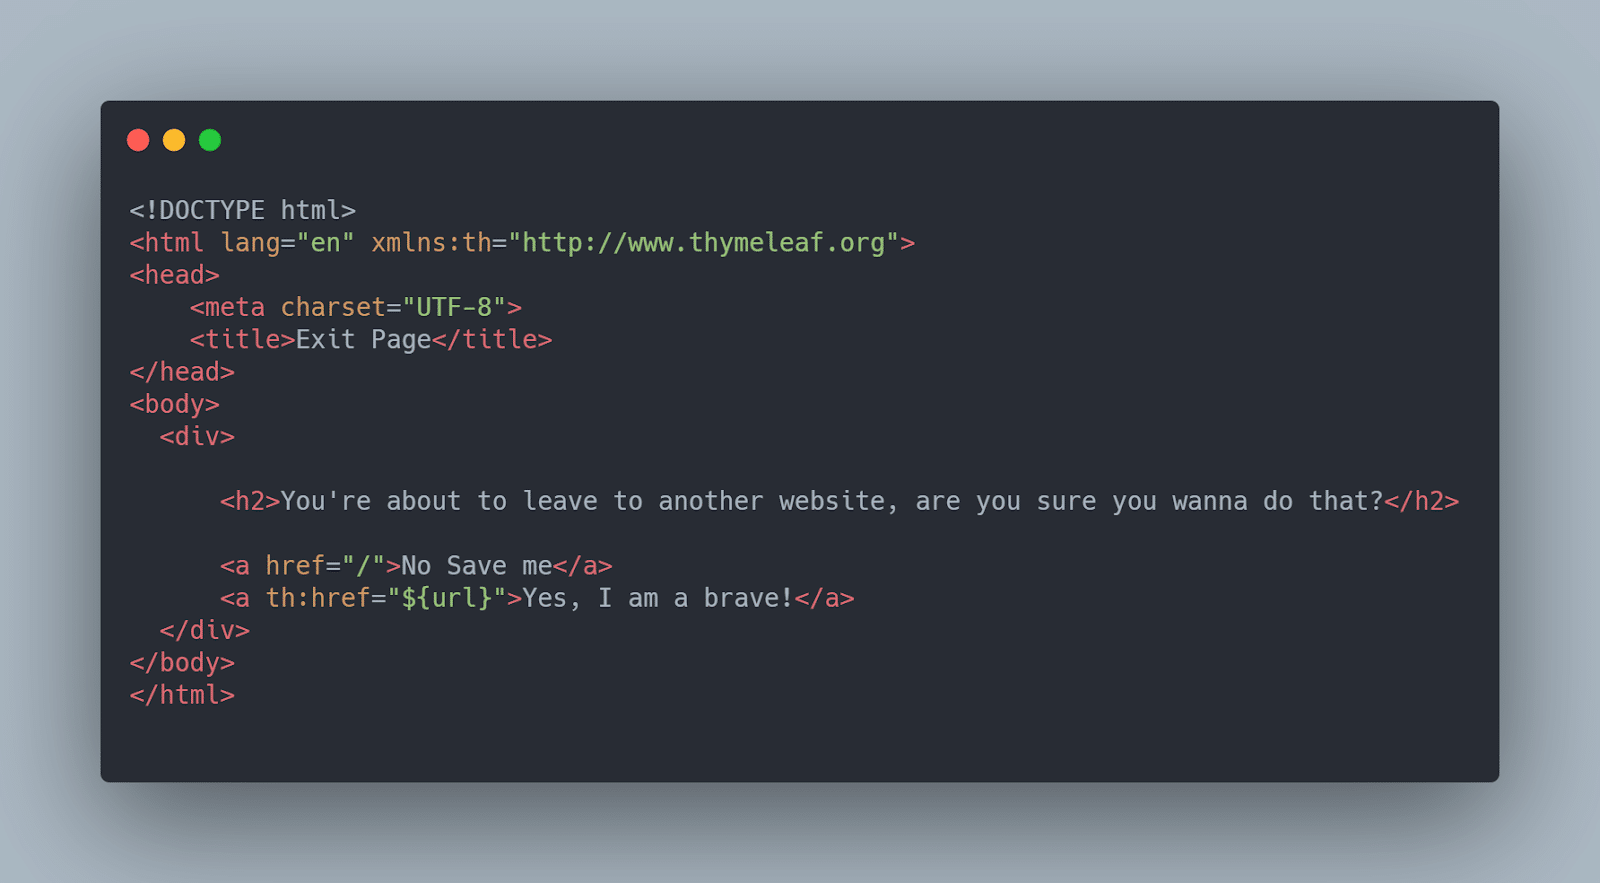
The th:href is a Thymeleaf tag that will parse the provided URL variable and create a link.
In the RedirectFilter class, you can modify your logic to redirect to the exit page instead of displaying the current message.
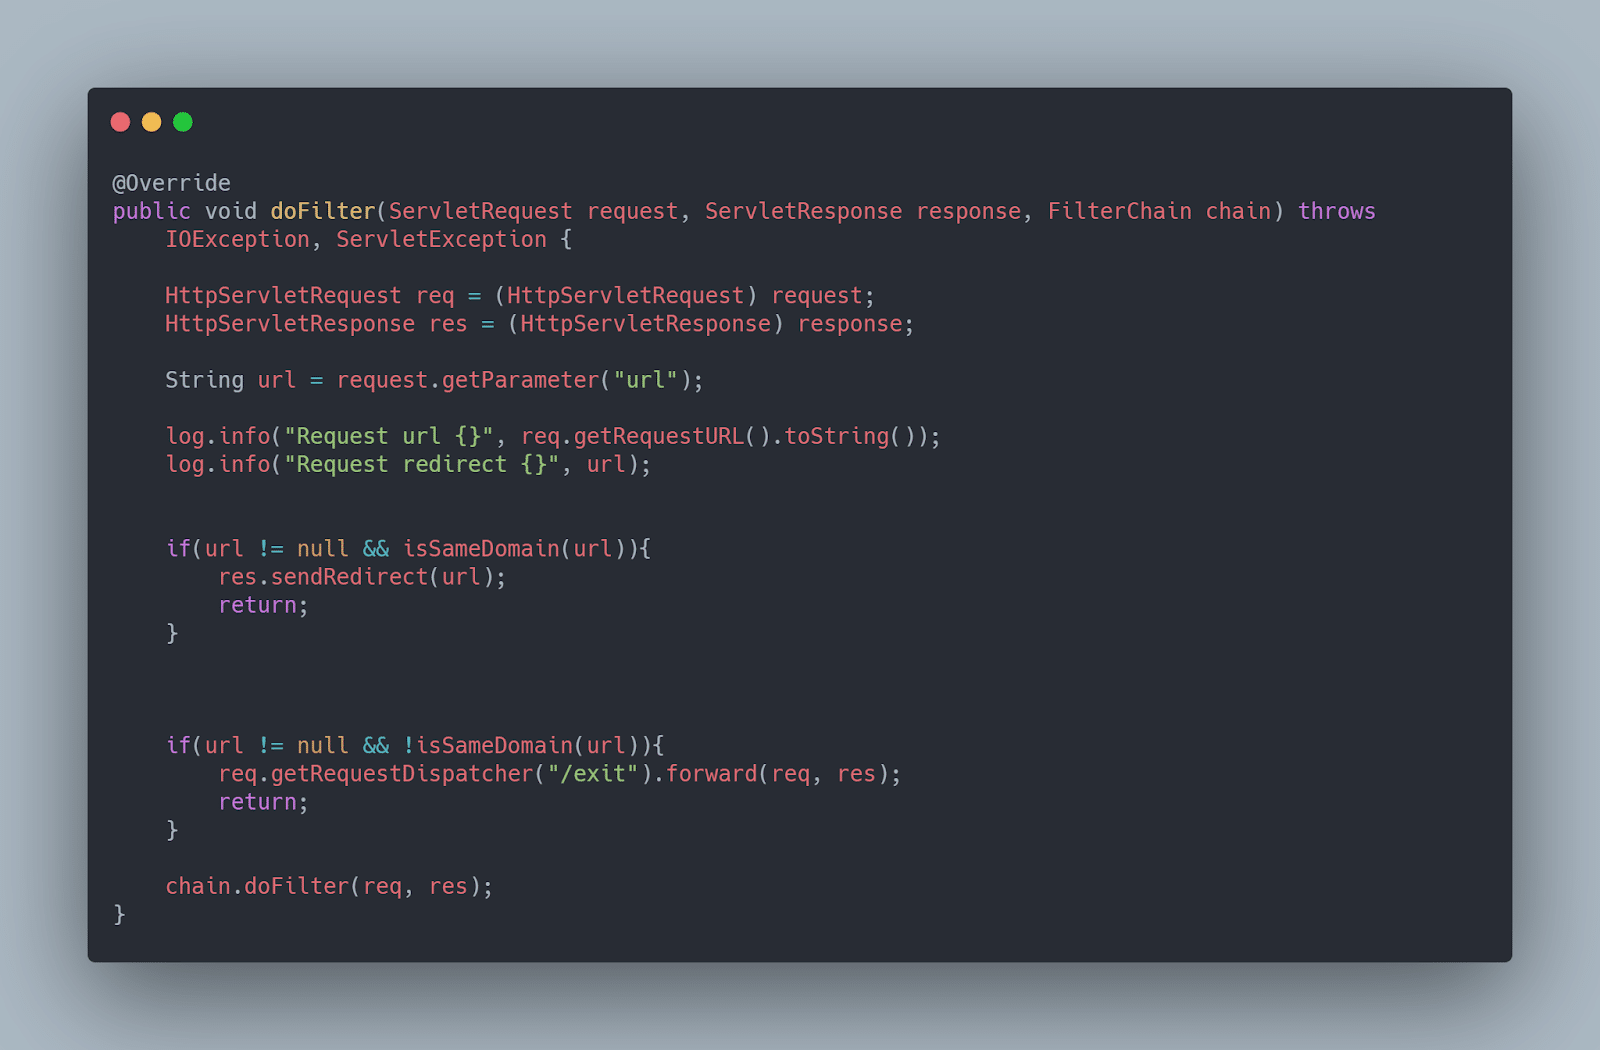
The getRequestDispatcher() method forwards to the exit page, where it asks you if we want to leave or return to the home page.
Summing Up and Learning More
Users expect security not only with their information, but also just browsing your application. Being able to prevent unauthorized redirection is another layer of protection you can provide. Adding redirect parameters to the URL is a quick and easy way to manage user flow. With these techniques, you can customize to your use cases.
For more information, check out StackHawk . There’s a searchable blog , and you can sign up for an account .
This post was written by Kenneth Reyes. Kenneth is a Full stack developer that has worked in different industries and with clients of all levels. He specializes in Java/Spring, Vue, and DevOps. He strives to make programming interesting for people outside the field.


