
The struggle between malicious actors and those tasked with securing online systems is in a constant state of flux. When attackers find a way into a system, defenders find ways to patch the hole and make their defenses stronger. In the same vein, defenders find more secure ways to authenticate the person logging in, while attackers try to compromise these methods. In this post, you’ll learn about cross-site request forgery (CSRF) and how you can reduce the chance of a malicious actor compromising a user’s account. This type of vulnerability relies on websites trusting requests made by authenticated users regardless of the requests’ intent. We’ll first have a look at recreating this vulnerability in the Vue app and then we’ll explore ways to fix the vulnerability.
What is Cross-Site Request Forgery?
CSRF is a type of vulnerability that allows a malicious third-party website to carry out unintended actions on behalf of a user authenticated by a trusted website. That’s a mouthful, but it’s easier to understand when you look at the illustration below.
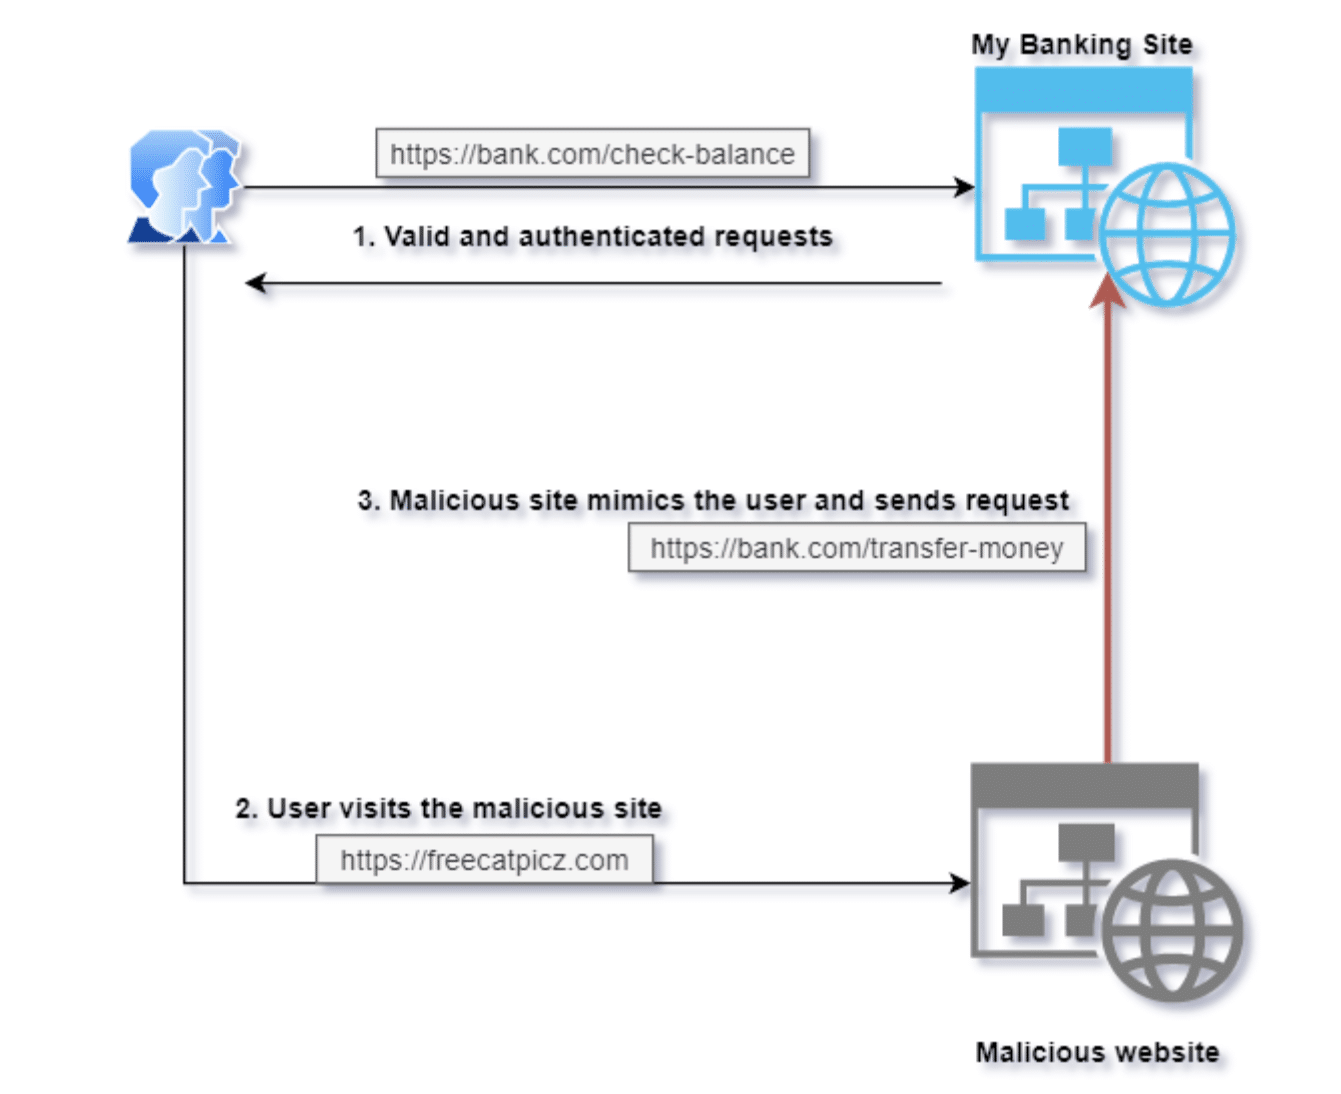
Let’s breakdown what’s going on here:
The user visits their bank.com , which is a trusted website but has a CSRF vulnerability in their fund transfer page. They authenticate with the bank and carry out regular banking activity. This is denoted by the valid and authenticated requests section in the illustration.
The user then wants to look at cat pictures and they find a new website for this: freecatpicz.com . In this scenario, a scammer has set up this website to fool users of bank.com .
The malicious website crafts a special HTTP request and sends it to bank.com . Since this happens on the user’s browser, where the authentication cookie is already set, the bank doesn’t know it’s not a genuine request. Before the user realizes anything is wrong, the bank will have processed the request and transferred the user’s money to the attacker’s account.
Now let’s look at some examples in code to really hammer this concept home.
Example of an Exploitable Vulnerability
For our example project, we’re going to make a small app that will let you set a status. It’s going to have two parts to it:
PHP backend
Displays a form and allow the user to set a status
Allows the user to fetch their latest status
Vue app
When the page is loaded, display the latest status
Display all statuses that have been set in the current page session
We won’t add any authentication for this example — the principle is the same with or without it. Since Vue is a progressive framework , it works well for our example because we can layer it on top of our PHP backend.
Let’s get started by setting up our PHP backend.
Setting Up PHP
In the interest of keeping things simple, I’ll assume you already have a PHP installation with Composer installed.
Run these commands to set up your directories:
mkdir vue-csrf-example
cd vue-csrf-example
mkdir status-app
mkdir bad-actor-app
Next, create a file named status-app/index.php and copy and paste the code below into it.
<?php
$mode = $_REQUEST['mode'] ?? null;
const STATUS_FILE = 'status.txt';

switch ($mode) {
  case 'SET_STATUS':
    // This is an example! You should NEVER trust user input and use it direct
    $status = $_POST['status'] ?? null;
    if (!empty($status)) {
      setUserStatus($status);
    }
    header("location: index.php"); // Redirect to the form page once it's set
    exit();
    break;

  case 'GET_STATUS';
    // Get the user stats and display it
    $status = getUserStatus();
    echo empty($status) ? "No status set" : $status;
    exit();
    break;
}

// Couple of methods to set and get the user status

function setUserStatus($status) {
  file_put_contents(STATUS_FILE, $status);
}

function getUserStatus() {
  if (is_file(STATUS_FILE)) {
    return file_get_contents(STATUS_FILE);
  }
  return false;
}
// Following is going to be our HTML
?>
<html>
  <head>
    <title>User Status App</title>
  </head>
  <body>
    <h1>User Status App</h1>
    <fieldset>
      <legend>Set Status</legend>
      <form action="index.php?mode=SET_STATUS" method="post">
        <input type="text" name="status">
        <button type="submit">Set Status</button>
      </form>
    </fieldset>
    <div id="app"><!-- Placeholder for Vue App --></div>
  </body>
</html>
Let’s load up our test app with the built-in PHP server: Open your console and type php -S localhost:8000 from the status-app folder and navigate to http://localhost:8000/index.php in your browser. You should see something like the following:
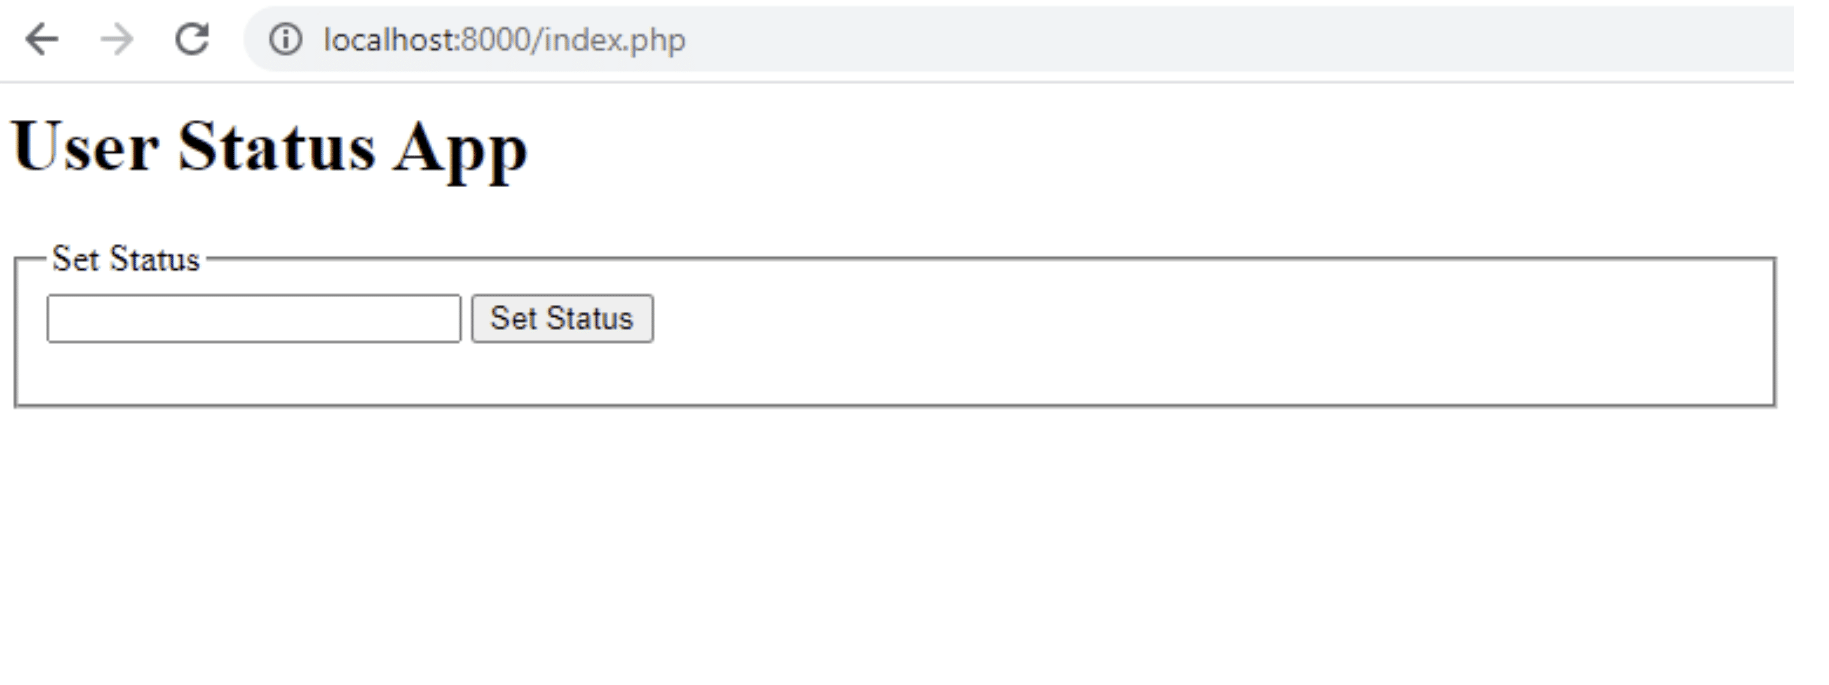
Screenshot of test app landing page.
Type something into the text box and click the Set Status button. If everything worked, you should now see a text file called status.txt inside your status-app project folder. Try loading http://localhost:8000/index.php?mode=GET_STATUS in your browser and see if the browser shows you your status. If it does, then we’ve confirmed that our app backend is working correctly.
Now let’s add some Vue magic to make our app a little better.
Setting Up Vue
Since we’re not interested in a full-fledged app for this example, we’re just going to progressively enhance the page we already created. To start with, let’s modify our HTML so it has all the elements we need. Replace the HTML markup in the index.php file with the following:
<html>
  <head>
    <title>User Status App</title>
  </head>
  <body>
    <div id="app">
      <h1>User Status App</h1>
      <fieldset>
        <legend>Set Status</legend>
        <form v-on:submit.prevent="setStatus" action="index.php?mode=SET_STATUS" method="post">
          <input type="text" name="status">
          <button type="submit">Set Status</button>
        </form>
      </fieldset>

      <fieldset>
        <legend>Current Status</legend>
        My current status : <strong>{{status}}</strong>
      </fieldset>

      <fieldset v-if="previousStatuses.length > 0">
        <legend>My Previous Statuses</legend>
        <ul>
          <li v-for="status in previousStatuses" :key="status">
            {{ status }}
          </li>
        </ul>
      </fieldset>
    </div>

    <script src="https://cdn.jsdelivr.net/npm/vue@2/dist/vue.js"></script>
    <script src="script.js"></script>
  </body>
</html>
Here are the changes we’ve made:
Wrapped the inner HTML in a DIV with an ID of app . This allows the Vue app to hook into the view,
Hijacked the form-submit event so that the submission happens in the background instead of in the foreground,
Added two fieldsets to fetch the current status and display the statuses that have been added, and
Included two script files — one for the main Vue file and one to include our script.
Now let’s create the status-app/script.js we refer to in the HTML.
var app = new Vue({
  el: '#app',
  data: {
    previousStatuses : [],
    status: "Loading status ..."
  },
  mounted : function() {
    this.getStatus();
  },
  methods: {
    setStatus : async function(e) {
      const status = e.target.elements.status.value;
      if (status === '') {
        return;
      }

      // Package up the form data and send the request the backend
      const formData = new FormData();
      formData.append('status', status);
      await fetch('/index.php?mode=SET_STATUS', {
        method : 'POST',
        body : formData
      });

      e.target.elements.status.value = ''; // Clear the input
      this.previousStatuses.push(this.status); // Add the status to the list of statuses
      this.status = status; // Update the current status
    },

    getStatus : async function(){
      //Fetch the current status
      this.status = await fetch('/index.php?mode=GET_STATUS')
        .then(res => res.text())
        .then(text => text);
    }
  },
})
The Vue component we created does the following:
Hooks into the element using the #app ID,
Loads the current status using the backend,
Submits the form to set the status in the background without a page reload, anytime it’s submitted, and
Shows us a list of previously set statuses.
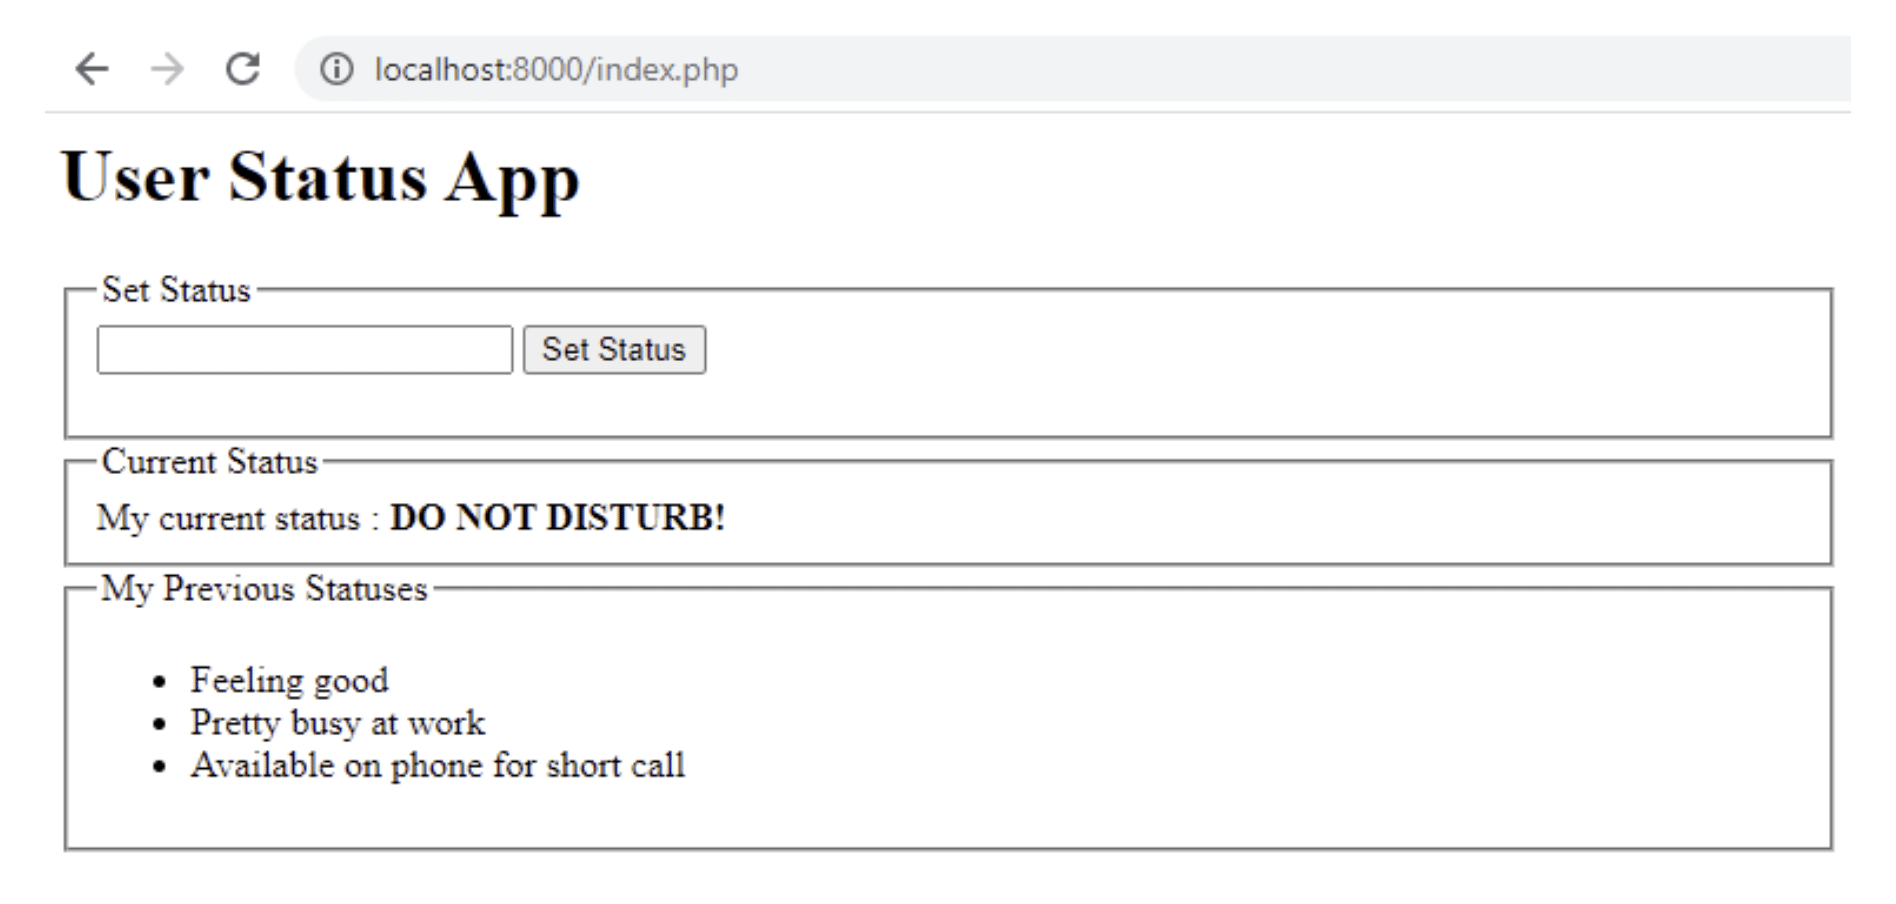
Test app with Vue.
Now that we have a working example, let’s switch to the malicious side of things!
Exposing the Vulnerability
As far as example applications go, our app looks fine. But, in our hasty design of the backend, we forgot to protect against CSRF attacks. So let’s create a malicious app that takes advantage of this security hole.
Navigate to the bad-actor-app directory we created earlier and create an index.html file with the following HTML markup inside it.
<html>
<head>
    <title>FreeCatPicz! Not Suspicous At All!</title>
    <script>
		/**
		This page simply creates a hidden form that matches the payload that our Laravel web app is expecting.
		When the user clicks the button, the payload is then sent to the Laravel app
		**/
        function carryOutBadAction() {
            let timer = 3;
            let timerInterval = setInterval(() => {
                document.getElementById('timer').innerHTML = `Whoops, you've been fooled! Attack carried out in : ${timer}`;
                timer--;
                if (timer === 0) {
                    clearInterval(timerInterval);
                    document.forms[0].submit();
                }
            }, 1000);
        }
    </script>
</head>
<body>
    <fieldset>
        <legend>Download Kitty of the Day</legend>
        <img src="http://placekitten.com/g/200/300">
        <!-- Make sure to point this at the correct URL that you are hosting your safe app -->
        <form method="post" action="http://localhost:8000/index.php?mode=SET_STATUS">
            <input name="status" type="hidden" value="Your site is vulnerable to CSRF">
            Innocent looking button : <button type="button" onclick="carryOutBadAction()">Download Photo</button>
        </form>
        <p><span id="timer"></span></p>
    </fieldset>
</body>
</html>
Since this is an HTML file, you don’t need a server to view it. Just double-click the file to open it and you should see something similar to what’s shown below.
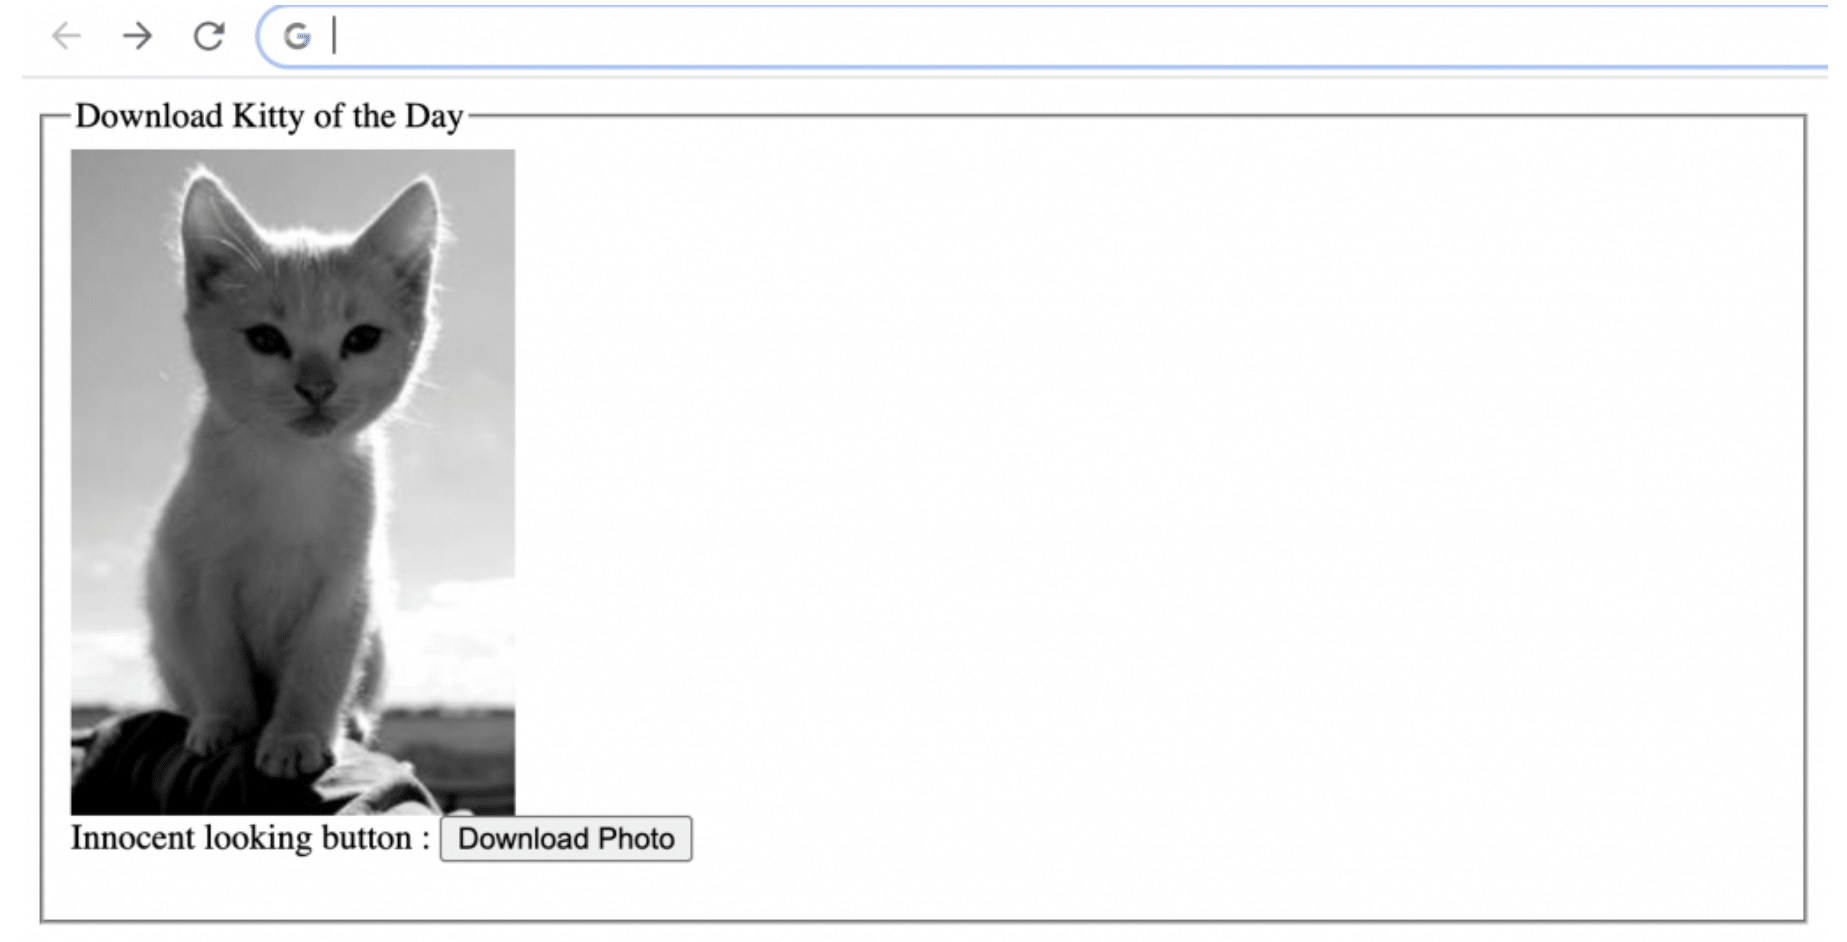
Malicious website masquerading as a cat pic website.
Nothing wrong on the surface of it, but if you click the Download Photo button, you get an ominous warning, and are redirected to the status app with your status changed to “Your site is vulnerable to CSRF.” So what’s going on here?
Looking Under the Hood
To get an understanding of what’s going on, let’s break it down:
The user opens the cat pictures website and clicks the Download Photo button.
Unknown to the user, there’s a hidden form with a payload that matches what our status app expects.
The malicious website sends the payload to the status app.
The status app is vulnerable to CSRF attacks and so does not verify who the sender is or that the user actually intended to send the payload.
The status app processes the payload and updates the user’s status to what is set in the malicious payload.
In our example, all of this happens on the surface so that we can see it playing out. But in a real scenario, the user wouldn’t even know that this action happened. So if something like a banking app were vulnerable, all your money might be in the attacker’s account before you knew it. And depending on the protections offered by the bank, it might not make a difference to the attacker whether you’re logged in or out.
Now that we understand what’s going on here, let’s try to find a way to fix it.
Neutralizing the Vulnerability
The vulnerability itself doesn’t exist on Vue. It’s actually a fault of the backend, but we need to adjust Vue so that it’s able to work together with the backend to fix it. Most modern frameworks come with CSRF protection and you just need to use it. For example, here’s a write-up about how to enable it on Laravel .
We’re going to add the OWASP recommended CSRF protection library for PHP. To add CSRF protection, create a composer.json file inside the status-app folder and paste in the following:
{
    "name": "user/status-app",
    "authors": [
        {
            "name": "JohnP",
            "email": "john@example.com"
        }
    ],
    "require": {
        "owasp/csrf-protector-php": "1.0.2"
    }
}
Next, run composer install from within the status-app directory. As described in the wiki of the CSRF protector project, carry out the following steps to configure the library.
Copy the file status-app/vendor/owasp/csrf-protector-php/libs/config.sample.php to status-app/config and rename the file to csrf_config.php .
Copy the file status-app/vendor/owasp/csrf-protector-php/js/csrfprotector.js to status-app/js .
Open the status-app/config/csrf_config.php file and set CSRFP_TOKEN to safeapptoken and jsUrl to http://localhost:8000/js/csrfprotector.js .
Open the status-app/js/csrfprotector.js file and set CSRFP_TOKEN token to safeapptoken .
That completes the configuration; now we just need to update the app to use the library.
Using the Library
Open status-app/index.php and add the following code to it right at the top.
include_once __DIR__ .'/vendor/owasp/csrf-protector-php/libs/csrf/csrfprotector.php';
Next, open up your script.js file and update your setStatus method so it looks like this:
...
  setStatus : async function(e) {
      const status = e.target.elements.status.value;
      if (status === '') {
        return;
      }

      // The library adds a CSRF token to the cookie and we just fetch it from there.
      let csrfToken = null;
      let cookieValue = `; ${document.cookie}`;
      let parts = cookieValue.split(`; safeapptoken=`); // This needs to match the value set in csrf_config.php file
      if (parts.length === 2) {
          csrfToken = parts.pop().split(';').shift();
      }

      // Package up the form data and send the request the backend
      // We now include the CSRF token in the post payload
      const formData = new FormData();
      formData.append('status', status);
      formData.append('safeapptoken', csrfToken) // Again, must match value set in csrf_config.php
      await fetch('/index.php?mode=SET_STATUS', {
        method : 'POST',
        body : formData
      });

      e.target.elements.status.value = ''; // Clear the input
      this.previousStatuses.push(this.status); // Add the status to the list of statuses
      this.status = status; // Update the current status
    },
...
And that’s it! You can try sending updates from the status-app and everything should work correctly. But if you try to trigger an update from the malicious app stored in bad-actor-app , it will fail because the CSRF token is missing.
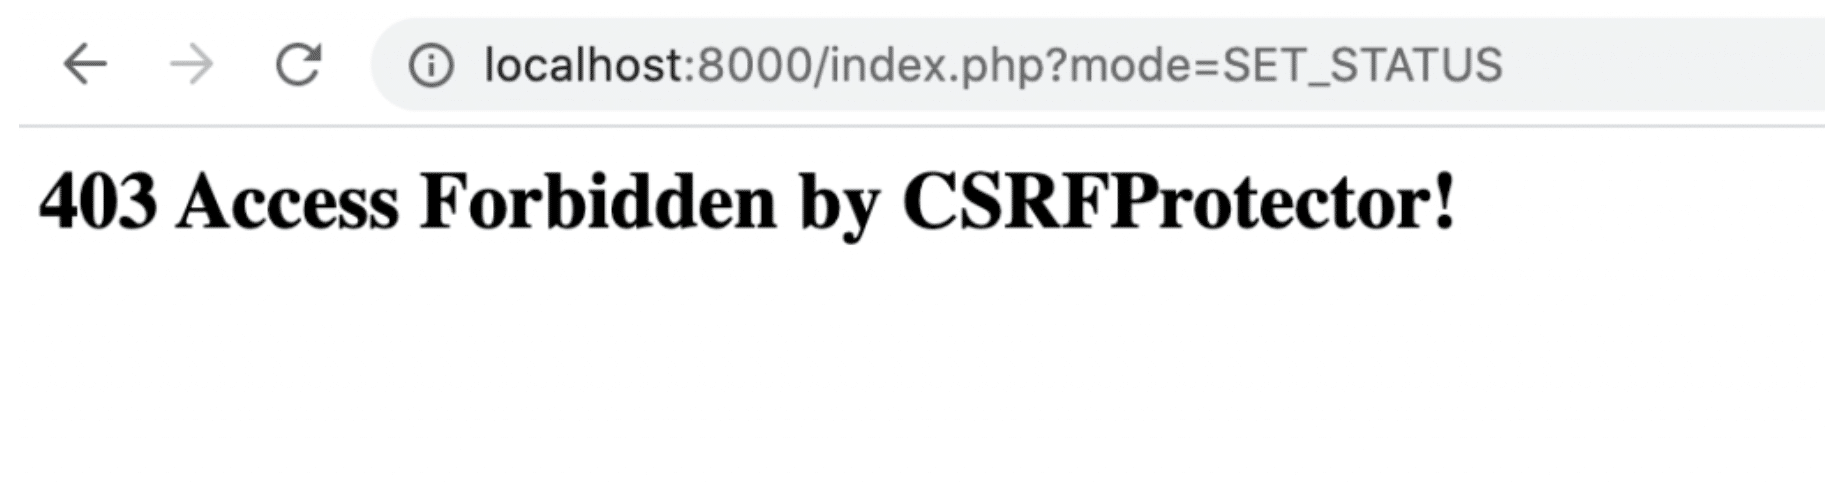
Failed malicious update attempt.
The CSRFProtector library added a secret code to the cookie, which we use in our Vue status-app. Since the cookie can only be accessed by a script running on the same site, external sites won’t know the token and will fail the CSRF check. This is just one of the libraries out there to guard against CSRF, and just one of the approaches for using this library. Make sure to familiarize yourself with the tools available to you in your ecosystem.
The Next Steps
In this post, we briefly looked at how CSRF vulnerabilities can expose your website’s users to malicious actors. We also created an example of a vulnerable website and implemented a fix for the vulnerability. If you want to read more about CSRF in general, the StackHawk blog has a great post on it .
Application security is a fluid topic and requires staying abreast of the latest developments.
Make sure to check out the StackHawk blog to read about other vulnerabilities and how you can stay ahead of the bad guys by using tools that do all the hard work for you.
This post was written by John Pereira. John is a technology enthusiast who’s passionate about his work and all forms of technology. With over 15 years in the technology space, his area of expertise lies in API and large scale web application development, and its related constellation of technologies and processes.


