
Authentication is an integral feature of any application. It’s also your users’ entry point to your product and business. So, you not only have to try to make it seamless, but you also must ensure that it’s secure and foolproof. But there are many vulnerabilities around authentication that developers can overlook.
Often these vulnerabilities lead to an authentication loophole in your application. An attacker can then easily exploit this loophole to break into your application. So, in this post, I’ll introduce you to what broken authentication is. I’ll also show you how you can prevent it in your Angular application.

Authentication Workflow
First, let’s have a quick refresher on how authentication usually works in an application.
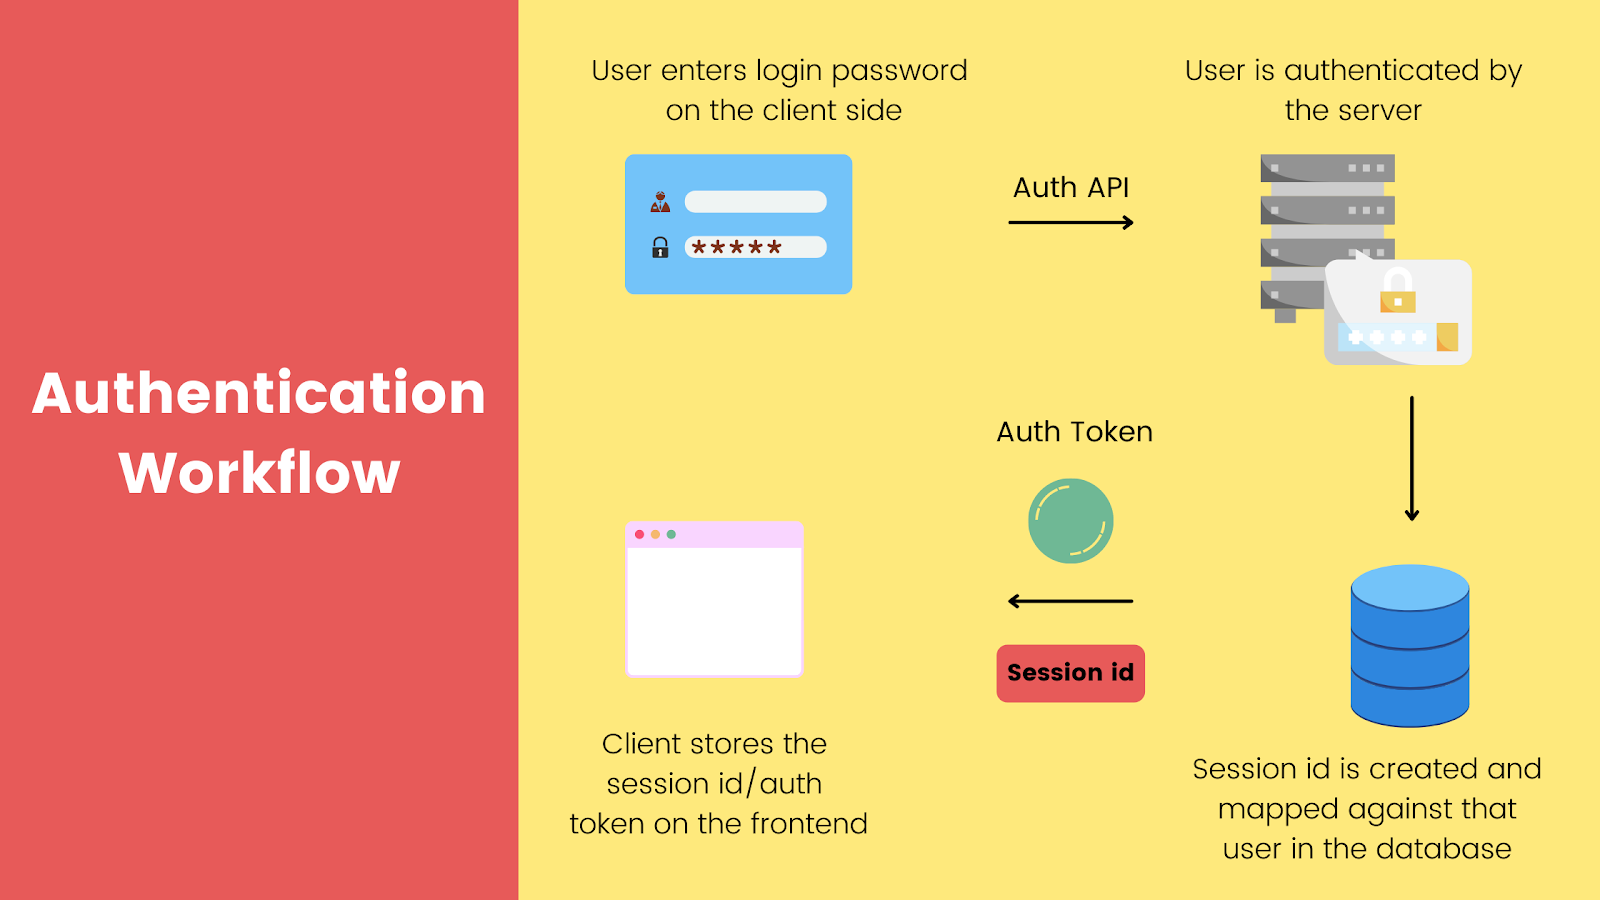
On the client side, you have a login or signup form that the user fills. The client then sends the user’s credentials to the server. The server validates the credentials and creates a new session for the user. It sends back an authentication token or a session ID.
The client stores this ID or token on the front end. It then sends it back with every request that the client makes to the server. That’s how the server identifies which user is making a request and if a resource is permitted to an incoming request.
Possible Loophole in Authentication Workflow
The server is responsible for generating the session ID or auth token. The client, on the other hand, is responsible for storing it securely. If leaked, this auth token or session ID can create a loophole in your authentication workflow. Then, an attacker can exploit it to break into your application using a legitimate user’s account.
Further, the attacker can steal all the user’s credentials, gain access to private resources, and tamper with the user’s data. Since your server recognizes the activity as coming from a legitimate user, neither you nor the user is alarmed about the situation. This could cause a lot of damage to your product, your user, and your business.
But in what instances can this token or ID be leaked? Let’s discuss a few scenarios of Angular broken authentication on both the server and client side.
Server-Side Vulnerabilities
When the user ends a session by logging out, the server should delete that session ID or authentication token. Then, the next time the user creates a new session, the server should also generate a brand-new session ID.
However, a lot of times the server simply updates a session flag in the database to log out the user. Consequently, it uses the same session ID against newer sessions. This practice could be problematic. If an attacker or a third party has seen your session ID before, they can use the same session ID to hijack your account even if you end your session.
Hence, the server should never use old session IDs for the new sessions. Instead, it should create a fresh session ID or auth token for each new session. Additionally, the server should rotate session IDs for each session. In other words, session IDs should have a TTL . After the TTL expires, the session should either be terminated or recreated. This is helpful in the sense that the server doesn’t need to completely rely on the client to terminate the session.
Now that you know some server-side vulnerabilities and how to combat them, let’s talk about client-side vulnerabilities.
Client-Side Vulnerabilities
Most of your client-side code is available in the browser. So, it’s vital that you structure your system in a way that it will still be intact if your global variables of the source code are exposed.
One of the best practices you should follow is ensuring that session IDs are not easily visible or accessible to anyone. As a first step, you should never store or append the authentication token or session ID in your front-end URL.
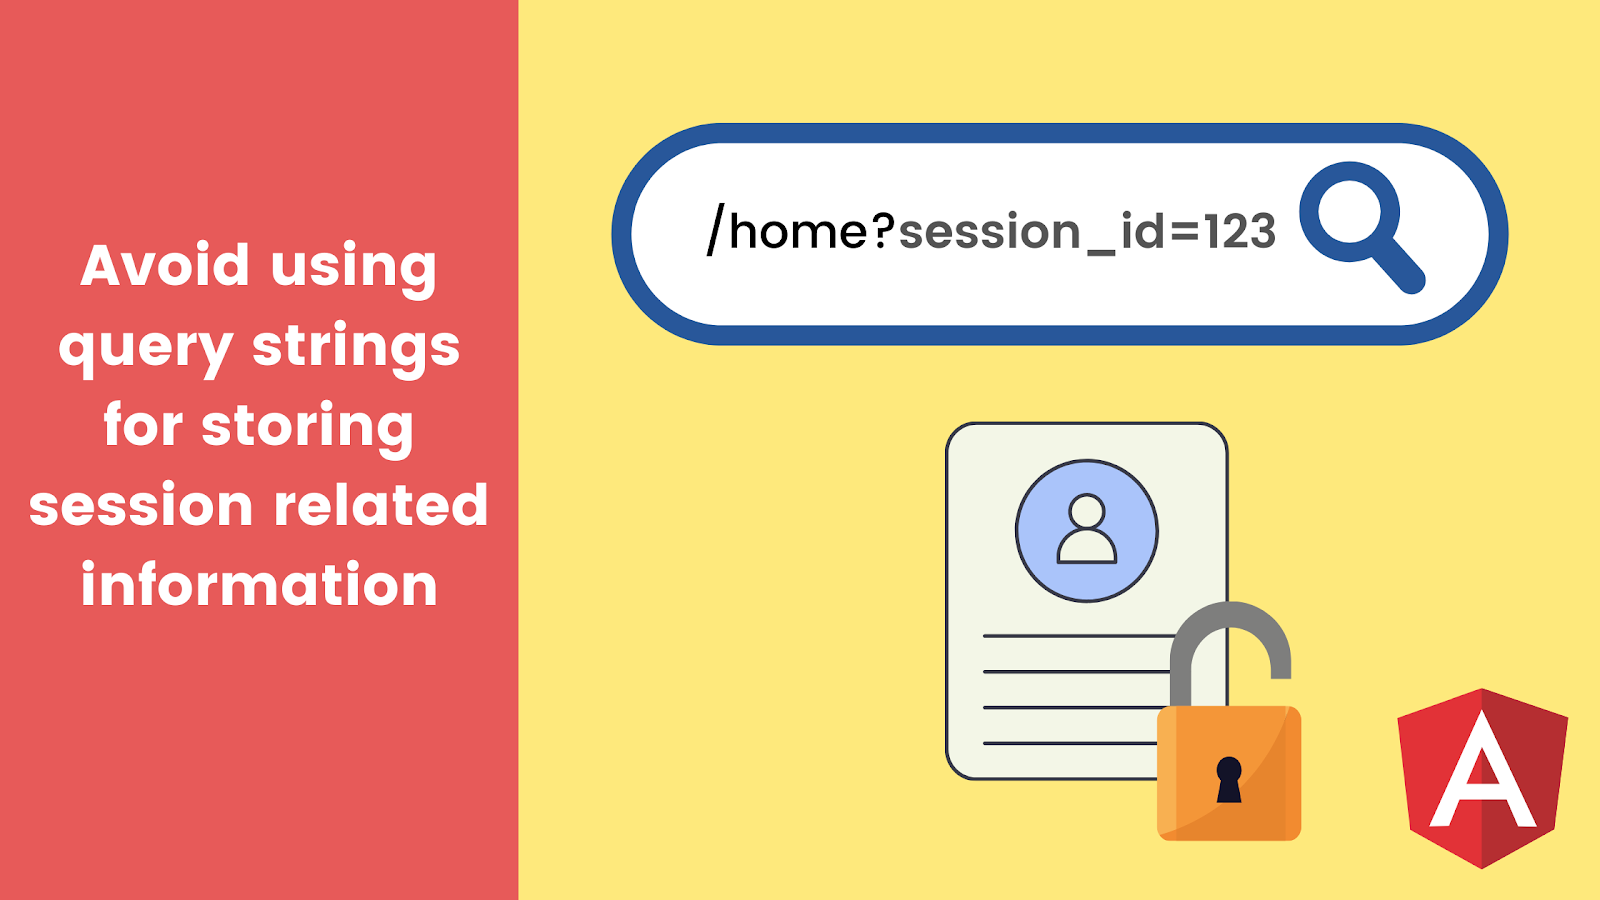
You should implement session management in your front end that keeps the session ID away from the UI. For this, you can store the session ID inside browser storage instead of route parameters.
Let’s see how we can achieve the above implementation in an Angular application. The result is that we should have some defenses against Angular broken authentication.
How to Handle Session Management in Angular
To get started, we’ll create a new Angular app with routing:
ng new my-app
Next, we’ll create two components: the home component and the login component.
ng g c home login
We’ll then configure routing for these components. Head over to the app-routing.module.ts file and add the following:
import { NgModule } from '@angular/core';
import { RouterModule, Routes } from '@angular/router';
import { LoginComponent } from './login/login.component';
import { HomeComponent } from './home/home.component';
const routes: Routes = [
  { path:"", component:LoginComponent},
  { path:"home", component:HomeComponent},
];
@NgModule({
  imports: [RouterModule.forRoot(routes)],
  exports: [RouterModule]
})
export class AppRoutingModule { }
Add Auth Service
Next, we’ll create a service that mocks login API action.
ng g s auth
Inside this service, we’ll have a function that simply returns a mock session ID to us. Here’s what the auth.service.ts file should look like:
import { Injectable } from '@angular/core';
import { HttpClient } from '@angular/common/http';
import { Observable, throwError } from 'rxjs';
import { catchError, retry } from 'rxjs/operators';

@Injectable({
  providedIn: 'root'
})
export class AuthService {
  baseURL: string = "https://random-data-api.com/api/users/random_user";

  constructor(private http: HttpClient) { }

  getAuthUser(): Observable<any> {
    return this.http.get(this.baseURL)
  }
}
Our service has a function getAuthUser that simply makes an HTTP request to a mock API that returns us some data. Within this data, we’ll get some information about a user and an id property. For the purpose of this tutorial, we’ll assume that this id is the session ID of the user. Make sense?
Create Login Page
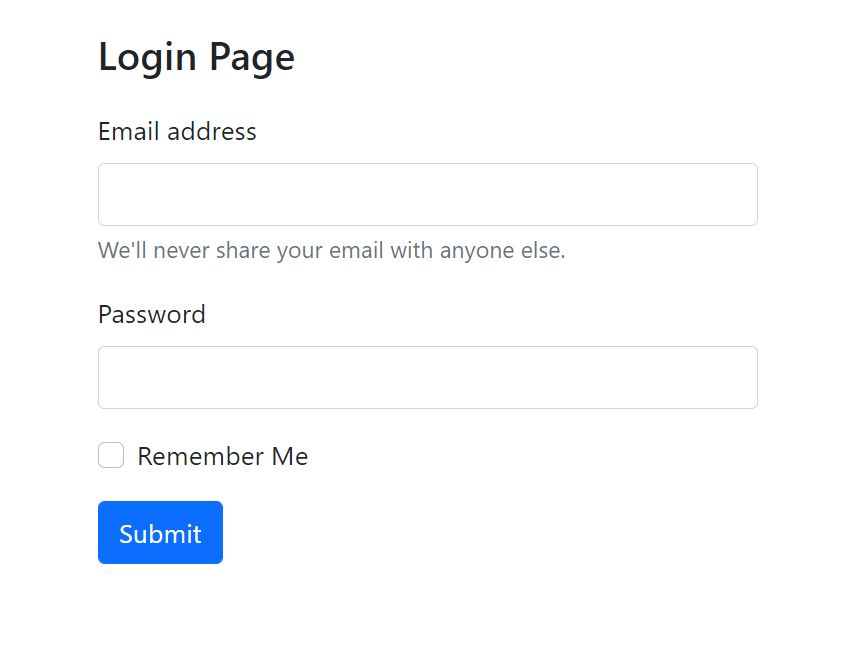
Let’s go back to our login component. Inside the login.component.html file, I have a simple markup that renders a login form.
<section>
    <h3>Login Page</h3>
    <form>
        <div class="mb-3">
          <label for="exampleInputEmail1" class="form-label">Email address</label>
          <input type="email" class="form-control" id="exampleInputEmail1" aria-describedby="emailHelp">
          <div id="emailHelp" class="form-text">We'll never share your email with anyone else.</div>
        </div>
        <div class="mb-3">
          <label for="exampleInputPassword1" class="form-label">Password</label>
          <input type="password" class="form-control" id="exampleInputPassword1">
        </div>
        <div class="mb-3 form-check">
          <input type="checkbox" class="form-check-input" id="exampleCheck1">
          <label class="form-check-label" for="exampleCheck1">Remember Me</label>
        </div>
        <button (click)="login($event)" type="submit" class="btn btn-primary">Submit</button>
    </form>
</section>
I also have some styles inside the login.component.css file as shown:
section{
    margin: 20px auto;
    max-width: 400px;
}

section h3{
    margin: 20px 0;
}
That should make the login page look this:
I’ve used Bootstrap to quickly bring in some styles to my template. You can do the same by referring here .
Inside the login.component.ts file, I’ll simply call the getAuthUser function from our Auth service and programmatically route to the home component. I’ll also pass the id received from the getAuthUser function as query parameters to the home component.
Here’s what the login.component.ts file looks like:
import { Component, OnInit } from '@angular/core';
import { AuthService } from '../auth.service';
import { Router } from '@angular/router';

@Component({
  selector: 'app-login',
  templateUrl: './login.component.html',
  styleUrls: ['./login.component.css']
})
export class LoginComponent implements OnInit {

  constructor(private AuthService:AuthService, private router: Router) { }

  ngOnInit(): void {
  }

  login(e:any){
     e.preventDefault()
     this.AuthService.getAuthUser().subscribe(data=>
      this.router.navigate(['/home'],{queryParams:{session_id:data.id}})
    )
  }

}
If you notice back in the template, the login function created above is called when the login button is clicked from the template.
The Home Component
The HTML file of the home component has a simple template as shown:
<section>
    <h3>This is the home page</h3>
    <p>Session ID of user: {{sessionId}}</p>
</section>
Right now, we’re getting the sessionId as query parameters in the /home URL. We’ll grab this from the route and append it to our component’s state variable. Here’s what the home.component.ts file should look like:
import { Component, OnInit } from '@angular/core';
import { ActivatedRoute } from '@angular/router';

@Component({
  selector: 'app-home',
  templateUrl: './home.component.html',
  styleUrls: ['./home.component.css']
})
export class HomeComponent implements OnInit {

  sessionId:any;
  constructor(private route:ActivatedRoute) { }

  ngOnInit(): void {
    this.route.queryParams.subscribe(params=>this.sessionId=params['session_id'])
  }

}
If you now click on the login button from the login page, here’s what you should get:
The Problem
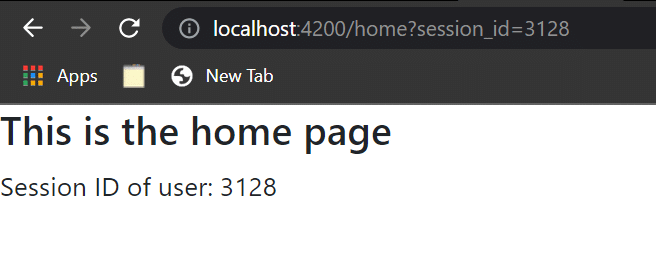
As you can see, the query parameters in the URL clearly show the session ID of the user. But as I mentioned earlier, this is not a good approach and could lead to Angular broken authentication in your application. What if the user used your application on a public computer, was on the homepage, and forgot to log out?
Or what if someone simply peeked at your user’s computer and saw the session ID clearly visible on the front end’s URL?
Use Browser Storage
Instead of passing the session ID in the front end route, we can push it inside browser storage like local storage or session storage.
Here’s what our updated login function should look like:
 login(e:any){
     e.preventDefault()
     this.AuthService.getAuthUser().subscribe(data=>{
      // this.router.navigate(['/home'],{queryParams:{session_id:data.id}})
      localStorage.setItem('session_id',data.id);
      this.router.navigateByUrl('/home')
     })
  }
Then, inside our home component we can grab the session ID from the localStorage :
ngOnInit(): void {
    //this.route.queryParams.subscribe(params=>this.sessionId=params['session_id'])
    this.sessionId=localStorage.getItem('session_id')
  }
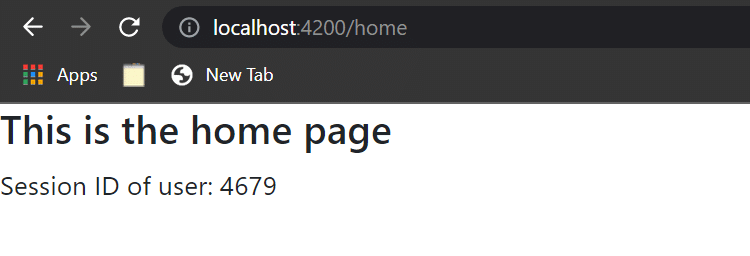
Now, if you go back to /login and press the login button again, you should still see the session ID on the /home page but it shouldn’t appear in your URL:
You can further improve this implementation by using the global state in your Angular app using NgRX.
Create Foolproof Authentication
We’ve seen how session management can help you prevent authentication loopholes. However, there are preventive measures you can implement to reduce the chances of taking damage from Angular broken authentication. The idea is simple: if you create an authentication system that’s foolproof, you’re already preventing future broken authentication loopholes in your application!
First, you should implement password strength validations in their systems. The core functionality will be implemented in the back end, but you may also use client-side libraries like this if you wish to ship this feature faster.
Second, you should also implement an auto sign-out functionality for idle users. This corresponds to use cases where the user forgets to log out from the application as well as close their application window on a public computer.
You can detect if the user is idle for more than a specified amount of time and automatically send a session termination or logout request to the server. Here’s a library in Angular that can come in handy for implementing this.
Conclusion
The first step to prevent Angular broken authentication is always implementing foolproof authentication. It’s safer and better to implement these on the server side and have your Angular client interact with these services when needed. That’s because front end checks, validations, and barriers are easier to bypass.
You can also check out my other similar post where I talk about broken authentication and how you can prevent it in your React application.
This post was written by Siddhant Varma. Siddhant is a full stack JavaScript developer with expertise in frontend engineering. He’s worked with scaling multiple startups in India and has experience building products in the Ed-Tech and healthcare industries. Siddhant has a passion for teaching and a knack for writing. He’s also taught programming to many graduates, helping them become better future developers.


