

Open redirect in Angular.
I’m sure at some point you’ve been redirected from one site to another. Website redirections are quite commonly used today for a variety of purposes. But when was the last time you paid attention to what site you’re being redirected to?
If done right, redirection is as harmless as it sounds. However, in some cases, it can become alarming for you and your users .
In this post, I’ll talk about open redirects—what they are and what impact they can have. I’ll also walk you through how you can detect and fix open redirects in your Angular application.
Are Redirects a Sign of Problems?
When you’re signing up on a website through your Google or Facebook account, the site may redirect you to another page first. Then it processes your authentication and redirects you to the actual website. Online retailers often use this pattern when you make online payments. For instance, if you’re booking flights or hotels for your trip, the website usually redirects you to a different website for making payments.
Thus, redirects are in a number of use cases. However, when a website allows other users to modify these redirects on their pages, a redirect becomes a vulnerability—an open redirect vulnerability . But how does this happen, and what are its impacts on your site and users?
Open Redirect Explained
To give you a better idea of what open redirect is, let’s take the simple example of password resets.
Redirection in Password Reset Links
If you’ve forgotten your password on a website, you request a form for setting a new password. The website then generally sends you a password reset link to your email. You click this link and land on a password reset form. You enter your new password, press the Submit button, and voilà! Your password is now reset. You’re then safely redirected to the homepage.
Visually, here’s what the process looks like:
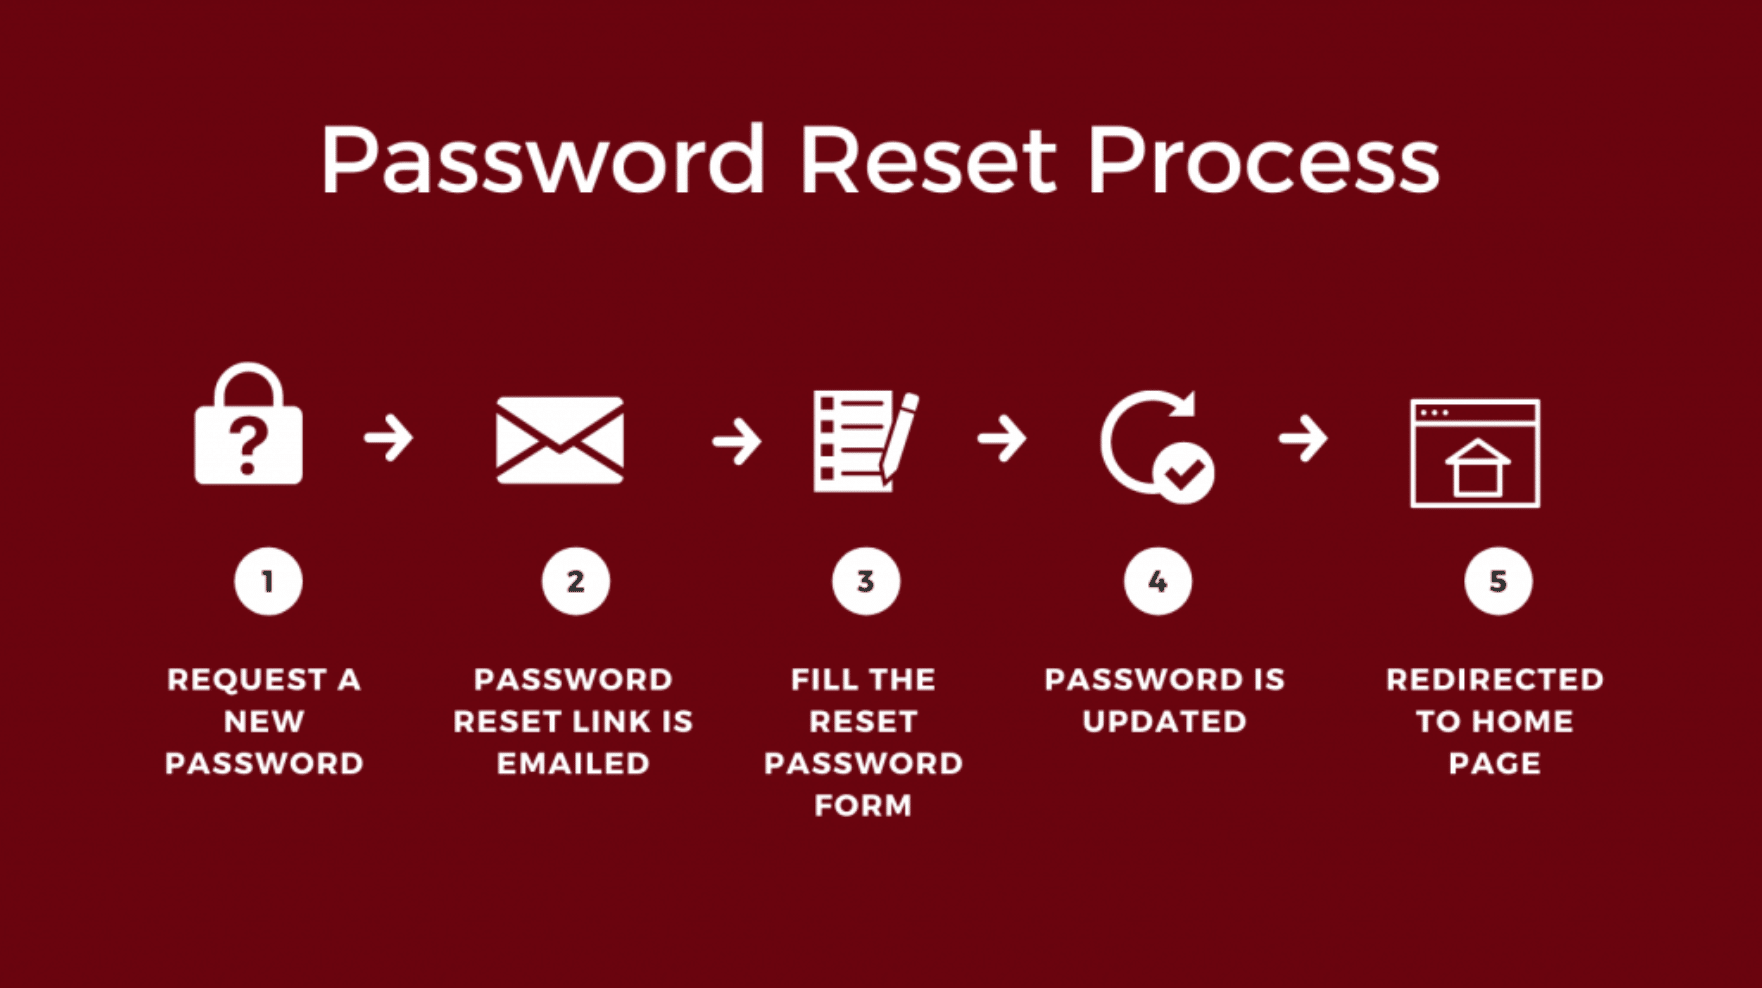
Password reset process.
Notice in step 2, you receive a password reset link. Let’s look at an example of a password reset link:
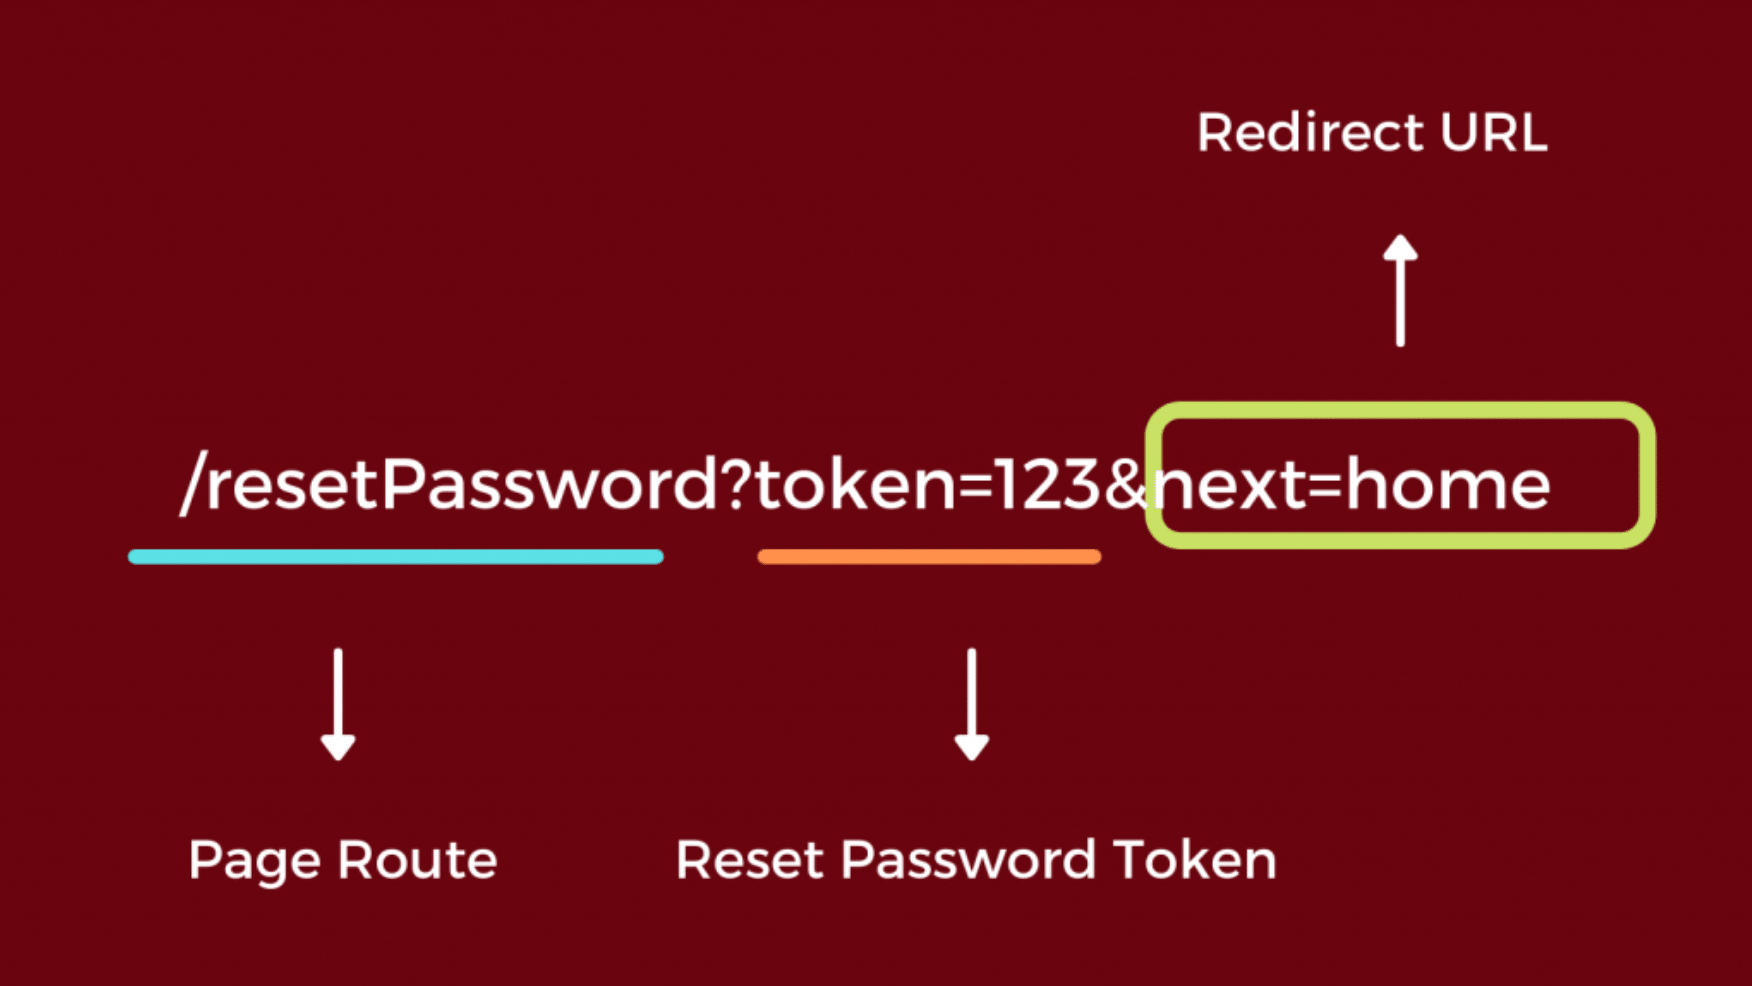
Anatomy of a reset password link.
The above link, /resetPassword?token=123&next=home , contains a route to the page of the website—that is, /resetPassword shown above. It contains some query parameters. The first query parameter is the authentication token. It’s sent in the reset password request the site will make to its server. The second parameter is next . It contains a redirect URL.
The Catch
Let’s focus on the final step a little. Most websites navigate you somewhere after you’ve reset your password. Some websites even redirect you to the login page. They tend to do this to enhance your user experience. In the above example, the website intends to navigate to the home page after you’ve reset your password.
However, how your website handles this redirection answers the question of whether it’s a vulnerability. To reiterate, what if I could simply change the next parameter in the URL to something else?
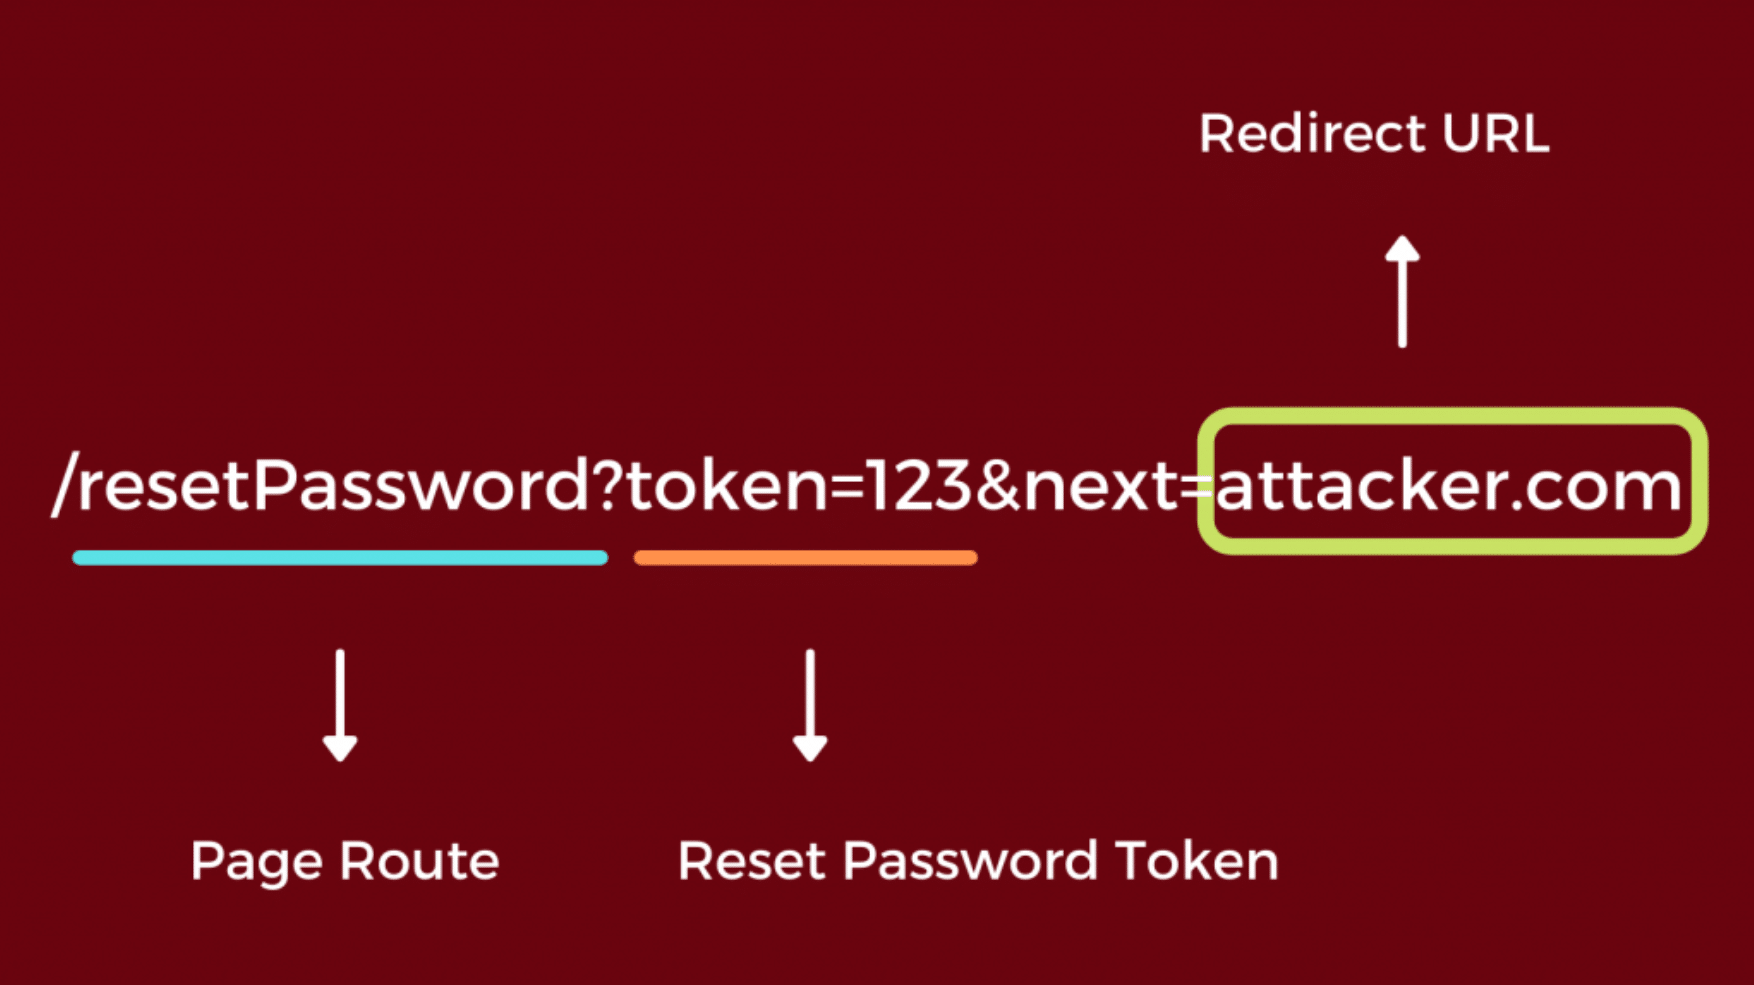
Changing the redirect URL.
In the above example, an attacker changes the next property, so the revision is /resetPassword?token+123&next=attacker.com . If the website now after submitting the form redirects to attacker.com , you’re in trouble! The attacker could get your authentication token in the headers of the request. Furthermore, she could potentially take control of your account on the site! Redirection doesn’t seem that harmless now, does it?
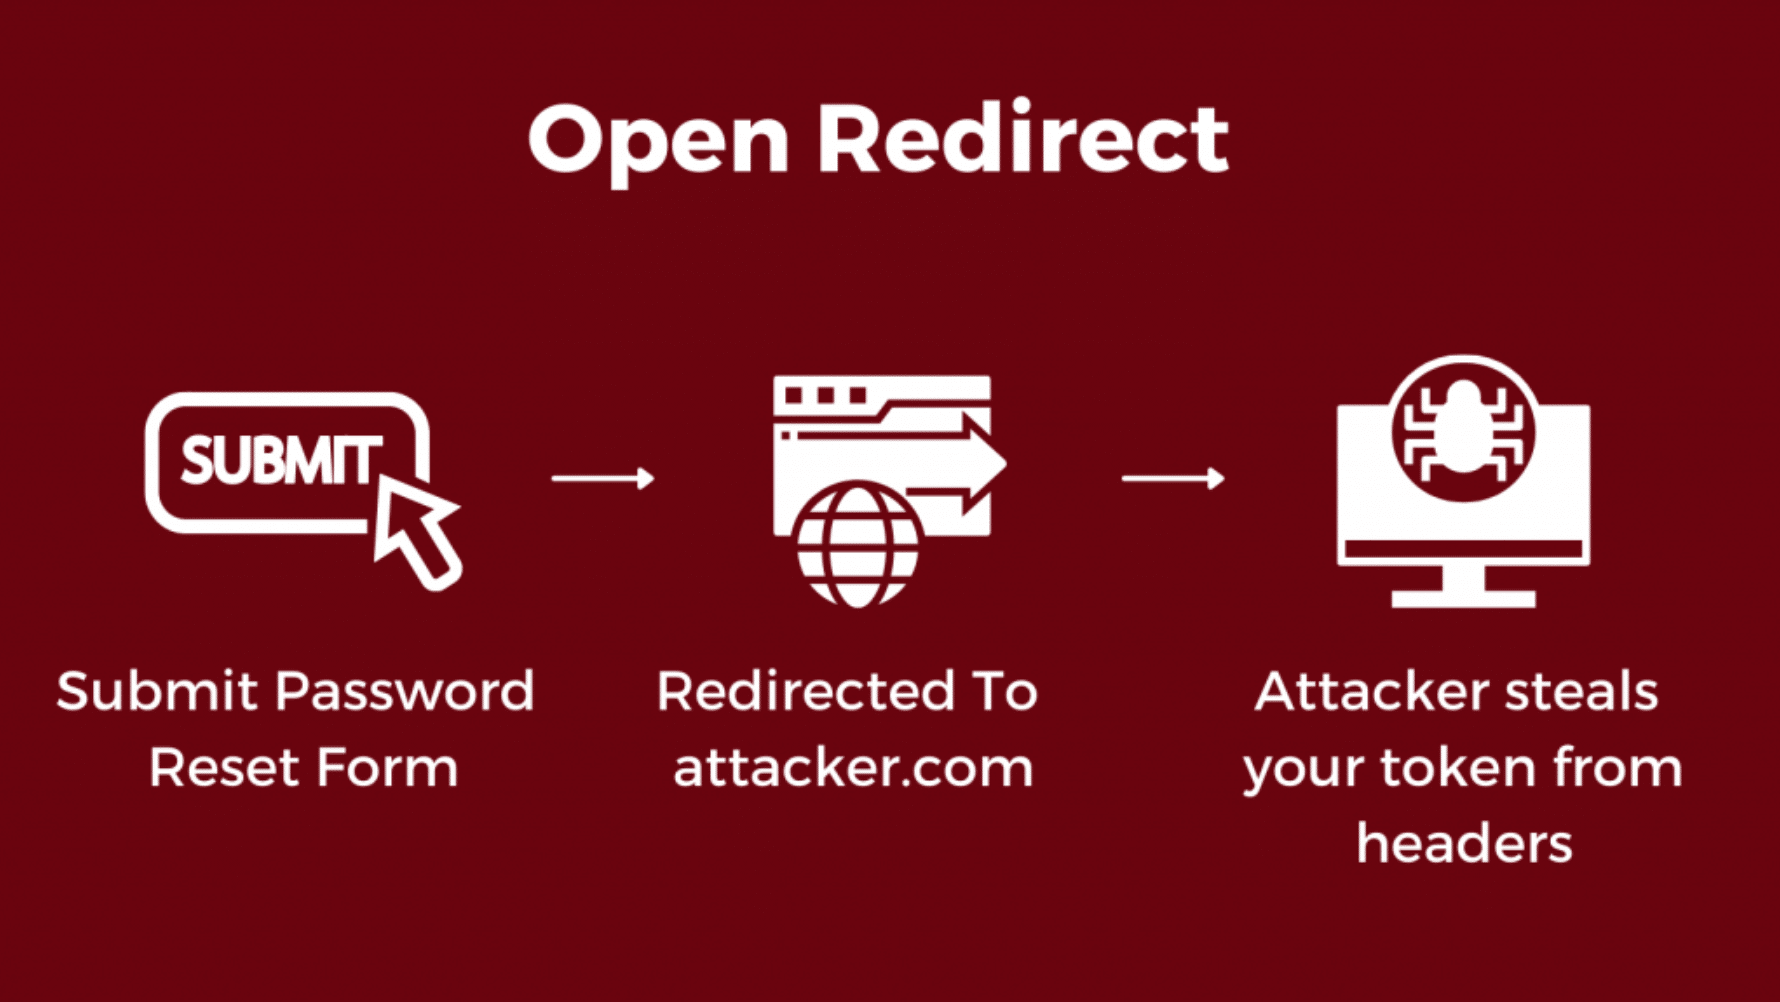
Open redirect.
Open Redirect in Angular
In light of the previous example, let’s see how you can detect and fix open redirects in your Angular application. That way you can see open redirect in action. Let’s jump straight into it.
Setup
First, create a fresh Angular app by running:
ng new angular-open-redirect --routing
The –routing flag configures some initial routing in the app for you. You need this set up so you can add and read query parameters from your URLs. Once you’re done with the above command, you need to create two components. Let’s create the first component, the Home Component, using the Angular command-line interface:
ng g c Home
Next, create the Reset Password component:
ng g c ResetPassword
Now that you have your two components up, let’s create routes for each of them. Inside your app-routing.module.ts , add the following code:
import { NgModule } from '@angular/core';
import { RouterModule, Routes } from '@angular/router';
import { AppComponent } from './app.component';
import { HomeComponent } from './home/home.component';
import { ResetPasswordComponent } from './reset-password/reset-password.component';

const routes: Routes = [

  {
    path:'resetPassword',component:ResetPasswordComponent
  },
  {
    path:'home', component:HomeComponent
  },
];

@NgModule({
  imports: [RouterModule.forRoot(routes)],
  exports: [RouterModule]
})
export class AppRoutingModule { }
To add the router in your component, go to your app.component.ts file, and render the Router component:
<router-outlet></router-outlet>
Your setup is done! Let’s kick-start the Angular app by running:
ng server
If you now visit http://localhost:4200/home , you should see the Home component. And as a result, if you visit http://localhost:4200/resetPassword , you should see the Reset Password component:
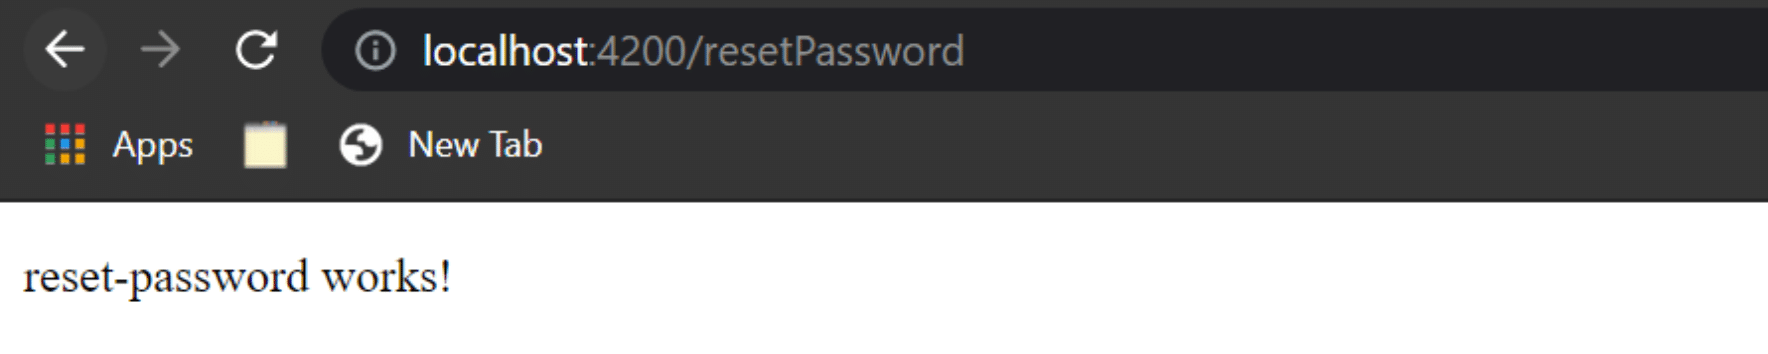
Reset Password component route.
Awesome! Let’s fill in these pages with some templates.
Add Page Templates
Let’s add some HTML to your Home page. Inside your home.component.html file, add the following code:
<div class="container">
    <h1>Welcome! 🏠</h1>
    <h4>This is the Home Page</h4>
</div>
Next, let’s create a simple Password Reset form user interface inside your Reset Password component. Head over to the reset-password.component.html file, and add the following code:
<div class="container">
    <h1>Reset Password Form</h1>
    <div class="form col">
        <div class="form-field">
            <label for="password">Enter your new password:</label>
            <input type="password" id="password" />
        </div>
        <div class="form-field">
            <label for="newpassword">Confirm your new password:</label>
            <input type="password" id="newpassword" />
        </div>
        <div class="form-field center">
            <button>Submit</button>
        </div>
    </div>
</div>
Lastly, let’s also add the following styles inside the styles.css :
/* You can add global styles to this file, and also import other style files */
body {
  background: #41295a; /* fallback for old browsers */
  background: -webkit-linear-gradient(
    to right,
    #2f0743,
    #41295a
  ); /* Chrome 10-25, Safari 5.1-6 */
  background: linear-gradient(
    to right,
    #2f0743,
    #41295a
  ); /* W3C, IE 10+/ Edge, Firefox 16+, Chrome 26+, Opera 12+, Safari 7+ */
  color: #fff;
  font-family: -apple-system, BlinkMacSystemFont, "Segoe UI", Roboto, Oxygen,
    Ubuntu, Cantarell, "Open Sans", "Helvetica Neue", sans-serif;
}

.container {
  display: flex;
  flex-direction: column;
  margin: 100px auto;
  align-items: center;
  justify-content: center;
}

.col {
  display: flex;
  flex-direction: column;
}

.form-field {
  width: 400px;
  display: flex;
  align-items: center;
  justify-content: space-between;
  margin: 20px 0;
}

input {
  outline: none;
  border: none;
  border-radius: 5px;
  padding: 10px 20px;
}

.center {
  justify-content: center;
}

button {
  padding: 10px 20px;
  border-radius: 5px;
  border: none;
  outline: none;
  cursor: pointer;
  font-weight: bold;
}
Great! Your Home page should now look like this:
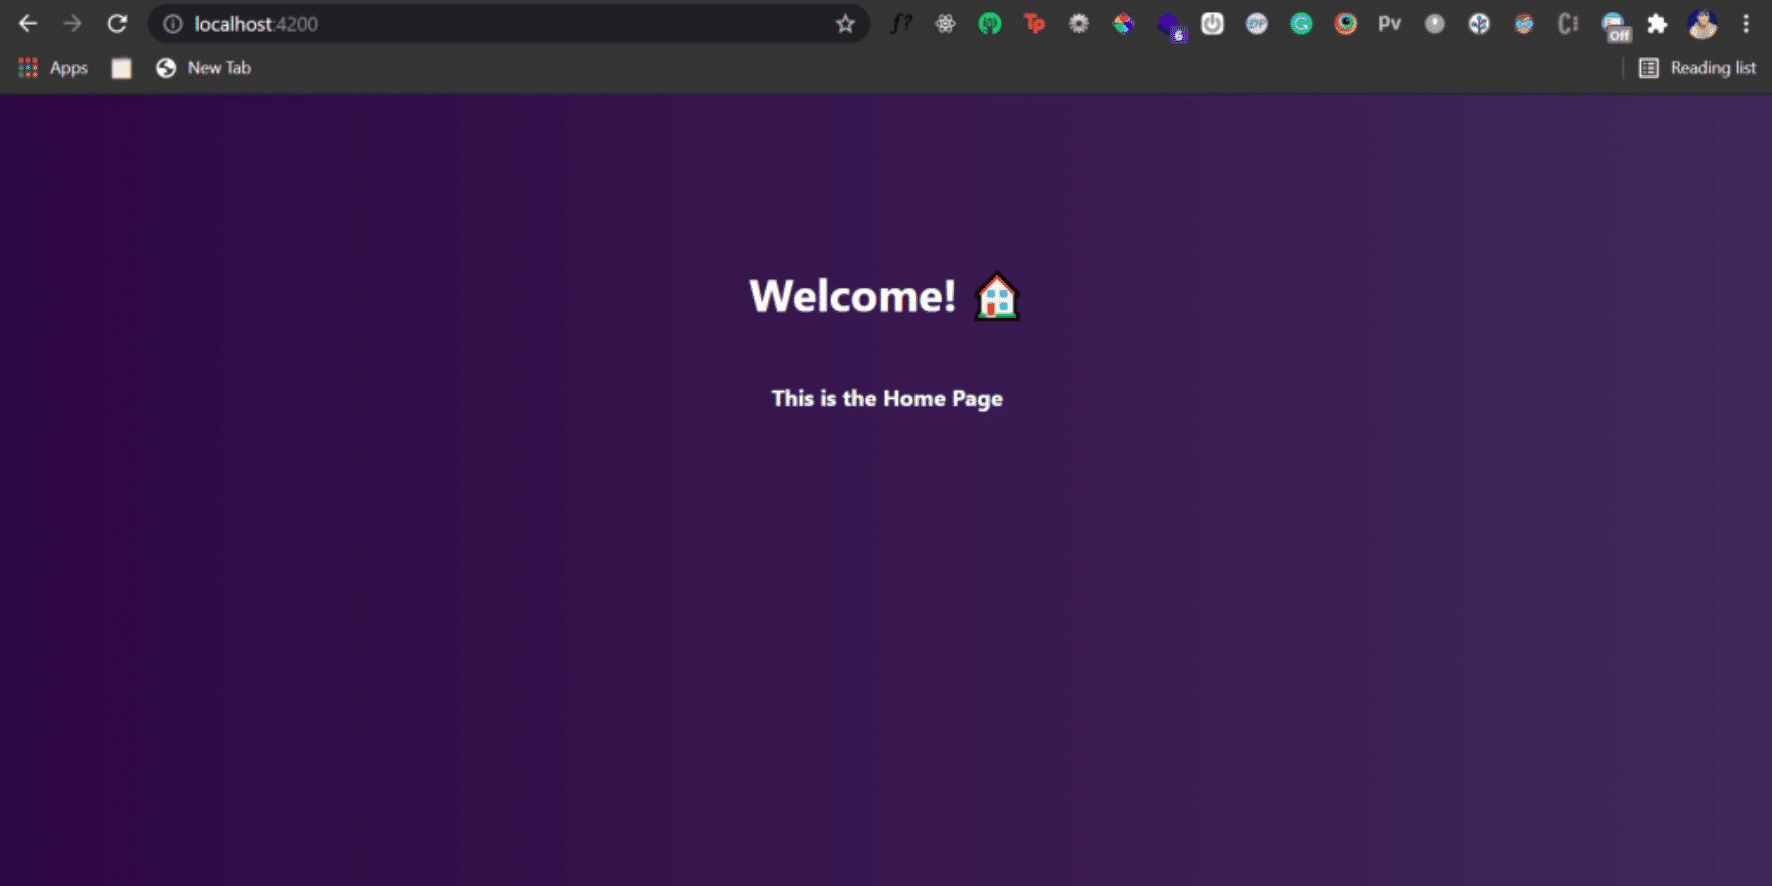
Home page.
Similarly, your Reset Password page should look like this:

Reset Password page.
Add Template Logic
Let’s add some logic to your Reset Password page.
First, I want the two input fields to bind to some variable in your component. This way, you can keep track of what the user is typing. Then, you’ll use ngModel to have two-way data binding in your template. For this, you first need to import the FormsModule inside your app.module.ts file:
import{FormsModule}from'@angular/forms';
And add this inside your imports:
@NgModule({
 ...
  imports: [
    BrowserModule,
    AppRoutingModule,
    FormsModule        //<-- This one
  ],
  ...
})
export class AppModule { }
Then, go inside your reset-password.component.ts file, and add the following code:
import { Component, OnInit } from '@angular/core';
import { ActivatedRoute, Router } from '@angular/router';

@Component({
  selector: 'app-reset-password',
  templateUrl: './reset-password.component.html',
  styleUrls: ['./reset-password.component.css']
})
export class ResetPasswordComponent implements OnInit {

  newPassword:any;         //Input binding for password field
  confirmNewPassword:any;  //Input binding for confirm password field
  token:any;               //Variable to store token
  redirectUrl:any;         //Variable for the URL to be redirected to after password reset is complete

  constructor( private Route: Router, private route: ActivatedRoute) { }

  ngOnInit(): void {

    //Grab query parameters from the URL
    this.route.queryParams.subscribe(params=>{
      this.token=params.token;
      this.redirectUrl=params.next;
    })
  }

  //This function is called when submit button is clicked
  handleSubmit(){
    console.log(this.newPassword,this.confirmNewPassword)

    //make an API call reset password in the db

    this.handleRedirectAfterSubmit();

  }

  //This function handles the redirect after password is reset
  handleRedirectAfterSubmit(){
    window.location.href=this.redirectUrl
  }

}
Let’s walk through what’s happening above.
Inside the ngOnInit() function, you get the required query parameters from the URL. You need the token and the redirect link, so you save both to the component’s state variables.
You can also create two other variables, newPassword and confirmNewPassword , to bind them to your input fields.
Finally, you have a handleSubmit() function. This fires when you submit the Reset Password form.
The other function, handleRedirectAfterSubmit() , fires after you reset the password. It handles the redirection to the Home page. Remember, the redirection is dynamic in nature. This is because the redirected URL is fetched from the query parameters of the Password Reset page’s URL.
You also need to update the template to call these functions and bind the input fields:
<div class="container">
    <h1>Reset Password Form</h1>
    <div class="form col">
        <div class="form-field">
            <label for="password">Enter your new password:</label>
            <input type="password" id="password" [(ngModel)]="newPassword" />
        </div>
        <div class="form-field">
            <label for="newpassword">Confirm your new password:</label>
            <input type="password" id="newpassword" [(ngModel)]="confirmNewPassword" />
        </div>
        <div class="form-field center">
            <button (click)="handleSubmit()">Submit</button>
        </div>
    </div>
</div>
The Open Redirect Vulnerability
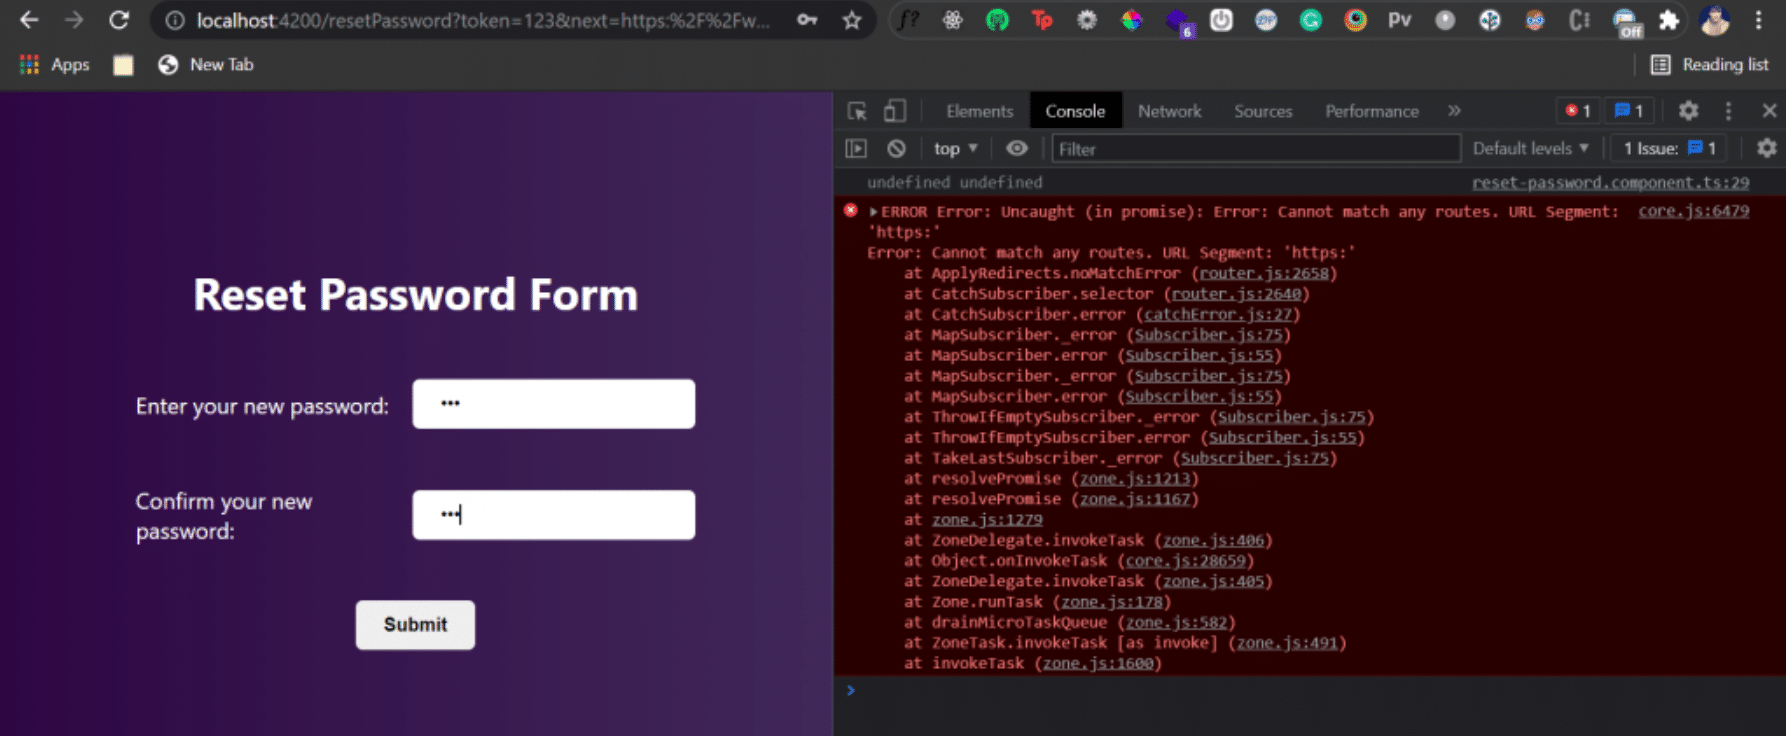
Let’s go to the URL http://localhost:4200/resetPassword?token=123&next=home. You should see the Reset Password page with the form. If you now type in the passwords and hit the Submit button, the app should redirect you to the Home page. That’s because you take the redirect URL from the next property inside your URL’s query parameter. You then use window.location.href to change the URL to this new location.
But what happens when you go to this instead? http://localhost:4200/resetPassword?token=123&next=https:%2F%2Fwww.google.com
If you now submit the form, the app redirects you to Google.com! This means your Angular application has an open redirect vulnerability. An attacker can change this URL to attacker.com and redirect the user to her lethal website instead.
Prevent Open Redirect in Angular
There are a number of ways to detect and fix open redirects in your Angular application. In this case, you can simply write code that allows only client-side redirects. Inside your reset-password.component.ts , you need to update your handleRedirectAfterSubmit() function as shown below:
//This function handles the redirect after password is reset
  handleRedirectAfterSubmit(){
    this.Route.navigateByUrl(this.redirectUrl)
  }
If you now go back to the route with changed next property and hit the Submit button again, here’s what you’ll see:
Open Redirect fixed using client-side routing.
The app throws an error! This allows your site to redirect only to other client-side routes of your site. It disables all external redirects, thereby preventing your site from being a victim of the open redirect vulnerability.
Safely Handle External Redirects
There may be cases where you need to allow redirects to external websites. For instance, you may need to integrate third-party services for authentication and payments. In these situations, you’ll have to revert to the previous code that allowed redirects to external websites.
But then how do you get rid of the open redirect vulnerability? The best practice here is to keep a list of external websites you’ll possibly redirect to. This is a no-brainer, since you’ll always know what third-party services you’re using in your application.
Let’s say in this case you want to allow redirects to https://www.google.com and https://www.youtube.com but prevent redirects to https://facebook.com . You can simply create an array that stores the URLs of the acceptable websites:
const allowedRedirects=[
  'https://www.google.com',
  'https://www.youtube.com'
]
And before redirecting, you can figure out if the website you’re redirecting to is safe by checking its entry against your permitted list of redirects. Here’s how the updated handleRedirectAfterSubmit() function looks:
//This function handles the redirect after password is reset
  handleRedirectAfterSubmit(){
    //this.Route.navigateByUrl(this.redirectUrl)
    if(allowedRedirects.includes(this.redirectUrl))
    window.location.href=this.redirectUrl;
  }
If you now change the next property to https://www.google.com and click the Submit button, it redirects you to Google. However, if you change it to https://www.facebook.com , Angular stalls you on the Reset Password page.
All this allows you to enable external redirects in your Angular application while still being safe from open redirects.

Conclusion and Exploring Further
In this post, you learned all about open redirects and how to cure them in your Angular application. You can explore more solutions to combat open redirects. If you’re using a front-end framework, you should always try to use framework-specific solutions for any kind of redirections.
There’s lots more to learn on StackHawk . You can create a free account or check out the searchable blog to find out more about topics that matter to you.
This post was written by Siddhant Varma. Siddhant is a full stack JavaScript developer with expertise in frontend engineering. He’s worked with scaling multiple startups in India and has experience building products in the Ed-Tech and healthcare industries. Siddhant has a passion for teaching and a knack for writing. He’s also taught programming to many graduates, helping them become better future developers.


