Most modern applications use a layered architecture where frontend and backend servers and technologies are decoupled. This means that integrating the two components is a pretty common task. It is one of the key tasks that frontend and full-stack developers do. Connecting your frontend app built in Angular to backend APIs doesn’t come without challenges, though. Often, your front-end application needs to communicate with a server of a different origin. This could be your own server or a third-party application programming interface you need in your application.
When integrating your frontend with your backend API, you may often encounter a cross-origin resource sharing (CORS) error. But what exactly is CORS? And how can you interact with your back-end services in a hassle-free way? In this post, we’ll talk about what CORS is and how you can enable it in your Angular application, as well as how to fix it on the server side.

How Do Modern Web Apps Work?
Before we understand CORS, let’s do a quick refresher on how most modern web applications work.
Web Apps with Decoupled frontend and backend
The popular way to create modern web apps is to decouple the frontend and backend of your application. Your backend is connected to a database where you store all the information. Your frontend requests the backend to perform CRUD (Create, Read, Update, and Delete) operations against the data and usually displays the results to the user.

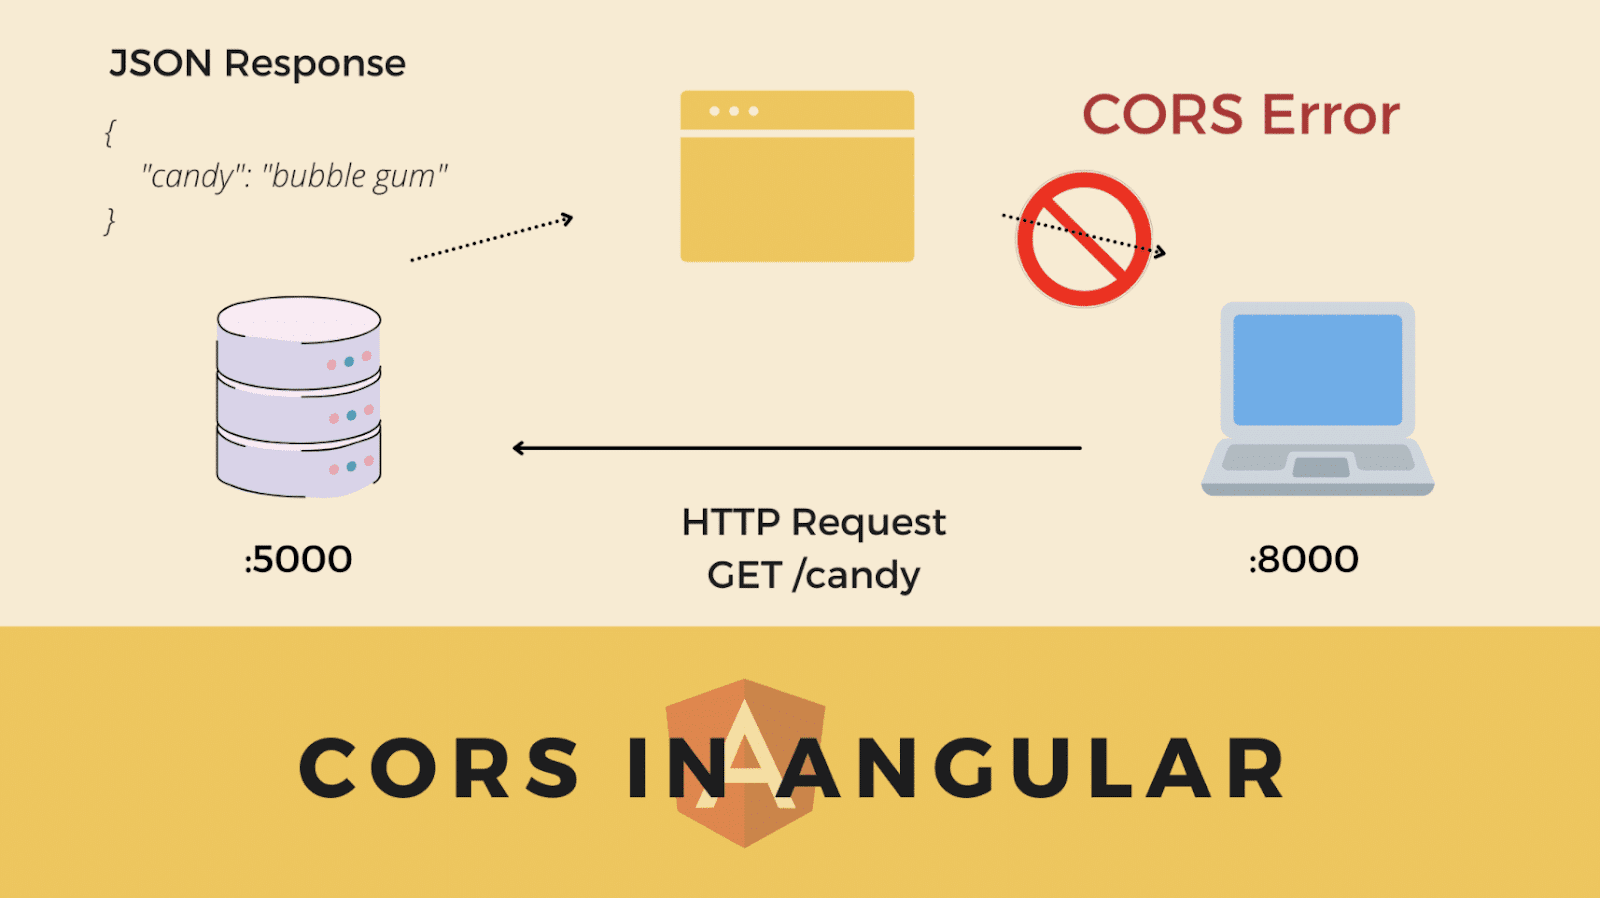
As shown below, your frontend makes an HTTP GET request to your backend at the endpoint /candy. Your backend then queries the database and returns a JSON response to the frontend.

But wait—what is /candy? That’s not a complete URL, right?
Anatomy of a URL
Conventionally, when we say our frontend is making a request to an endpoint that begins with /, it means the endpoint is hosted on the same domain as the frontend. However, there’s more to a URL than just a domain. Since both our frontend and backend are running on different servers, despite being on the same domain, they’re differentiated by the port number.

A URL always has the following three components:
- scheme (http/https)
- domain (localhost, example.com)
- port (4200, 5000, 80, 443)
Here’s how these three components look in an actual URL. In http://www.example.com:80, the HTTP part is the scheme, the www.example.com is the domain, and the 80 part is the port.

The above three components together constitute the origin of the URL. If two URLs differ in any of the above three components, they have different origins. In the above example, our backend could be hosted at example.com:5000, and our frontend could be hosted at example.com:4200. Both have different ports and therefore are of different origins.
Browsers’ “Same Origin” Policy and CORS
Due to security measures, web browsers enforce a “same origin” policy on all web applications. This policy states that a client on a browser can interact only with servers that have the exact origin as the client. In the case of a decoupled application, if your frontend attempts to request a resource from your server, the browser will throw an error. Since each is of a different origin, they aren’t allowed to share resources with each other. We call this the CORS error.
To get around this, you need to tell your browser to enable your client and your server to share resources while being of different origins. In other words, you need to enable cross-origin resource sharing or CORS in your application.
One important thing to note, though, is that not all cross-origin requests trigger preflight OPTIONS requests. Simple requests (such as GET, HEAD, or POST with standard headers and content types, such as application/x-www-form-urlencoded, multipart/form-data, or text/plain) bypass the preflight check and are sent directly to the server. Only requests with custom headers, non-standard HTTP methods (like PUT or DELETE), or content types other than these three will trigger a preflight OPTIONS request. For example, a POST request with application/json will trigger a preflight.
What does a CORS error actually look like? Let’s see it inside an Angular application.
Understanding the CORS Error in Your Angular App
If you’re reading this, you’ve likely encountered a CORS error in your existing Angular application. Let’s look at what this error looks like and understand what’s happening.
Common CORS Error Messages
When your Angular app tries to call an API on a different origin, you’ll see errors like these in the browser console:
Access to XMLHttpRequest at 'https://api.example.com/data' from origin 'http://localhost:4200' has been blocked by CORS policy: No 'Access-Control-Allow-Origin' header is present on the requested resource.Access to XMLHttpRequest at 'http://localhost:5000/api/users' from origin 'http://localhost:4200' has been blocked by CORS policy: The request client is not a secure context and the resource requires 'https'.Seeing these errors signals that you are dealing with a CORS issue! Your next step is to figure out what is causing the error.
Where CORS Errors Typically Occur
In your Angular app, you’re making HTTP requests out to an API. For example, let’s assume that you have a DataService that is making some API calls. That might look like this:
export class DataService {
  constructor(private http: HttpClient) {}

  getData() {
    // This might cause a CORS error
    return this.http.get('https://api.example.com/data');
  }

  // Or calling your own backend API
  getUsers() {
    // This might also cause CORS error in development
    return this.http.get('http://localhost:5000/api/users');
  }
}
Common Scenarios That Trigger CORS Errors
So, what about this particular setup causes the error? Here are a couple of the most common scenarios that lead to a CORS issue popping up:
- Development setup: Your Angular app runs on http://localhost:4200 but calls an API on http://localhost:5000
- Third-party APIs: Calling external services that don’t allow your domain
- Production deployment: Frontend deployed to https://myapp.com, calling an API at https://api.myapp.com
- Mixed protocols: HTTPS frontend trying to call HTTP API (blocked by modern browsers for security) or HTTP to HTTPS with CORS misconfiguration
Diagnosing CORS Issues
Even though it’s fairly easy to see that CORS is an issue, before fixing it, you should confirm that it’s actually a CORS problem. You can do this by:
- Check the Network tab in your browser’s developer tools. If it’s a CORS issue, you’ll see the request, but no response data will be displayed.
- Look for preflight OPTIONS requests – complex requests, such as those that a CORS policy would catch, which show an OPTIONS call before the actual request.
- Test the API directly – Try the same URL in a new browser tab or with curl. If it works, it’s a CORS issue. If the API responds normally with curl but fails in your Angular app, you have a CORS issue.
Now that the issue is confirmed, let’s explore some ways to resolve it.
Proxy Requests to Enable CORS in Angular
When you’re in development, frameworks provide you a neat little hack to get around CORS. If our Angular application is running on port 4200 and our backend is running on port 5000, we need to proxy requests from the Angular development server to the backend server.
Although this sounds complex, it’s pretty simple with Angular. Inside the src folder of your application, create a new file called proxy.conf.json. This is a JSON file that’ll contain the configuration for our proxy server. Here, we’ll instruct our Angular application to act as a proxy server that receives API calls and redirects them to http://localhost:5000.
Inside the proxy.conf.json file, add the following code:
{
  "/api/*": {
    "target": "http://localhost:5000",
    "secure": false,
    "changeOrigin": true
  }
}
Next, we need to inform Angular about this proxy configuration. We can achieve this by adding a proxyConfig option to the project’s angular.json file.
...
"architect": {
  "serve": {
    "builder": "@angular-devkit/build-angular:dev-server",
    "options": {
      "browserTarget": "your-application-name:build",
      "proxyConfig": "src/proxy.conf.json"
    },
...
Next, we will update your Angular service to use the proxy path. If your endpoint is /candy, change from:
this.http.get('http://localhost:5000/candy')To this:
this.http.get('/api/candy')The proxy will automatically route requests starting with /api/ to your backend server. Angular CLI matches path prefixes, so /api/* matches any request starting with /api/, like /api/users or /api/candy.
That’s it! Now, simply restart your server using the ng serve command.
Advanced Proxy Configuration
For more complex scenarios, you can configure multiple proxy rules. For example, if we have two different base endpoint URLs, such as /auth and /api then we can add more elements to our proxy configuration.
{
  "/api/*": {
    "target": "http://localhost:5000",
    "secure": false,
    "changeOrigin": true,
    "logLevel": "debug"
  },
  "/auth/*": {
    "target": "http://localhost:6000",
    "secure": false,
    "changeOrigin": true
  }
}
Drawbacks of Proxy Servers
The above method works great, but it’s only a development environment trick. Proxying works by avoiding CORS entirely. This is because your frontend sends requests to a server on the same origin (the Angular dev server), which then makes the real request. In production, this setup only exists if you deliberately run a backend proxy. Angular-CLI provides this type of configuration, but not for your production app bundles.
Due to this method’s simplicity, it’s great to use it to enable CORS in development. For a more logical and foolproof solution that can be used in production, though, you must always enable CORS on the server side.
Fix CORS on the Server Side
Fixing CORS errors requires a server-side fix, at least when it comes to any fixes that extend beyond the scope of a development environment. To enable CORS on the server side based on our server’s configuration, we can set an Access-Control-Allow-Origin property on our response. When the browser receives the response, it receives this property in the headers of the request.
To demonstrate how this is done, let’s look at some examples using a NodeJS and Express server implementation. To make it so that the correct CORS config is relayed back to the browser, we will need to update the request handler with the following code:
app.get('/candy', (req, res) => {
    res.set('Access-Control-Allow-Origin', 'http://localhost:4200');
    res.json({'candy': 'bubble-gum'})
});

// Handle preflight OPTIONS requests
app.options('/candy', (req, res) => {
    res.header('Access-Control-Allow-Origin', 'http://localhost:4200');
    res.header('Access-Control-Allow-Methods', 'GET, POST, OPTIONS');
    res.header('Access-Control-Allow-Headers', 'Content-Type, Authorization');
    res.sendStatus(200);
});
Here, we can see how the different CORS headers are set so that requests will execute as expected, free of errors. Since we mentioned our frontend’s origin as part of the CORS config, we have now enabled our server to interact with any incoming requests from the client running on http://localhost:4200. You can set that value to be whatever you want, depending on which client you want to enable CORS for. Of course, this will work, but for actual production use cases, you’ll likely want something a bit more flexible and production-ready.
Production-Ready CORS Configuration
Since CORS configuration is a well-known thing, it makes sense that developers have found easy and production-ready ways to do it across almost all languages and frameworks. One of the most popular ways to do so is to use third-party packages, like the Node.js cors package, as middleware for all your requests. Let’s look at how to add this particular package to a Node.js project and use it.
First, you need to install the package by running the following npm install command:
npm install corsThen, in the file we will be using it, we will need to import it at the top as shown:
const cors = require('cors');Once this is done, the package can then be used in the code as CORS configuration middleware. To give a further example of how it could be used to implement a secure and production-ready CORS configuration, we can inspect the code below:
const express = require('express');
const cors = require('cors');
const app = express();

// Environment-specific origins
const allowedOrigins = [
  'http://localhost:4200',  // Development
  'https://myapp.com',      // Production
  'https://www.myapp.com'   // Production with www
];

const corsOptions = {
  origin: function (origin, callback) {
    // Allow requests with no origin (mobile apps, etc.)
    if (!origin) return callback(null, true);

    if (allowedOrigins.indexOf(origin) !== -1) {
      callback(null, true);
    } else {
      callback(new Error('Not allowed by CORS'));
    }
  },
  credentials: true,
  methods: ['GET', 'POST', 'PUT', 'DELETE', 'OPTIONS'],
  allowedHeaders: ['Content-Type', 'Authorization']
};

app.use(cors(corsOptions));

app.get('/candy', (req, res) => {
    res.json({'candy': 'bubble-gum'})
});
We can see that this implementation supports multiple environments (based on the associated URLs), performs workarounds for mobile apps and non-browser-based requests, and more. This is the type of configuration typically required when apps transition from local development to production traffic.
An important point to note is that, although many online articles and popular forums suggest using it:
Never use Access-Control-Allow-Origin: * with Access-Control-Allow-Credentials: true
Doing this allows any website to make authenticated requests to your API. Letting this workaround move beyond local development leads to a critical security vulnerability that’s unfortunately common in production systems.
Why Automated CORS Testing Matters
CORS misconfigurations are among the most common security issues in modern web applications. Manual testing often misses edge cases, and it’s easy to accidentally create security gaps while trying to fix functionality issues.
Luckily, platforms exist to help catch these common mistakes so they can be fixed before they have the chance to hit production. One of the most trusted security platforms for this type of testing is StackHawk. By using StackHawk to test for vulnerabilities in your applications and APIs, you get:
- Early detection of CORS issues during development
- Automated testing of complex CORS scenarios you might not think to test manually
- Clear remediation guidance with specific examples of vulnerable requests
- Verification that fixes don’t introduce new security issues
By integrating CORS security testing into your development workflow, you can ensure that your cross-origin requests work reliably while maintaining your application’s security.
Getting Started with StackHawk
To start testing applications for CORS vulnerabilities with StackHawk, you’ll need an account. You can sign up for a trial account. If you’re using an AI-coding assistant like Cursor or Claude Code, sign up for our $5/month single-user plan, Vibe, to find and fix vulnerabilities 100% in natural language.

Validating Your CORS Configuration with StackHawk
Once you’ve implemented CORS headers, it’s crucial to ensure your configuration is both functional and secure. A common mistake is fixing the immediate CORS error but inadvertently creating security vulnerabilities, such as allowing credentials from any origin or being overly permissive with allowed domains.
This is where automated security testing becomes invaluable. Instead of manually testing every possible CORS scenario and hoping you haven’t introduced security gaps, you can use StackHawk to automatically validate that your CORS implementation works correctly without creating new attack vectors.
StackHawk will test your CORS implementation for common security issues, including:
- Wildcard origin acceptance with credentials: Testing if your API dangerously accepts * as an origin while allowing credentials
- Origin reflection vulnerabilities: Checking if your API blindly reflects the Origin header without proper validation
- Missing security headers: Identifying CORS setups that lack proper CSRF protection
- Overly permissive configurations: Finding CORS policies that are broader than necessary
Instead of waiting for our AppSec team to notify us of an issue later in development, let’s use StackHawk to automatically identify this vulnerability for us. To do this, you’ll need to ensure you have a StackHawk account. If you need one, you can sign up for a trial account or log into an existing account.
If you’re logging into an existing StackHawk account, from the Applications screen, you’ll click Add Application.

If you’re new to StackHawk, you’ll be automatically brought into the Add an App flow. On the Scanner screen, you’ll see the instructions for installing the StackHawk CLI. Since we will be running our testing locally, we will use this option. Once the hawk init command is executed successfully, click the Next button.
On the next screen, you will fill out an Application Name , Environment , and URL. Once filled out, click Next.

Since we will be testing a RESTful API, on the next page, we will choose our Application Type as “Dynamic Web Application/Single Page Application”.

Depending on what you have set up as a backend API, you’ll also plug these details in. For example, if you have a REST API running, you would set the API Type as “REST / OpenAPI”, and point to our OpenAPI Specification file by selecting URL Path and adding the path to where your OpenAPI spec is located in the textbox. Alternatively, as I’ve done here, we can also click “Skip for now” if you’re unsure. Once complete, click Next.

Lastly, we will need to add a stackhawk.yml file to the root of our project. Once the file is added, copy the screen’s contents, paste them into the file, and save it. Lastly, we can click the Finish button.

In our root directory, we should see the stackhawk.yml file we’ve added:

Lastly, depending on our scan policy, CORS misconfiguration detection may not be enabled. To ensure that it is, back in StackHawk go to the Applications page and select your app. Once in the config page, click on the Settings tab, then the Active Scan Plugins tab just below it. Then, locate the CORS Header plugin in the list and check it off. You can find it easily by typing “cors” into the plugin search bar.

Lastly, click Save just above the Plugins list to save the new configuration.
Run HawkScan
Next, we can go ahead with testing our application. In a terminal pointing to the root of our project, we will run HawkScan using the following command:
hawk scan
After running the command, the tests should execute in the terminal.

Note that if you get an error similar to:
HawkScan Target Not Found Error: Unable to access https://localhost:4000. Check if the web server is listening on the specified port.
This means that your API is not running in HTTPS, and that is how HawkScan is trying to call the API. To fix this, either add HTTPS capabilities to your API or, more simply, change the host entry in your stackhawk.yml to use only “http”.

This will run tests against our React application and the corresponding backend. Once the tests have run, we can begin to explore any findings that were discovered.
Explore The Initial Findings
Once the tests are complete, the terminal will contain some information about any vulnerabilities found. Below, we can see that StackHawk has found a few CORS vulnerabilities within my code that are present on multiple paths.

To explore this further, we will click on the test link at the bottom of the output. This will take us into the StackHawk platform to explore further.

After clicking on the link, we can now view the test results in a nicely formatted display. Next, we will click on the CORS Misconfiguration entry.

Within this entry, we can see an Overview and Resources that can help us with fixing this vulnerability, as well as the Request and Response that the API returned on the right side of the screen. Above this, you will also see a Validate button, which will display a cURL command with the exact HTTP request used to expose the vulnerability.

Understanding and Fixing CORS Security Issues
When StackHawk identifies CORS vulnerabilities, you’ll see detailed findings that indicate which paths are affected and provide potential remediation techniques (as shown in the image above). Using the techniques in this guide or the remediation advice provided by StackHawk for the vulnerability, you can then make the necessary adjustments to your code and configuration. Once fixed, ensure that you stop your web servers and redeploy the latest code. Next, we can ensure that the fix implemented actually resolves our CORS misconfiguration issues.
Confirm the fix!
With the latest code deployed, let’s confirm the fix in StackHawk. To do this, we will click the “Rescan Findings” button in StackHawk.

Then, we will see a modal containing the “hawk rescan” command that includes the correct Scan ID. You’ll run this command in the same terminal where you ran the initial set of tests.

In the output, you will again see any vulnerabilities that were found during the scan. In this case, you’ll see that the CORS misconfiguration vulnerabilities are no longer showing. Clicking on the link at the bottom of the terminal output, you can confirm that the CORS misconfiguration vulnerabilities have now been added to the Fixed Findings from Previous Scan, confirming that the vulnerability has been successfully fixed and has passed any vulnerability tests.

With that, we’ve successfully remedied and retested our application to ensure its safety from potential CORS misconfiguration attacks.
Securing and Simplifying Angular CORS Configuration
With this post, we’ve simplified how CORS works and showed how you can enable it in your Angular application. For quick prototyping or testing, you can safely use the proxy configuration. However, you must always aim to handle CORS from the server. In situations where you don’t have access to server-side code, like a third-party API, you can implement a custom proxy server. All you need to do is make requests to your third-party API from this custom server and hit your server to consume that data in your Angular application.
Remember that fixing CORS errors correctly involves striking a balance between functionality and security. Tools like StackHawk help ensure your CORS implementation works for legitimate requests while blocking potential security threats.
Want to ensure your Angular CORS configuration is both functional and secure? Sign up for StackHawk today for a free 14-day enterprise trial to automatically test your CORS configuration and detect potential vulnerabilities.