
In today’s rapidly evolving digital landscape, the security of web applications and APIs is more crucial than ever. With cyber threats becoming increasingly sophisticated, protecting sensitive data against unauthorized access is a top priority for developers and businesses. Among the numerous security vulnerabilities that frequently plague web applications and APIs, SQL Injection stands out as one of the most dangerous and prevalent.
In this blog, we delve into the world of web application security by exploring SQL Injection vulnerabilities. First, we will build a simple API with Flask, then configure StackHawk and use HawkScan through the Hawk CLI to identify any vulnerabilities. This hands-on approach will highlight how SQL injection vulnerabilities are introduced and demonstrate practical steps to fix them. After addressing the SQL injection vulnerability in our code, we’ll retest with StackHawk to ensure the security issue is resolved. Let’s start by looking at the basics of StackHawk and SQL injection.
What is StackHawk?
StackHawk is a modern, powerful DAST tool designed for developers to integrate application security testing seamlessly into their software development lifecycle. It is not just another security tool; it’s a developer-first platform emphasizing automation, ease of use, and integration into existing development workflows.
At its core, StackHawk is built around empowering developers to take the lead in application security. It provides a suite of tools that make it easy to find, understand, and fix security vulnerabilities before they make it to production. One of the critical components of StackHawk is HawkScan, a dynamic application security testing (DAST) tool that scans running applications and APIs to identify security vulnerabilities.
With StackHawk, developers and security teams can:
Automate Security Testing: Integrate security testing into CI/CD pipelines, ensuring every build is automatically scanned for vulnerabilities.
Identify and Fix Vulnerabilities: Receive detailed, actionable information about each vulnerability, including where it is in the code and how to fix it.
Test in All Environments: Use StackHawk in various environments, including development, staging, and production, to catch security issues at any stage of the development process.
Customize Scans: Tailor scanning configurations to suit specific applications and environments, ensuring more relevant and accurate results.
By focusing on a developer-first approach to security testing and integrating smoothly into existing dev tools and practices, StackHawk demystifies application security, making it a more approachable and manageable part of the software development lifecycle.
What is SQL Injection?
SQL Injection (SQLi) is a type of security vulnerability that occurs in the database layer of an application. It allows attackers to interfere with the queries that an application makes to its database. This can lead to various harmful outcomes, including unauthorized viewing of data, deletion of data, and, in some cases, complete control over the database.
The vulnerability arises when an application uses user input in its SQL queries without proper validation or escaping. Attackers can exploit this by injecting malicious SQL code through the application’s input channels (like forms, URLs, API endpoints, etc.), which can unintentionally manipulate the database.
For example, consider an API that uses a URl parameter to retrieve user information from a database. If this input is inserted into a SQL query without proper safeguards, an attacker could input SQL commands that the database will execute. This could lead to unauthorized access to sensitive data, such as passwords, personal information, etc.
SQL Injection can be classified into different types, such as:
In-band SQLi: The most common and straightforward kind, where the attacker uses the same communication channel to launch the attack and gather results.
Inferential SQLi: The attacker sends data payloads to the server and observes the response and behavior of the server to learn about its structure.
Out-of-band SQLi: Used when the attacker can’t use the same channel to launch the attack and gather information, often relying on server capabilities to send data to the attacker.
SQL Injection is a high-severity vulnerability because it can compromise sensitive data and take over database systems. Fortunately, with the right tools and practices, it can be detected and remediated effectively, which we will explore in this blog with the help of StackHawk and HawkScan.
How can SQL injection impact application security?
SQL Injection can have a profound and detrimental impact on application security, with consequences ranging from data breaches to complete system compromise. Here’s how SQL Injection can affect application security:
Data Breach: The most immediate threat posed by SQL Injection is unauthorized access to sensitive data. Attackers can exploit vulnerable inputs to extract data from the database, exposing personal information, financial details, and other confidential data.
Data Loss and Corruption: SQL Injection attacks can also be used to delete or modify data in the database. This can result in data loss, data integrity corruption, and application functionality disruption.
Unauthorized System Access: In severe cases, SQL Injection can lead to a complete system takeover. Attackers can use advanced SQL Injection techniques to escalate their privileges within the database, allowing them to execute administrative operations and potentially gain access to the underlying server.
Legal and Compliance Issues: A successful SQL Injection attack can lead to violations of data protection regulations like GDPR, HIPAA, etc. This can result in hefty fines, legal action, and damage to the organization’s reputation.
Loss of Trust: Customers and users lose trust in applications and businesses that fail to protect their data. A single SQL Injection vulnerability that leads to a data breach can have long-lasting repercussions on an organization’s credibility and customer loyalty.
Financial Costs: Dealing with the aftermath of a SQL Injection attack can be costly. Expenses can include legal fees, regulatory fines, costs associated with rectifying the breach, and investments in upgrading security measures.
Preventing SQL Injection requires a multi-faceted approach, including proper input validation, use of prepared statements, regular security testing, and awareness training for developers. Tools like StackHawk play a crucial role in identifying potential SQL Injection vulnerabilities, enabling teams to address these issues before they lead to security incidents proactively.
Finding and Fixing SQL Injection in a Flask API
Now, we will understand SQL injection a bit more deeply by creating a simple API with an endpoint containing a SQL injection vulnerability. In this step-by-step guide, we will create an API using Flask, then set up StackHawk to test the application through HawkScan and the Hawk CLI. Once the vulnerability is reported, we will fix the injection flaw and retest to ensure it’s indeed fixed.
Creating an API with Flask
In this part of the guide, we will create our base project and its corresponding API. For this, we will rely on Flask. To follow along, you will need to ensure that you:
Have Python and pip installed
Have an IDE where you can edit text
Optionally, have a tool that you can send API requests through to test the endpoint, such as Postman or Insomnia
With the prerequisites above, you can proceed with each step below.
Step 1: Create and Initialize the Project
First, create a new directory for your project and navigate into it. If you do this through a terminal, you can run the command below.
 mkdir sql-injection-api-example
  cd sql-injection-api-example
Next, with the terminal pointed to the root directory, Initialize a new Python project/virtual environent using the following command.
python3 -m venv venv
source venv/bin/activate
Finally, before we write any code, we will Install the following dependencies:
Flask: for setting up the server.
Flask_SQLAlchemy: for ORM support.
SQLite: for the database (chosen for simplicity; no separate DB server needed).
To do this, using the same terminal pointed to the project root, run the following:
pip install Flask Flask_SQLAlchemy flask-restx
Step 2: Create the Application Code
Now, we will begin to create our API application. In the root directory of the project, create a file named app.py . This file will contain your Flask server and the API endpoint that contains the SQL injection vulnerability.
After creating and opening the app.py file, add the following code:
from flask import Flask, jsonify, request
from flask_sqlalchemy import SQLAlchemy
from sqlalchemy.sql import text
from flask_restx import Api, Resource, fields


app = Flask(__name__)
app.config['SQLALCHEMY_DATABASE_URI'] = 'sqlite:///test.db'
app.config['SQLALCHEMY_TRACK_MODIFICATIONS'] = False
db = SQLAlchemy(app)


api = Api(app, version='1.0', title='User API',
         description='A simple User API with a SQL Injection vulnerability')


ns = api.namespace('users', description='User operations')


user_model = api.model('User', {
   'id': fields.Integer(readOnly=True, description='The user unique identifier'),
   'name': fields.String(required=True, description='The user name')
})


class User(db.Model):
   id = db.Column(db.Integer, primary_key=True)
   name = db.Column(db.String(50))


def insert_example_users():
   if User.query.count() == 0:
       # Only insert if the table is empty to avoid duplicate entries on reload
       db.session.add(User(id=1, name="John Doe"))
       db.session.add(User(id=2, name="Jane Smith"))
       db.session.add(User(id=3, name="Alice Johnson"))
       db.session.commit()


@app.before_request
def create_tables_and_insert_initial_data():
   db.create_all()
   insert_example_users()


@ns.route('/<string:id>')
@ns.response(404, 'User not found')
@ns.param('id', 'The user identifier')
class UserResource(Resource):
   @ns.doc('get_user')
   @ns.marshal_with(user_model)
   def get(self, id):
       """Fetch a user given its identifier"""


       try:
           # Directly incorporating user input into the SQL query
           rawQueryString = f"SELECT * FROM user WHERE id = {id}"
           query = text(rawQueryString)


           # Execute the vulnerable query
           result = db.session.execute(query)
           user = result.fetchall()


           if user:
               return user
           else:
               api.abort(404)
       except Exception as e:
           # Handle the exception here
           print(f"An error occurred: {str(e)}")
           api.abort(500, f"An error occurred: {str(e)}")


# Serve the OpenAPI spec at /api-spec
@app.route('/api-spec')
def api_spec():
   return jsonify(api.__schema__)


if __name__ == '__main__':
   with app.app_context():
       db.create_all()
   app.run(debug=True, port=4000)
For those wondering about the code above, this Flask application establishes a simple web API connected to a SQLite database using SQLAlchemy for basic setup but diverges from ORM best practices for query handling. It initializes a Flask server and configures it to connect to a SQLite database, defining a User model for database interactions. However, the application introduces a significant security vulnerability by directly incorporating user input into SQL query strings in the /users/<id> endpoint. This approach makes the application susceptible to SQL injection, as it executes raw SQL queries without sanitizing or parameterizing the user input. Finally, once started, the server will listen for incoming API requests.
For this particular API, we also included the ability to retrieve an OpenAPI Spec. To do this, you will see that we are using the Flask-RESTx dependency to create the OpenAPI Spec and an endpoint, /api-spec , that will return the generated OpenAPI Spec.
Step 3: Running the Application
Finally, let’s start the Flask application by executing the following command in a terminal, ensuring you’re in the root directory of your project:
flask run -p 4000
Next, let’s quickly check to make sure that our endpoint is working as intended. As you can see In the provided Flask application, the vulnerability lies in the /users endpoint. The endpoint concatenates user input directly into an SQL query without sanitization or parameterization. This makes it susceptible to SQL injection.
In Postman, you can send a simple request to the endpoint. For instance, suppose you want to query the user with ID 1. For this, you could use the following GET request:
http://localhost:4000/users/1
In a malicious query, an attacker could exploit the SQL injection vulnerability by providing an SQL snippet in the id parameter. For example, they could use the following amended GET request:
http://localhost:4000/users/1 OR 1=1
This query would cause the SQL command to return all rows in the users ‘ table because ‘ 1=1’ is always true. What happens in this scenario is that the SQL query executed by the server turns into something like this:
SELECT * FROM users WHERE id = 1 OR 1=1
Since 1=1 is always true, this condition bypasses the intended filter and can potentially expose all the data in the users ‘ table. In the case above, you’ll get the returned data from all three default users we added in the code instead of just a single user.
Configure StackHawk
Now that our code is set up and our API is running, let’s get StackHawk to identify this vulnerability for us automatically. To do this, you’ll need to make sure that you have a StackHawk account. If you need one, you can sign up for a trial account or log into an existing account.
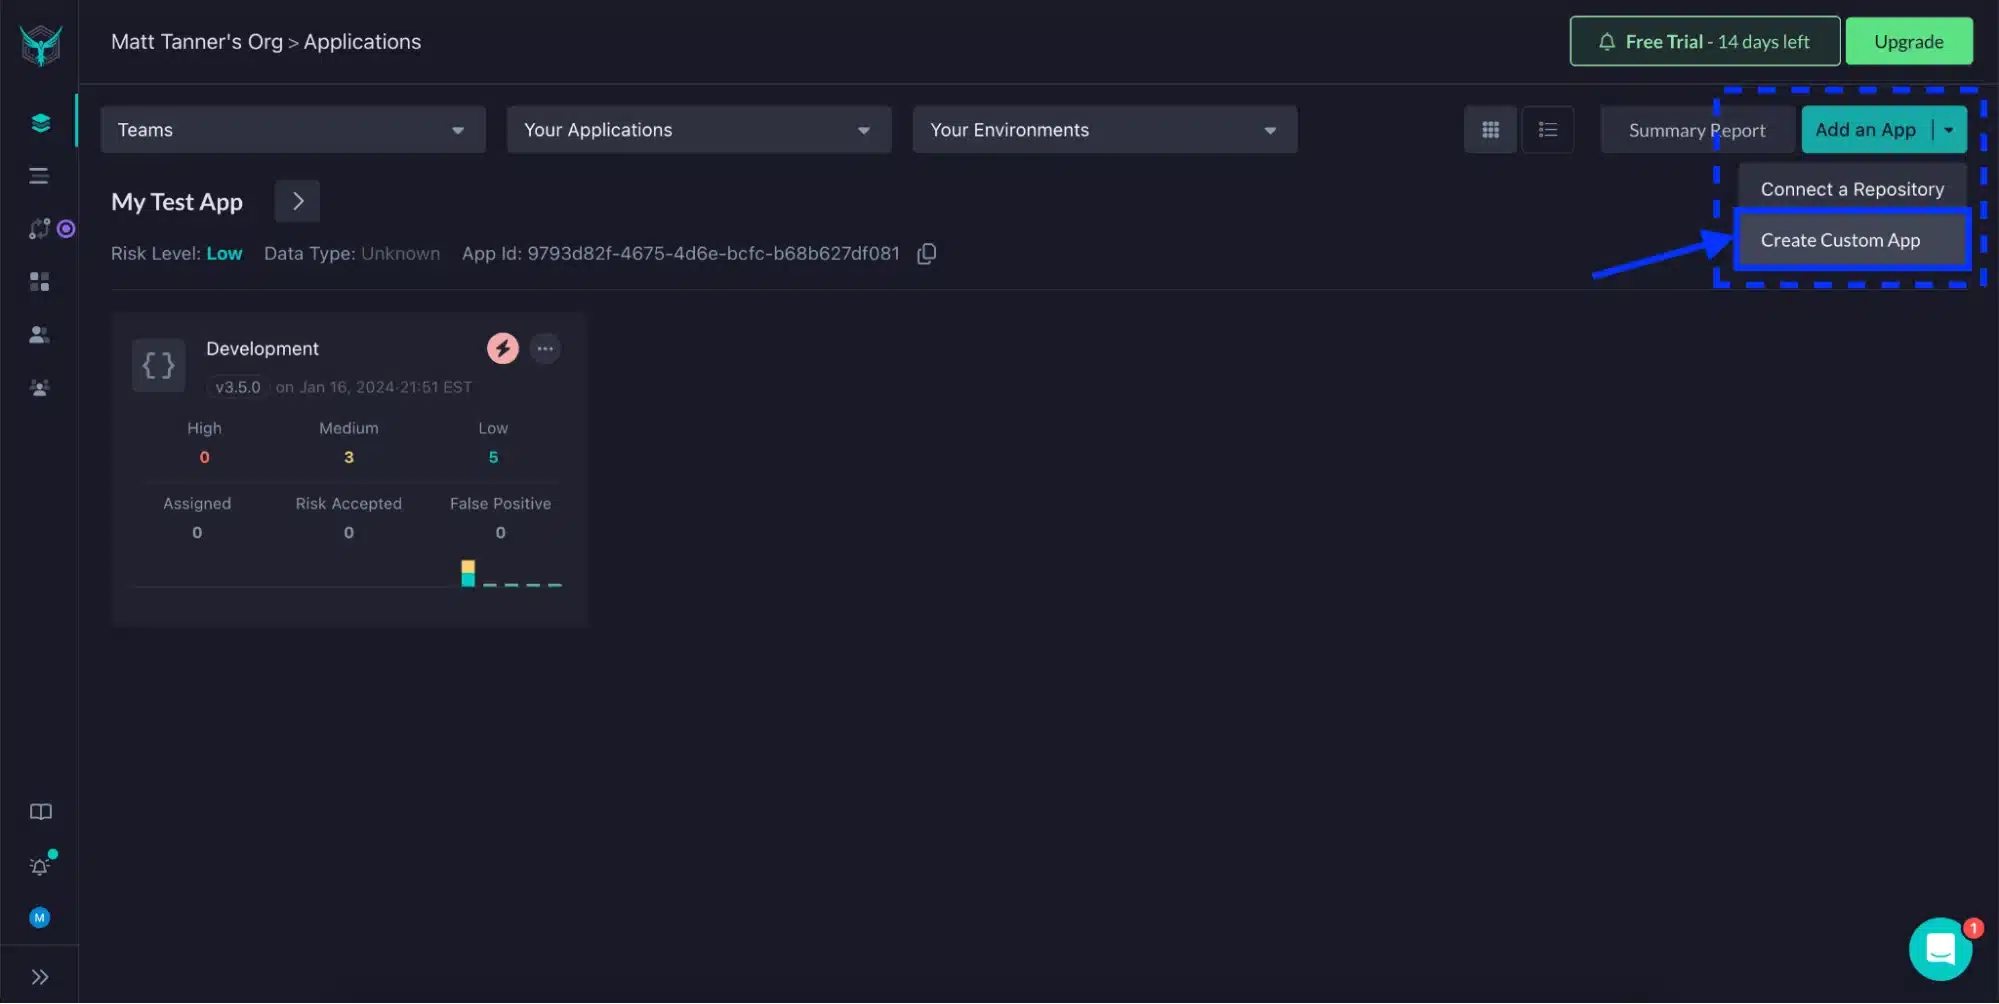
If you’re logging into an existing StackHawk account, from the applications page you’ll click Add an App -> Create Custom App
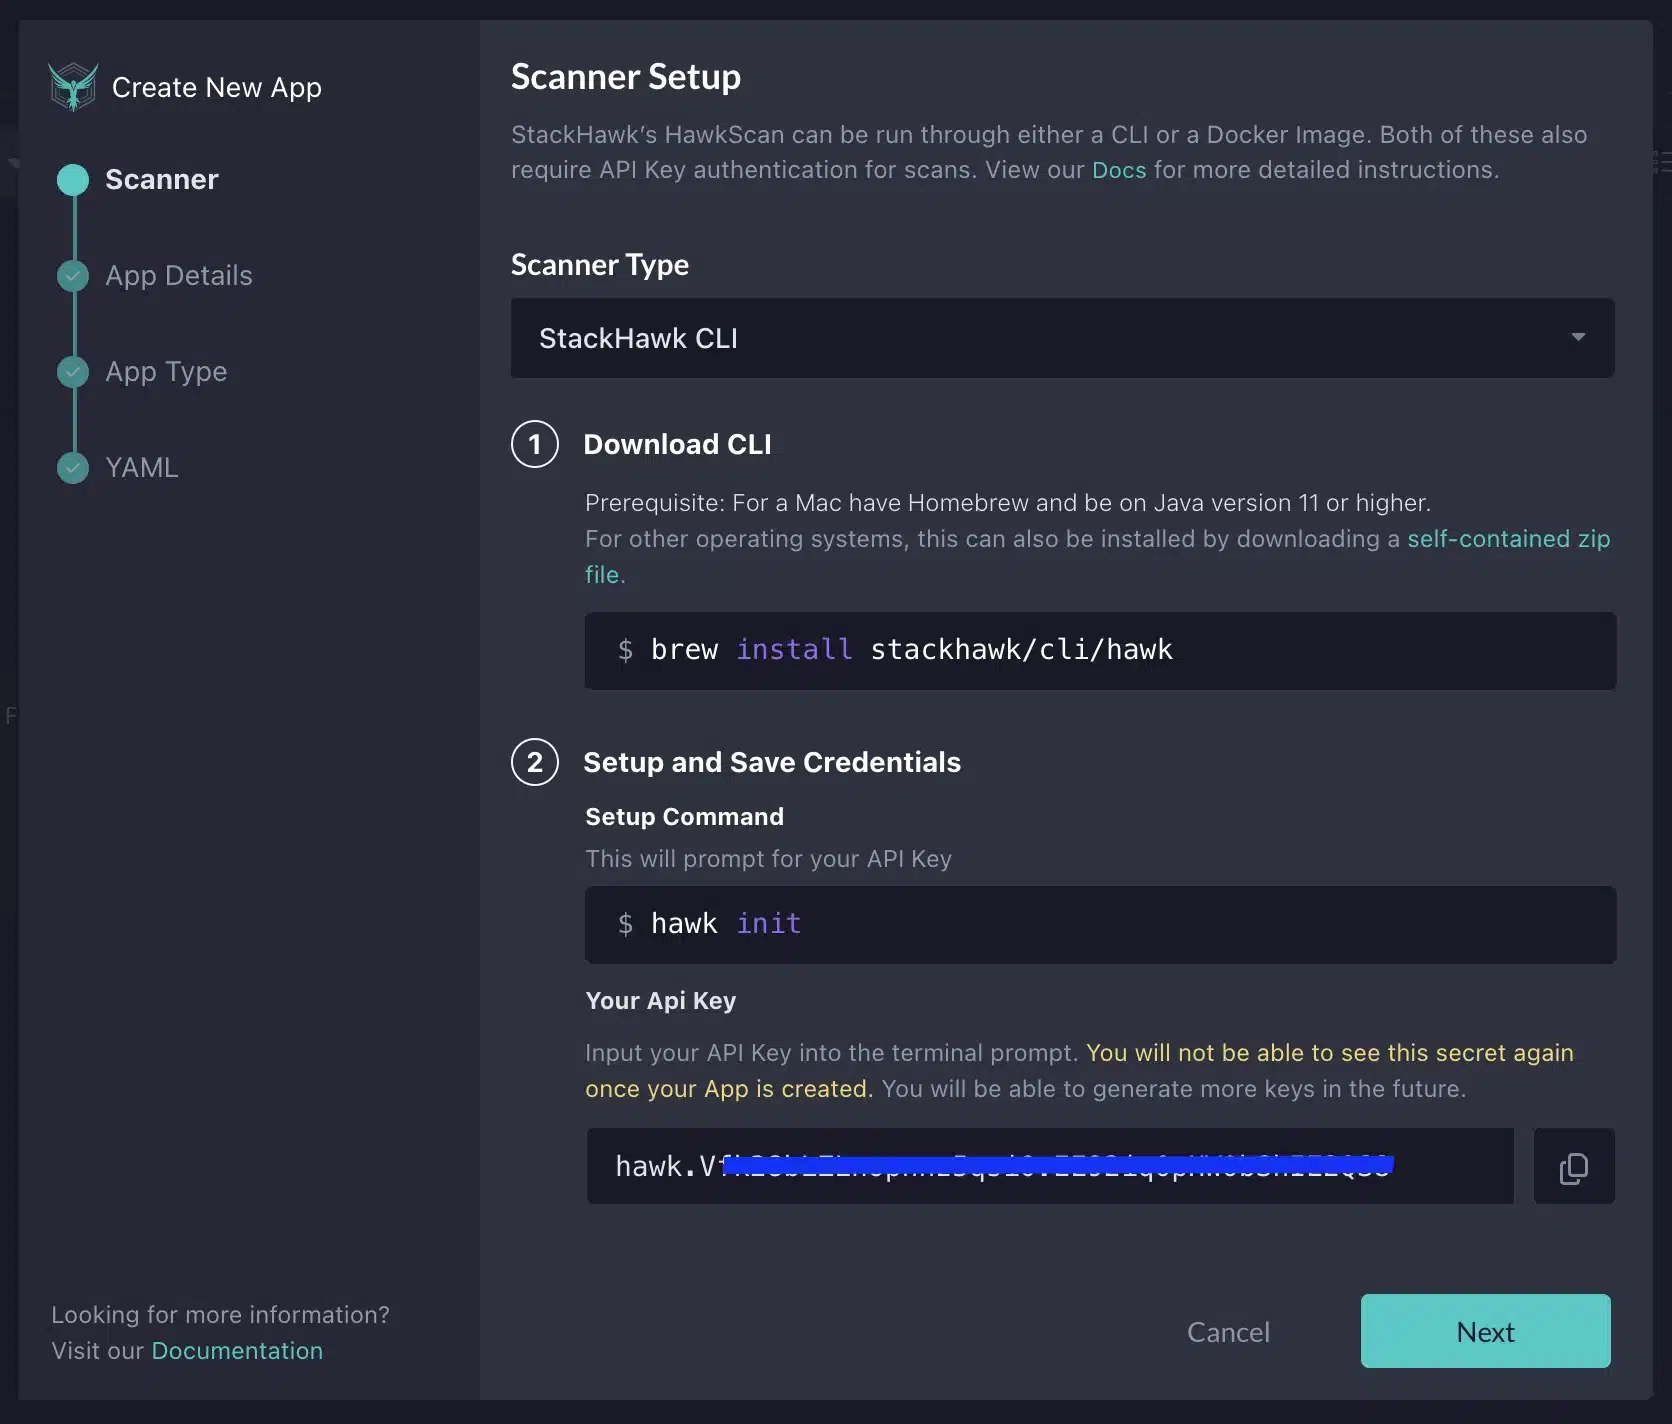
If you’re new to StackHawk, you’ll be automatically brought into the Add an App flow. On the Scanner screen, you’ll see the instructions for installing the StackHawk CLI. Since we will be running our testing locally, we will use this option. Once the hawk init command is executed successfully, click the Next button.
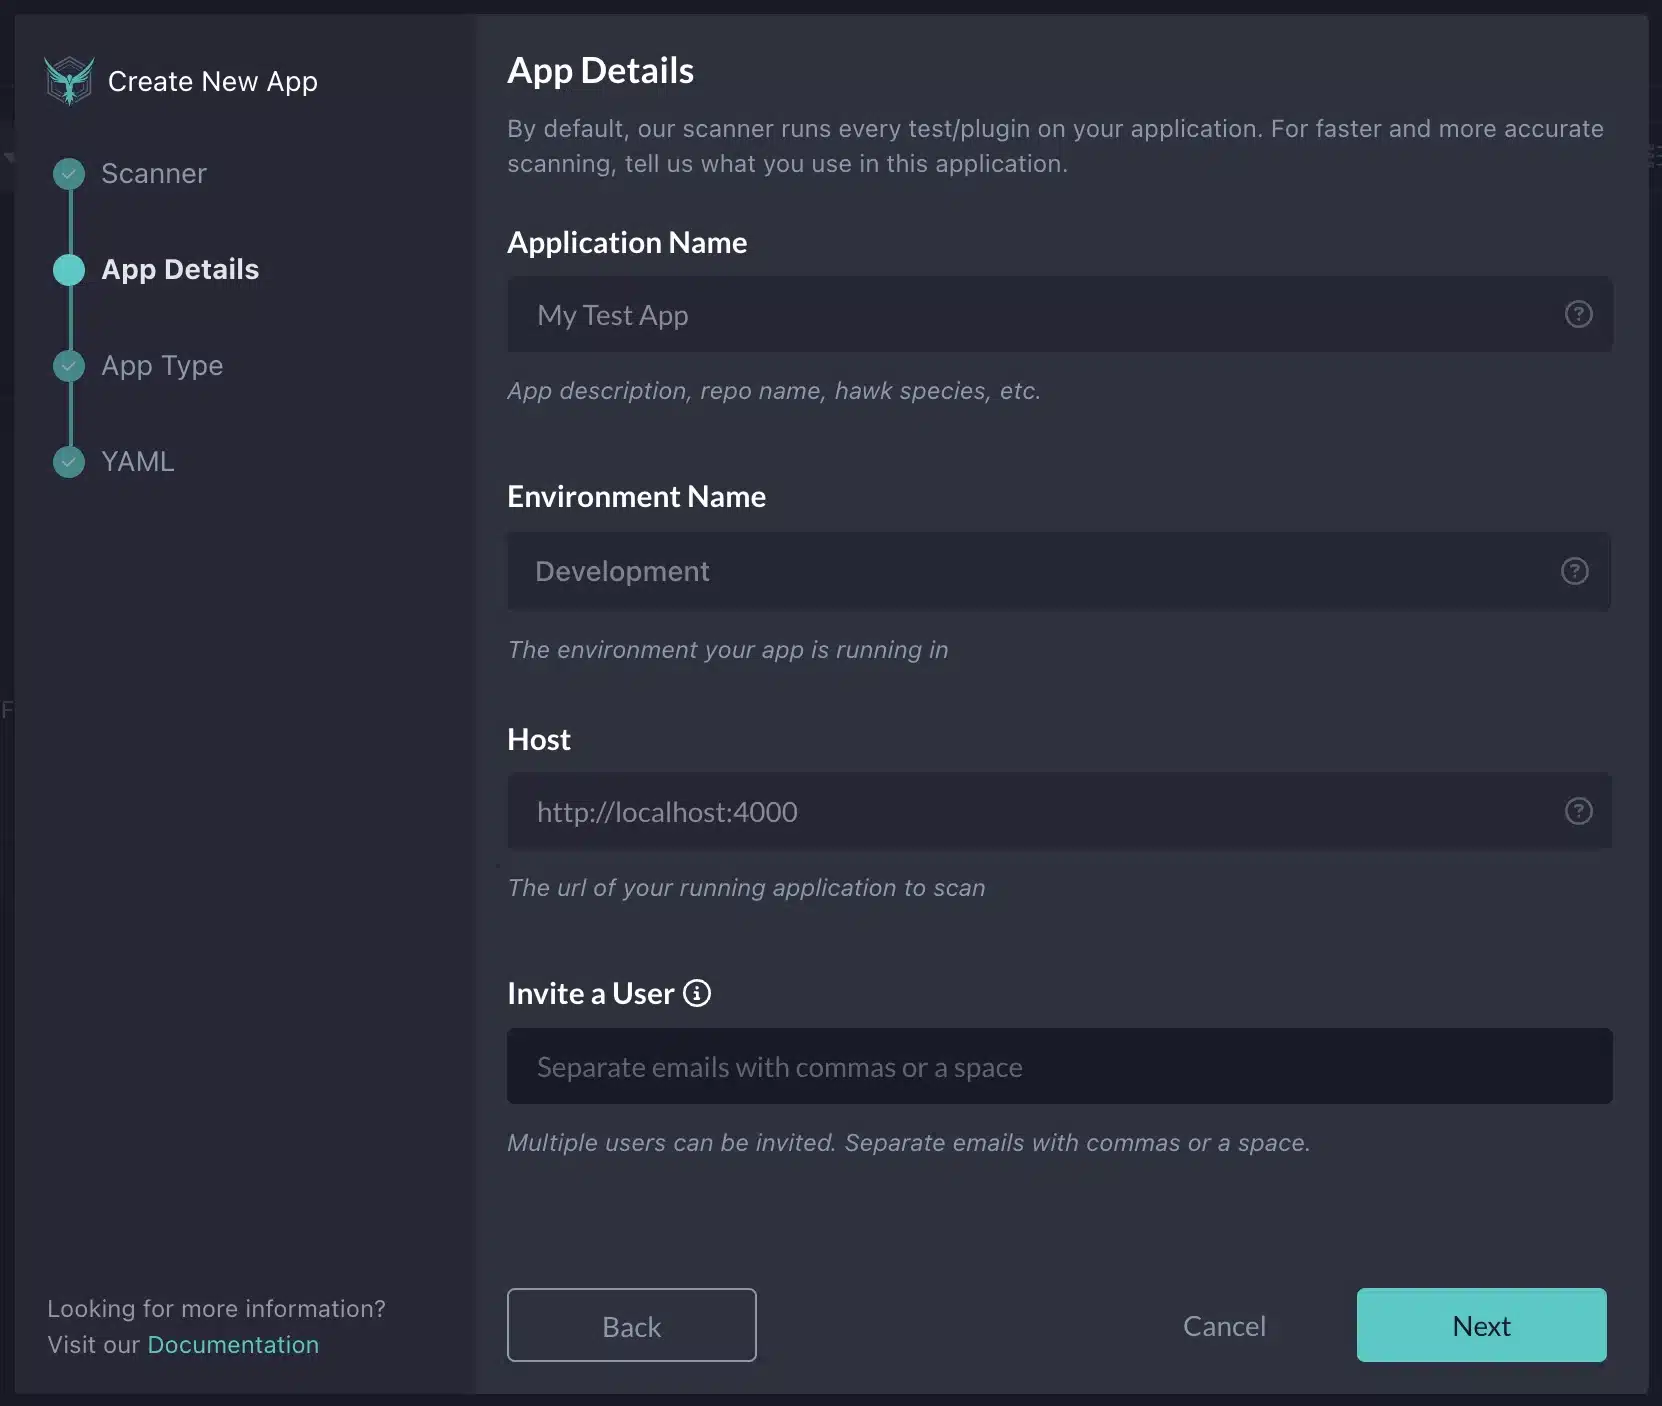
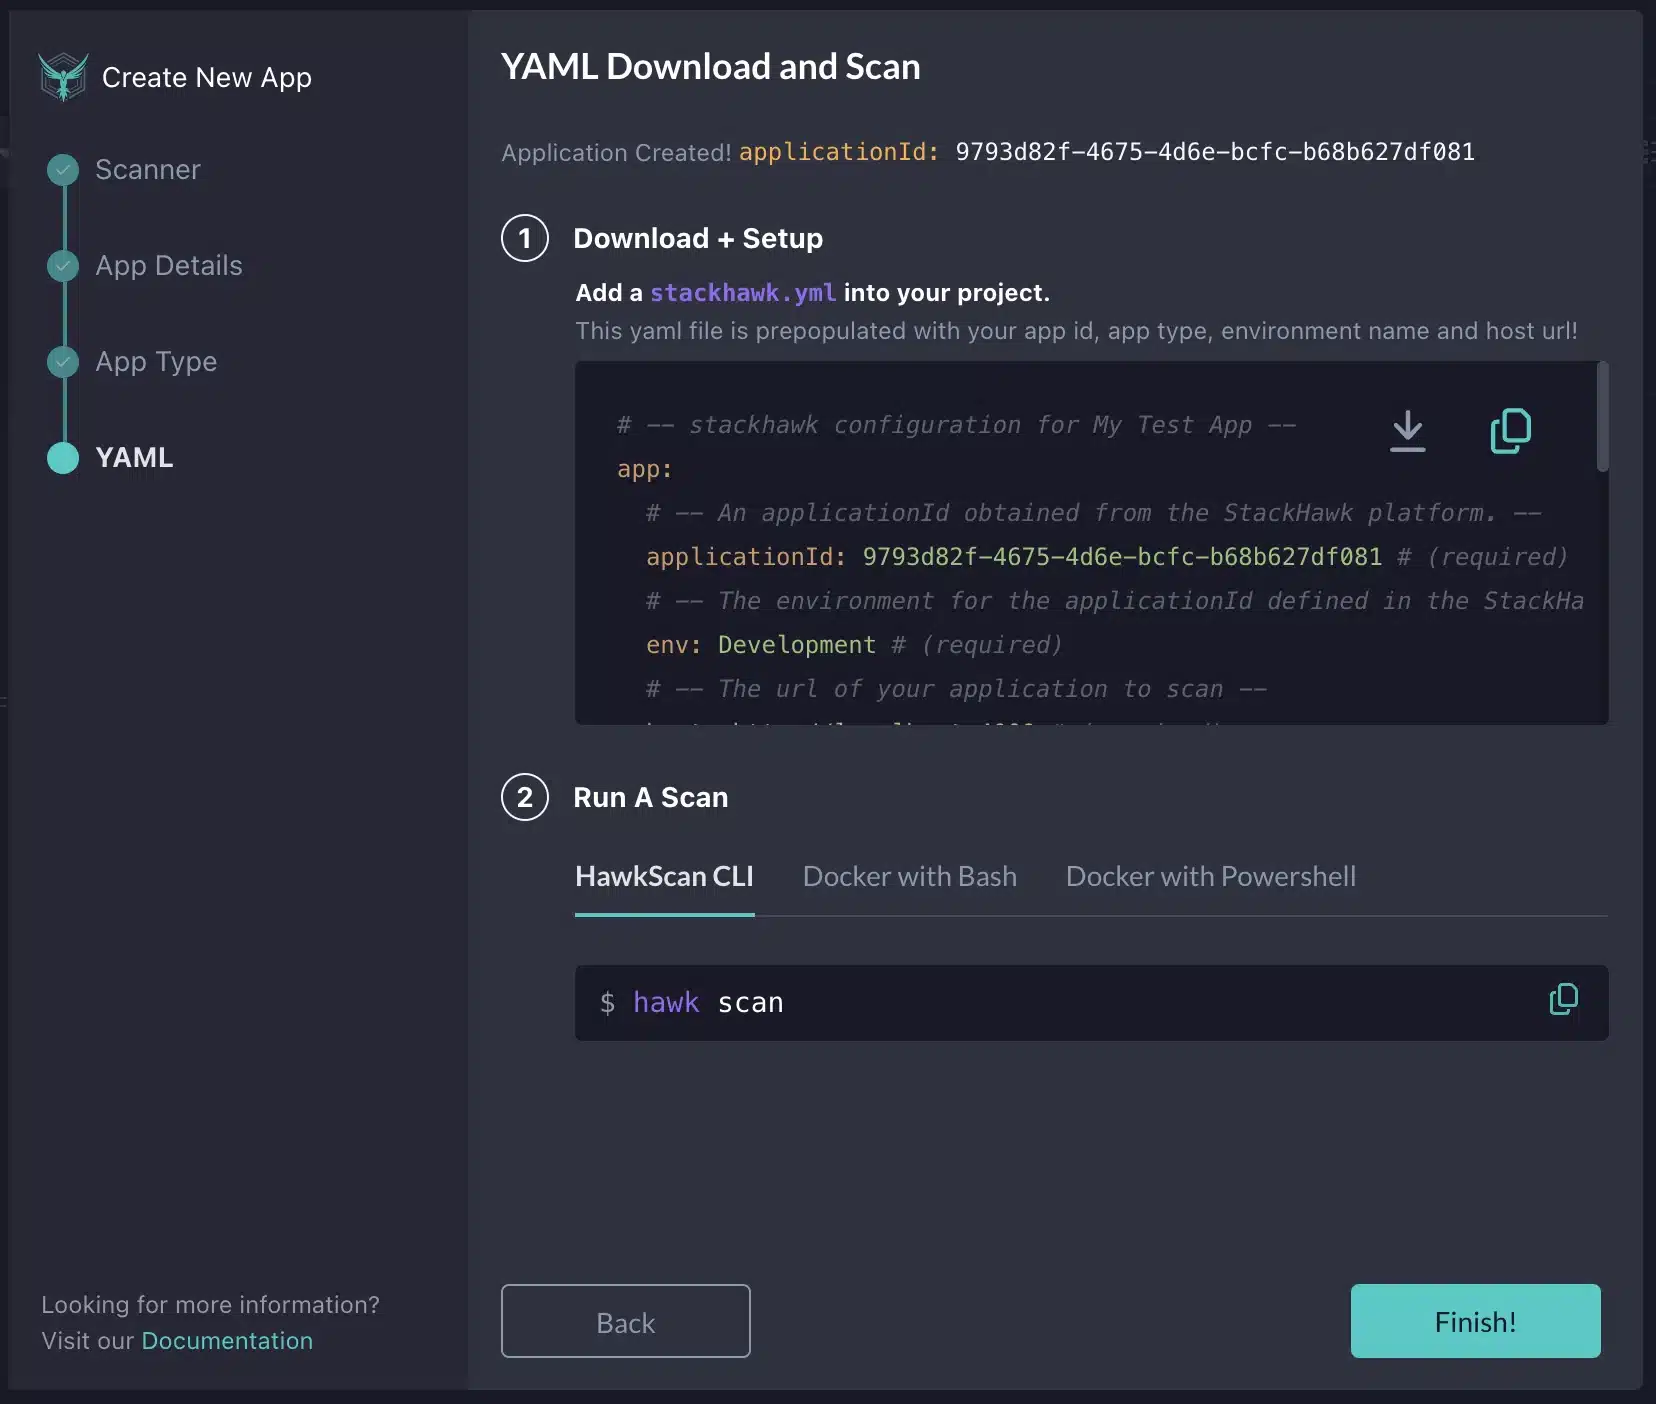
On the next screen, you will fill out an Application Name , Environment Name , and Host . Feel free to copy the default values I’ve added in the screenshot below for our purposes. Once filled out, click Next .
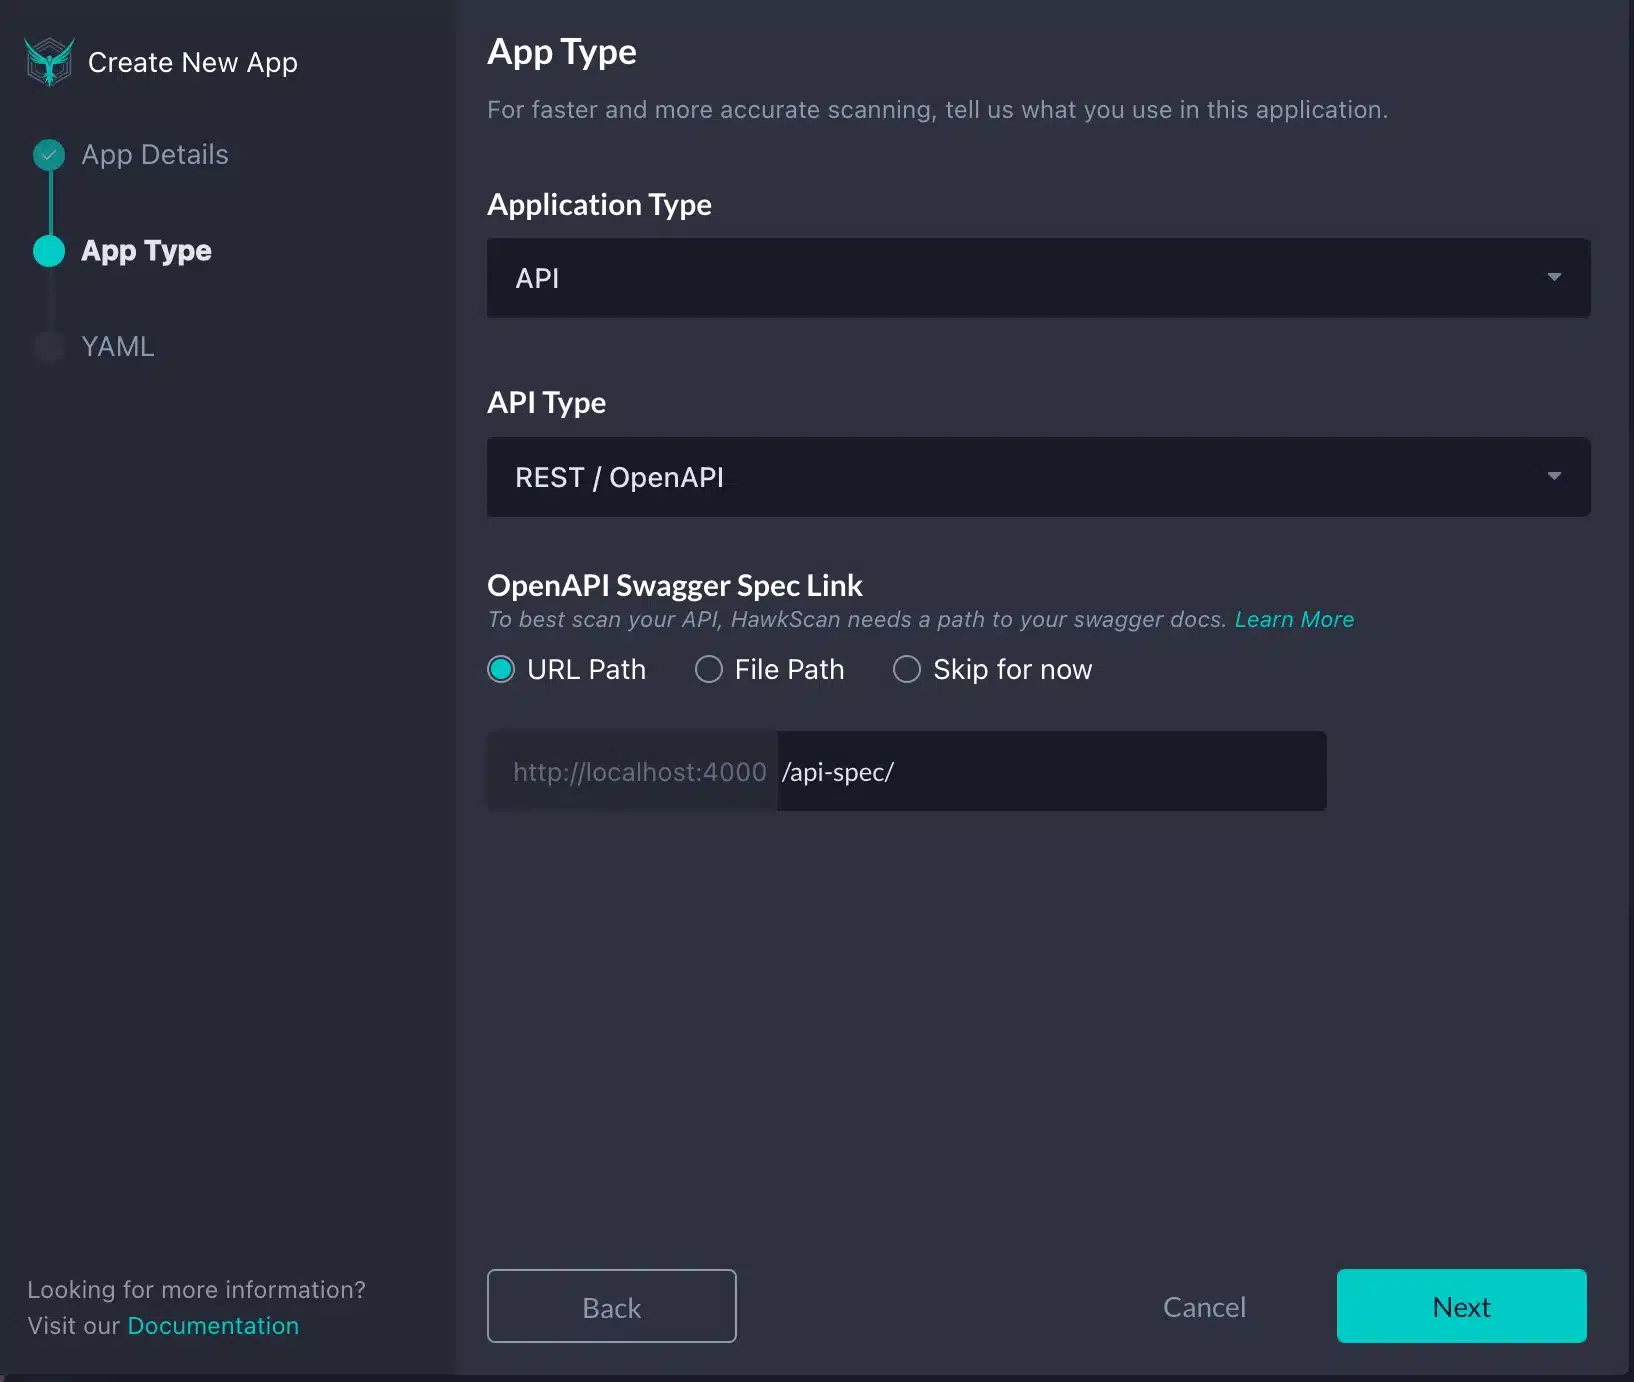
Since we will be testing a RESTful API, on the next page, we will choose our Application Type as “API”, the API Type as “REST / OpenAPI”, and point to our OpenAPI Specification file by selecting URL Path and adding in our endpoint, /api-spec/ , into the textbox. Once complete, click Next .
Lastly, we will need to add a stackhawk.yml file to the root of our project. Once the file is added, copy the screen’s contents, paste it into the file, and save it. Once complete, we can run the “ hawk scan ” command in a terminal pointing to the root of our project. Lastly, we can click the Finish button.
Run HawkScan
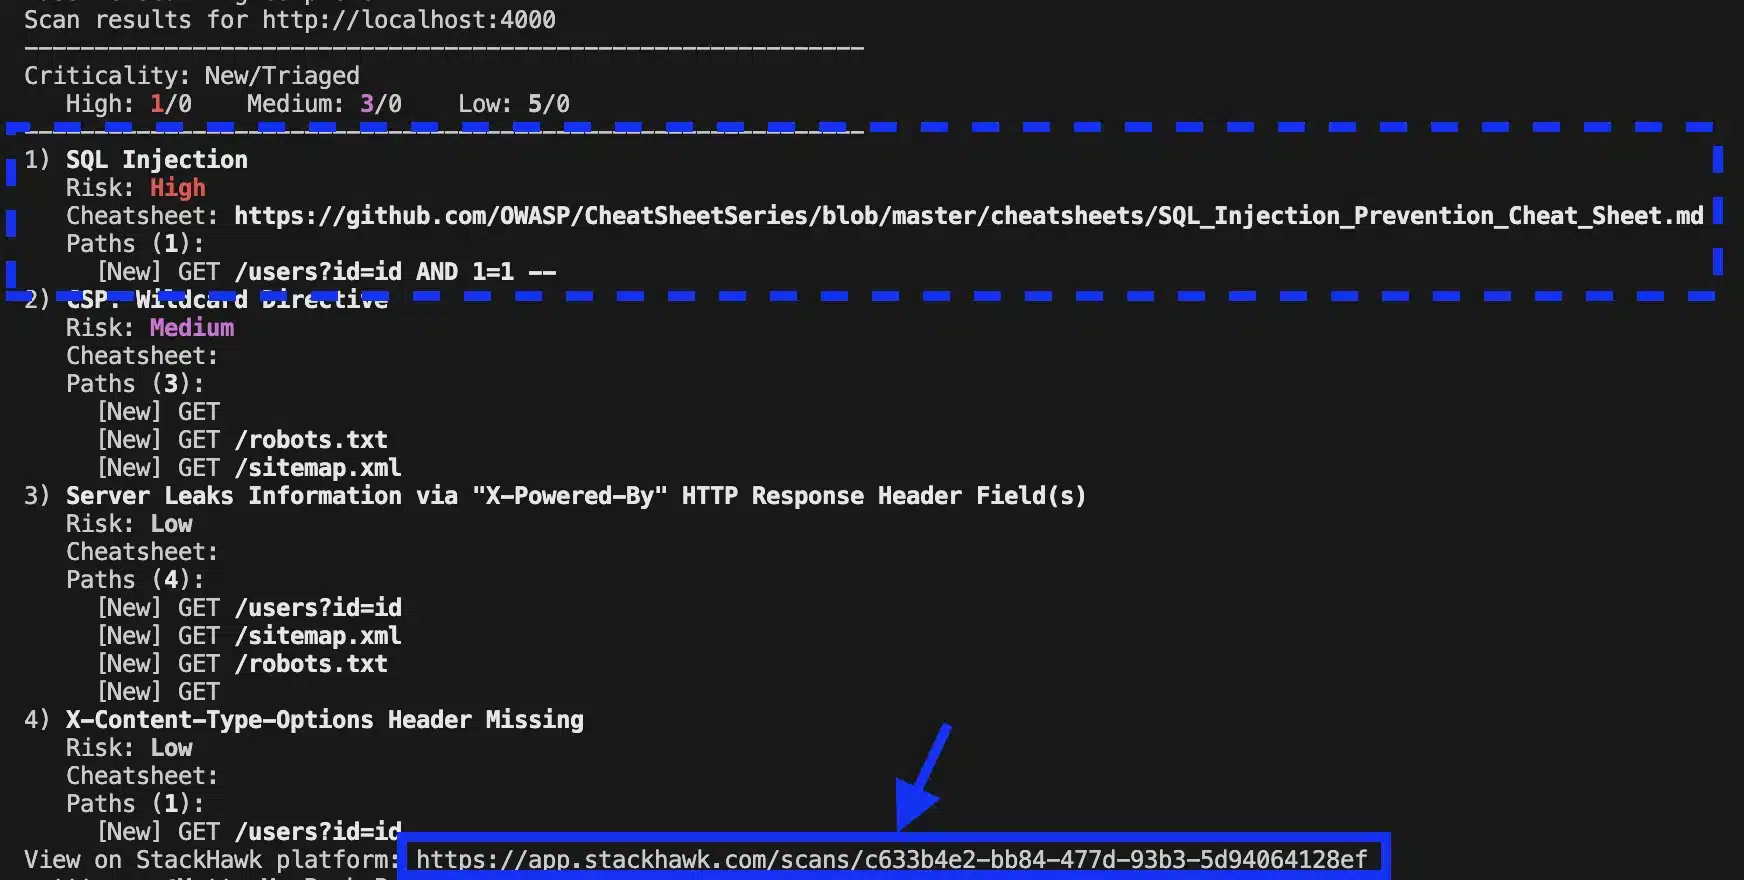
After running the “ hawk scan ” command in the previous step, you should see the tests beginning to execute in the terminal.

This will run tests against our API based on the OpenAPI spec using the OpenAPI Spider provided by StackHawk.
Explore the initial findings
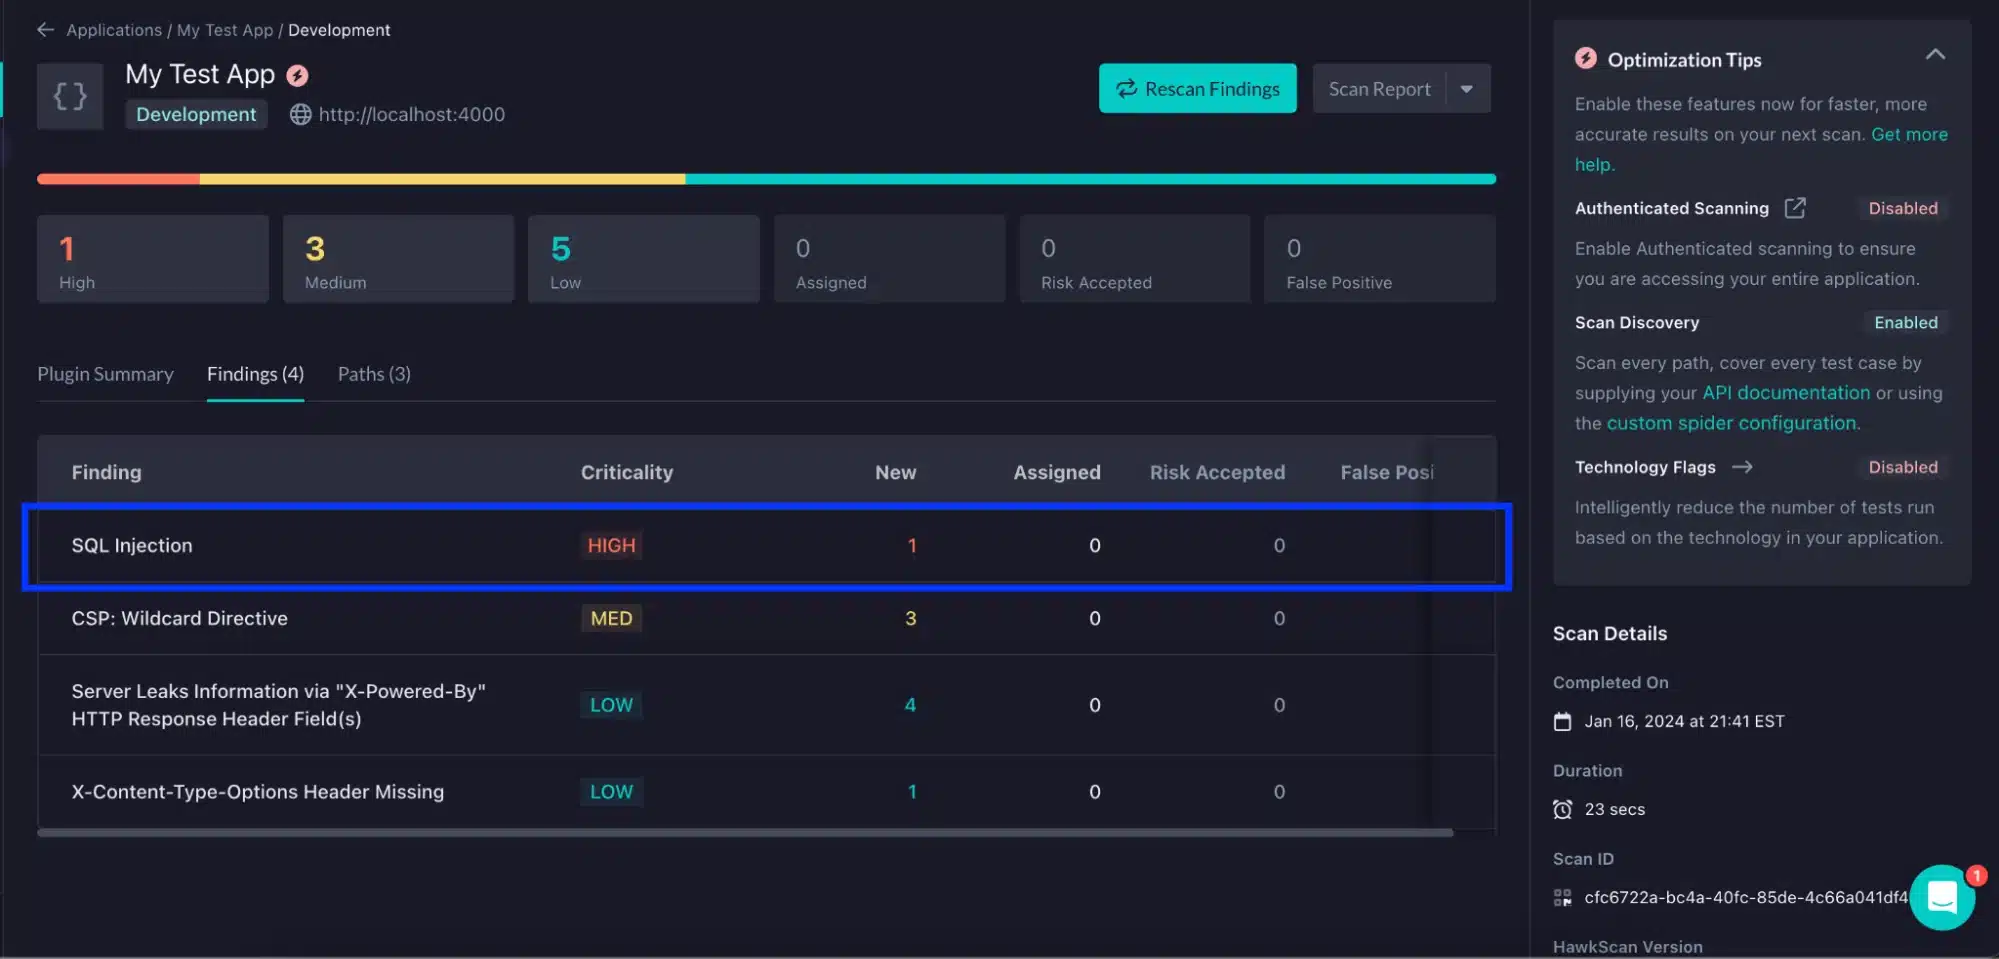
Once the tests are complete, the terminal will contain some information about any vulnerabilities found. Below, we can see that it has identified the SQL injection vulnerability that we introduced in the code. To explore this further, we will click on the test link that is provided at the bottom of the output. This will take us into the StackHawk platform to explore further.
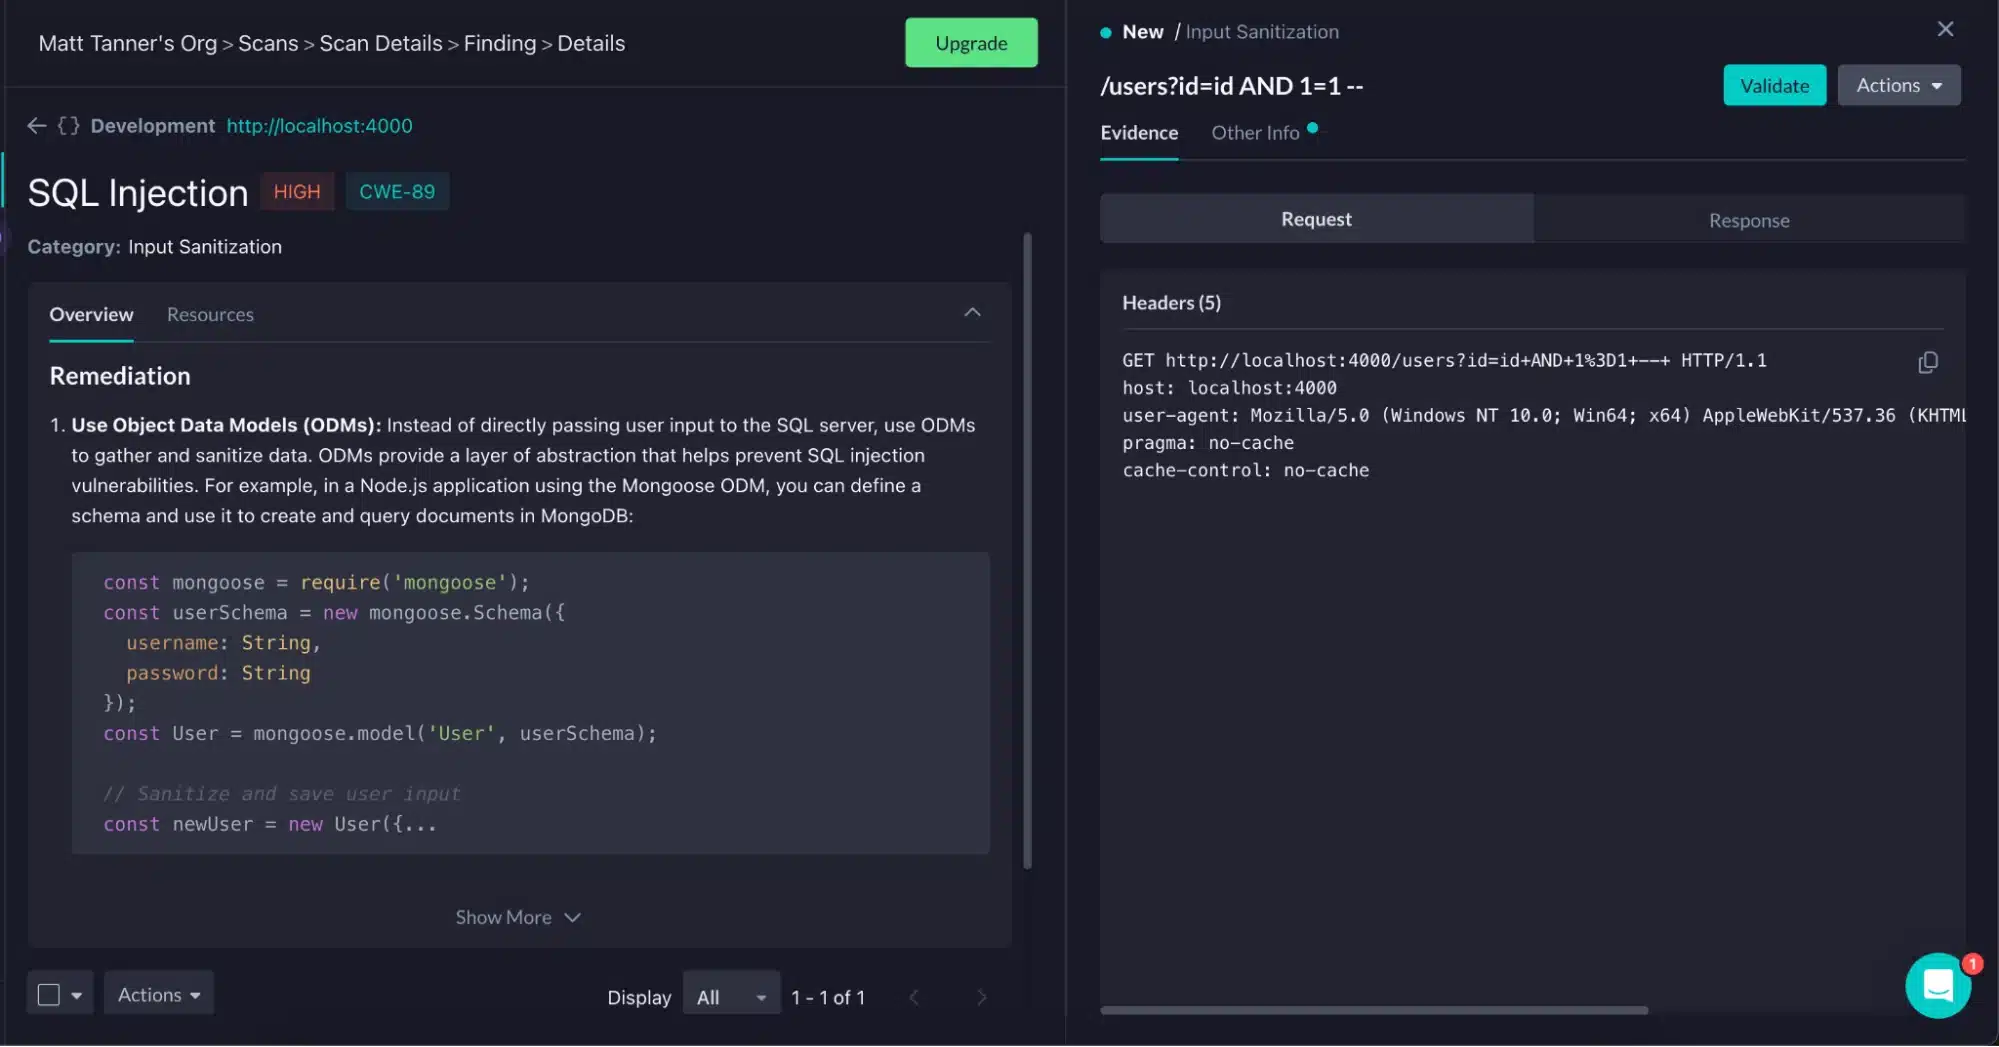
After clicking on the link, we can now see the test results nicely formatted. Next, we will click on the SQL Injection entry.
Within this entry, we can see an Overview and Resources that can help us with fixing this vulnerability as well as the Request and Response that the API returned. Just above this, you will also see a Validate button, which will display a cURL command with the exact API request used to expose the vulnerability.
Fixing the SQL Injection vulnerability
Now that we have identified the vulnerability, it’s time to fix it. In this case, to prevent SQL injection in the Flask application, the easiest way to fix this is to modify the code to use parameterized queries. This approach ensures that user input is treated as data, not as part of the SQL command. Doing so prevents attackers from injecting malicious SQL code through user input.
Here’s how you can modify the vulnerable endpoint in your app.py file to use parameterized queries:
@ns.route('/<string:id>')
@ns.response(404, 'User not found')
@ns.param('id', 'The user identifier')
class UserResource(Resource):
   @ns.doc('get_user')
   @ns.marshal_with(user_model)
   def get(self, id):
       """Fetch a user given its identifier"""

       try:
           # Use parameterized SQL query to prevent SQL injection
           query = text("SELECT * FROM user WHERE id = :id")


           # Execute the query with safe parameter substitution
           result = db.session.execute(query, {'id': id})
           user = result.fetchone()


           if user:
               return user
           else:
               api.abort(404)
       except Exception as e:
           # Handle the exception here
           print(f"An error occurred: {str(e)}")
           api.abort(500, f"An error occurred: {str(e)}")
Let’s summarize the modifications made to the Flask application to address the SQL injection vulnerability. Initially, the application directly included the `id` parameter from the user input into the SQL query string, creating a significant security risk. To mitigate this vulnerability, the code now employs parameterized queries. In the updated query `text(“SELECT * FROM user WHERE id = :id”)`, the `:id` serves as a placeholder for the `id` parameter. This placeholder is securely substituted with the actual `id` value provided in the request through the execution method `db.session.execute(query, {‘id’: id})`. This method of handling user input ensures it is always regarded as a data value rather than executable code, effectively preventing SQL injection attacks.
By implementing these changes, the endpoint is safeguarded against SQL injection threats. The application now consistently treats user inputs as parameters rather than parts of the executable SQL command. This practice is essential in the development of secure applications. It underscores the importance of always validating and sanitizing user inputs, in addition to utilizing parameterized queries for processing SQL statements, to protect against possible injection attacks.
To finalize the adjustments, save the updated code and restart the application. This action ensures that the changes take effect, reinforcing the application’s defense against SQL injection vulnerabilities.
Confirm the fix!
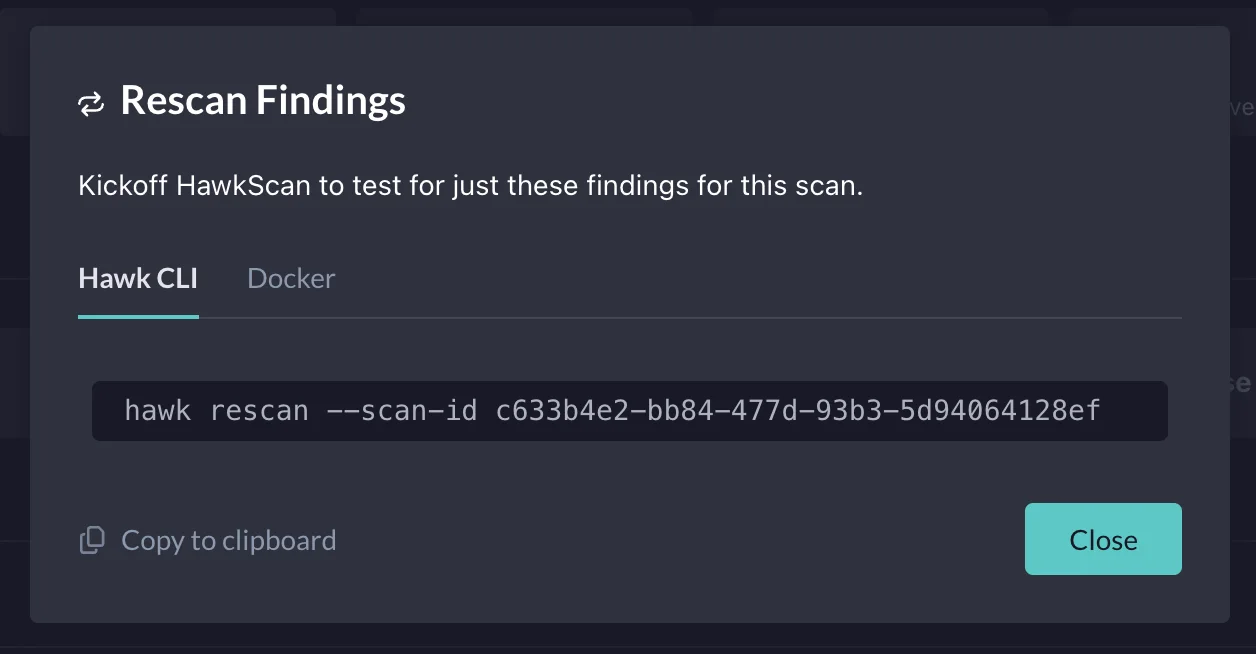
With the fix in place, let’s confirm it is working as intended. To do this, back in StackHawk , we will click the Rescan Findings button.

Then, we will see a modal containing the “hawk rescan” command that includes the correct Scan ID . You’ll run this command in the same terminal where you ran the initial set of tests.
In the output, you will again see any vulnerabilities found in the scan. In this case, you’ll see that the SQL injection vulnerability is no longer showing. Clicking on the link at the bottom of the terminal output, you can confirm that the SQL injection vulnerability has now been added to the Fixed Findings from Previous Scan , confirming that the vulnerability has been successfully fixed and has passed any vulnerability tests.

Try it out!
With that, we’ve successfully used StackHawk to scan an API, identify a SQL injection issue, and confirm that our fix worked as intended. Are you looking to make your applications more secure and put the power of security testing into the hands of developers? With StackHawk, “shift-left” the responsibility of security and empower developers to build secure APIs and applications with ease. Want to give it a try for yourself? Sign up for StackHawk today for a free 14-day trial.


