CORS errors can be extremely frustrating. The “No ‘Access-Control-Allow-Origin’ Header Present” error is up there as one of the least helpful error messages a developer can face. Sure, it tells you that there’s a header missing, but from where is it missing, and what should it be? Searching for it on the internet brings up a popular forum where the most common answer is simply allowing all requests to bypass legitimate CORS checks on the API side. Although it works to eliminate the error, it’s worse than wrong – it’s dangerous.
In short, the ‘access-control-allow-origin’ header is a Cross-Origin Resource Sharing (CORS) header. It’s a key component in CORS, which, if you’re unfamiliar, is a mechanism for relaxing the “Same-Origin” policy of modern browsers. These policies allow things like serving your static content from www.example.com and your dynamic content from api.example.com.
Skip the debugging — your coding agent can find AND fix this.
If you’re using Claude Code, Cursor, Codex, or GitHub Copilot, you may not need to read this entire post. Wingman gives your coding agent security testing superpowers — it scans for CORS misconfigurations, brings findings back with full codebase context, and fixes them using your existing code patterns. No manual config, no Stack Overflow spelunking. The rest of this post explains what’s happening under the hood.
What Causes This Error?
This error occurs when a script on your website attempts to make a request to a resource that isn’t configured to accept requests from your domain. Here’s what’s happening:
Before making certain cross-origin requests, the browser first makes a preflight request using the OPTIONS method. This allows the server to define what origins, methods, and headers are allowed. Simple requests (such as GET, HEAD, or POST with standard headers and content types like application/x-www-form-urlencoded) bypass the preflight check and go directly to the server. Only requests with custom headers, non-standard HTTP methods (PUT, DELETE, PATCH), or certain content types (like application/json) require preflight validation.
There is an important and sometimes confusing distinction to make, though: CORS is a browser-enforced security mechanism. It helps to protect users from malicious scripts running in their browsers. However, CORS does not provide server-side security, which is what many developers think. This means that it won’t prevent requests made outside of browser contexts (such as curl commands, server-side scripts, or API clients).
All being said, if the server isn’t configured to handle cross-origin requests properly, you’ll see this error.
Common Scenarios That Trigger This Error
There are several common scenarios that lead to this error appearing. Even experienced developers run into this frequently during the development process, especially when spinning up new applications. Here are a few scenarios where you’ll likely see this type of error pop up:
- React or Vue app calling an API: Frontend at https://myapp.com, trying to call https://api.myapp.com
- Development server setup: Local development at http://localhost:3000, calling a local API at http://localhost:8080
- Third-party API integration: Your website is trying to call an external service that doesn’t allow your domain
- Subdomain requests: www.example.com trying to access api.example.com
Of course, this CORS issue is just one of many issues that can pop up during development. So, to get closer to fixing it, we need to figure out the root causes for our particular app.
How to Diagnose The Error Cause?
When you encounter this error, you’ll want to do some quick checks to figure out what is causing it. Unfortunately, the error message itself generally doesn’t give a whole lot of context. Here are a few questions to ask to get down to the root cause:
- Are you making a cross-origin request? If you are using a different protocol (http vs https), domain, or port, then you’ll likely experience cross-origin issues.
- Does the target server send CORS headers? Check the Network tab in the browser and look for Access-Control-Allow-Origin in the response, which will show you the allowed origins for the requested resource.
- Is your origin in the allowed list? The header value should be either * (but use this wisely and intentionally, or it can be dangerous since it allows all origins) or your exact domain. If it’s not present, this would be the cause!
- For complex requests: Check to make sure that the server handles OPTIONS requests properly.
How to Fix This Error
There are two main approaches, depending on whether you control the server. The best way to do this is to fix this at the server level; however, it can sometimes also be done outside of the server.
Fixing at the API Server Level
The proper fix is to configure your server to send the right CORS headers. Here’s how for common frameworks:
In Node.js (Express), in your app.use() you would set the response header value for Access-Control-Allow-Origin to the desired value. This would likely be your frontend domain/URL, like this:
res.header('Access-Control-Allow-Origin', 'https://yourapp.com');In full context, here is what that would look like more completely:
const express = require('express');

const app = express();

const allowedOrigins = ['https://yourapp.com', 'https://www.yourapp.com'];

app.use((req, res, next) => {

  const origin = req.headers.origin;

  if (allowedOrigins.includes(origin)) {

    res.header('Access-Control-Allow-Origin', origin);

  }

  res.header('Access-Control-Allow-Methods', 'GET, POST, PUT, DELETE, OPTIONS');

  res.header('Access-Control-Allow-Headers', 'Content-Type, Authorization');

  if (req.method === 'OPTIONS') {

    return res.status(200).end();

  }

  next();

});
In Python (Django), you’d make a similar update to your code in the middleware or views components. Below you can see a method we created to add_cors_headers and then a check for pre-flight requests in the handle_preflight where we inject the correct CORS headers.
from django.http import HttpResponse

def add_cors_headers(response, allowed_origin):

    response['Access-Control-Allow-Origin'] = allowed_origin

    response['Access-Control-Allow-Methods'] = 'GET, POST, PUT, DELETE, OPTIONS'

    response['Access-Control-Allow-Headers'] = 'Content-Type, Authorization'

    return response

# For preflight requests

def handle_preflight(request):

    if request.method == 'OPTIONS':

        response = HttpResponse()

        return add_cors_headers(response, 'https://yourapp.com')
As a last example, this is what these types of updates would look like in C# (ASP.NET Core). Here, we would add some additional policy configuration in the Startup.cs file:
public void ConfigureServices(IServiceCollection services)

{

    services.AddCors(options =>

    {

        options.AddPolicy("AllowSpecificOrigin",

            builder => builder

                .WithOrigins("https://yourapp.com")

                .AllowAnyMethod()

                .AllowAnyHeader());

    });

}

public void Configure(IApplicationBuilder app, IWebHostEnvironment env)

{

    app.UseCors("AllowSpecificOrigin");

}
Potential Fixes Without Access to the API Server
If you’re calling a third-party API that doesn’t support CORS, you have a few options:
- Use a proxy server: Route requests through your own backend
- Use JSONP (if the API supports it, though this is legacy)
- Browser extensions for development (NOT for production)
- Contact the API provider to request CORS support
Essential CORS Headers Explained
As you probably noticed in the fixes above, there are quite a few different CORS headers that you can set. Although we have mainly focused on the Access-Control-Allow-Origin header, there are many other important ones that can help with overall security. Here is a quick breakdown of their names, purpose, and example values:
| Header | Purpose | Example |
| Access-Control-Allow-Origin | Which domains can access this resource | https://yourapp.com or * |
| Access-Control-Allow-Methods | Which HTTP methods are allowed | GET, POST, PUT, DELETE |
| Access-Control-Allow-Headers | Which request headers are allowed | Content-Type, Authorization |
| Access-Control-Allow-Credentials | Whether cookies/auth can be sent | true (only with specific origins) |
| Access-Control-Max-Age | How long to cache preflight results | 3600 (seconds) |
Common CORS Security Mistakes to Avoid
CORS does play a significant role in application and user security. There are many different ways to configure CORS that aren’t necessarily optimal. However, it can be hard to actually figure out if you’ve done something dangerous or insecure if you’re not aware (which is where API security tools like StackHawk, covered below, can give you a hand at finding out if you’ve misconfigured CORS). Let’s take a look at some of the most common security mistakes:
The Dangerous Wildcard (*)
This is probably one of the most commonly seen workarounds for developers. While doing this on your local machine might be okay, when deployed onto an actual environment (especially production), this is generally a big no-no. Here is what that looks like:
res.header('Access-Control-Allow-Origin', '*');

res.header('Access-Control-Allow-Credentials', 'true');
By doing this, you are allowing any website to make authenticated requests to your API. StackHawk’s CORS scanner — including through Wingman for Claude Code, Cursor, Codex, and GitHub Copilot — flags wildcard configurations like this as findings, so you catch them before they reach production.
Insufficient Origin Validation
This is another vulnerable configuration that may look secure on the surface. In the code below, it looks like we are only going to allow requests from www.myapp.com; however, declaring it this way is too permissive and actually more open than it seems.
if (origin.includes('myapp.com')) {

    res.header('Access-Control-Allow-Origin', origin);

}
The caveat here is that even though this will allow requests from www.myapp.com to come through, this policy can also be bypassed by domains like evil-myapp.com.malicious.com.
Why Automated CORS Testing Matters
CORS misconfigurations are among the most common security issues in modern web applications. Manual testing often misses edge cases, and it’s easy to accidentally create security gaps while trying to fix functionality issues.
Luckily, platforms exist to help catch these common mistakes so they can be fixed before they have the chance to hit production. One of the most trusted security platforms for this type of testing is StackHawk. By using StackHawk to test for vulnerabilities in your applications and APIs, you get:
- Early detection of CORS issues during development
- Automated testing of complex CORS scenarios you might not think to test manually
- Clear remediation guidance with specific examples of vulnerable requests
- Verification that fixes don’t introduce new security issues
By integrating CORS security testing into your development workflow, you can ensure your cross-origin requests work reliably while keeping your application secure.
Validating Your CORS Configuration with StackHawk
Once you’ve implemented CORS headers, it’s crucial to ensure your configuration is both functional and secure. A common mistake is fixing the immediate CORS error but accidentally creating security vulnerabilities, like allowing credentials from any origin or being too permissive with allowed domains.
This is where automated security testing becomes invaluable. Instead of manually testing every possible CORS scenario and hoping you haven’t introduced security gaps, you can use StackHawk to automatically validate that your CORS implementation works correctly without creating new attack vectors.
StackHawk will test your CORS implementation for common security issues, including:
- Wildcard origin acceptance with credentials: Testing if your API dangerously accepts * as an origin while allowing credentials
- Origin reflection vulnerabilities: Checking if your API blindly reflects the Origin header without proper validation
- Missing security headers: Identifying CORS setups that lack proper CSRF protection
- Overly permissive configurations: Finding CORS policies that are broader than necessary
Instead of waiting for our AppSec team to let us know we have an issue later in development, let’s get StackHawk to identify this vulnerability for us automatically. To do this, you’ll need to ensure you have a StackHawk account. If you need one, you can sign up for a trial account or log into an existing account.
If you’re logging into an existing StackHawk account, from the Applications screen, you’ll click Add Application.

If you’re new to StackHawk, you’ll be automatically brought into the Add an App flow. On the Scanner screen, you’ll see the instructions for installing the StackHawk CLI. Since we will be running our testing locally, we will use this option. Once the hawk init command is executed successfully, click the Next button.
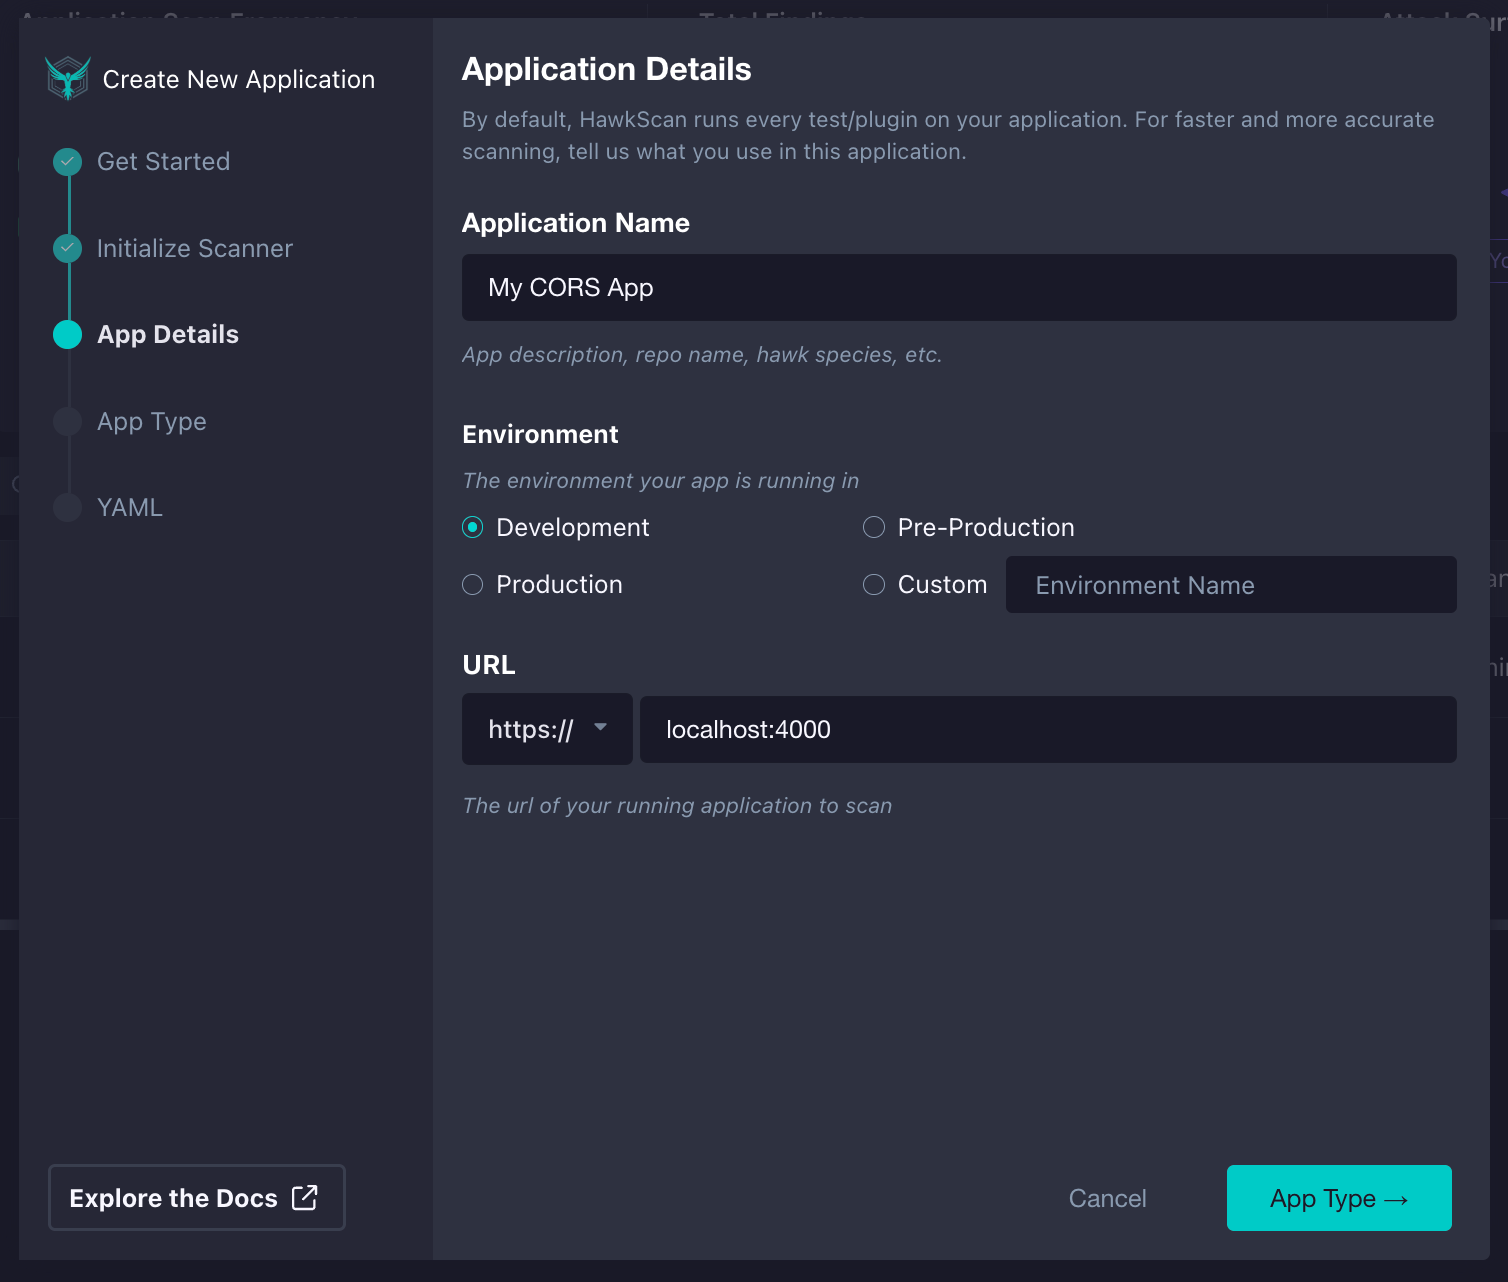
On the next screen, you will fill out an Application Name , Environment , and URL. Once filled out, click Next.
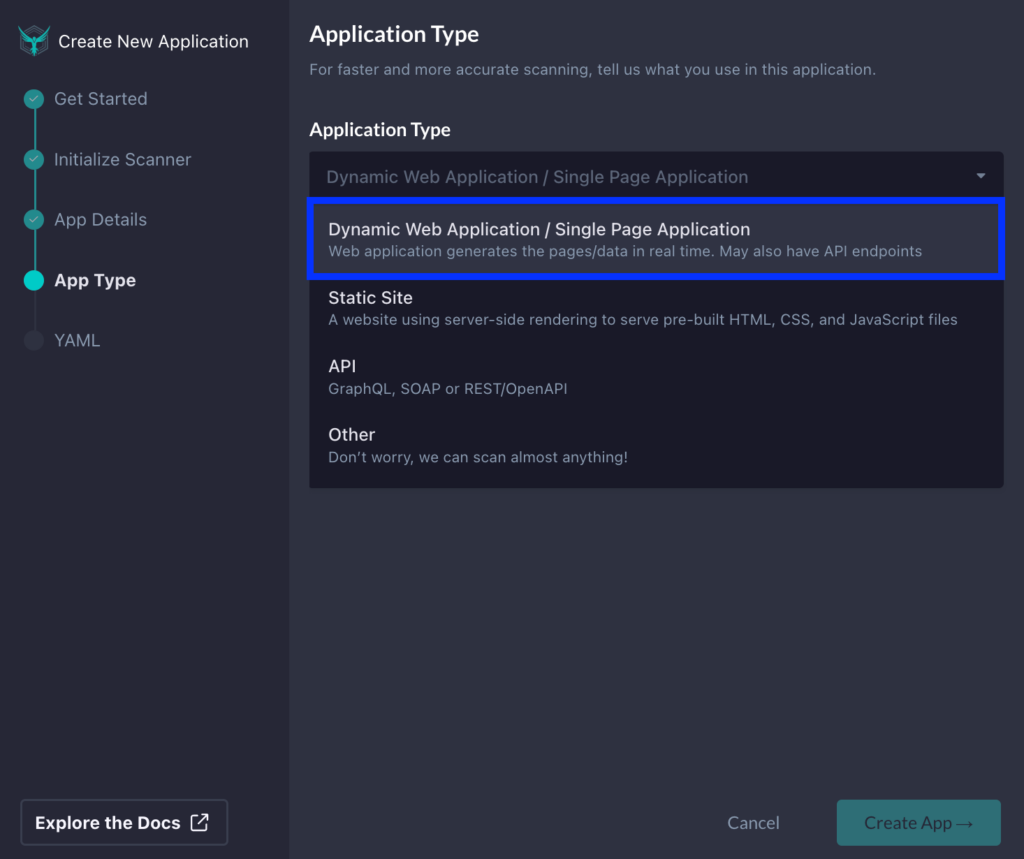
Since we will be testing a RESTful API, on the next page, we will choose our Application Type as “Dynamic Web Application/Single Page Application”.
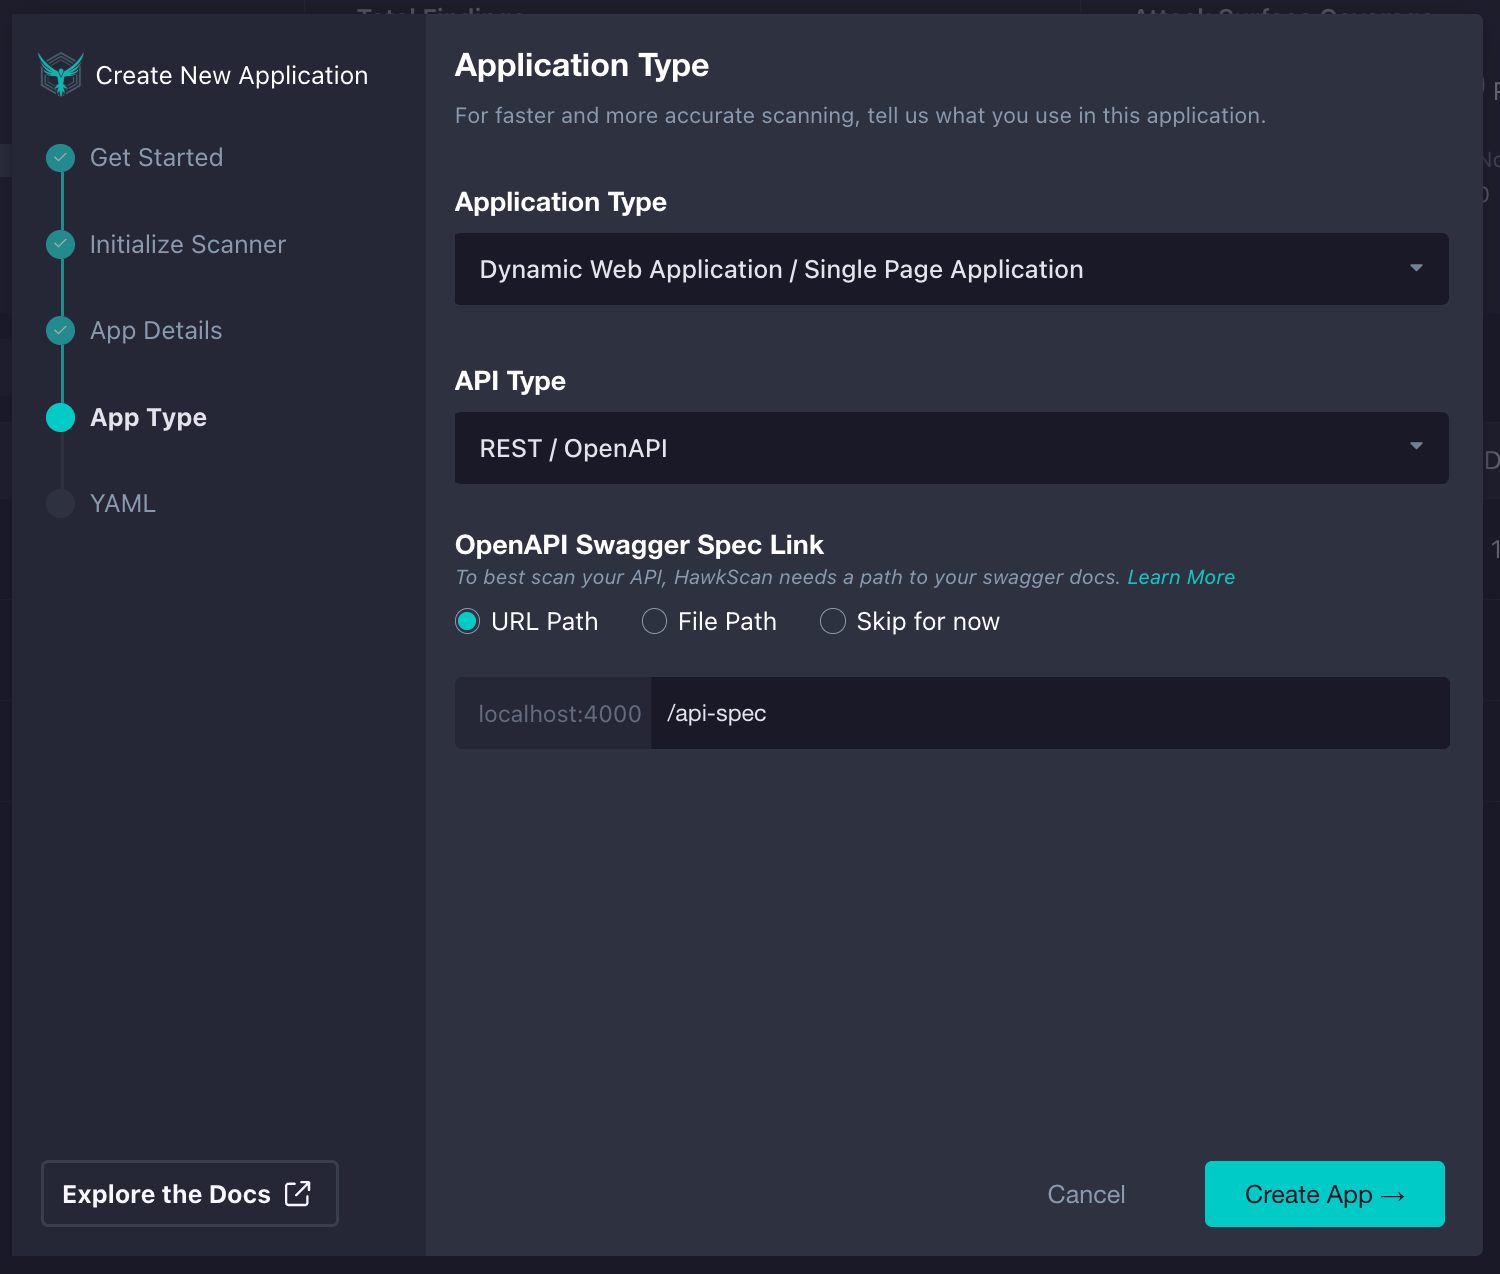
Depending on what you have set up as a backend API, you’ll also plug these details in. For example, if you have a REST API running, you would set the API Type as “REST / OpenAPI”, and point to our OpenAPI Specification file by selecting URL Path and adding the path to where your OpenAPI spec is located in the textbox. Alternatively, as I’ve done here, we can also click “Skip for now” if you’re unsure. Once complete, click Next.
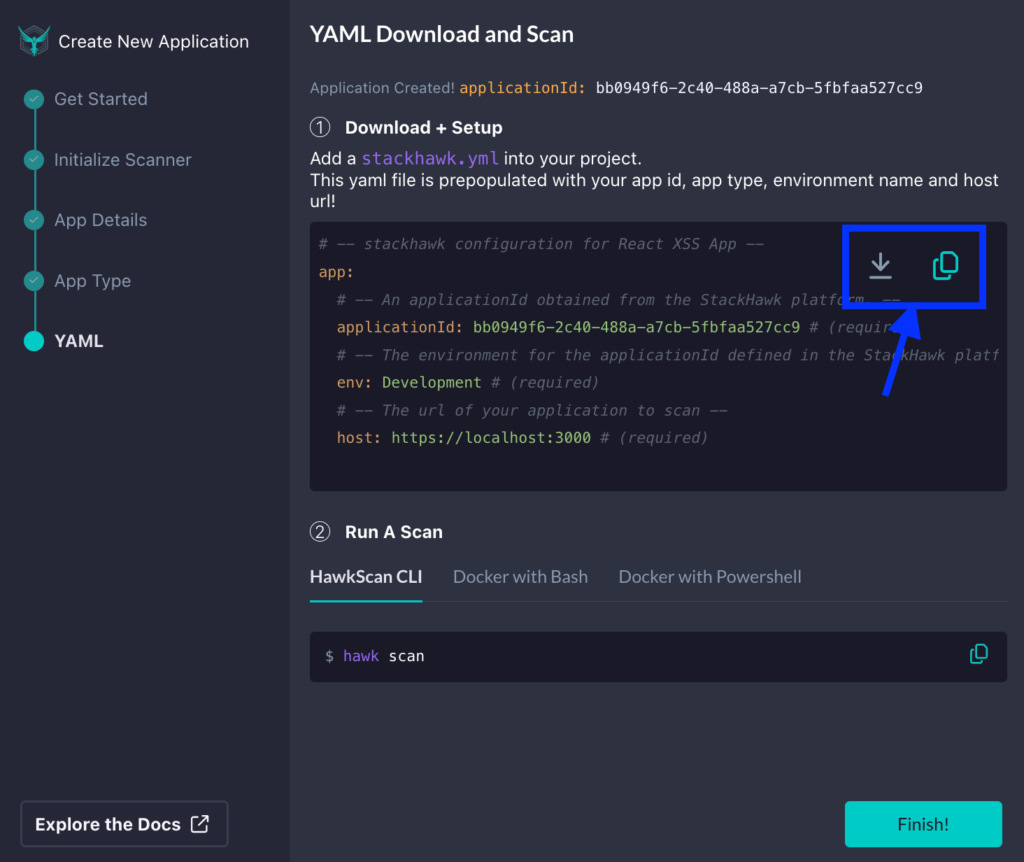
Lastly, we will need to add a stackhawk.yml file to the root of our project. Once the file is added, copy the screen’s contents, paste them into the file, and save it. Lastly, we can click the Finish button.
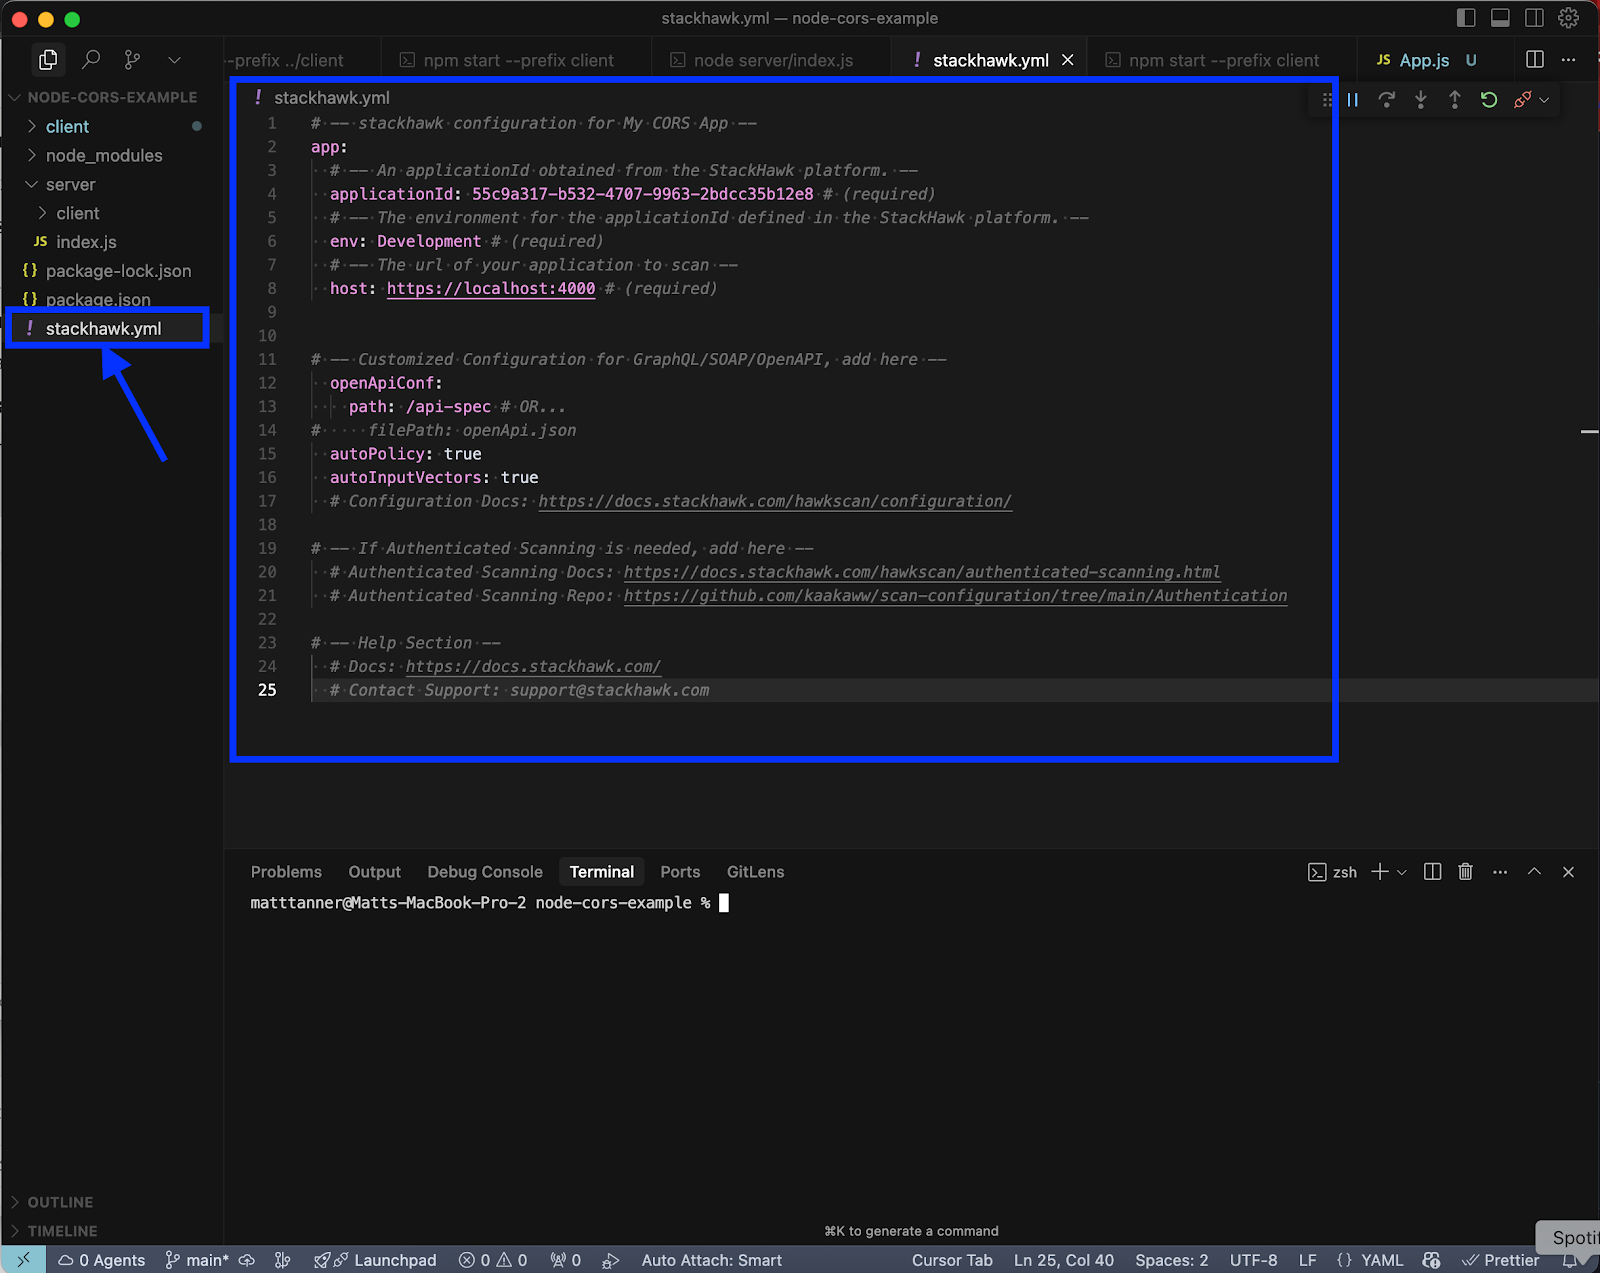
In our root directory, we should see the stackhawk.yml file we’ve added:
Lastly, depending on our scan policy, CORS misconfiguration detection may not be enabled. To ensure this, go back to StackHawk, navigate to the Applications page, and select your app. Once in the config page, click on the Settings tab, then the Active Scan Plugins tab just below it. Then, locate the CORS Header plugin in the list and check it off. You can find it easily by typing “cors” into the plugin search bar.
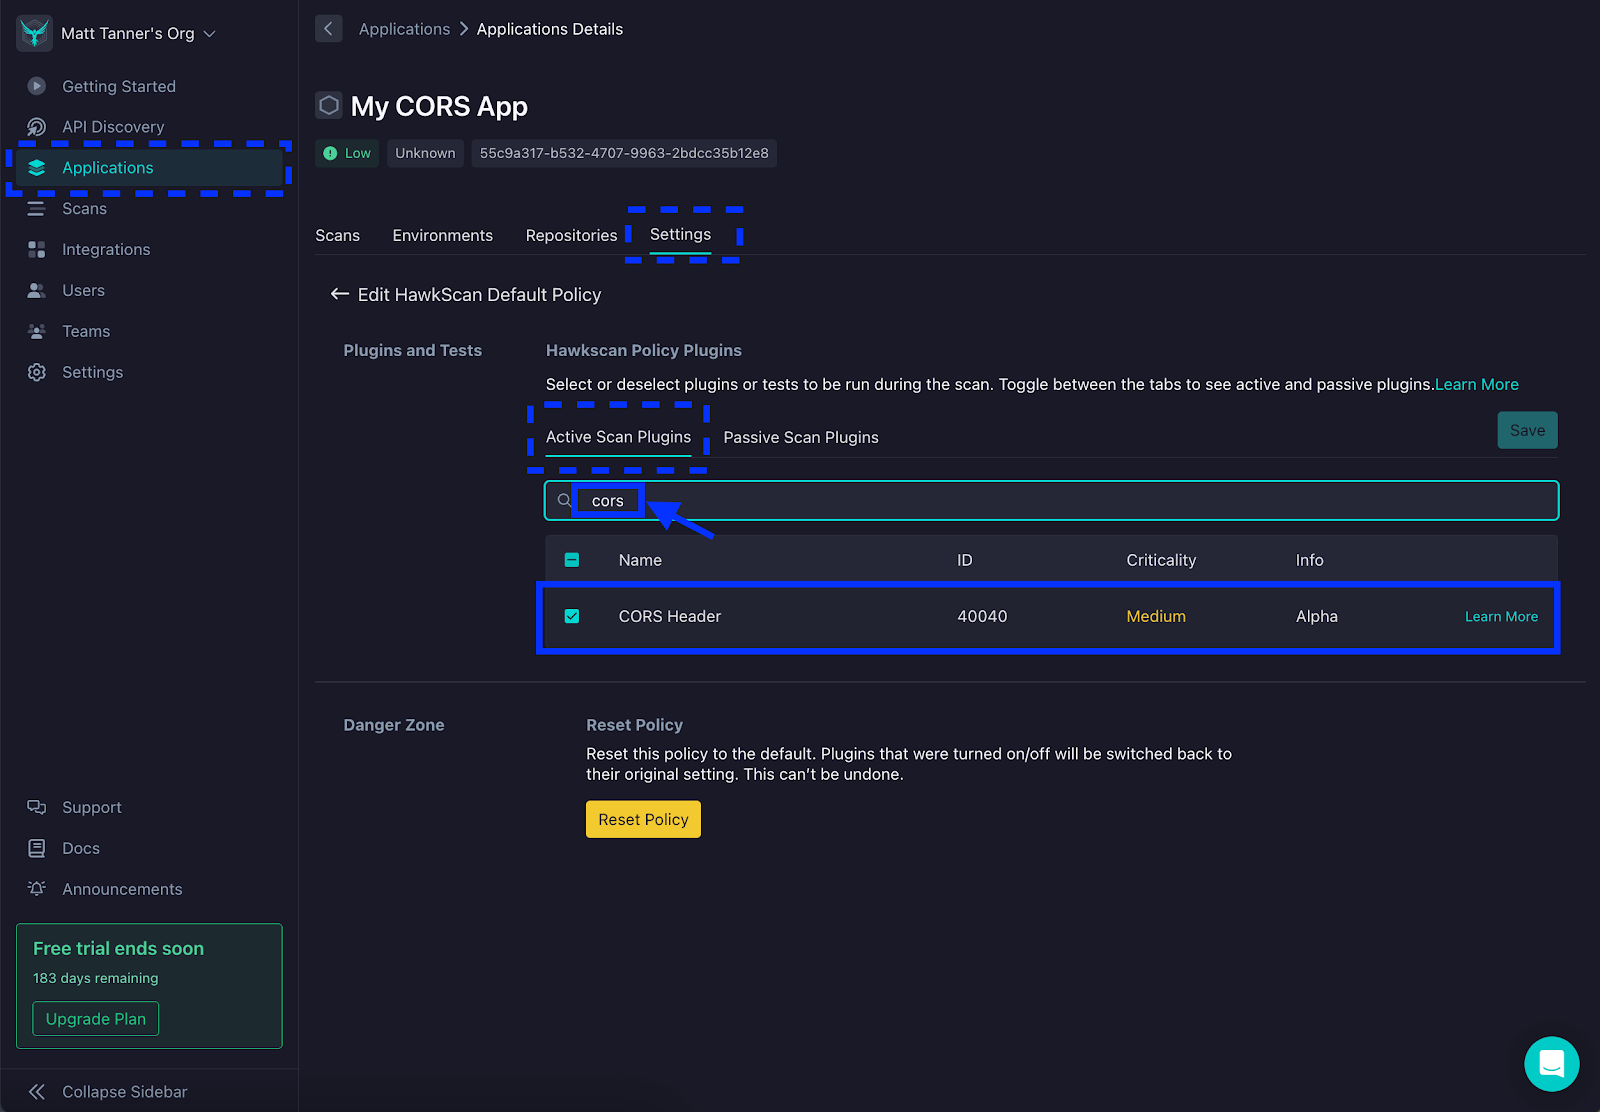
Lastly, click Save just above the Plugins list to save the new configuration.
Run HawkScan
Next, we can go ahead with testing our application. In a terminal pointing to the root of our project, we will run HawkScan using the following command:
hawk scanAfter running the command, the tests should execute in the terminal.

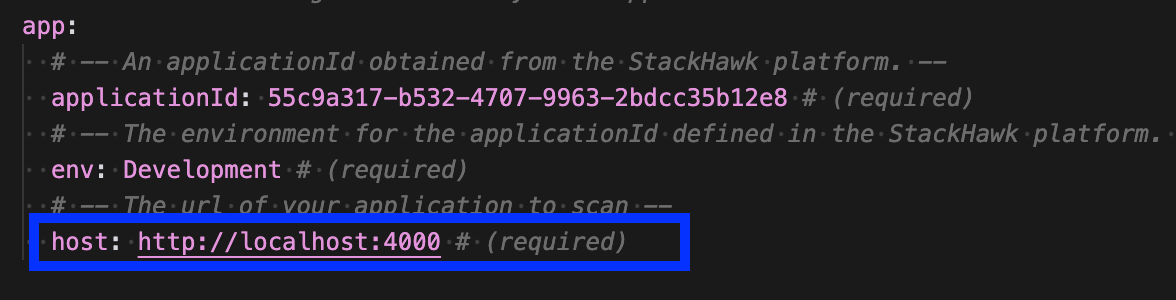
Note that if you get an error similar to:
HawkScan Target Not Found Error: Unable to access https://localhost:4000. Check if the web server is listening on the specified port.This means that your API is not running in HTTPS, and that is how HawkScan is trying to call the API. To fix this, either add HTTPS capabilities to your API or, more simply, go and change the host entry in your stackhawk.yml to only use “http”.
This will run tests against our React application and the corresponding backend. Once the tests have run, we can begin to explore anything that was found.
Explore The Initial Findings
Once the tests are complete, the terminal will contain some information about any vulnerabilities found. Below, we can see that StackHawk has found a few CORS vulnerabilities within my code that are present on multiple paths.
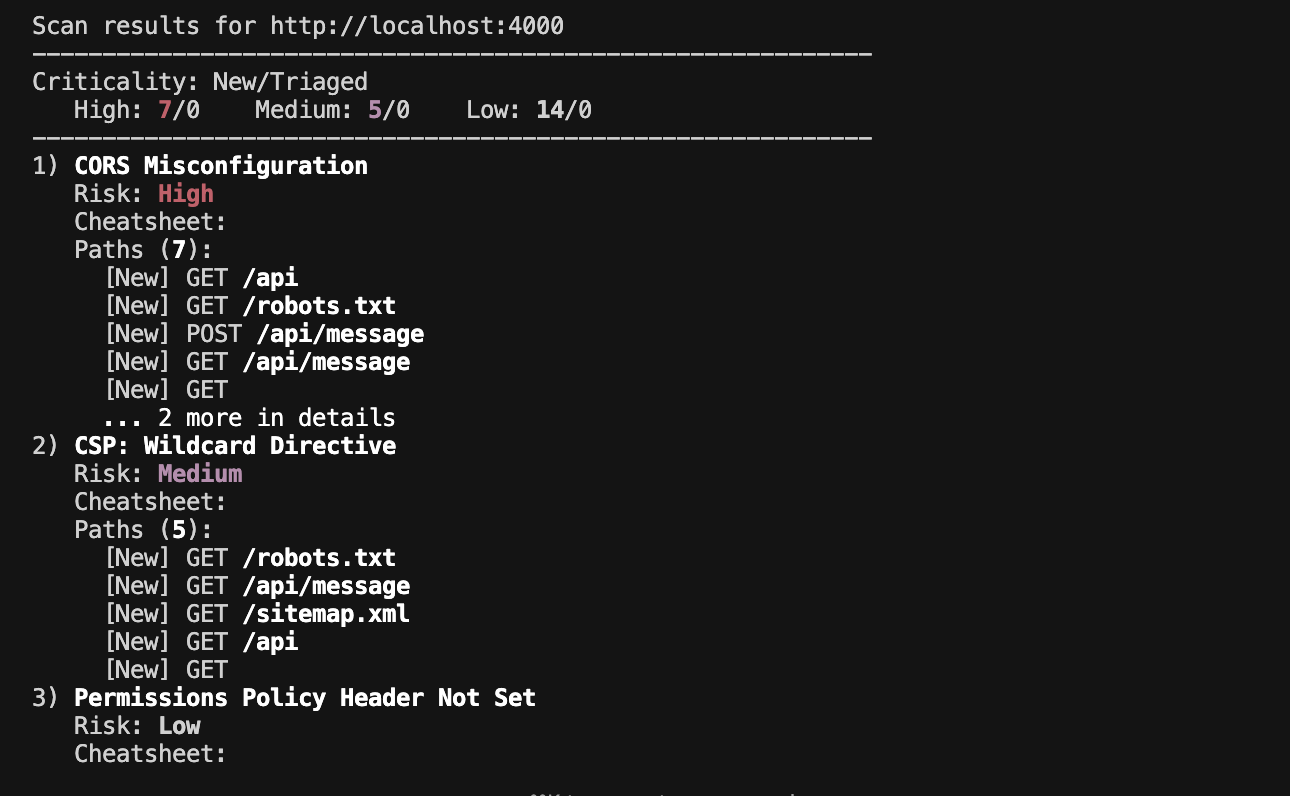
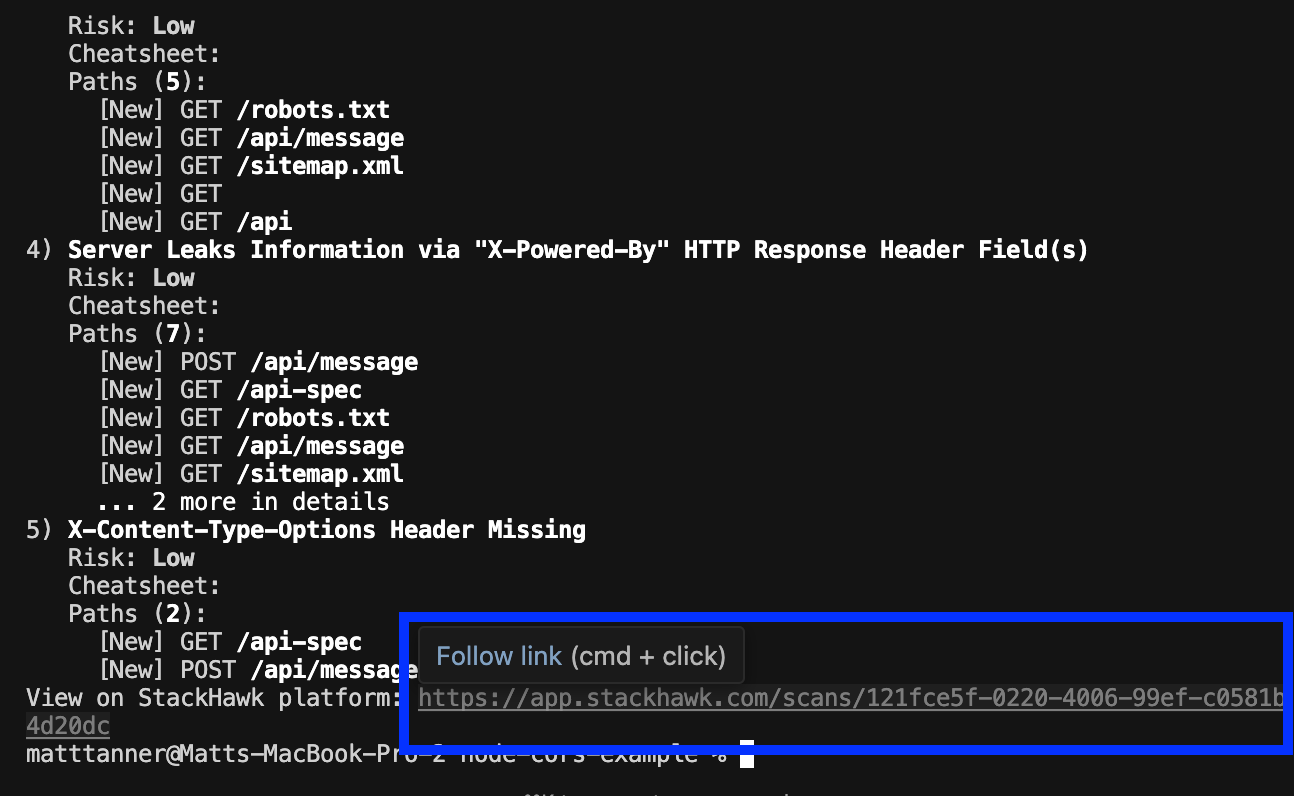
To explore this further, we will click on the test link at the bottom of the output. This will take us into the StackHawk platform to explore further.
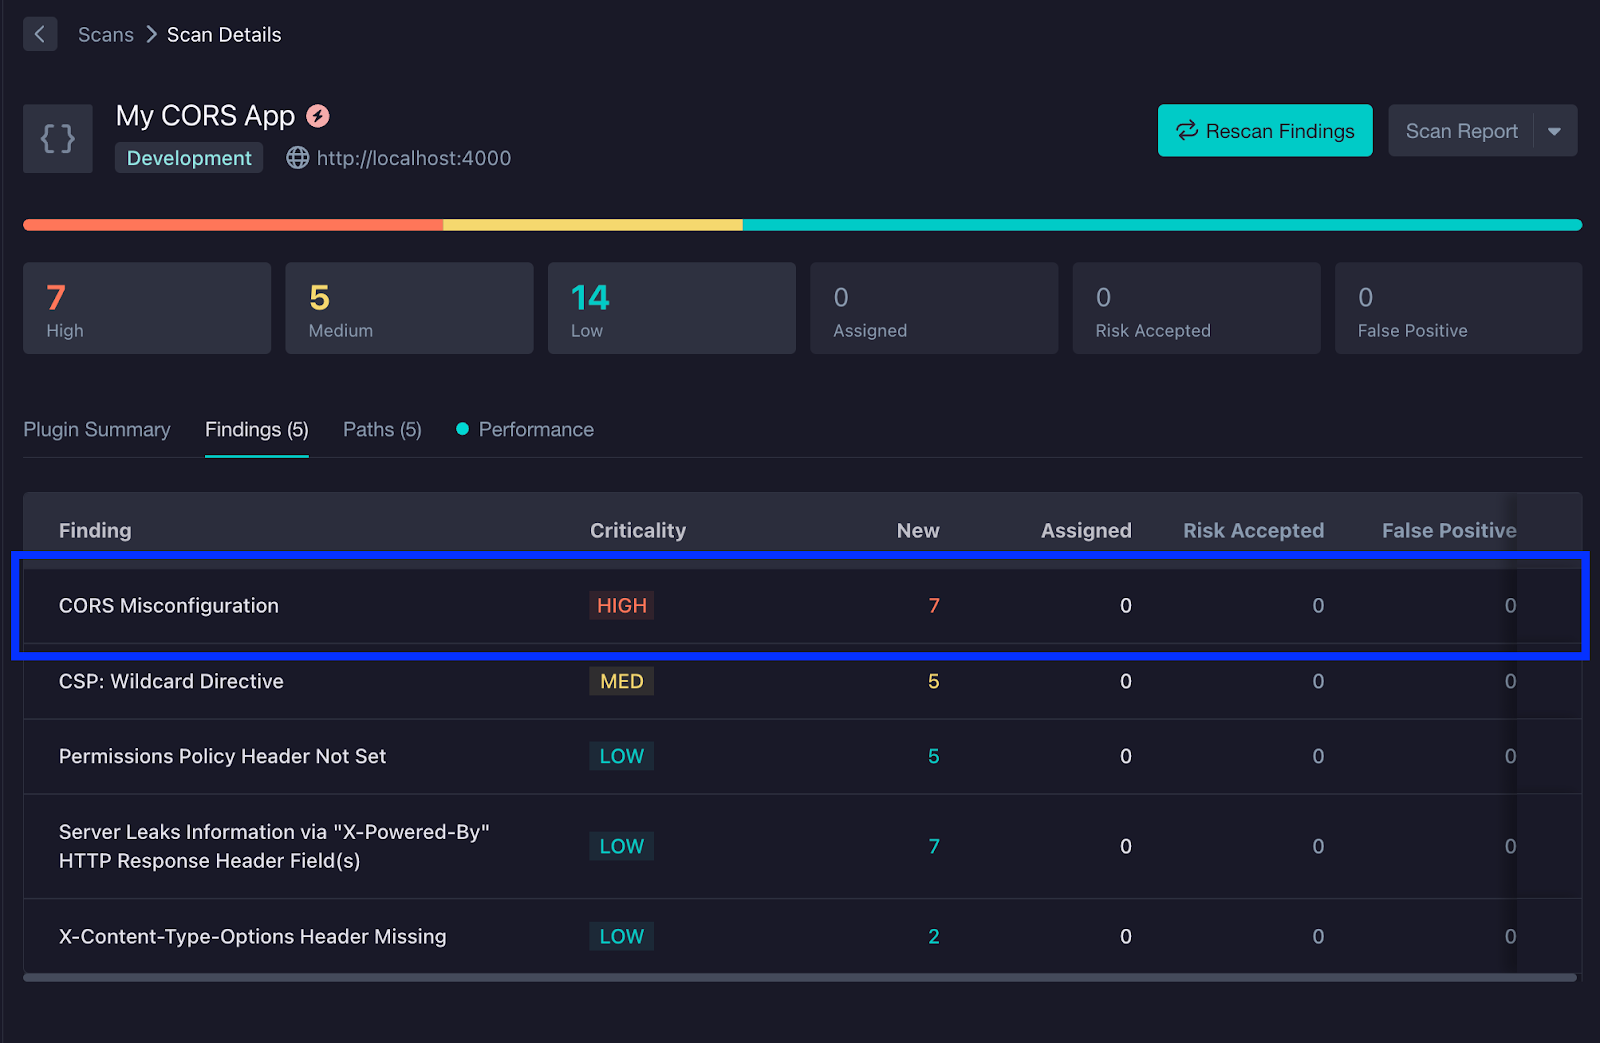
After clicking on the link, we can now see the test results nicely formatted. Next, we will click on the CORS Misconfiguration entry.
Within this entry, we can see an Overview and Resources that can help us with fixing this vulnerability, as well as the Request and Response that the API returned on the right side of the screen. Above this, you will also see a Validate button, which will display a cURL command with the exact HTTP request used to expose the vulnerability.
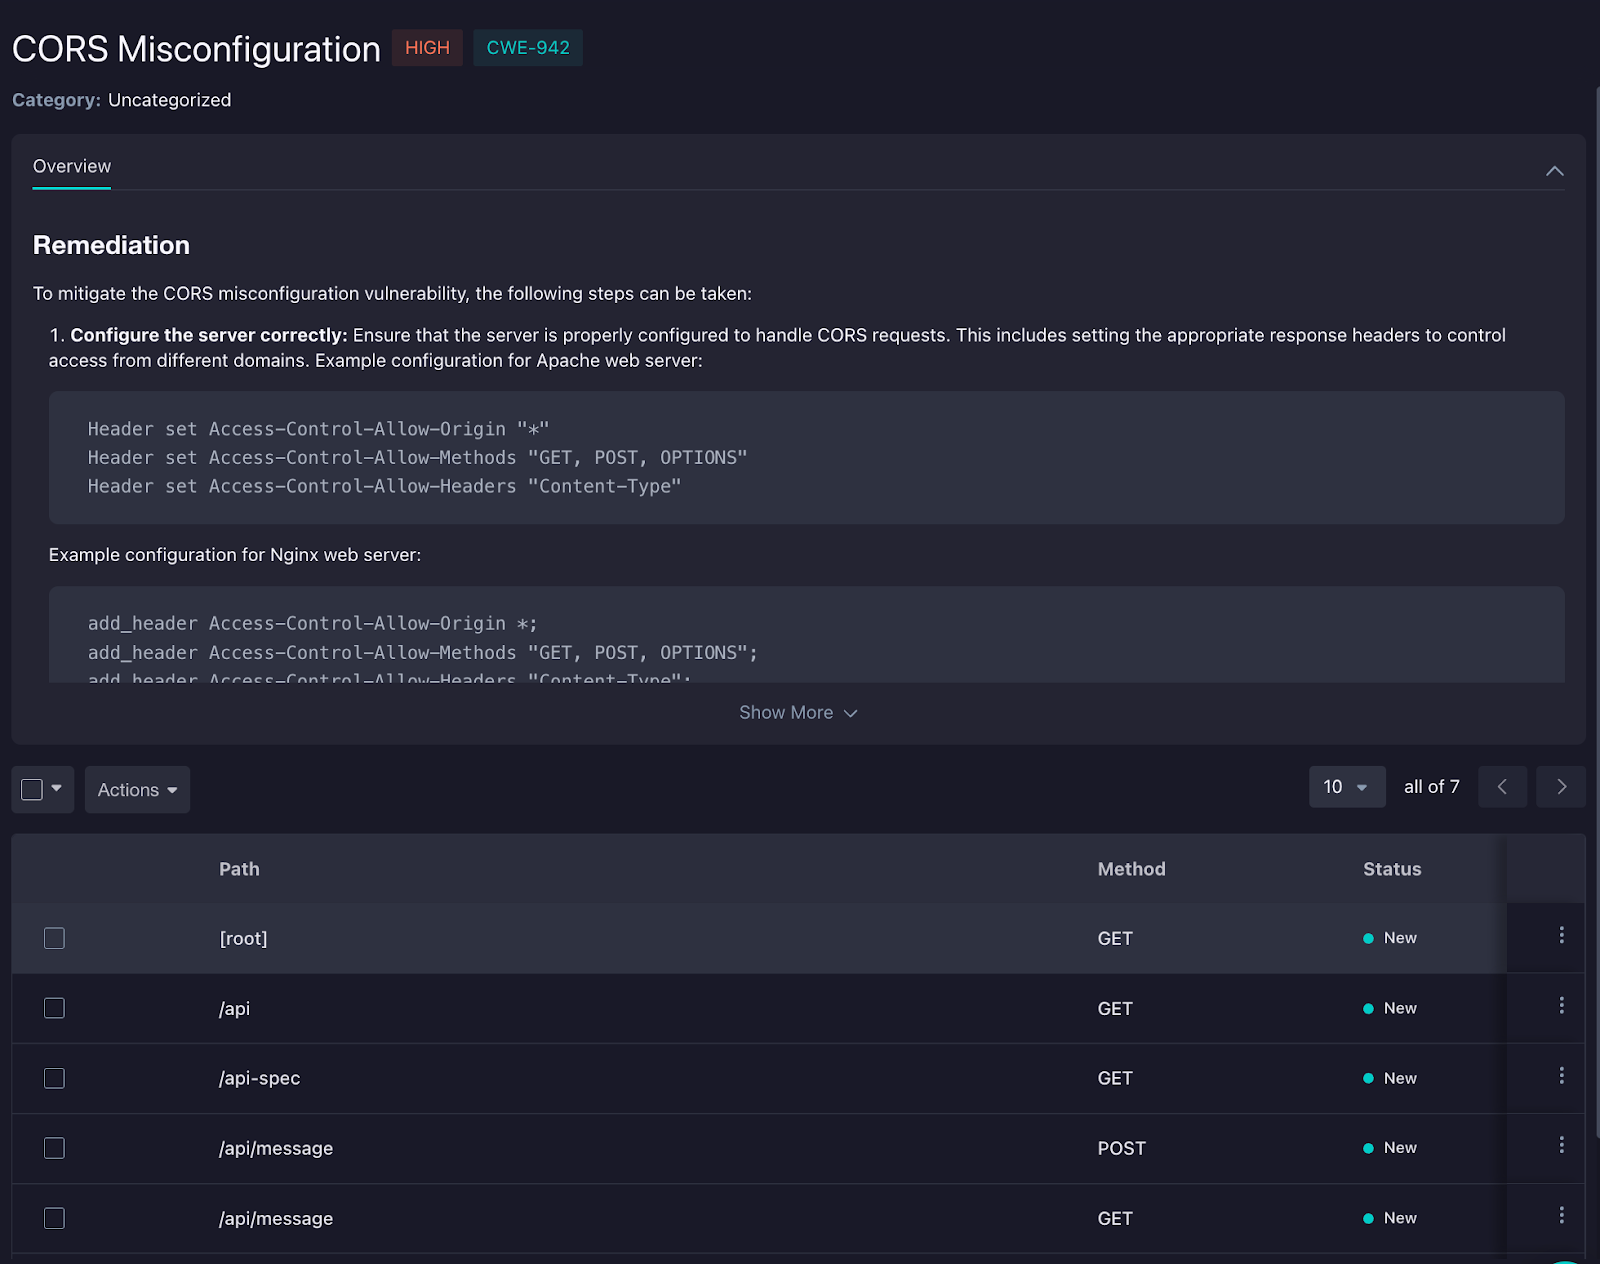
Understanding and Fixing CORS Security Issues
When StackHawk finds CORS vulnerabilities, you’ll see detailed findings that show what paths are affected and potential remediation techniques (like those in the image above). Using the techniques in this guide or within StackHawk’s remediation advice for the vulnerability, you can then go ahead and make the needed adjustments in your code and configuration. Once fixed, make sure to stop your web servers and redeploy the latest code. Next, we can make sure that the fix implemented actually fixes our CORS misconfiguration issues.
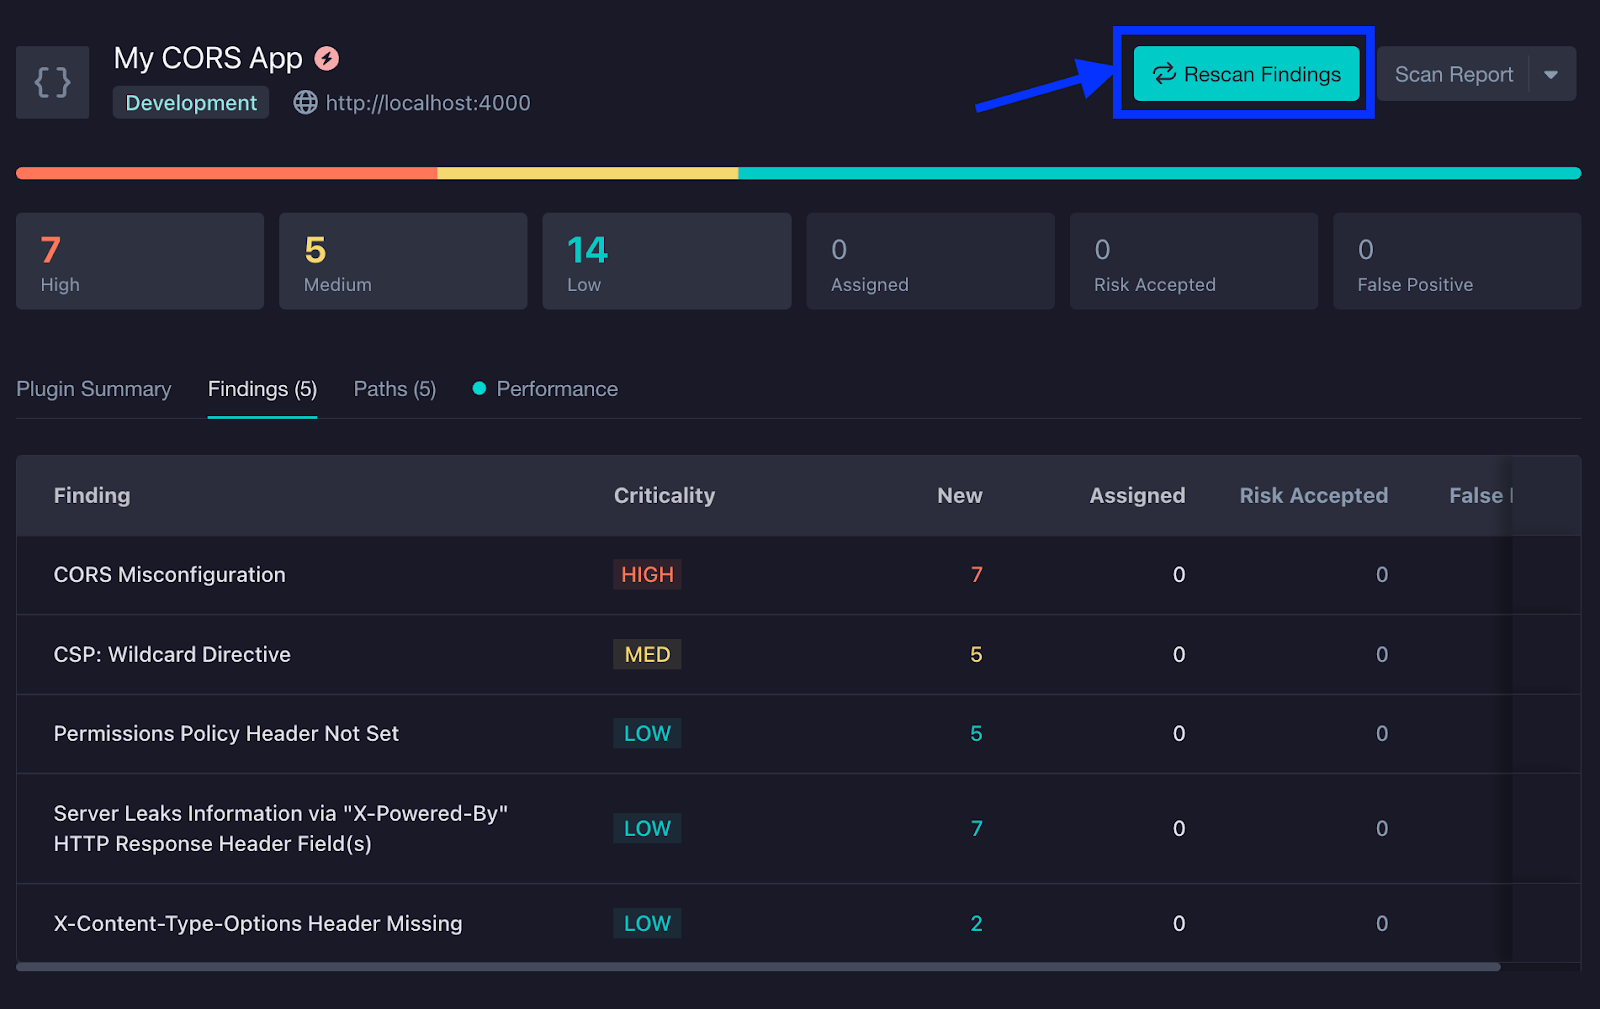
Confirm the fix!
With the latest code deployed, let’s confirm the fix in StackHawk. To do this, we will click the Rescan Findings button back in StackHawk.
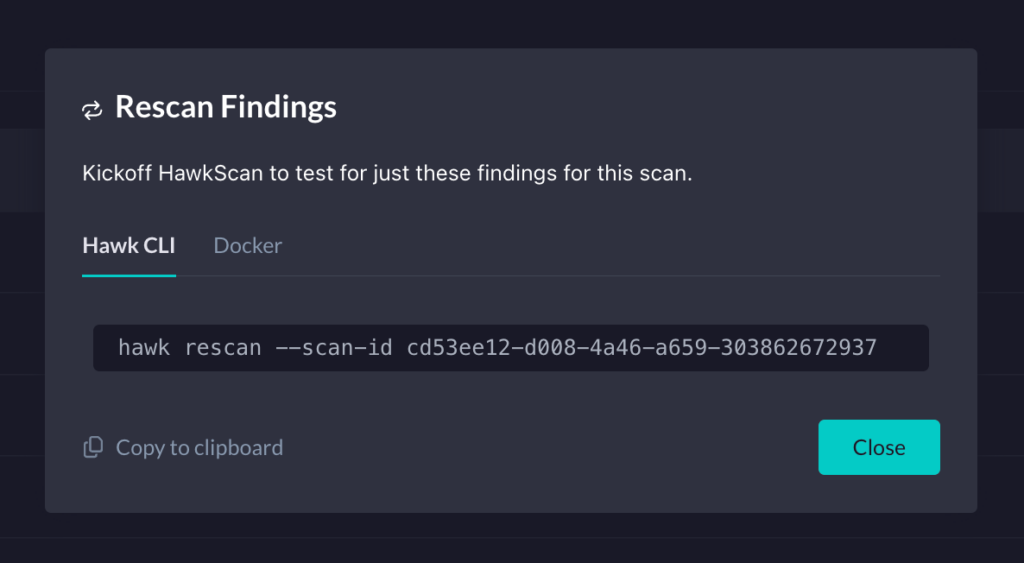
Then, we will see a modal containing the “hawk rescan” command that includes the correct Scan ID. You’ll run this command in the same terminal where you ran the initial set of tests.
In the output, you will again see any vulnerabilities found in the scan. In this case, you’ll see that the CORS misconfiguration vulnerabilities are no longer showing. Clicking on the link at the bottom of the terminal output, you can confirm that the CORS misconfiguration vulnerabilities have now been added to the Fixed Findings from Previous Scan, confirming that the vulnerability has been successfully fixed and has passed any vulnerability tests.

With that, we’ve successfully remedied and retested our application to ensure its safety from potential CORS misconfiguration attacks.
Conclusion
The “No ‘Access-Control-Allow-Origin’ header present” error is usually straightforward to fix by adding proper CORS headers to your server responses. The key is understanding whether you’re dealing with simple or complex requests, configuring your server to handle both scenarios appropriately, and validating origins properly to maintain security.
Remember: fixing CORS errors correctly means balancing functionality with security. Tools like StackHawk help ensure your CORS implementation works for legitimate requests while blocking potential security threats.
Want to ensure your CORS implementation is both functional and secure? Sign up for StackHawk for a free 14-day trial to automatically test your CORS configuration and detect potential vulnerabilities. If you’re using Claude Code, Cursor, Codex, or GitHub Copilot, Wingman gives your agent the skills to find and fix CORS misconfigurations automatically — before you commit.