
We are beyond thrilled to have released a new version of the StackHawk scanner, sometimes referred to as HawkScan.
All the new features in this version of the scanner help overcome the most common challenges engineers run into when making application security testing part of their workflows.
This post will get into details on each one of the new features including the new CLI, configuration linting, and custom authentication support.
Let’s get into what each feature does and how you can use it to optimize your team’s application security testing program.
Getting Started Pre-Reqs
In order to get going with the latest version of the StackHawk scanner you will need to:
Have a StackHawk account. Sign-up here .
Create an app in the StackHawk platform. This requires configuring an app which will provide you with an API key and a YAML config file. Make sure you save these!
Deployment: Docker or CLI, Which One to Choose?
The StackHawk scanner has been available as a Docker image since we introduced the tool. Depending on your deployment scenario, using Docker to run the StackHawk scanner could still be great, or you could get big benefits from using the CLI.
The features described later in this blog post including config validation and custom auth scripting are available in both the Docker and CLI versions of the scanner.
The StackHawk CLI and Docker container will be released on the same versioning cycle and will be feature compatible moving forward.
Docker Could Be Right For You If…
For many CI/CD use cases the StackHawk Docker container is the best choice for running scans against a web application. By nature, the Docker framework wraps the scanner into a single image that is simple to instrument and automate in pipelines.
The CLI Could Be Right for You If…
There are two primary areas where the CLI can help users reach a successful scan faster.
The CLI is ideal for those looking to integrate StackHawk in their local development environment. The commands available in the CLI provide greater granularity to understand the scanner and ensure that it is configured appropriately, all from the terminal. Certain commands will run faster via the CLI than Docker due to lower runtime overhead in most scenarios – this makes the CLI better suited for rapid iteration.
In some instances, the Docker version of the StackHawk scanner can be prohibitive to use in CI/CD either due to limited Docker support or Docker-in-Docker issues. In these scenarios, the CLI can be a great workaround for running the scanner as part of your automated testing.
Using the StackHawk CLI
The new version of the StackHawk scanner introduces the StackHawk CLI.
We love the CLI because it gives developers a more familiar way to install and interact with application security tooling. And even better, they can identify vulnerabilities in their code without changing their workflow.
We have put together a comprehensive getting started guide on this feature, but here are a a few highlights:
Installation
Before installing the CLI, make sure you are running Java 11 or higher.
Once you have done so, you can then install the CLI via homebrew or you can install the zip , depending on your personal preference.
Our docs can help you understand these two options in greater detail, and walk you through installation step by step.
CLI Commands
Currently, the CLI offers four primary commands to help developers get going with StackHawk.
- hawk –help
orhawk -h
: We recommend using this command to get your bearings and understand all the details for usage, commands, and options for the scanner. This can also be used with subcommands. - hawk init
: This command connects you to the StackHawk platform. Upon entering this command you will be prompted for your API key to authenticate your session. - hawk validate
: Use this command to ensure that your StackHawk configuration file is error free. More on this validation capability below! - hawk scan
: This is where the magic happens! Use this command to kick off a StackHawk scan and start finding vulnerabilities.
If you are looking for more details check out our full CLI Getting Started Guide .
Configuration Validation
Getting configuration right for any application security testing tool can be tricky.
The latest version of the StackHawk scanner now provides users with real-time feedback on configuration before the scan starts.
Not only does this allow for huge time recapture, but it also saves on frustration from unreadable error codes when a scan doesn’t succeed.
YAML Linting Validation
We have introduced three ways you can validate your StackHawk YAML config before attempting a scan.
📺 Technical Demo
StackHawk engineer Omar Alkhalili will give you the lowdown on YAML validation. This is a great resource to watch, pause, and replay as you get going.
Validation In Your IDE
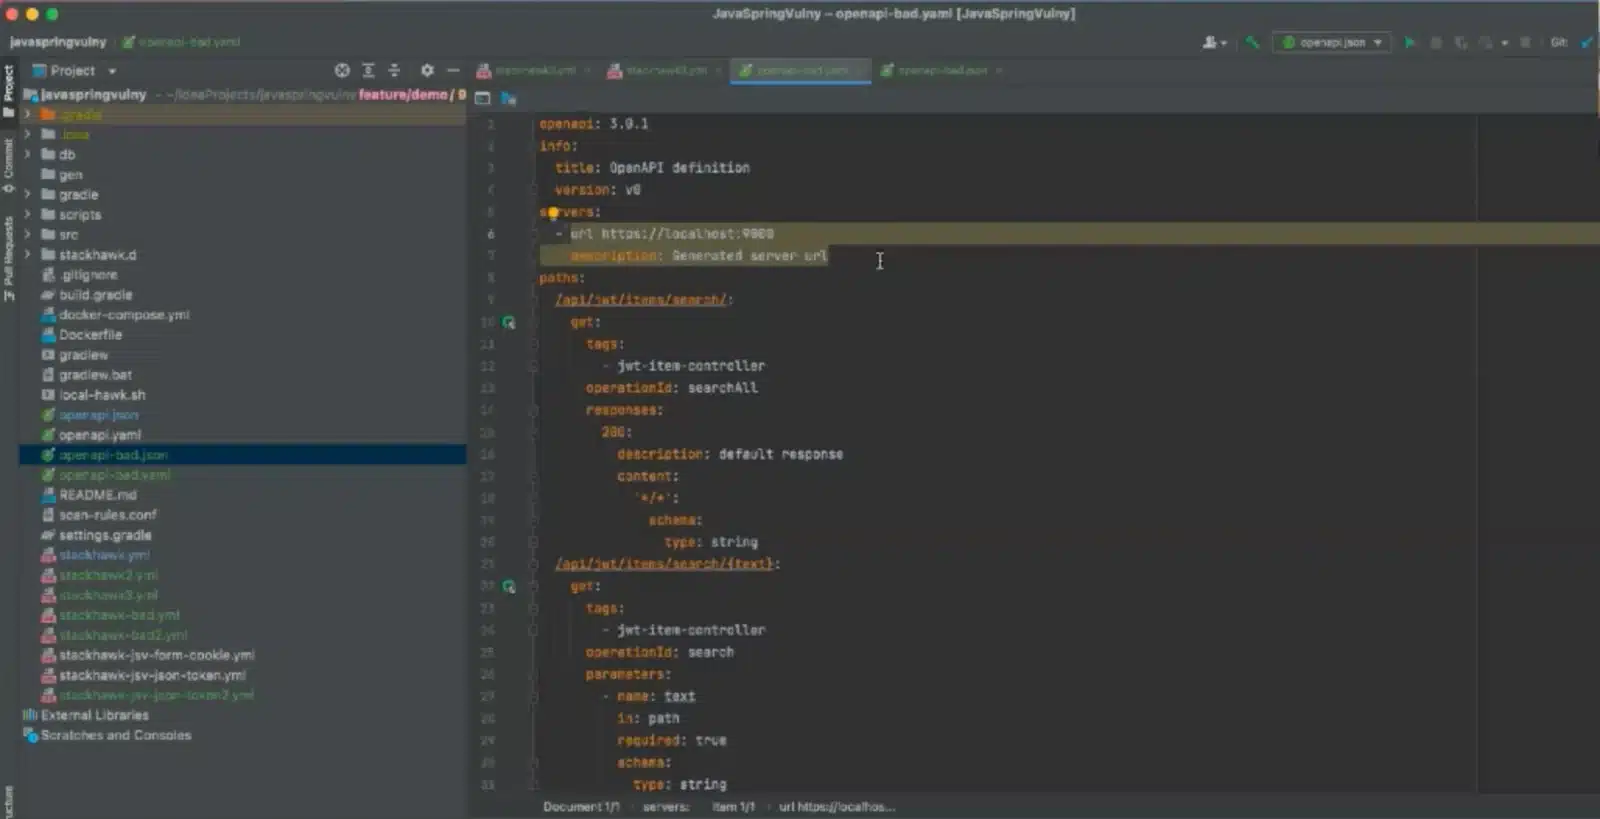
If you are using IntelliJ, you can now validate your StackHawk YAML, right from your IDE.
If your YAML is not configured correctly, the IDE will highlight the portions that need fixing, and provide insights as to how the error can be resolved.
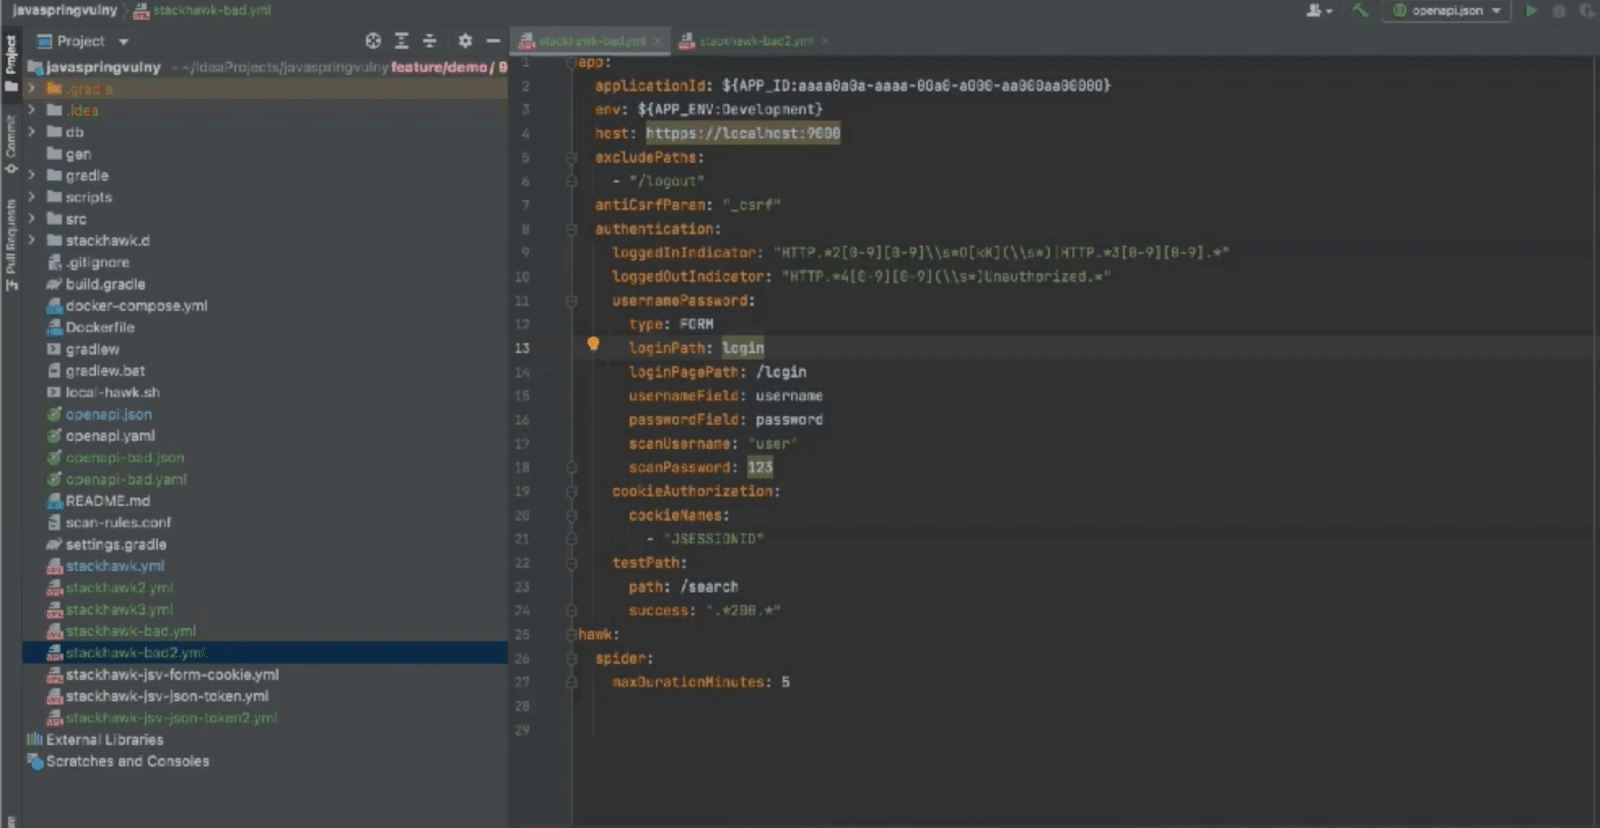
Follow the prompts to get the configuration polished and you are ready to scan.
Validation With The CLI
Using the CLI, you can validate your configuration with either thehawk validate
command or while running thehawk scan
command.Usinghawk validate
, the CLI will quickly return error messages should your StackHawk YAML not be configured correctly.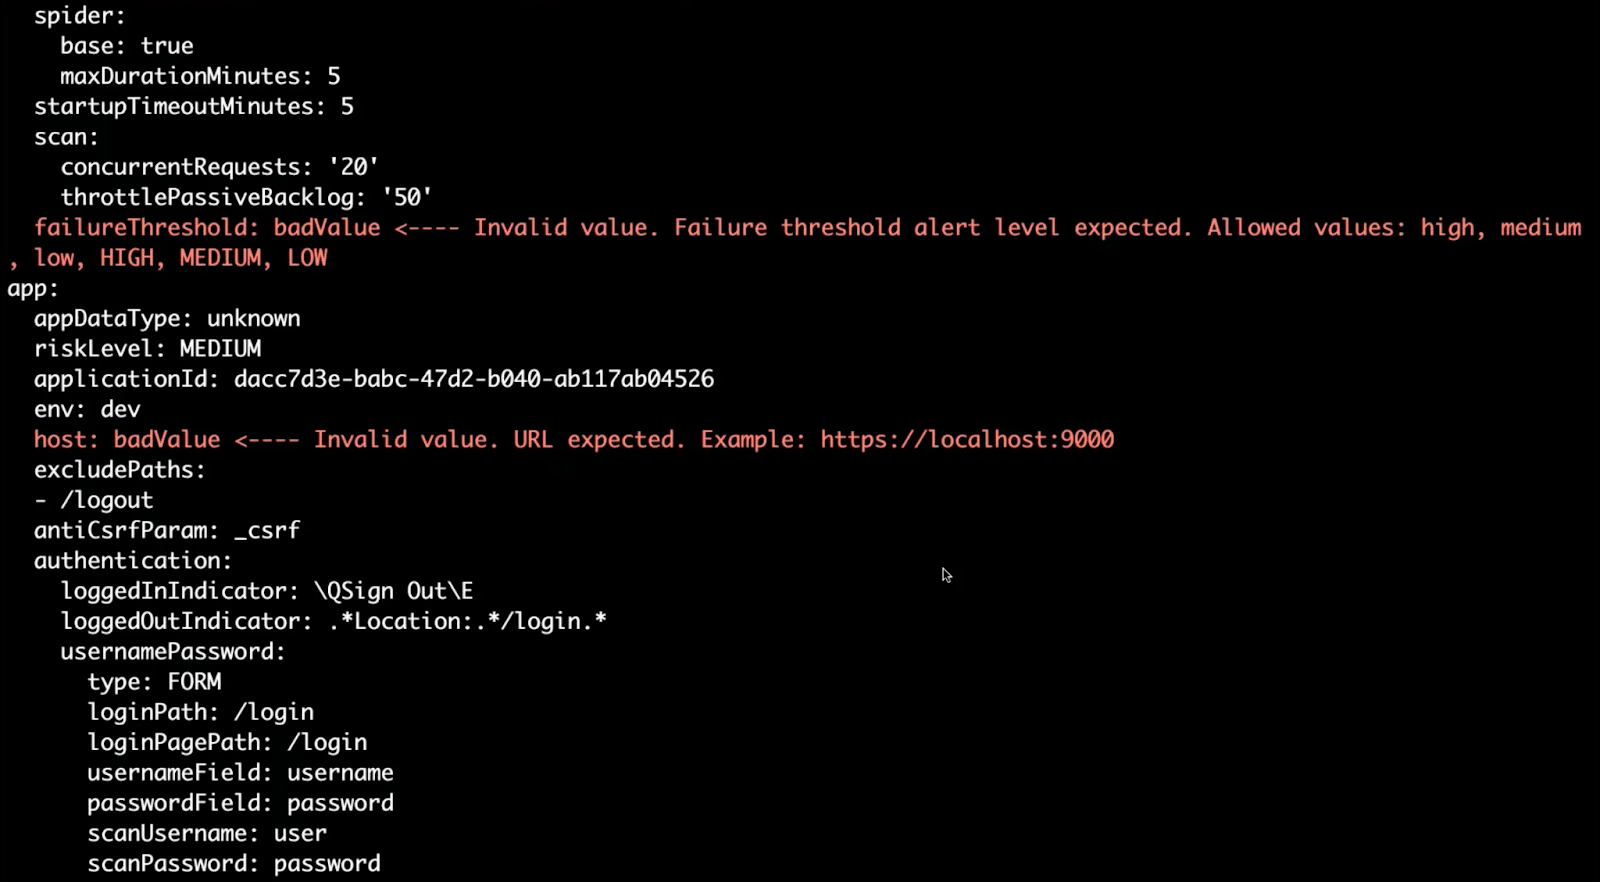
If you attempt to initiate a scan withhawk scan
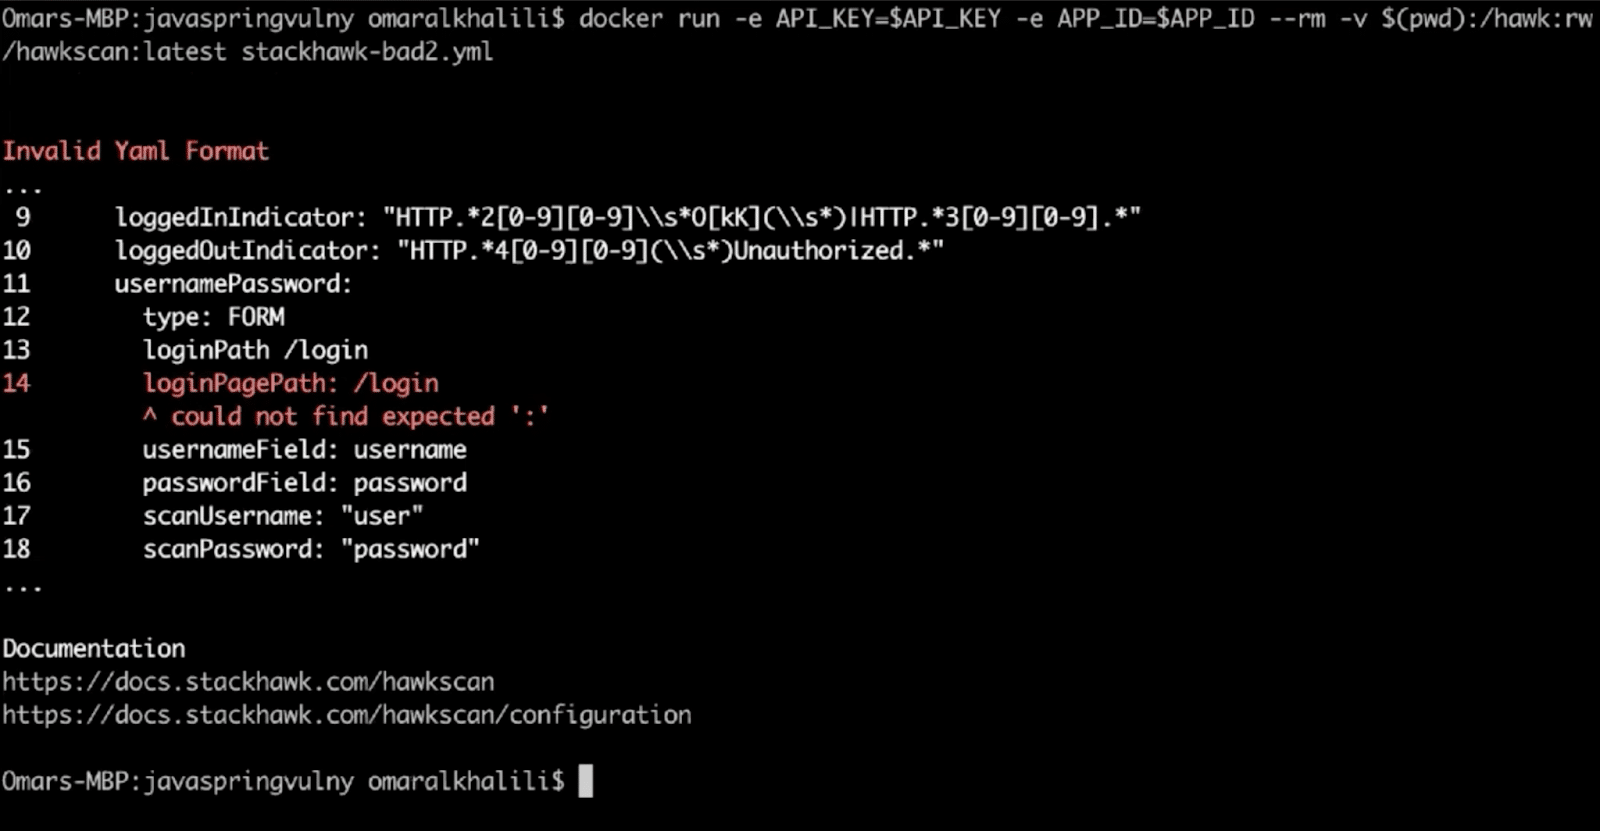
with an invalid config, the same error messages will be displayed.Validation With Docker
Similar to thehawk scan
scenario, if you attempt a scan using thedocker run
command, you will be given detailed error messages pointing to the misconfigurations in your StackHawk YAML.
As with the CLI, these messages will include suggestions to help troubleshoot so you can get your scan kicked off.
OpenAPI Specification Validation
We know that using your OpenAPI spec with security tooling can come with tremendous benefits in the form of better coverage and higher quality findings. But it can also be tricky.
That’s why we are so excited to introduce OpenAPI specification linting. This can happen in your IDE or when you initiate a scan with either the StackHawk CLI or the Docker image.
📺 Technical Demo
Follow along as Omar Alkhalili walks you through getting your OpenAPI spec configured correctly for HawkScan.
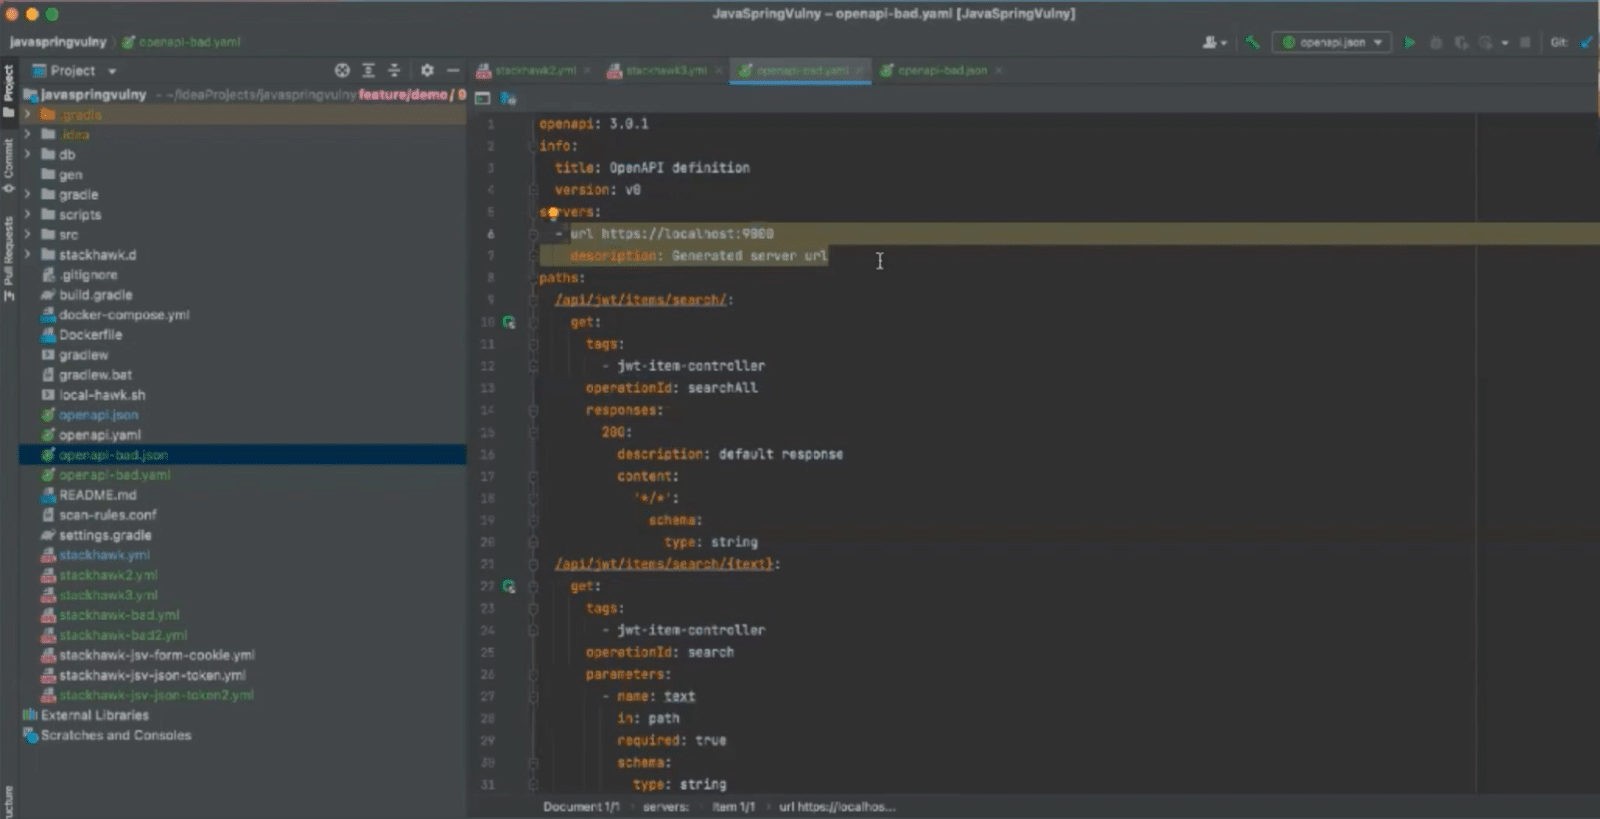
Validation In Your IDE
Similarly to YAML Linting, IntelliJ will now notify you if your OpenAPI specification contains errors and give you guidance on how to fix it.
Validation With Scan Initiation
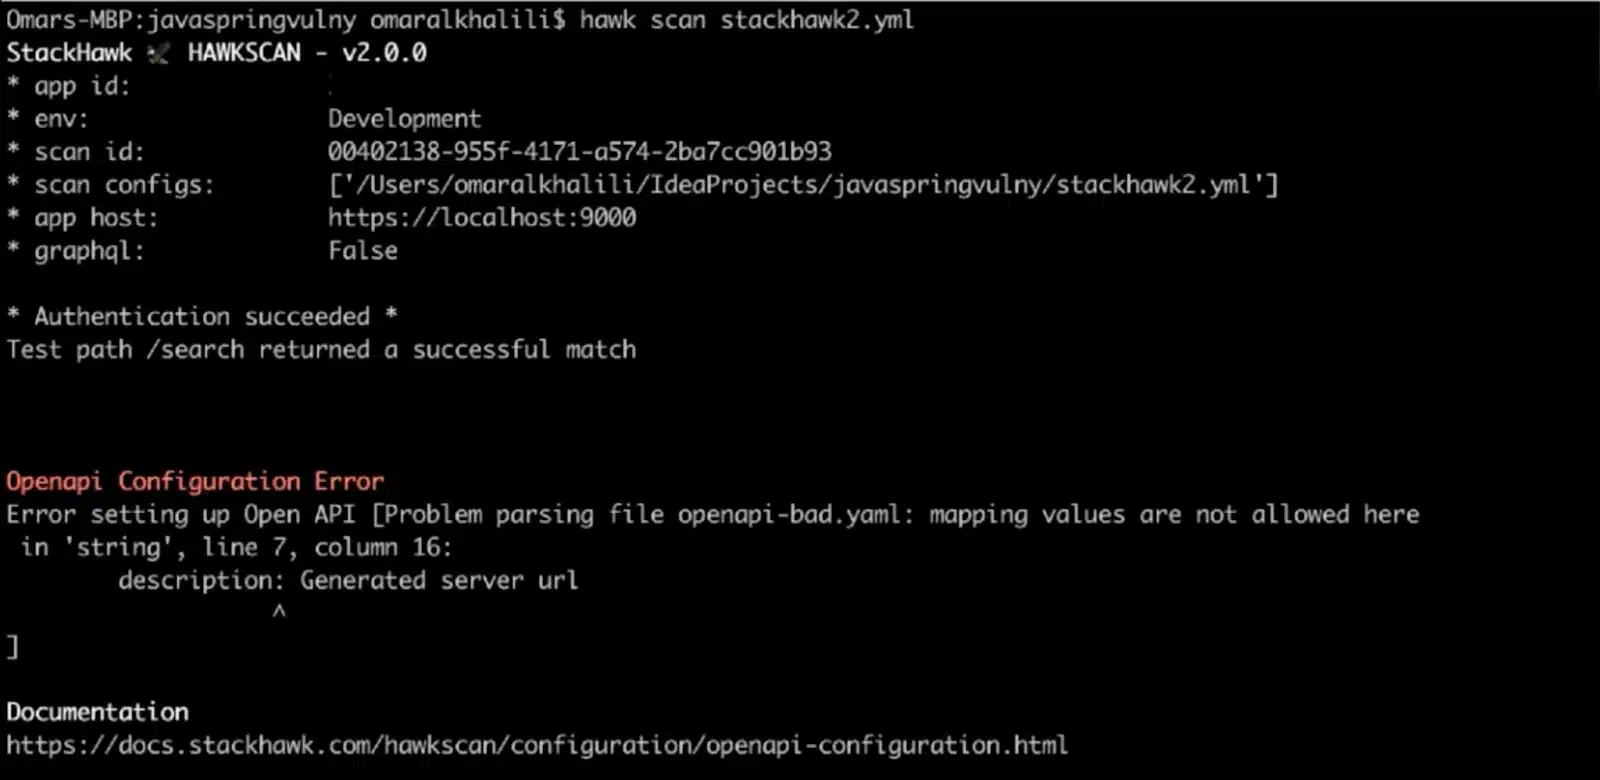
Whether you are using the CLI or the Docker image, OpenAPI linting is now included in StackHawk’s pre-scan checks. The scanner will attempt to parse the OpenAPI file, and if the file is not formatted correctly, an error message with troubleshooting details will appear in the terminal.
This happens before the full scan initiates so you don’t have to waste time.
Improved Auth Support
The last hurdle in getting going with automated application security testing is authentication. And while this can be a huge lift for many teams, complete protection for your apps requires that security tooling is able to complete an authenticated scan.
While previously StackHawk supported three of the most common authentication scenarios, we now provide even more flexibility to fit your team’s one-of-a-kind auth needs.
Custom Auth Scripting
Users can now write custom scripts in JavaScript and Kotlin via ZAP scripting support.
To use authentication scripts in HawkScan you’ll need to walk through three key steps.
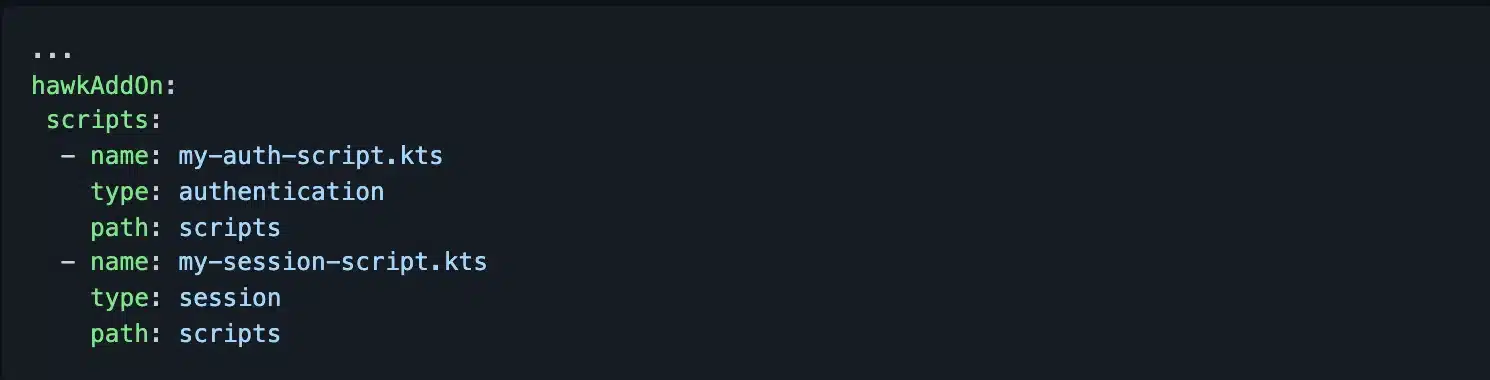
- Create script files with functions defined to match the interface of the script type .
- Add your script to the hawkAddons.scripts configuration section. That configuration should look something like this:
- Add the authentication.script and/or authentication.sessionScript configuration sections to your StackHawk YAML.
To learn more about authentication scripts, reference the Examples repository .
Get Going with the New Version of the StackHawk Scanner
Leading teams know that application security testing has to be part of the development workflow, and the new version of the StackHawk scanner makes that possible.
By equipping development teams to overcome the trickiest parts of scanning, your team will be able to have consistent and efficient security testing as part of the software delivery process.
If you are new to StackHawk, try getting started with an example app from our vulnerable app repos and see how simple it is to execute your first scan. If you are an existing user, try giving the CLI a go and see how easy it is to make application security testing part of your local development.
If you run into challenges along the way, drop us a line at support@stackhawk.com .


