AI-powered development tools are continually changing how we write code. Although the speed at which AI agents can work is of great help to developers who use them, it also introduces new security challenges. While tools like GitHub Copilot can accelerate development, they can also introduce vulnerabilities that slip through the cracks if you’re not careful. In this guide, we’ll show you how to combine the power of GitHub Copilot’s AI-assisted coding with StackHawk’s dynamic application security testing (DAST) to create a secure development workflow, whether you’re using Copilot for inline suggestions, agentic task execution, or fully autonomous coding workflows.
What is GitHub Copilot and How Does It Generate Code?
GitHub Copilot is an AI-powered coding assistant developed by GitHub and backed by models from OpenAI and Anthropic. What started as an inline autocomplete tool has evolved into an agentic development platform that lives inside your editor and across the GitHub platform itself. Withover 20 million users and more than 77,000 organizations on board (including 90% of the Fortune 100), Copilot has become one of the most widely adopted AI coding assistants available. Copilot now contributes an average of 46% of all code written by its active users, up from 27% at launch. The scale of its influence on codebases worldwide is hard to overstate.
How GitHub Copilot Works
GitHub Copilot supports multiple large language models. Copilot Pro+ and Enterprise users can choose from models including GPT-5, Claude Sonnet, and others, providing intelligent coding assistance through several distinct capabilities:
Agent Mode (In-Editor): Launched in February 2025, Copilot’s agent mode acts as an autonomous peer programmer directly within your IDE. Rather than just suggesting code completions, it can analyze your codebase, read relevant files, propose multi-file edits, and run terminal commands in a self-correcting loop. It monitors compile errors, lint output, and test results, automatically iterating until the task is resolved. Agent mode is available in VS Code, Visual Studio, JetBrains, Eclipse, and Xcode.
Copilot Coding Agent (Background/Cloud): Announced at Microsoft Build 2025 and now generally available, the coding agent is a separate, GitHub-hosted autonomous developer that works entirely in the background. You assign it a GitHub issue (or delegate a task from Copilot Chat), and it spins up an ephemeral development environment powered by GitHub Actions. From there, it explores your code, implements changes, runs tests and linters, pushes commits to a draft pull request, and requests your review when done. If your repository requires pull request approvals, the developer who triggered the agent’s approval won’t count toward the required number, so at least one other reviewer must sign off before merging.
Planning Mode: Added in late 2025, planning mode lets you review and approve a transparent, traceable plan before the agent starts making changes. This makes agentic workflows more predictable and reviewable, especially for large or collaborative tasks.
Codebase Indexing and AGENTS.md: Copilot indexes your repository to understand project structure, dependencies, and naming conventions. You can further guide its behavior with AGENTS.md files that contain project-specific instructions: coding standards, architectural rules, and preferred patterns. This keeps all agents in sync with your team’s practices.
IDE-Native Integration: Copilot lives directly inside VS Code, JetBrains, Visual Studio, and other editors, integrating with your existing workflow. It also connects to GitHub’s broader platform, including Issues, Pull Requests, Actions, and the GitHub CLI.
MCP and Extensibility: With Model Context Protocol (MCP) support, Copilot can interface with external tools and services through a growing ecosystem of MCP servers discoverable via the GitHub MCP Registry. This extends Copilot’s capabilities to databases, monitoring platforms, security scanners, and more, all without leaving your editor.
The Pros and Cons of AI-Assisted Development
While Copilot’s capabilities are impressive, the speed and convenience of AI-generated code come with security risks that developers need to be aware of. The way these platforms work introduces several issues that can quickly create security gaps deep within a codebase:
Optimization for Functionality Over Security: AI models are trained to generate working code that solves the stated problem. When developers ask for “quick” or “minimal” solutions, security considerations often take a backseat to getting something functional out the door.
Pattern Replication Without Context: AI learns from vast datasets of existing code, including code that contains security vulnerabilities. Without specific security guidance, Copilot can replicate insecure patterns found in its training data. Research has shown that the more secure a project’s existing codebase is, the less likely Copilot is to produce vulnerable suggestions. But the inverse is also true: if your codebase already has SQL injection or hardcoded credentials, Copilot’s context window picks up those patterns and replicates them in new code, amplifying existing security debt.
Lack of Security Awareness: Unlike a seasoned developer who can apply security knowledge contextually, AI lacks a true understanding of security implications. It generates code based on statistical patterns, not security principles.
Implicit Trust in Generated Code: The sophistication of AI-generated code can create a false sense of security. Multiple peer-reviewed studies have found that roughly 40% of Copilot-generated code contains security weaknesses spanning dozens of CWE categories, including injection flaws, insecure randomness, and cross-site scripting. GitHub has added an AI-based vulnerability prevention system targeting common patterns like hardcoded credentials (CWE-798) and SQL injection (CWE-89), but coverage is not yet across the board. Despite these risks, many developers accept suggestions without thorough review.
Supply Chain Attack Vectors: Copilot’s reliance on configuration files introduces new attack surfaces. In March 2025, Pillar Security disclosed the “Rules File Backdoor” attack (CVE-2025-53773), demonstrating how hidden Unicode characters in rule and configuration files can inject malicious instructions that manipulate Copilot’s code generation. The result: vulnerable output that bypasses typical code reviews. Because these configuration files are shared across projects and survive forking, a single compromised file can affect downstream dependencies at scale.
Of course, the extent to which security becomes a problem is highly dependent on how the developer prompts and guides the tool. Explicitly prompting with security requirements in mind helps, but it takes expertise to do so effectively, sometimes at odds with the “anyone can code” narrative these platforms promote.
Why AI-Generated Code Creates New Security Challenges
Even when prompted with security in mind, there are concerning patterns in how AI coding tools handle security requirements. When security isn’t explicitly mentioned or when developers prioritize speed, AI tools consistently generate code that falls short of production-ready security standards.
Common Security Issues in AI-Generated Code
Often, AI-generated code is closer to a proof-of-concept than a production application, especially when prompting is minimal. Developers who are unaware of what’s missing may ship applications that are vulnerable to both basic and sophisticated attacks. Common issues include:
Missing Input Validation: AI often generates endpoints and functions without proper input sanitization, leaving the door open to injection vulnerabilities. The OWASP Top 10 consistently ranks injection as one of the most critical web application security risks, and AI-generated code is particularly prone to it.
Weak Authentication Implementation: When asked to create authentication without specific security requirements, AI tends to implement simplistic or flawed mechanisms that wouldn’t hold up under real-world attack conditions.
Inadequate Error Handling: AI-generated code frequently lacks proper error handling that prevents information disclosure. Stack traces, database errors, and internal paths get leaked to potential attackers.
Insecure Defaults: AI gravitates toward permissive configurations that prioritize ease of use over security. CORS set to allow all origins, debug modes left enabled, and overly broad permissions are common patterns.
Omitted Security Headers: Web applications generated by AI often lack essential security headers like Content-Security-Policy, X-Frame-Options, Strict-Transport-Security, and others that form the baseline of web application security.
Secret Leakage: AI suggestions can introduce hardcoded API keys, passwords, and other credentials drawn from training data patterns. Because LLMs learn from public repositories where secrets are frequently committed by accident, Copilot may suggest code that includes placeholder credentials, default passwords, or API key formats that look functional but expose sensitive values. This is especially dangerous when developers accept suggestions without reviewing them, since the generated code can look production-ready while containing secrets that get pushed straight to version control.
Knowing these issues exist allows a developer to prompt the AI to address them or bake these requirements into the initial request. However, it’s hard to fix what you don’t know about. These vulnerabilities appear in traditional, hand-written applications too, but those usually come with dedicated cycles for security review. Blindly trusting AI-generated code is a pattern that should be avoided.
The “Security by Afterthought” Problem
One of the biggest challenges with AI-powered development is that security becomes an afterthought rather than being built into the application’s foundation. This happens because:
- Developers focus on getting working code quickly
- AI responds to immediate functional requirements rather than holistic security needs
- Security requirements are often implicit rather than explicit in development requests
- The rapid pace of AI-powered development can bypass traditional security review processes
- Copilot’s coding agent can autonomously implement changes across multiple files, push commits, and open PRs, compounding security issues before a human ever reviews the code
The issue isn’t that security being an afterthought is unique to AI-generated code. The problem is the sheer volume and velocity at which AI-generated code can be deployed. Months of work can be done in hours, potentially by developers who haven’t yet developed strong security instincts. While that’s great for companies looking to accelerate development, the risk of releasing a business-critical system with easily exploitable vulnerabilities is very real. This is where adding security testing into the workflow makes a lot of sense.
Why DAST is Critical for AI-Generated Code
Dynamic Application Security Testing (DAST) has become essential for validating the security of AI-generated code. Unlike static analysis tools that examine source code at rest, DAST tests your running application to identify vulnerabilities that only manifest during execution. For teams building with AI tools, this approach fills gaps that other testing methods can’t.
The Unique Value of DAST for AI Code
Runtime Vulnerability Detection: DAST identifies security issues that emerge when AI-generated code interacts with real data, user inputs, and system resources. These are scenarios that static analysis simply cannot fully replicate.
Black-Box Testing Approach: DAST doesn’t need to understand the code structure or how the AI generated it. It evaluates security from an attacker’s perspective, testing how the application actually behaves under malicious conditions.
API-First Testing: Modern applications are API-driven, and AI tools excel at generating API endpoints. DAST tools like StackHawk are purpose-built to test APIs, ensuring AI-generated endpoints are actually secure.
Validation of Security Controls: DAST can verify whether the security measures the AI implemented, like authentication, input validation, and rate limiting, actually work as intended in the running application.
Developer Workflow Integration: DAST tools can integrate directly into the same IDE and CI/CD workflows that Copilot uses, providing security validation without disrupting development velocity.
Why Traditional Security Testing Falls Short with AI Code
While traditional testing methods should still be part of your security strategy, layering a modern DAST solution into the stack is critical. Traditional methods tend to fall flat in the age of AI because of:
Speed of Development: AI accelerates development to the point where traditional security review cycles can’t keep pace. Automated DAST scanning helps bridge this gap by providing immediate security feedback.
Volume of Generated Code: AI can produce large amounts of code in minutes, making manual security review impractical. Automated DAST scanning scales to match the speed of AI development.
Subtle Logic Flaws: AI-generated code may contain subtle security logic flaws that are difficult to catch in code review but become apparent when testing the running application.
Integration Vulnerabilities: Security issues often emerge at the integration points between AI-generated components and existing systems, exactly the kind of thing DAST is designed to catch.
Autonomous Workflow Validation: With the Copilot coding agent able to autonomously implement features, push commits, and open pull requests via GitHub Actions, security testing needs to happen automatically as part of that pipeline. The agent’s PRs already require independent human review by design, but DAST adds an automated verification layer that catches what code review alone might miss.
How StackHawk Fits into AI Development Workflows
StackHawk is a DAST tool built for the way modern development teams actually work, including teams using AI-powered coding tools.
Built for Developers, Not Security Teams
Traditional DAST tools were designed for security teams running periodic scans against production environments. That model doesn’t work when Copilot’s coding agent can push a dozen commits in an afternoon. StackHawk is designed for the developers writing and shipping the code. It provides findings in terms developers can act on: which endpoint is vulnerable, what the attack vector is, and how to reproduce it.
API Testing Across Protocols
StackHawk tests REST, SOAP, GraphQL, and gRPC APIs, exactly the types of services AI tools generate. When Copilot scaffolds a new API endpoint, StackHawk can test it against known attack patterns before it ever reaches production.
CI/CD Pipeline Integration
StackHawk runs inside your CI/CD pipelines, so security tests execute every time AI-generated code is committed. This is especially important for teams using the Copilot coding agent, where autonomous commits and PRs can introduce vulnerabilities without a developer actively writing the code.
Feedback During Development, Not After Deployment
Traditional DAST tools were built for periodic scanning of production systems. By the time they catch something, the vulnerable code has already shipped. StackHawk provides feedback during development so you can catch and fix AI-generated vulnerabilities before they ever reach production.
CLI-First Design
StackHawk’s CLI-first approach fits naturally alongside GitHub Copilot’s IDE-native workflow. You can trigger a security scan from the same terminal where you’re running your dev server, making security testing part of the development loop rather than a separate process.
Native MCP Capabilities
StackHawk also offers an MCP server that brings DAST directly into MCP-enabled AI coding environments. Instead of switching to a separate dashboard, you can ask your AI assistant to “scan my API endpoints on localhost:3000,” and the MCP server translates that into a real HawkScan run against your application. Results come back in context, and your AI assistant can generate framework-specific remediation code that matches your existing codebase patterns.
Since Copilot now supports MCP through the GitHub MCP Registry, this creates a tight loop that allows Copilot to write the code, StackHawk tests it for vulnerabilities, and your AI assistant helps you fix what it finds, all without leaving your editor.
Ready to see how StackHawk fits into your Copilot workflow? Get started with StackHawk and run your first scan in minutes.
Getting Started with StackHawk and GitHub Copilot
To start testing applications built with AI-powered workflows, you’ll need a StackHawk account. You can sign up for a trial account here. If you’re using an AI coding assistant like GitHub Copilot or Cursor, sign up for the $5/month single-user plan, Vibe, to find and fix vulnerabilities 100% in natural language.
Using GitHub Copilot and StackHawk Together Method 1: Manual Setup
To create a more secure application, we will use a combination of insights from StackHawk and security-informed prompting. We will use a workflow that will essentially use StackHawk to test the application, feed the results into Copilot, let the agent fix the security issues, and then retest with StackHawk to ensure that the fixes created actually solve the underlying issue.
To do this, we will need:
- VS Code installed on your machine
- A StackHawk account and active license
The steps below can be used with any type of application or API; however, in this example, we will use a simple Node.js application to show how the workflow would work. You can even begin to use this workflow from the onset of an AI-automated project to make sure that the application is secure as it evolves.
Step 1: Create a StackHawk Application
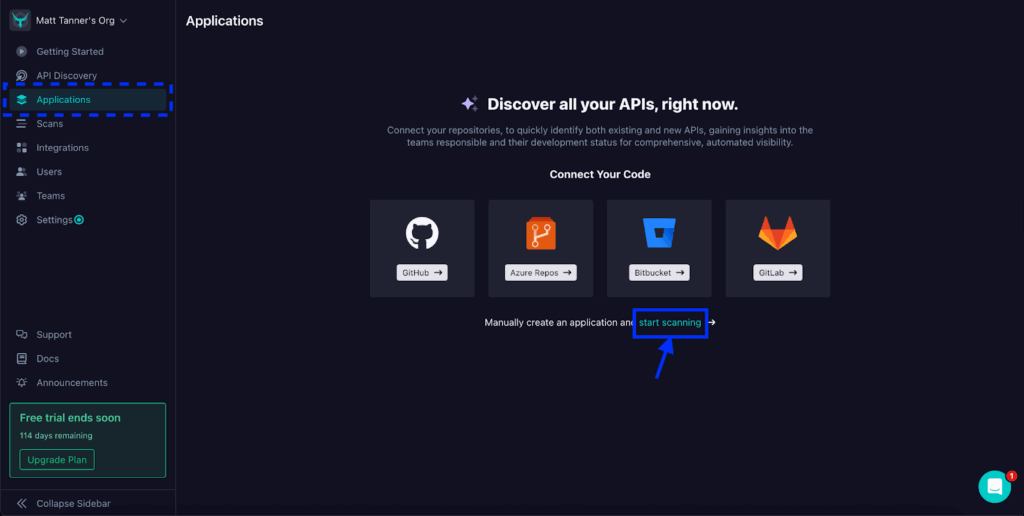
First, let’s create a StackHawk app for our application. Once you’ve created an account and logged into StackHawk, your next step will be to create an app by either connecting your repository, such as GitHub or Bitbucket, or manually creating an app. For simplicity in this tutorial, we will forego adding our repository (although it’s highly recommended to do so to get the full functionality of StackHawk). For that, let’s click the link to manually set up an app.
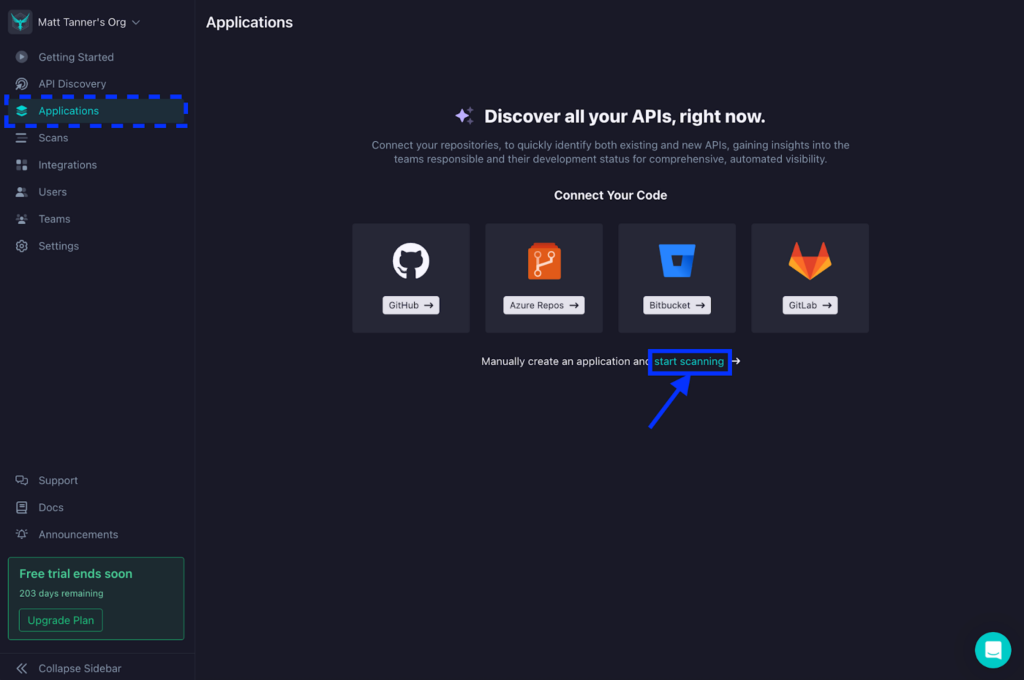
Next, a modal will appear, walking you through each step. In the first screen, you’ll be prompted to download StackHawk. Since I’m running this locally, I will download the appropriate installer for my OS. However, if you want to run this on a different OS or in CI/CD, you can check the downloads page to get the right version. Once you have it downloaded and installed, click Initialize Scanner in the bottom right.
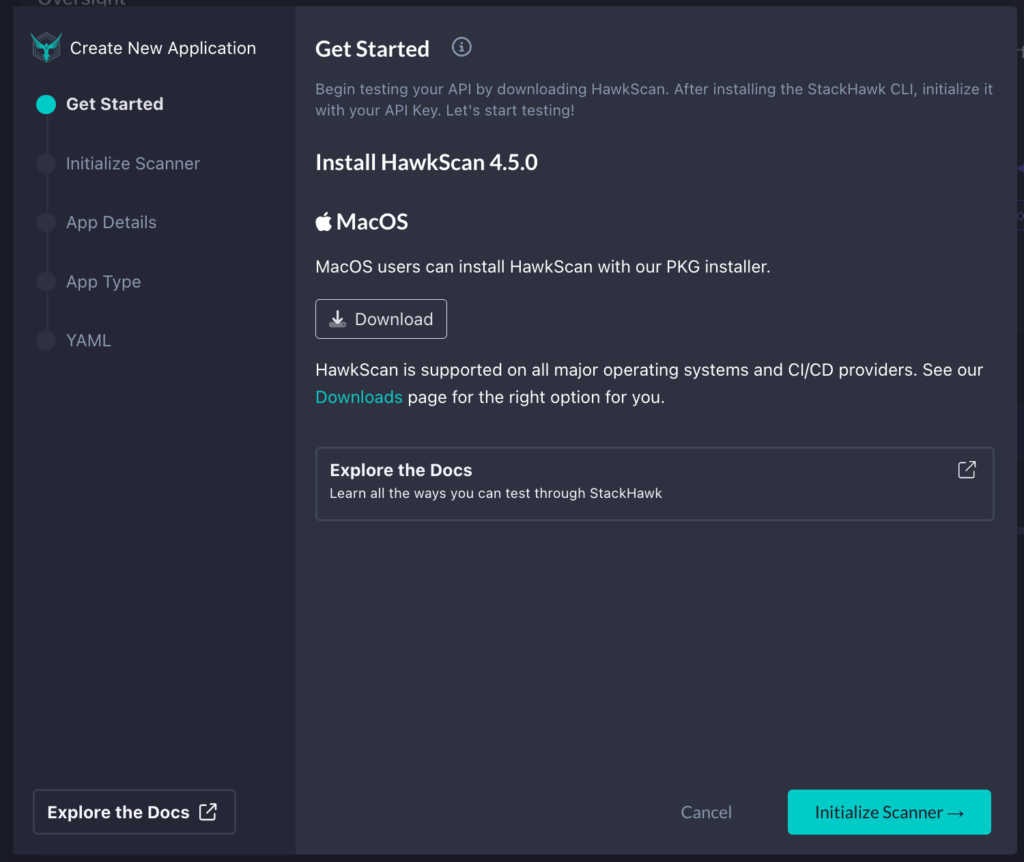
After this, we will initialize StackHawk by running hawk init in a terminal. Once successfully completed, click App Details in the bottom right corner of the modal.
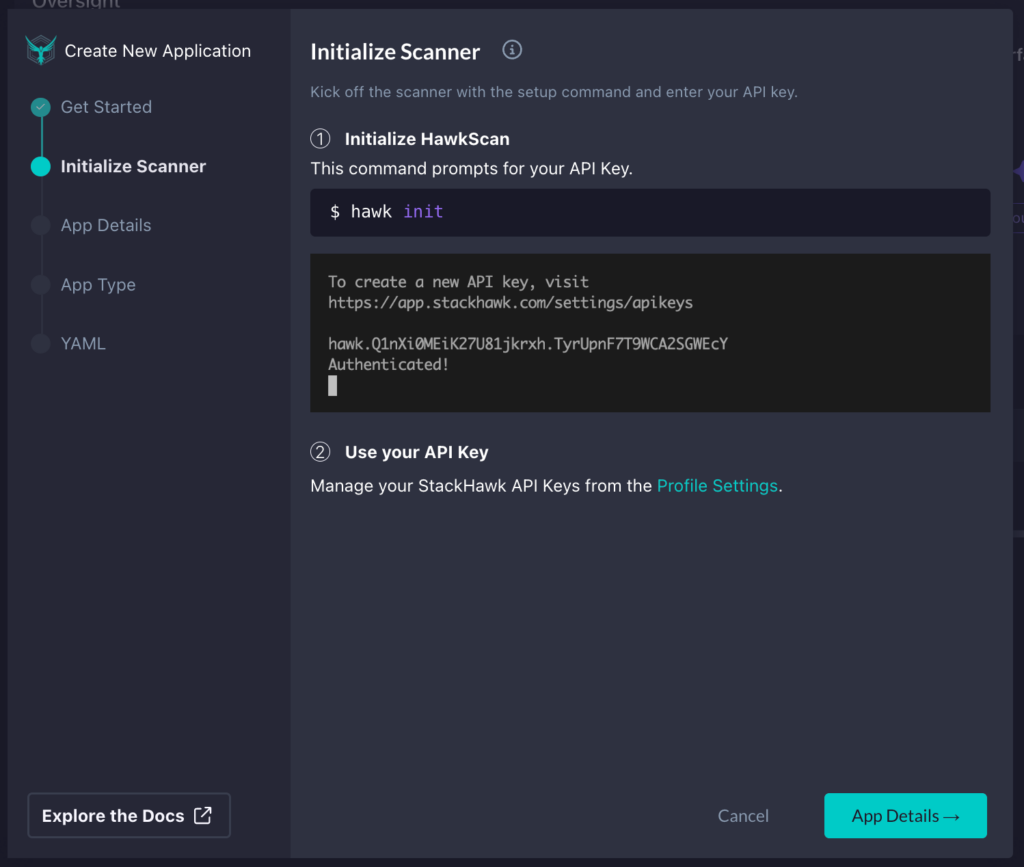
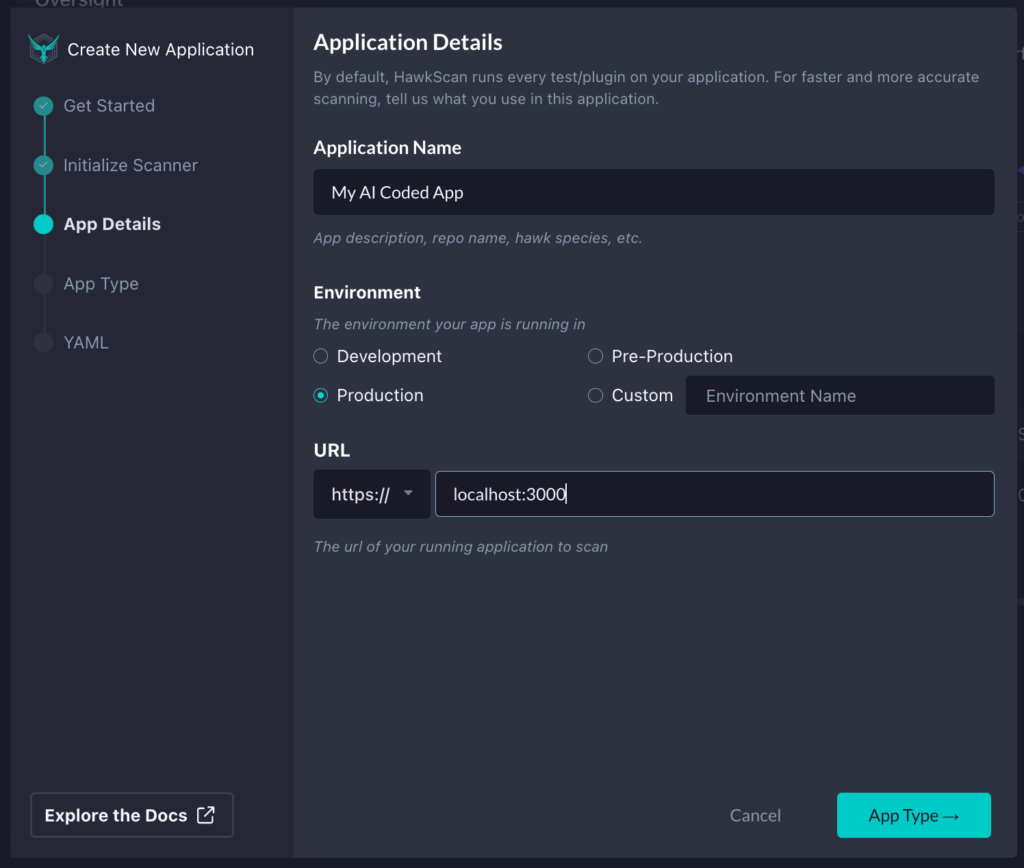
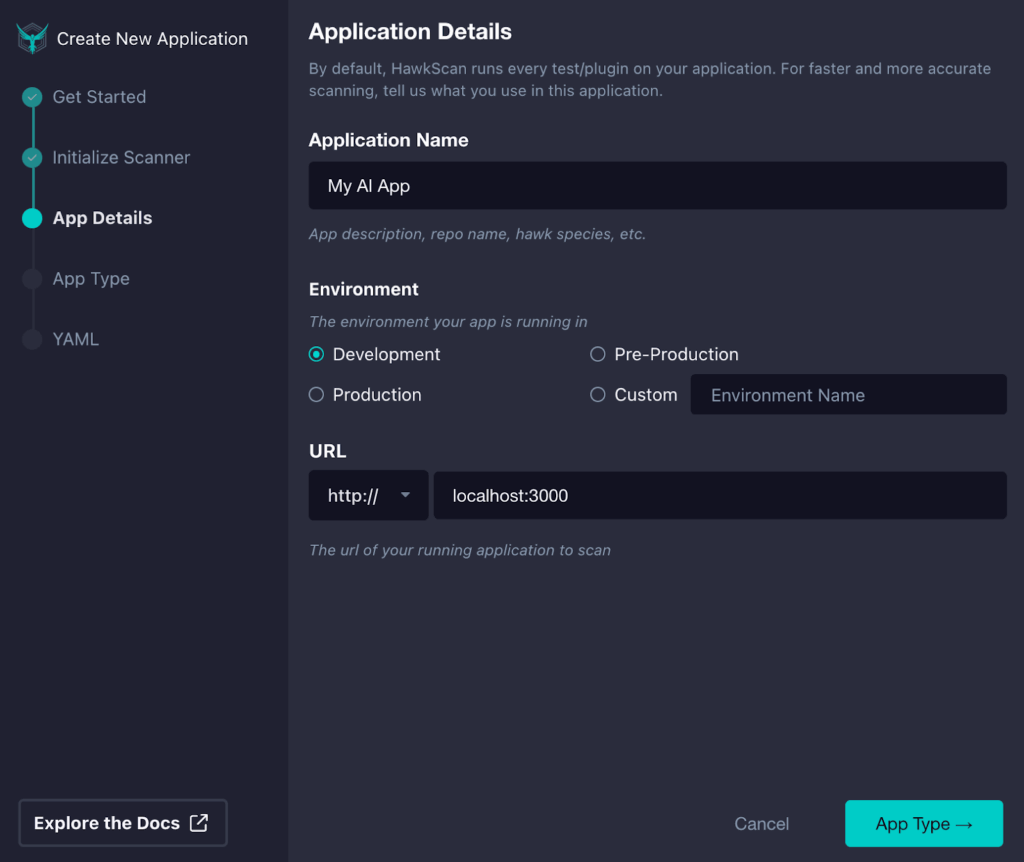
After it has been initialized, we can finally put in the details for our app. Here, we will set our Application Name, Environment, and the base URL of our app or API. Once you’ve filled in the details, click App Type in the bottom right.
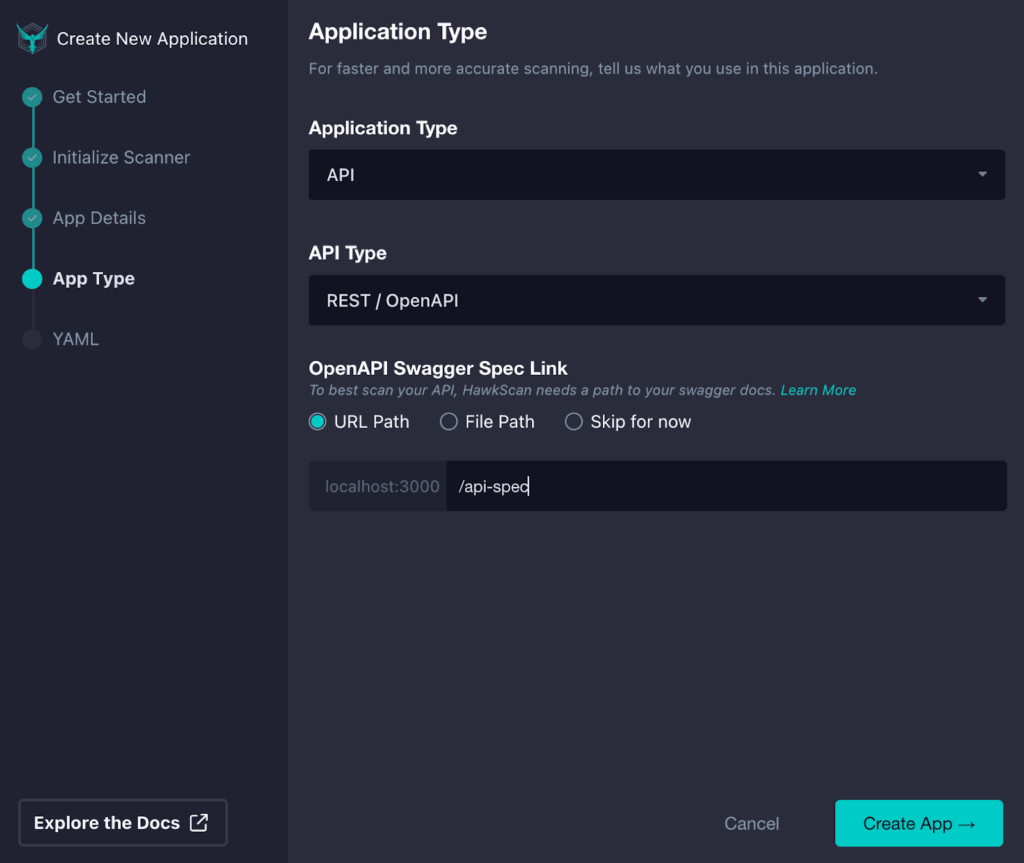
In StackHawk, depending on what type of application we want to test, we can select the type. Here, we can choose from a single-page app, static site, API, or other options.
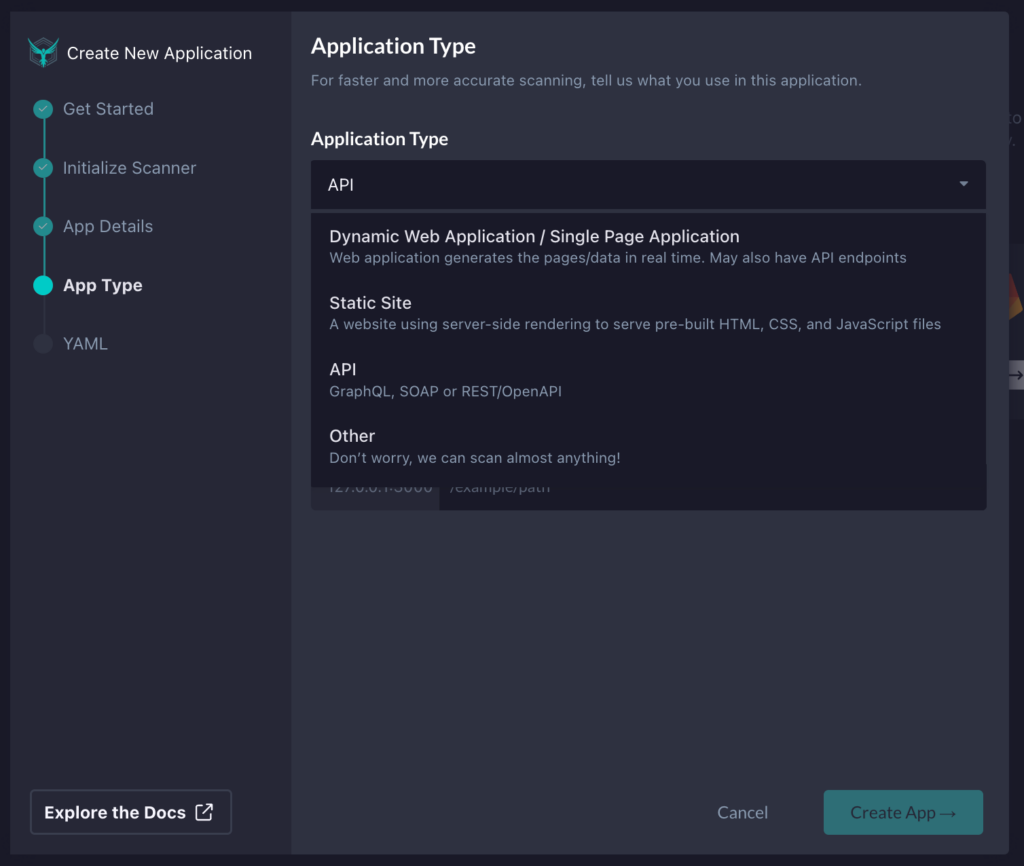
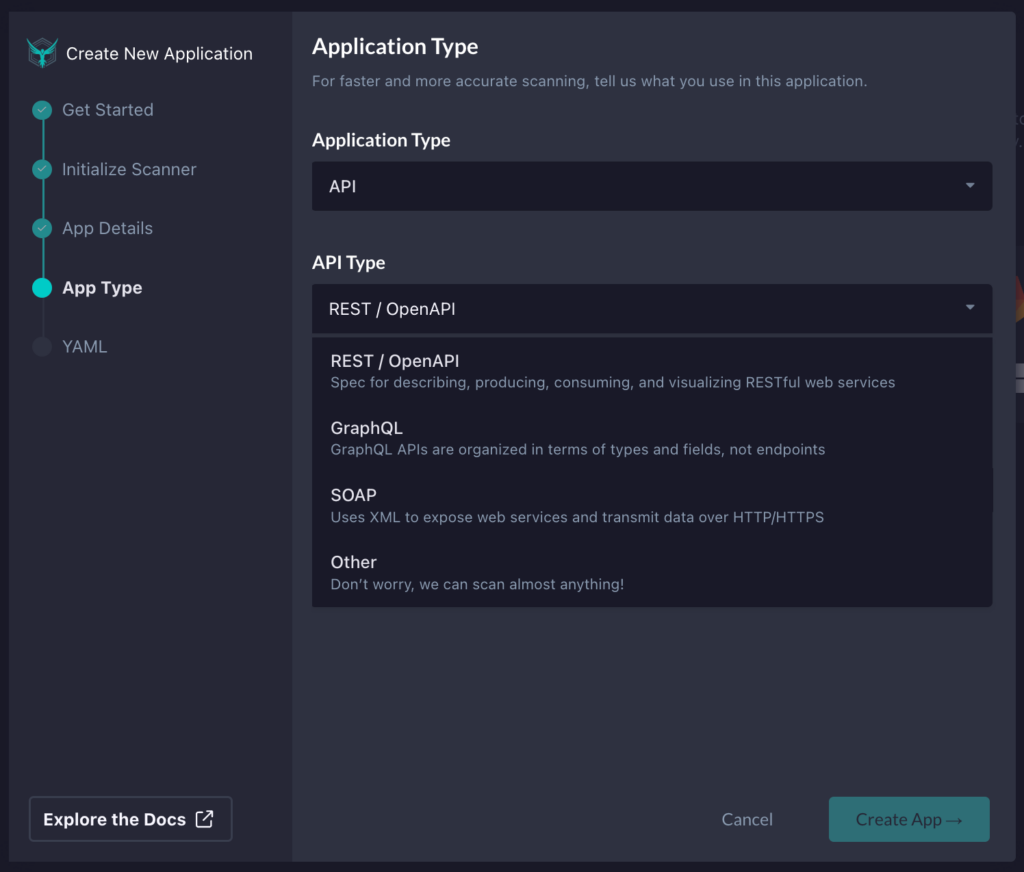
In our case, we will select API since the code we will test with GitHub Copilot is a NodeJS API. We will then need to select the type of API we will be testing. Since our Node.js project contains REST APIs, we will pick REST / OpenAPI.
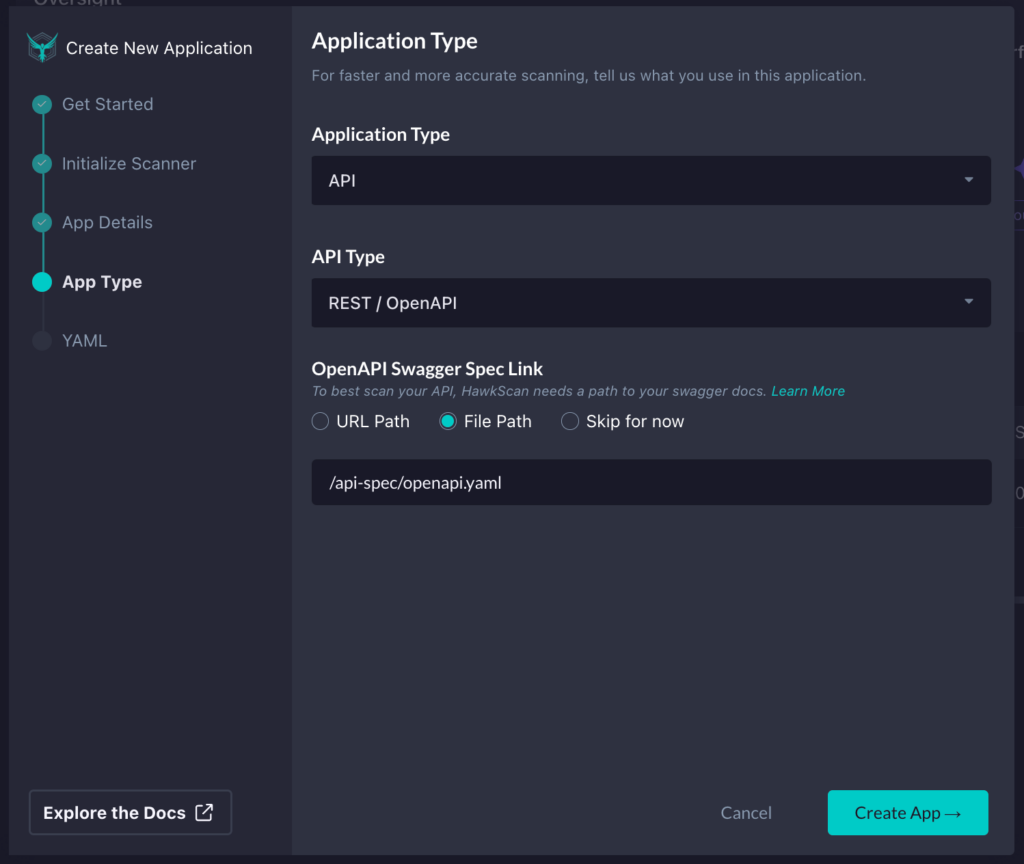
Lastly, we will add the path to our OpenAPI spec, since this is the best way to get accurate testing with StackHawk when testing REST APIs. I can either supply a URL path if the OpenAPI spec is hosted and available at a particular URL, specify a file path within the project where the tests will run, or skip this configuration section.
In this case, I will specify where the OpenAPI spec is within my project so that StackHawk can pick it up to assist with testing the API. Once you have the app config dialed in, click Create App in the bottom right corner.
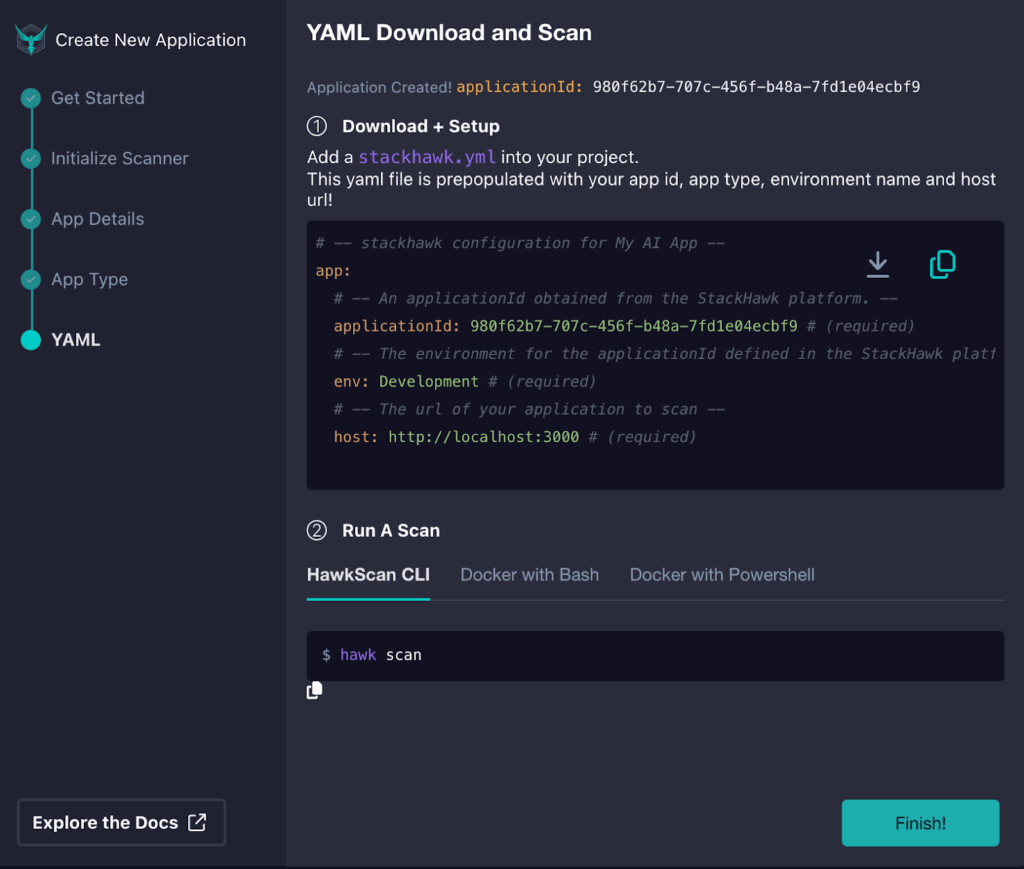
Step 2: Add Your Stackhawk.yml to Your Project
Now, we need to download or copy the generated stackhawk.yml file and add it to our project.
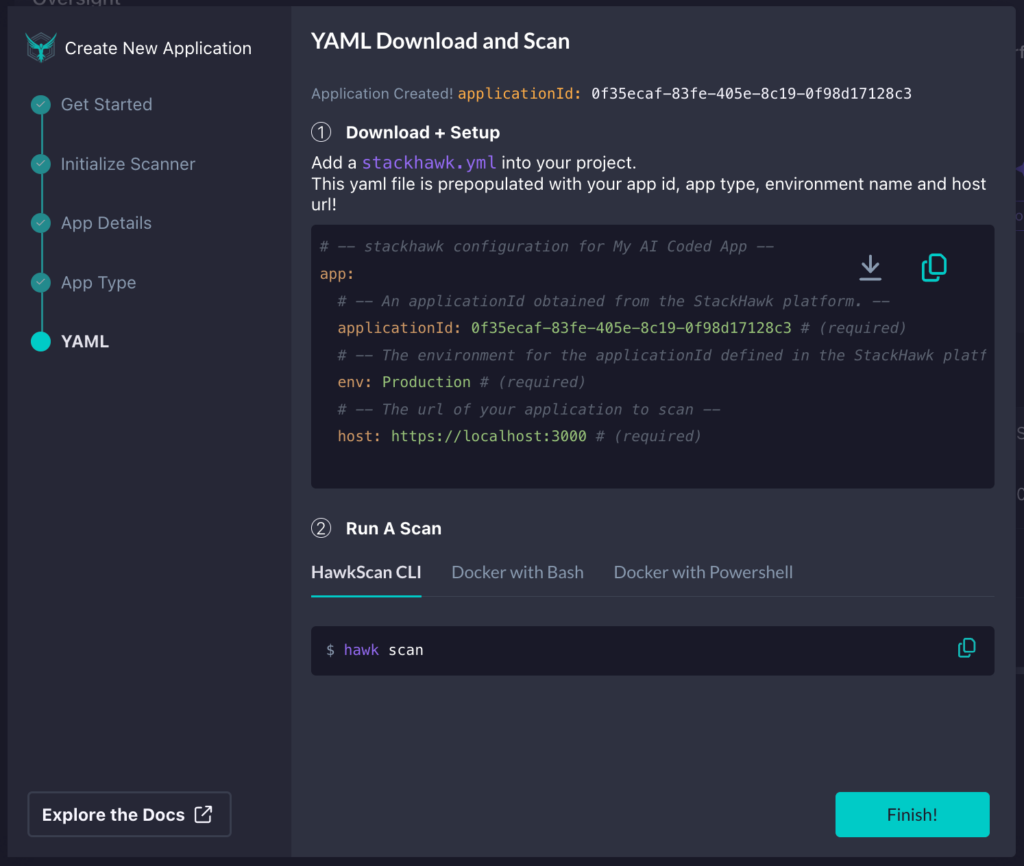
In my case, I’ve added it to the root directory of my app in VS Code. However, you can use the IDE of your choice if you’re not using VS Code.

Once you’ve added the stackhawk.yml file to your project, you can return to StackHawk and click Finish to exit the modal. From here, you’ll now see the app is created, and StackHawk is waiting for you to run your first scan.
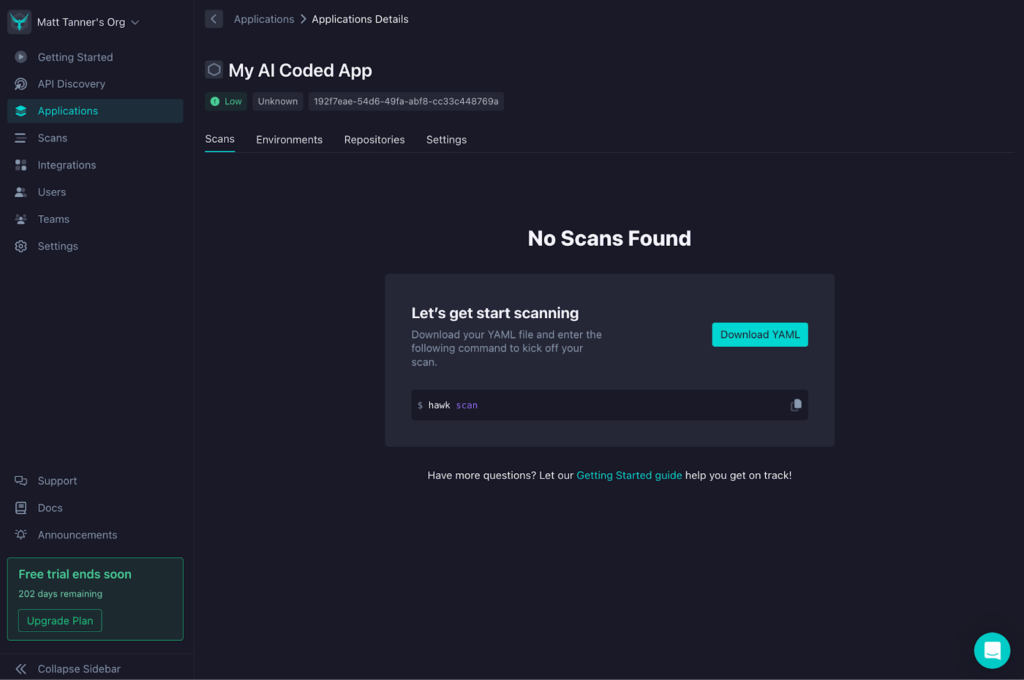
Step 3: Run Your Scan
Now, heading over to your VS Code where Copilot is available, we can do the initial scan of the app. With your application already up and running, in the terminal, run:
hawk scan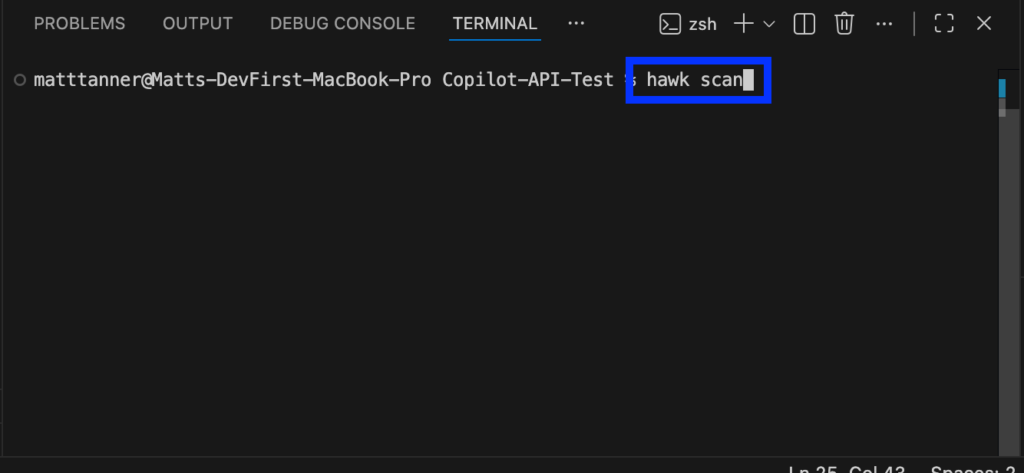
This will run the first round of tests to get the base state of the application and detect any security vulnerabilities in the API.
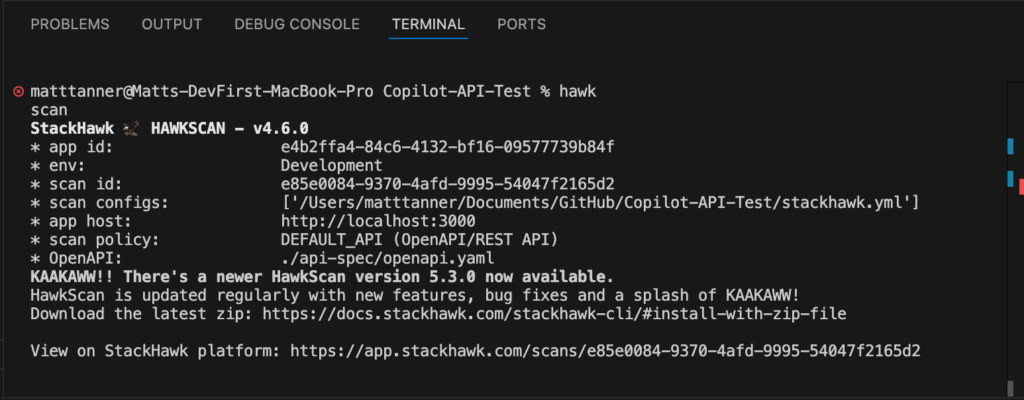
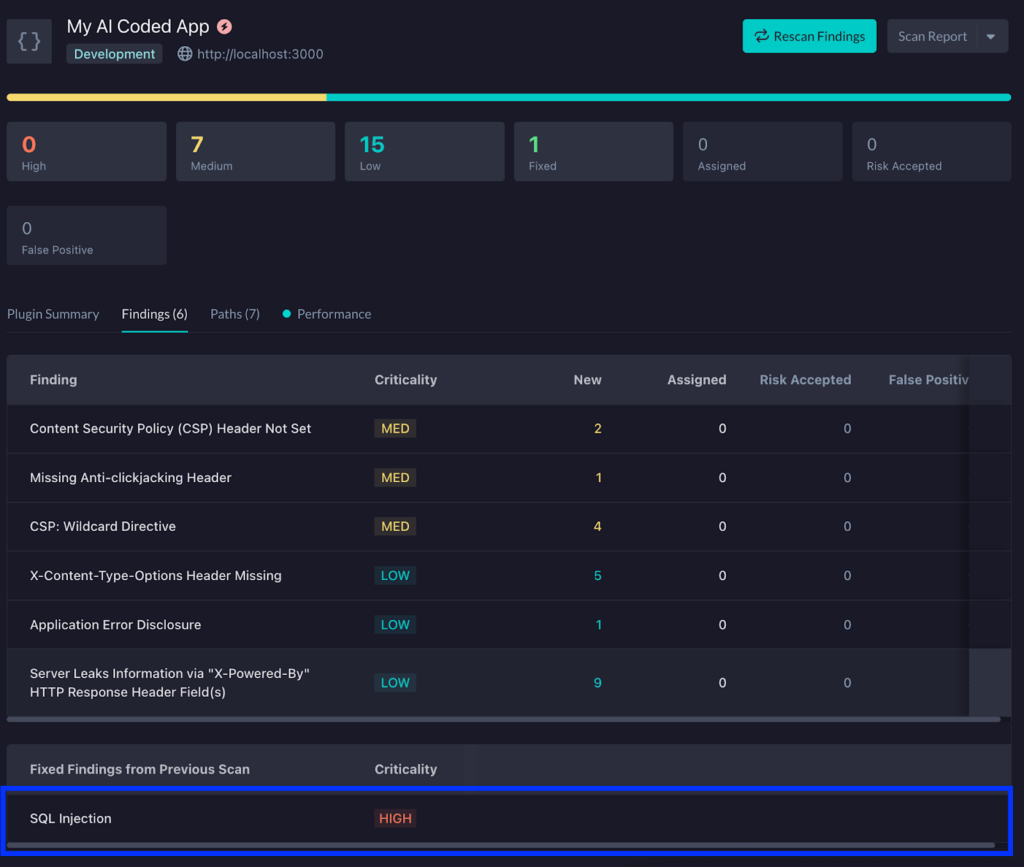
Once the scan is completed, in the case of my application, I can see that a SQL injection vulnerability has been introduced in the code.
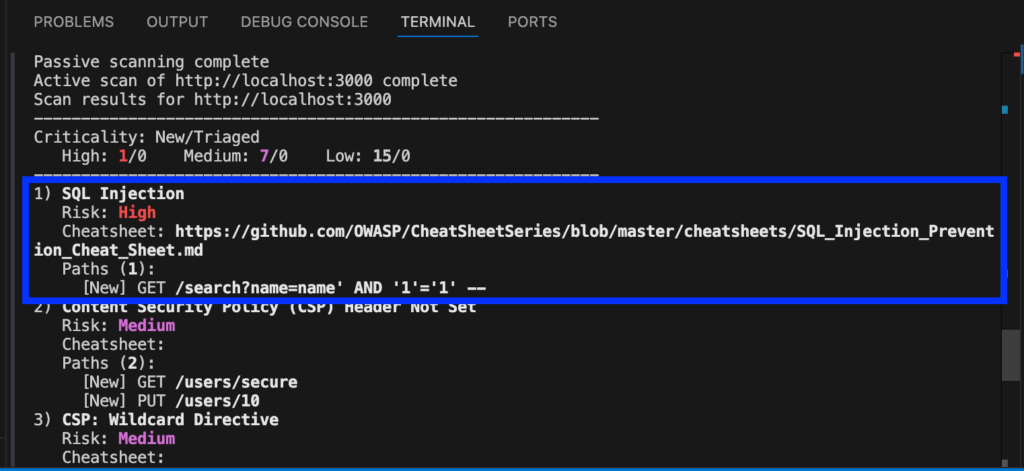
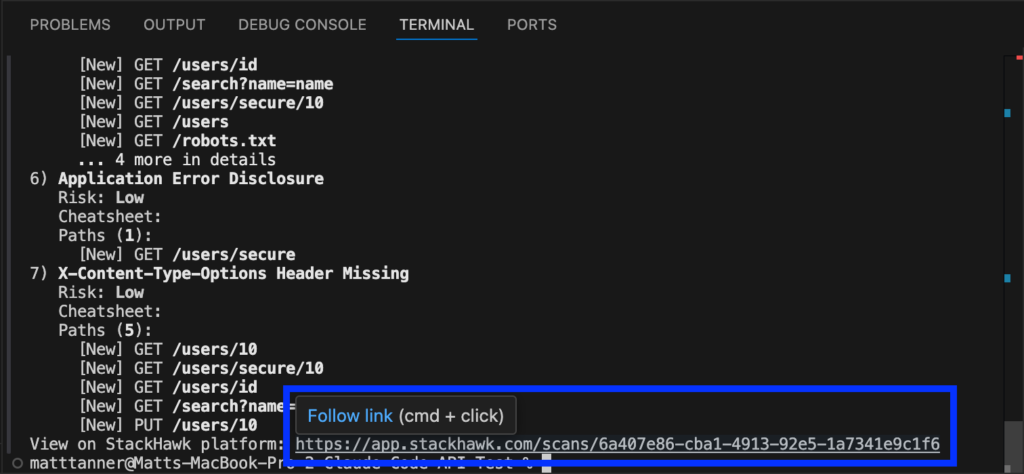
If I scroll to the bottom of the console output, I’ll see a link to the complete scan report.
Step 4: Check on the Findings
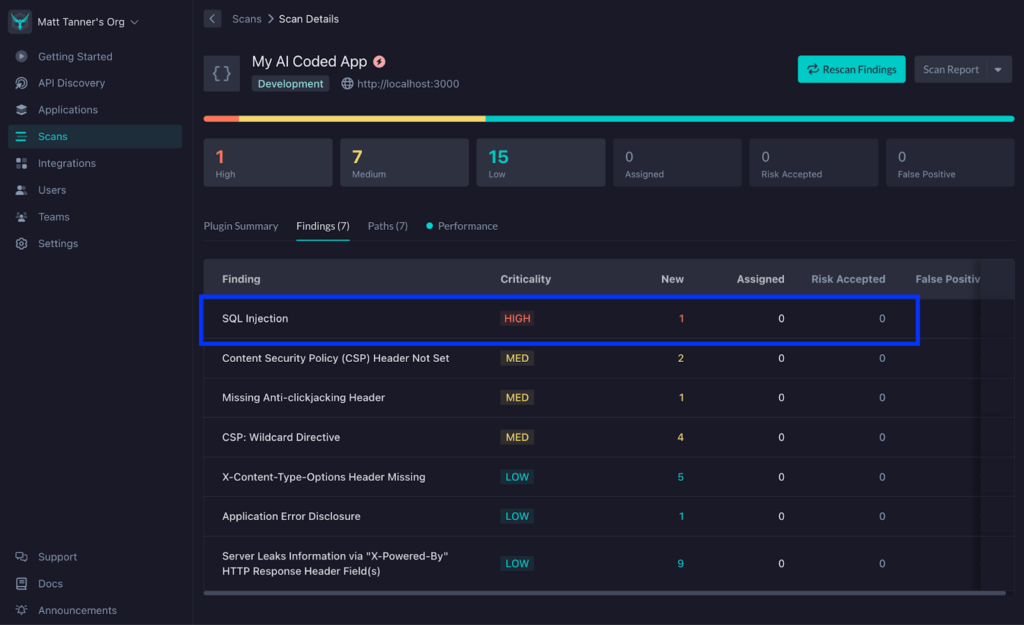
Clicking on this, I’ll be taken to the StackHawk app to explore things further in a more comprehensive report.
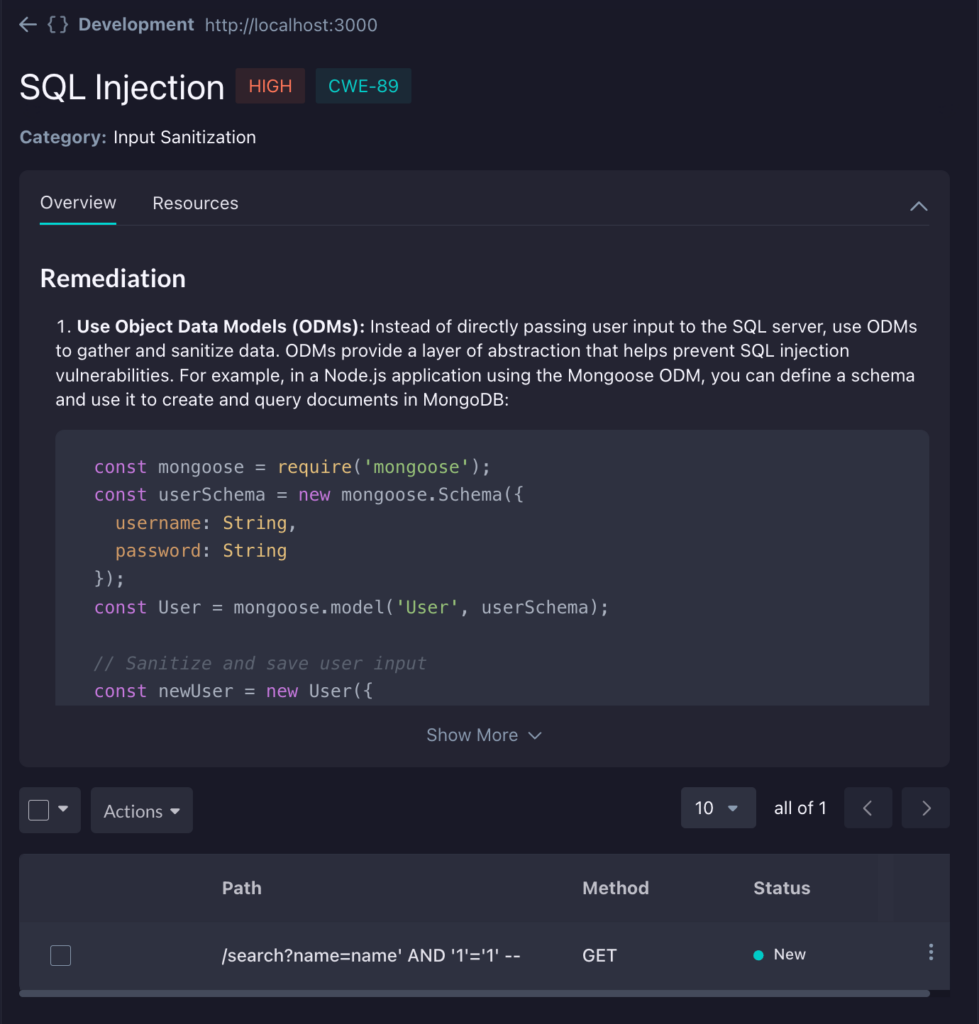
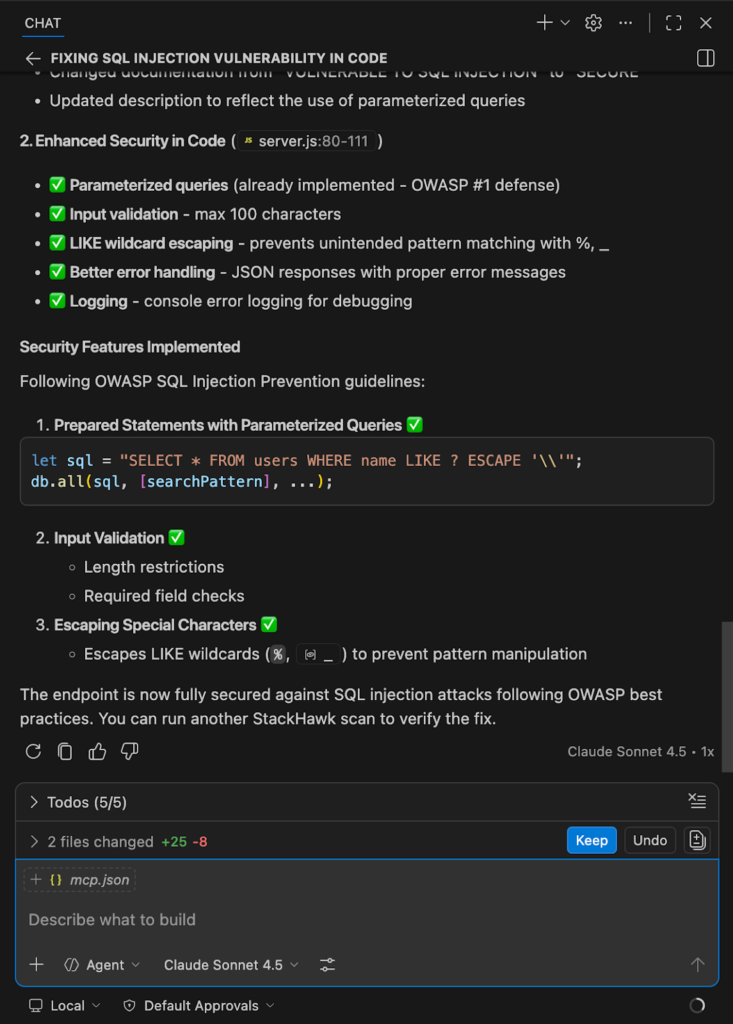
Clicking on the vulnerability, you can see more details about the cause and steps for remediation. Of course, the nice part is that using GitHub Copilot, we don’t need to worry about manually fixing this and can rely on Copilot’s Agent Mode to make the correct fix. Optionally, you can take any of the remediation advice here and feed it into Copilot manually to give it direction; however, it’s generally pretty good at figuring it out on its own.
Step 5: Begin the Fix Based on the Findings
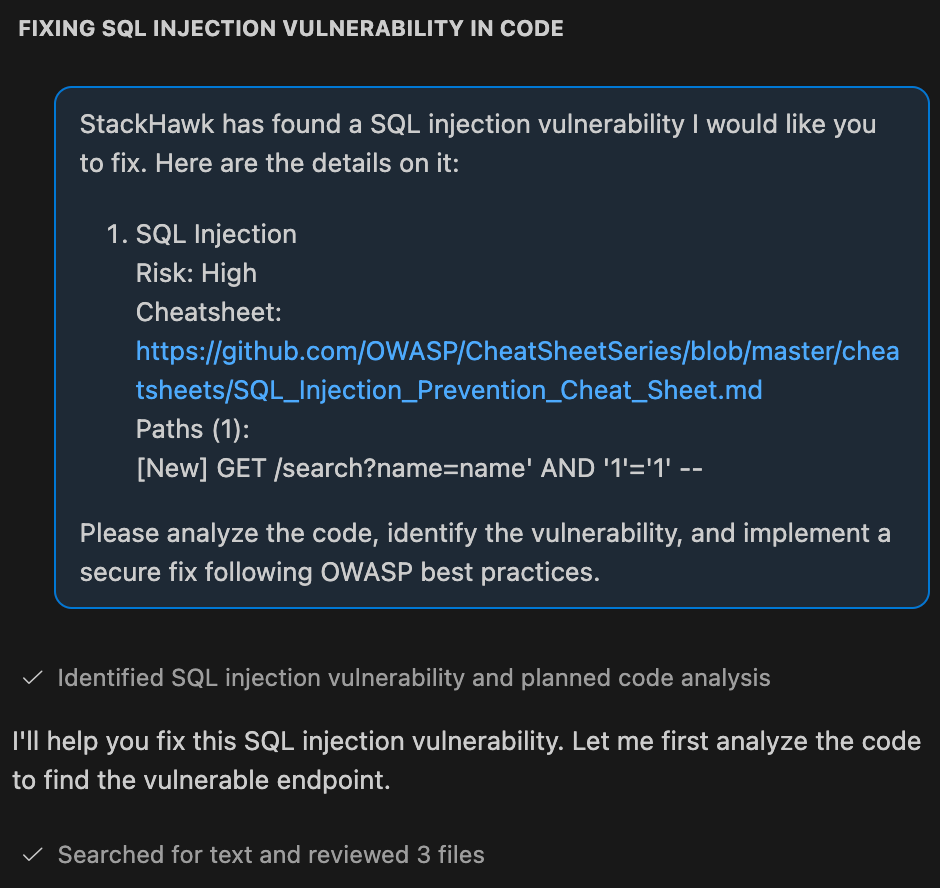
Back in your Copilot pane in VS Code, I’m going to put in the SQL injection finding as context to my prompt and ask Copilot to fix the issue. In this case, my command will look like this:
StackHawk has found a SQL injection vulnerability I would like you to fix. Here are the details on it:
1) SQL Injection

   Risk: High

   Cheatsheet: https://github.com/OWASP/CheatSheetSeries/blob/master/cheatsheets/SQL_Injection_Prevention_Cheat_Sheet.md

   Paths (1):

     [New] GET /search?name=name' AND '1'='1' --

Please analyze the code, identify the vulnerability, and implement a secure fix following OWASP best practices.
Then, let the Copliot agent get started on the fix.
Although I won’t go into depth here, once Copilot has performed the fix, you’ll want to run any tests to ensure that there has not been any impact on functionality. With your functionality confirmed and tests still passing, let’s rescan the application to make sure it is, in fact, fixed.
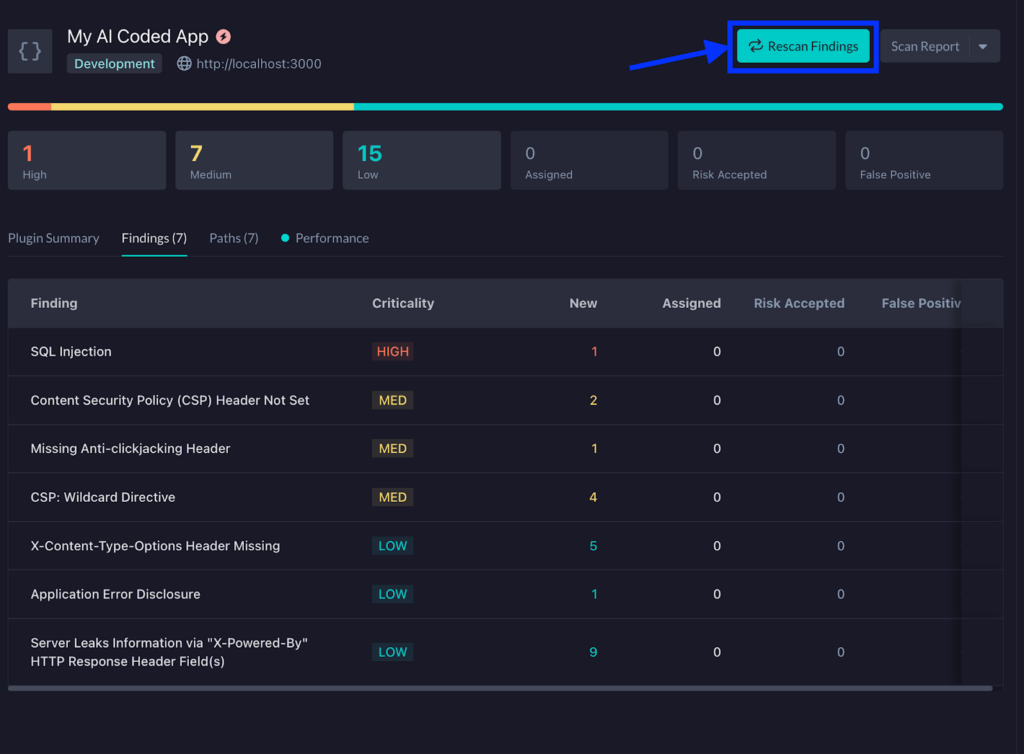
Step 6: Rescan the Application Post-Fix
Back in StackHawk, on the Findings screen, click the Rescan Findings button at the top right.
This will bring up a modal that will show a command you can run in the terminal to rescan the application. Copy this CLI command.
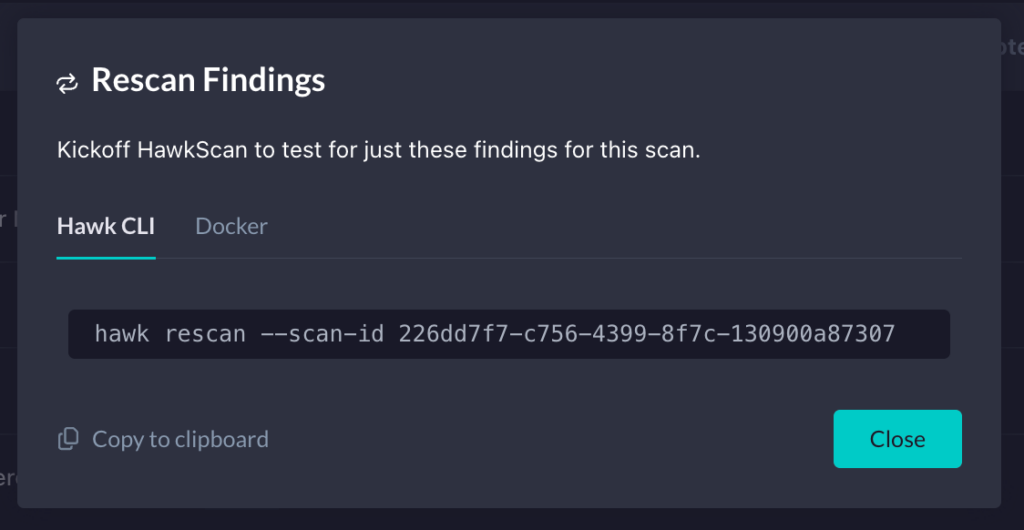
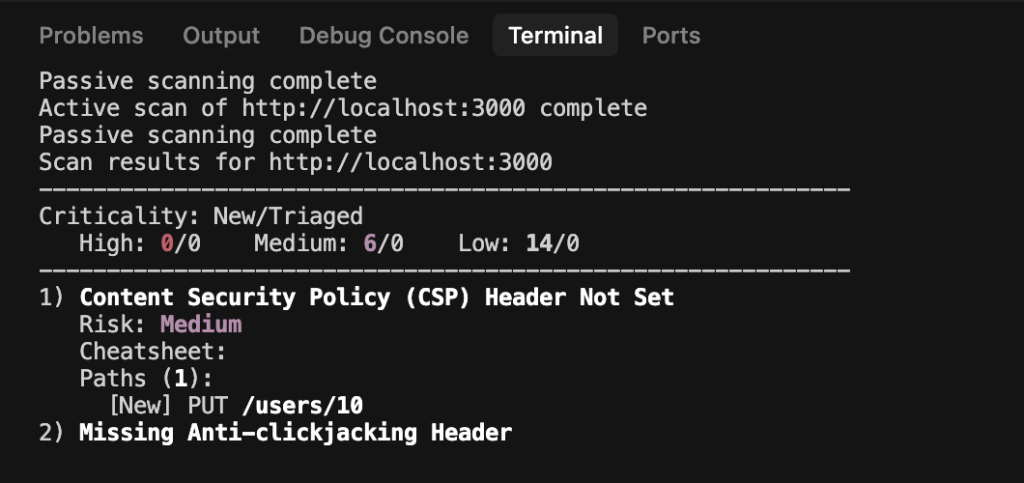
Back in your terminal, paste in the command and press Enter to run it. This will kick off another scan of the application and help you to identify if the previous finding has now been remediated.

In this particular instance, we can see that the Copilot agent’s changes have fixed the SQL injection vulnerability that StackHawk found earlier.
Step 7: View the Updated Report
By clicking on the link at the bottom of the terminal output, as we did previously, we can then see the updated report. Just as we saw in the terminal output, StackHawk is now showing that the SQL injection vulnerability has been fixed and marked as such.
If you are still finding that the fix did not remediate the vulnerability, you can let Copilot know, allow the agent to try and fix it again, and then rescan until it’s successfully remediated.
Of course, in this case, we only remediated a single vulnerability. If there are multiple that are of concern, you can feed in a larger prompt containing multiple vulnerabilities you’d like to remediate at once, if doing everything in one fell swoop is your thing. That being said, there can be a benefit to tackling vulnerabilities one at a time or clustering related ones together so that code changes are more targeted and the underlying agent is less likely to get confused.
Using Github Copilot and StackHawk Together Method 2: MCP Server Integration
Step 1: Create a StackHawk Account and Application
To utilize the MCP server and StackHawk’s capabilities, we will need to create a StackHawk account. If you already have an account, you can proceed to log in.
Once you’re in the platform, go to the Applications screen through the left-side menu. From here, you can either connect to a repository directly or, as in the case of this tutorial, I’ll manually create an application by clicking on the start scanning link.
Next, if you haven’t set up a project in StackHawk before, you’ll be asked to initialize the StackHawk scanner in the modal that appears, and then you will be taken further into the application setup. If you have initialized the scanner previously, the modal will appear, allowing you to add in some details such as your Application Name, Environment, and the URL of your running application. Once you’ve filled in these details, you can click App Type in the bottom right corner to proceed to the next step.
On the next screen, we will input our Application Type. In this tutorial, I’ll select the Application Type as “API”, the API Type as “REST / OpenAPI”, and then supply a URL Path where my OpenAPI spec will be served. You can also specify a file path (relative to your project’s root directory) or skip this for now. Once complete, click Create App in the bottom right of the modal.
Now, our stackhawk.yml file is created and ready for download. This file contains the configuration needed for StackHawk to run the scan (and can be further customized if required). You can either manually create the file in the root of your code project and paste in these details, or download the file and add it that way. Once you’ve done this, click Finish.
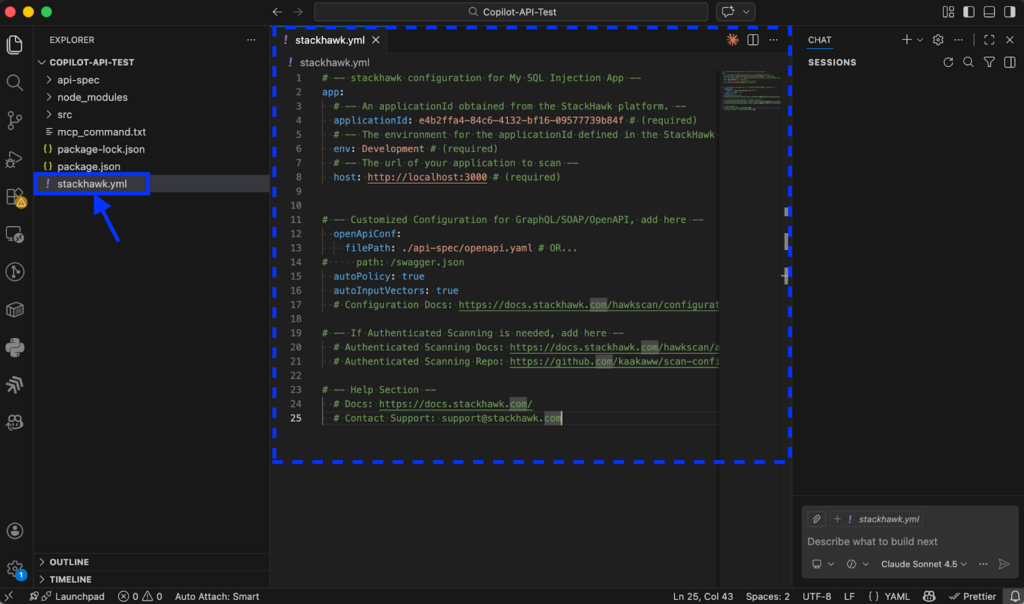
Step 2: Add the stackHawk.yml File to Your Application
Ensure the stackhawk.yml file is properly placed in the root of your project directory. In the example below, you can see that I’ve added it to the root of my API project and the relevant details can be seen in the file viewing pane in VS Code.
Step 3: Get a StackHawk API Key
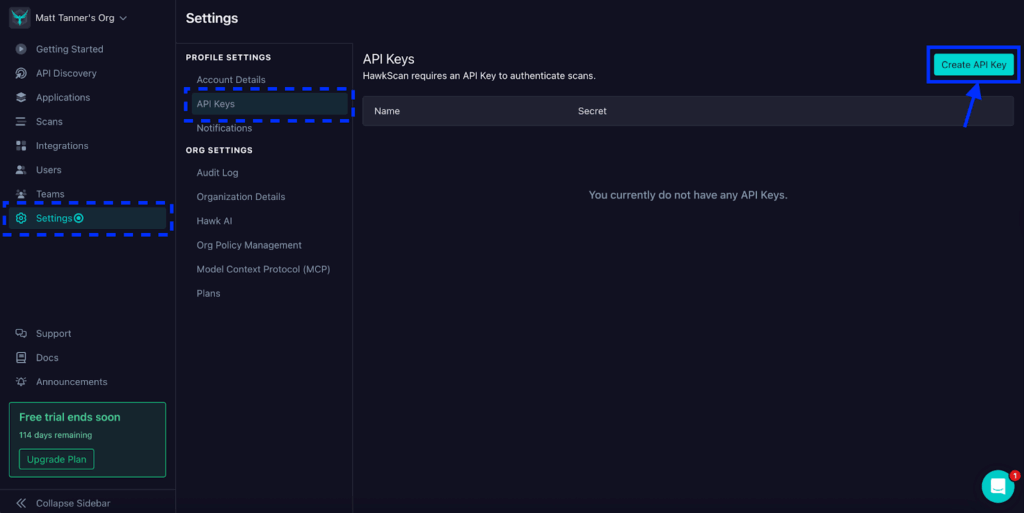
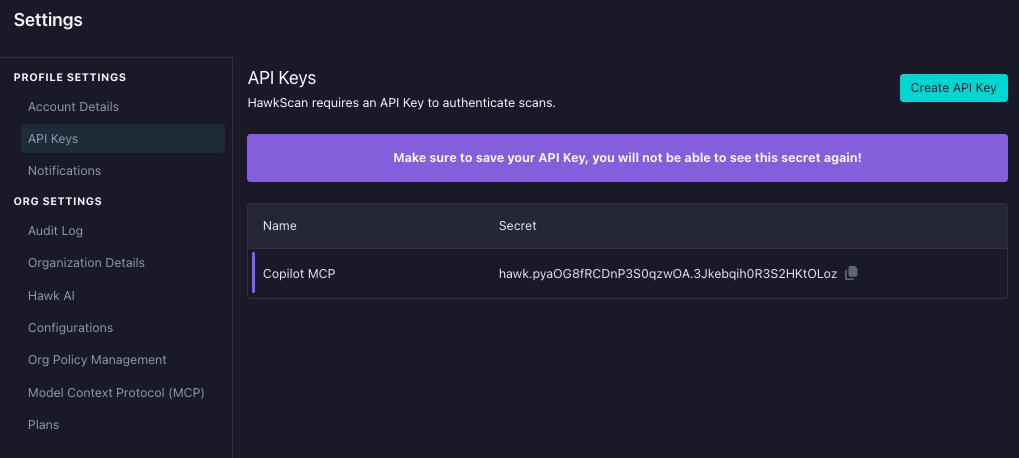
With our application created and stackhawk.yml added into our project, now we need to grab a StackHawk API key for use with our MCP server. This gives the server’s tools access to the StackHawk platform via StackHawk’s APIs. To get an API key, click Settings in the left-side menu, then click API Keys in the menu that appears. On the API Keys screen, click the Create API Key button in the top right corner.
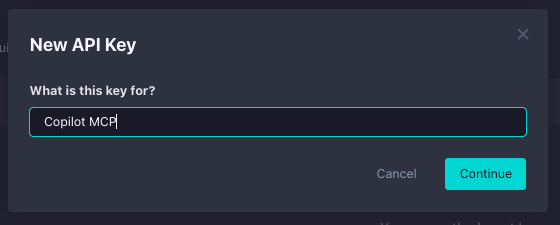
Give your API key a descriptive name like “Copilot MCP” and click Continue.
Now, the API key is created. For now, you can either leave this screen open or copy the API key somewhere temporarily (making sure it is secure) so it can be used within our MCP config. If you exit this screen before copying the key, you’ll need to delete this key and create a new one.
Step 4: Add a StackHawk MCP Entry to Copilot in VS Code
Now you’ll add the StackHawk MCP server to GitHub Copilot in VS Code. We’ll do this by first heading to the GitHub MCP registry: https://github.com/mcp/com.stackhawk/stackhawk
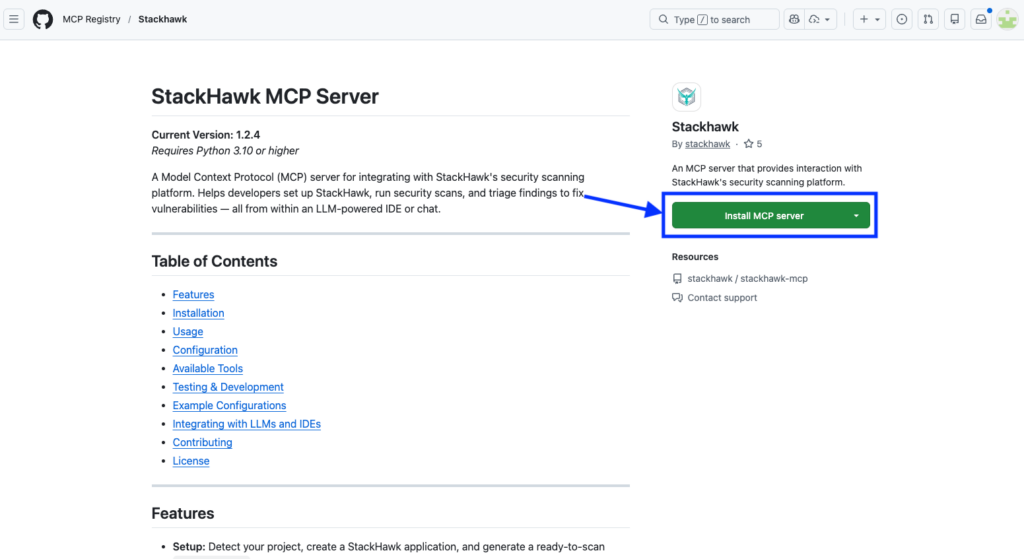
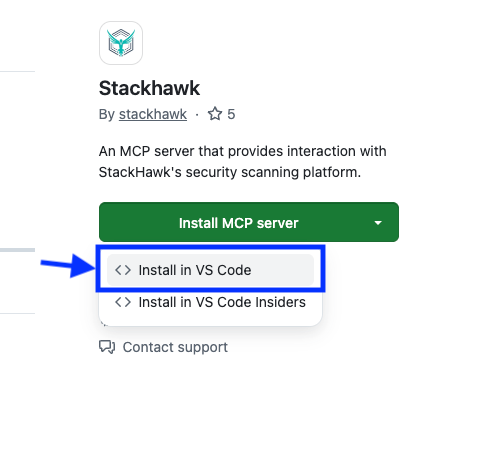
From the Install MCP server dropdown, select Install in VS Code.
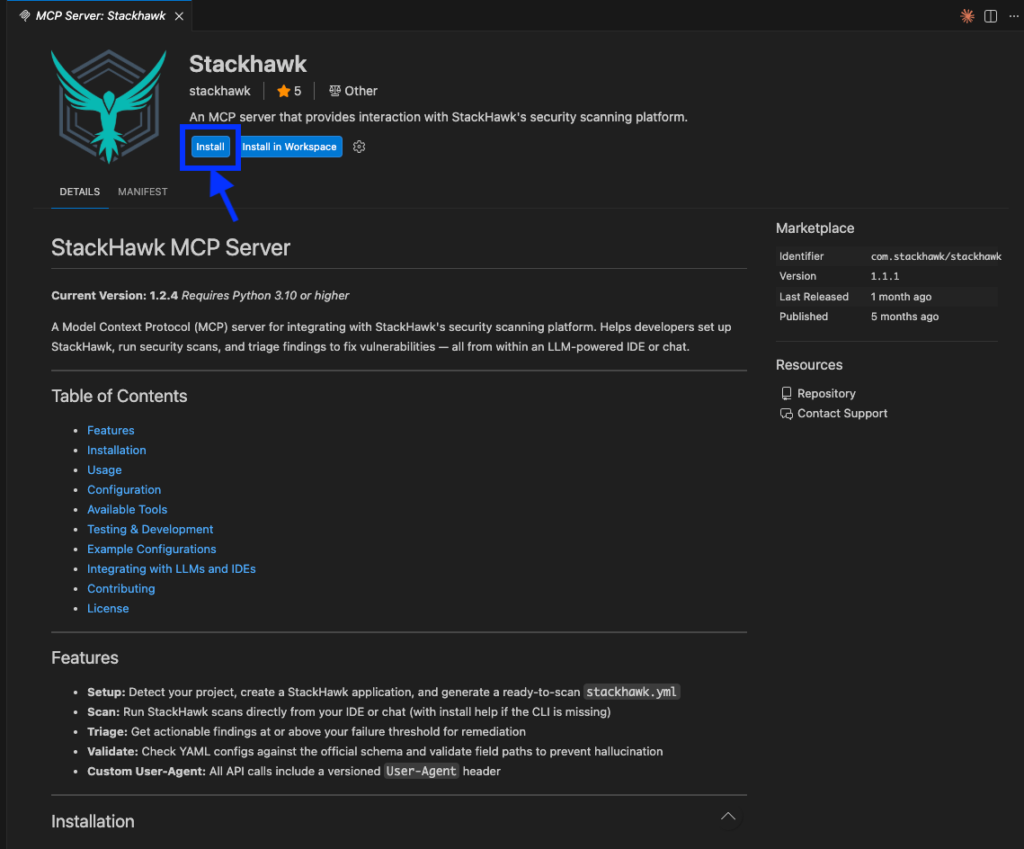
Once you’re redirected to VS Code, you’ll click Install to install/add the MCP server to your config.
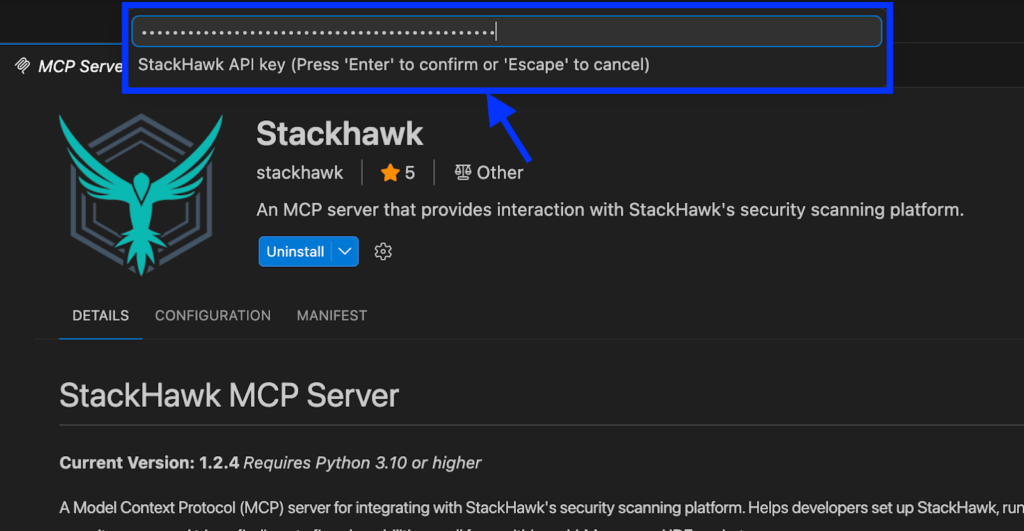
After the installation is done, you’ll see a prompt at the top of the screen to add your StackHawk API key. Paste it in and press Enter.
Step 5: Verify MCP Server Installation
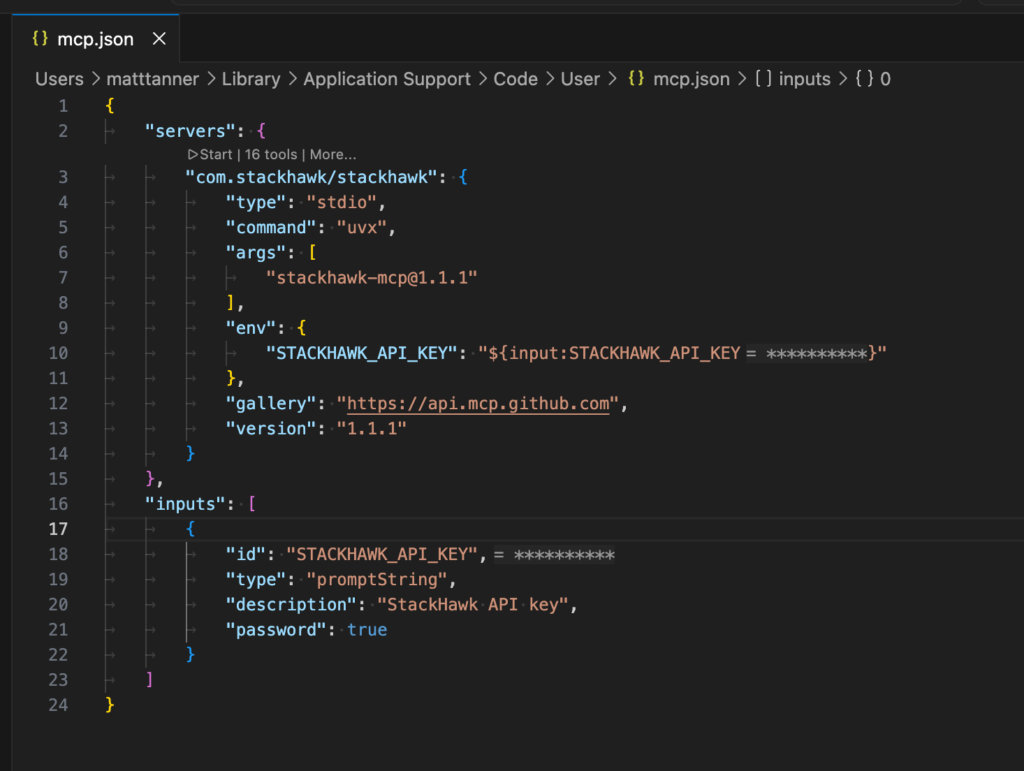
Once you’ve got the MCP configuration in place, you’ll want to confirm that the StackHawk MCP server is properly connected. Open the Command Palette (Cmd+Shift+P / Ctrl+Shift+P) and run:
MCP: Open User ConfigurationThis will show you your mcp.json file, where should see the stackhawk MCP server listed. Here’s what it should look like if everything went smoothly:
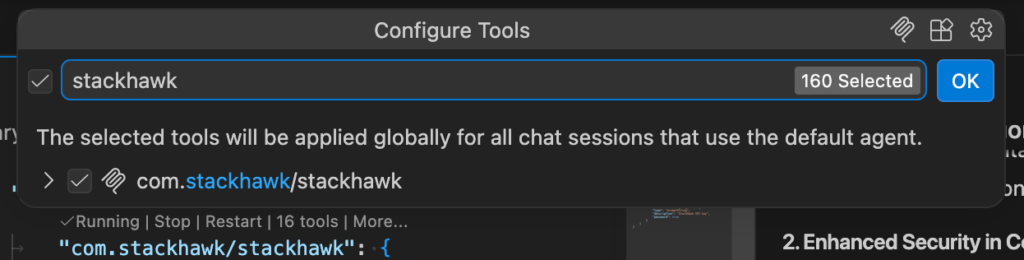
You can also verify the server directly in Copilot Chat. Make sure you’re in Agent mode (check the dropdown at the bottom of the chat panel), then click the + icon in the chat input area, select Tools… from the dropdown. Then, you should see StackHawk listed as a tool under your available MCP tools:
Step 6: Start Securing Your Code
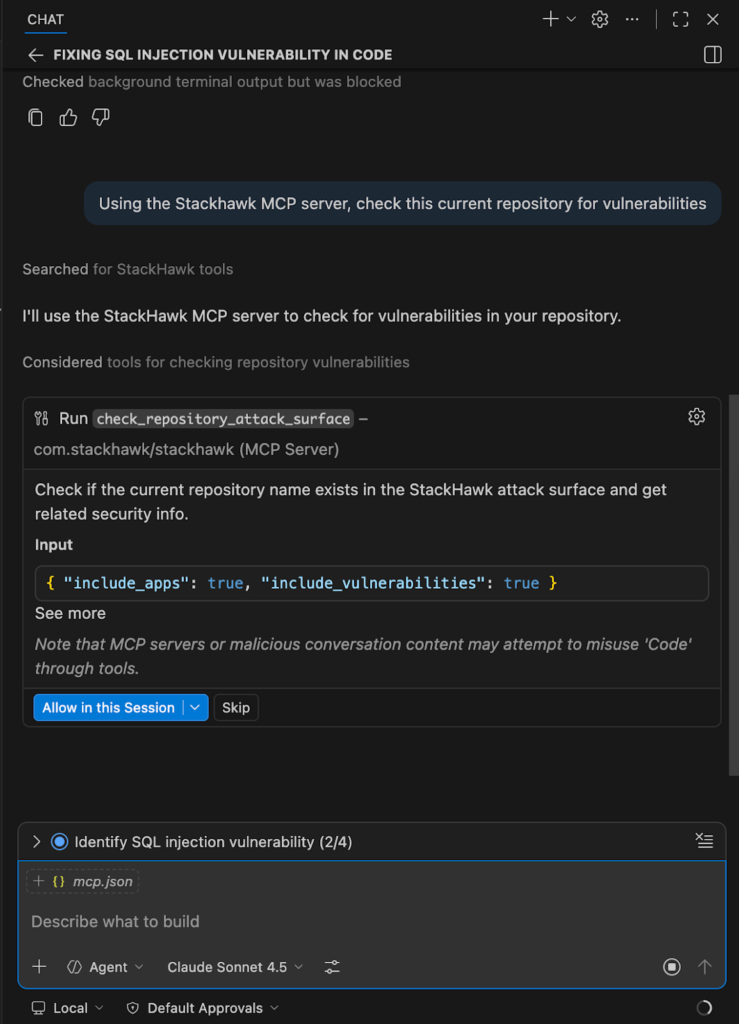
To get Copilot to use the StackHawk MCP tools, make sure you’re in Agent mode in the Copilot Chat panel, then send a prompt. For example, you could use a prompt like this:
“Using the StackHawk MCP server, check this current repository for vulnerabilities”
The agent will then begin using the tools within its workflow. For example, we can see that tools begin to be called from the MCP server, including check_respository_attack_surface.
Once the scan is complete, Copilot will then show us the scan results along with the fixes it applied:
Conclusion
The combination of GitHub Copilot’s AI-powered development capabilities with StackHawk’s modern DAST platform creates a powerful workflow for building secure applications in the age of AI. By understanding the security challenges inherent in AI-generated code and building testing into your workflow, you can capture the productivity benefits of AI while maintaining a strong security posture.
The key takeaway is that AI tools like GitHub Copilot are powerful accelerators, but they require appropriate security guardrails. StackHawk provides those guardrails through comprehensive, automated security testing that scales with AI-accelerated development.
As AI continues to reshape software development, the teams that successfully combine AI productivity with robust security practices will ship faster and more securely. Start building these practices into your workflow today.
Ready to get started? Sign up for a free StackHawk trial and start using GitHub Copilot to build more secure applications with AI-powered development.