May I see some ID?
To the unaware, nothing says you don’t belong quite like a 400 level Unauthorized or Forbidden error message. To the maleficent, however, these messages reveal a potential hidden treasure trove of data available for exploitation. Given the typical web application undergoes an average of 13,279 attacks each month, (source | Contrast Security) security testing is critical for ensuring only the right users have access to the right information.
When implementing security testing and vulnerability scanning, it is important to test all paths, including the authenticated routes. Only scanning public routes will give an incomplete picture of your web application’s security posture and cause you to miss the majority of vulnerabilities, which are often hidden behind a credentialed login.
As covered in our Onboarding Series, StackHawk supports the following types of automated authentication for security testing:

The rest of this article will focus on configuring StackHawk’s scanner, HawkScan, using Username/Password + Cookie Authorization, commonly implemented with form-based authentication.
Configuring HawkScan
Let’s assume you’ve implemented the following paths for your application.
https://yourApplication.com/home [public route]
https://yourApplication.com/admin/login [public route]
https://yourApplication.com/comments [public route]
https://yourApplication.com/admin [protected route]
https://yourApplication.com/comments [protected route]
https://yourApplication.com/privatemessage [protected route]
Basic HawkScan Configuration (Public Routes):
First, we’ll begin with a basic configuration for HawkScan, which will only find the publicly available routes /home, /login/, and /comments. While only a partial picture of your application, this is still a great place to start to ensure the scanner is working as expected and able to find your environment.
app:
    applicationId: kkAAAKAW-kAWW-kkAA-WWwW-kAAkkAAAAwWW
    env: Development
    host: http://localhost:8020
Authenticated Configuration (Public + Protected Routes)
To enable HawkScan to find and test the protected routes you need to define the expected experience of an authenticated user. For example, what elements of your web application indicate that a user’s state is logged-in vs. logged-out? Additionally, it’s important to know where a user would navigate to login to your application, what pages are accessible after a login has been validated, and what would indicate success or failure. These elements are easily found using existing developer tools within your browser.
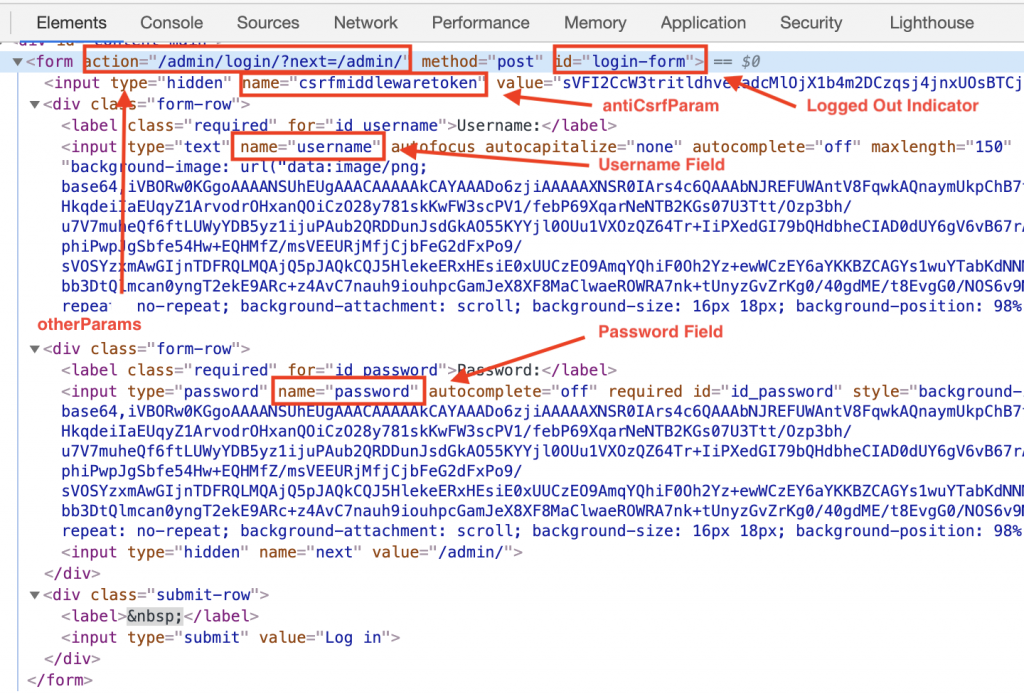
Developer Tools HTML Form Element
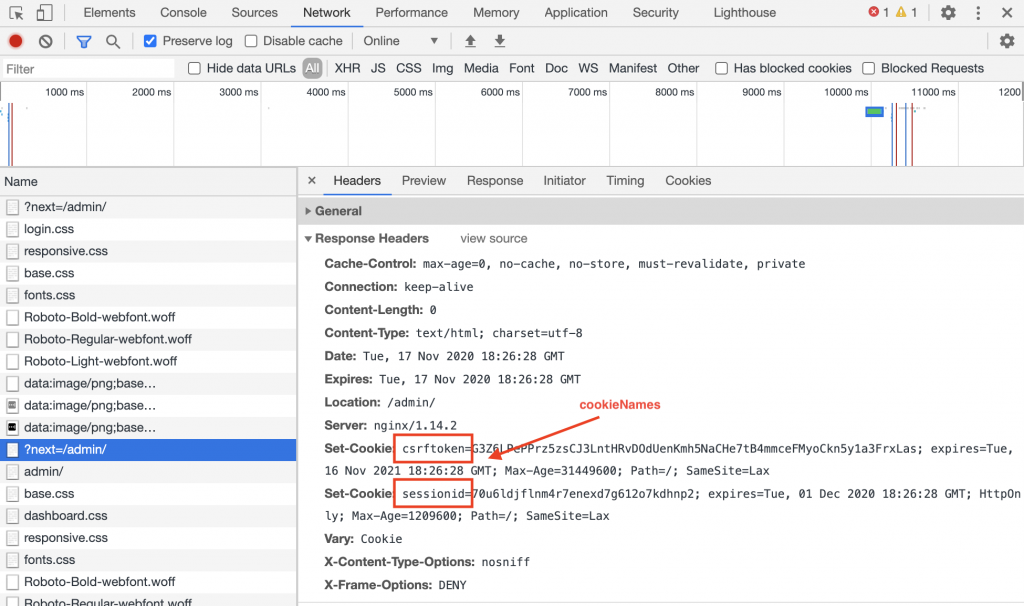
Cookie Names
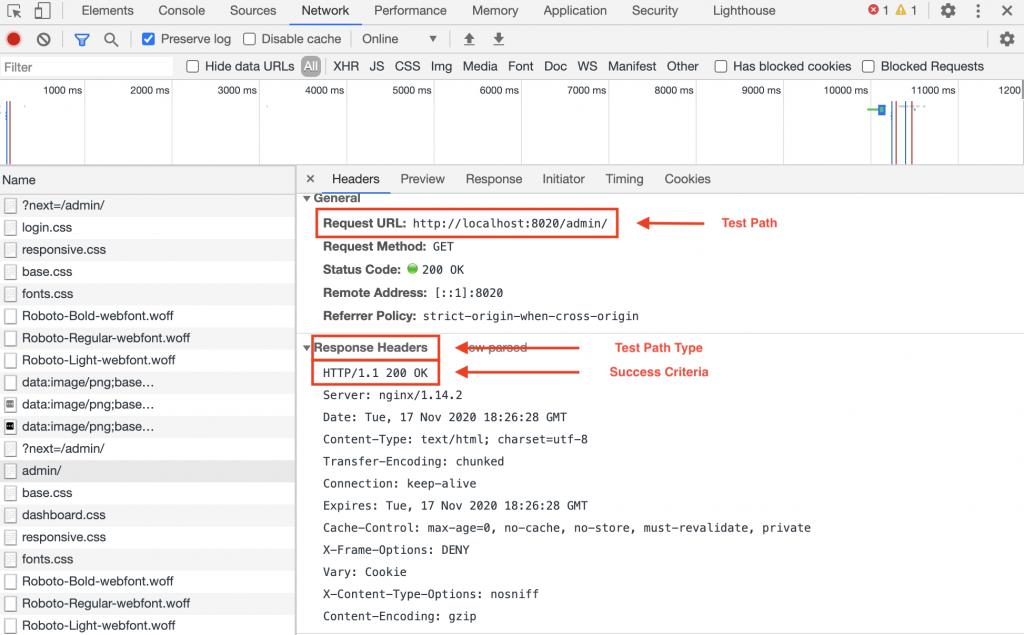
Test Path & Success Criteria
Now that we’ve understood the experience of an authenticated user, we can use the information we’ve found to configuration our stackhawk.yml file.
app:
    applicationId: kkAAAKAW-kAWW-kkAA-WWwW-kAAkkAAAAwWW
    env: Pre-Production
    host: <http://localhost:8020>
    antiCsrfParam: csrfToken
    authentication:
        loggedInIndicator: "\\\\QLog out\\\\E"
        loggedOutIndicator: "\\\\Qlogin-form\\\\E"
        usernamePassword:
            type: FORM
            loginPagePath: /admin/login/
            loginPath: /admin/login/
            usernameField: username
            passwordField: password
            scanUsername: ${SCAN_USERNAME} # env variable
            scanPassword: ${SCAN_PASSWORD} # env variable
            otherParams:
                - name: next
                - val: "/admin/"
        cookieAuthorization:
            cookieNames:
                - "csrftoken"
				- "sessionid"
        testPath:
            path: /admin/
			type: HEADER
            success: ".*200.*"
Configuration Definitions:
applicationId: Unique ID for organizing your scan results by app or microservice in the StackHawk Platform.
env: The name of your staging environment, corresponding to your application in the StackHawk platform.
host: The url of the application to scan.
antiCsrfParam: The name of your CSRF security parameter used in any application form inputs.
loggedInIndicator: When this regex pattern is present in the HTTP response (header or body), it signifies the user is logged-in. EX: logout link
loggedOutIndicator: When this regex pattern is present in the HTTP response (header or body), it signifies the user is logged out. EX: login link
loginPathPage: The path to your login form, if applicable. This is an optional path but is often required if the POST to the loginPath requires an anti-csrf token to be passed as part of the POST.
loginPath: Your login route to POST credentials for a user in the application.
otherParams: Parameters required by your login payload in addition to login credentials.
testPath: The path to a protected route in your application that requires authorization. Example: /mysettings.
scanUsername & scanPassword: Credential values to be passed into the form’s usernameField and passwordField via environment variables or secret store.
Running the Scan
All that’s left to do is run the scan. If you haven’t already, make sure you complete the following checklist to see successful scan results:
Install Docker
Create a stackhawk.yml file in the root directory of your application
Create an application at stackhawk.com and add the application id to the top of your YAML file.
Ensure the “host” value in your YAML file points to a running application
Complete the YAML configuration following the steps outlined above
Create and API Key within your StackHawk profile settings
Run the following docker command:
docker run --rm -v $(pwd):/hawk:rw -it \
  -e API_KEY=hawk.xxxxxxxxxxxxxxxxxxxx.xxxxxxxxxxxxxxxxxxxx \
  stackhawk/hawkscan:latest
Check out our HawkDocs page for more information and additional configuration options.
Summary
You don’t have to be afraid of those Unauthorized or Forbidden error messages anymore! If you’re using HawkScan and see one of those messages, you now know how to fix the issue. Using those handy developer tools to better understand your authentication workflows and double-check your configuration file will put you on the path to successful scans and a more secure web application environment.

